Hikari HW762T Owner's manual


ell£m:~
Jt:$~?:
~
w
*1'ffi'tJU1f~Gf-t:vZ:1H~
~
'§1
45
oo
~~,
~~~m~~45~~m~-m*o
~45
oom~~~~~~*~*fi~--~~-•~-
l&
*
~.>fo
~~
l:r££
/_)(./I]J"
..l.6._']1=1.--:J o
·~~m~~45mhl•~~3R~~•~m~~
§
~'
:ff:$ili5rm~~~~~~o
~~~®m~*~'§J~~ff~~ffo
~~'
~~~m~~45~~*1fm~~~~~~hl~,
*~'§J~~~ff~~ff-~*ffiff~m*o
·~
Ll1*1'ffi'tJU1f~Gf4VZ::ff~~~'§J
Si';%'7
IA~7t*~
vz:*,
ll£~~~~~¥~~~tt~-~m~~
~0
~~,
~m*~i±rrm~~~m,
~*~~
~0~~~*45~c~m)-~~hl•m1r~
-'%
R~~-'%~~~1f~~o
*~~45~R.~h*~'
~T~ffl~~~~~~
~~~~*H~fflWi5~~om~m~~3,
r;t;
ill[~
~L±.
+b
~
)IlL;' 'if"
i§
I=! 1
C!
7J\
0
.t!Ui~JJtJL
~
~~1HI~~J;Jili'!~i'1Fi1UD
!±.~!%
~Jli±r,
~11Xim~1)'i'l~~j;Jili'!rm~li*~o
i-!F
m•~~ffl~~m~~45~~,·~~-~~
n:~iA~ffiu5E¥t1tY:nX:.
r~il?JT1f1Jilt!~o¥t1$~&,
~~1tt,
~R.?JT1fllf±i1~t?~J;JillJ1Uo
~i-!Fi'!
-~Jf!ffl~I
fp:~1Jw~U~1~~B:~~5frf!J;Jil1J1U,
~&
~:t-fu~R1f~mn&tJL~ffiu5E~1Jilmu
0
Be
sure
to
study very
carefully
for
safety
Copyright
eThis
instruction
manual
may
not
be reproduced,
trans
-cribed,
transmitted,
distributed
or
translated
into
any language,
in
whole
or
part,
in
any form
or
thro
-ugh a paper
or
electronic
medium,
without
the
prior
written
permission from Hikari
Precise
Machin
-ery
Science & Technology
Co.
Ltd.
eDisclaimer
The
contents
described
in
this
instruction
manual
are
intended
for
giving
information and
subject
to
change without
notice.
We
assume
no
responsibility
for
these
information, and any
errors
and/or
incor
-rect
descriptions
that
may
appear
in
this
instruc
-tion
manual.
eHikari
Precise
Machinery Science & Technology
Co,
Ltd. has a
policy
that
we
always modify
the
performance and/or
specifications
of
this
product
introducing
the
state-of-
the-art
technology.Accor
change
the
specifications
and/or
design without
notice.
eThis
instruction
manual
is
valid
for
all
the
models
and
subclasses
listed
in
the
chapter
"Specfication"
Directives
This machine
is
constructed
in
accordance with
the
European
regulations
contained
in
the
conformity and
manufacturer' s
declarations.
In
addition
to
this
instruction
manual,
strictly
observe
all
the
generally
accepted,
statutory
regulations,
legal
requirements
and
all
the
environmental
protection
regulations.Also
rigidly
adhere
to
the
regionally
valid
regulations
of
the
social
insureance
society
for
occupational accide
-nts
or
other
supervisory
organizations.
ft~~~~~~&~~~,
~T~~~ffl;~,
@~~~~~~-~*~*~~fflo~~*~
mJtr*J~,
:%-&':il~~~~tlt~o
-~~~@Mft~~m~~~B~~ili*~~
tfo
~~®~~~~~~~~,
@&~~~,
M~
¥JT~tlF~o
~~~~ffl~~~~'
~~~~~~~~~~
f'iD]j:**"
1.
Introduction
4tThis
is
the
instruction
manual
that
describes
how
to
use
this
product
safely.
4tRead
this
instruction
manual and
learn
very
care-
fully
hwo
to
operate,abjust
and
service
this
sewing
machine
before
beginning
any
of
the
procedures.
4tYou
should
realize
first
that
there
is
always
the
risk
of
contacting
moving
parts,
such as
needles
be
cause
you have
to
work
at
point-blank
range
to
them
when
you
are
operating
industrial
sewing machines.
For
safety
it
is
essential
that
we
supply
safe
prod-
ucts
and you ues them
correctly
ang
safely.
There
may
be
some
safely
measures
that
you
yourself
must
take.
Therefore,
you
should
read
and
understand
very
carefully
this
instruction
manualtogether
whih
that
of
the
driving
equipment and
take
necessary
safety
measures
in
order
to
use
this
machine
effciently
and
effectively.
2.
Indications
of
dangers,
Warning and
cautions
To
prevent
accidents
and
ensure
safety,
warning
indications
which
show
the
degree
of
danger
are
used
on
our
products
and
in
this
manual.
Study
the
contents
of
these
indications
carefully
and
follow
all
warnings and
instructions.
Indication
labels
should
be found
easily.
Attach
new
labels
when
they
are
stained
or
removed.
Contact
our
sales
office
when
mew
labels
are
needed.
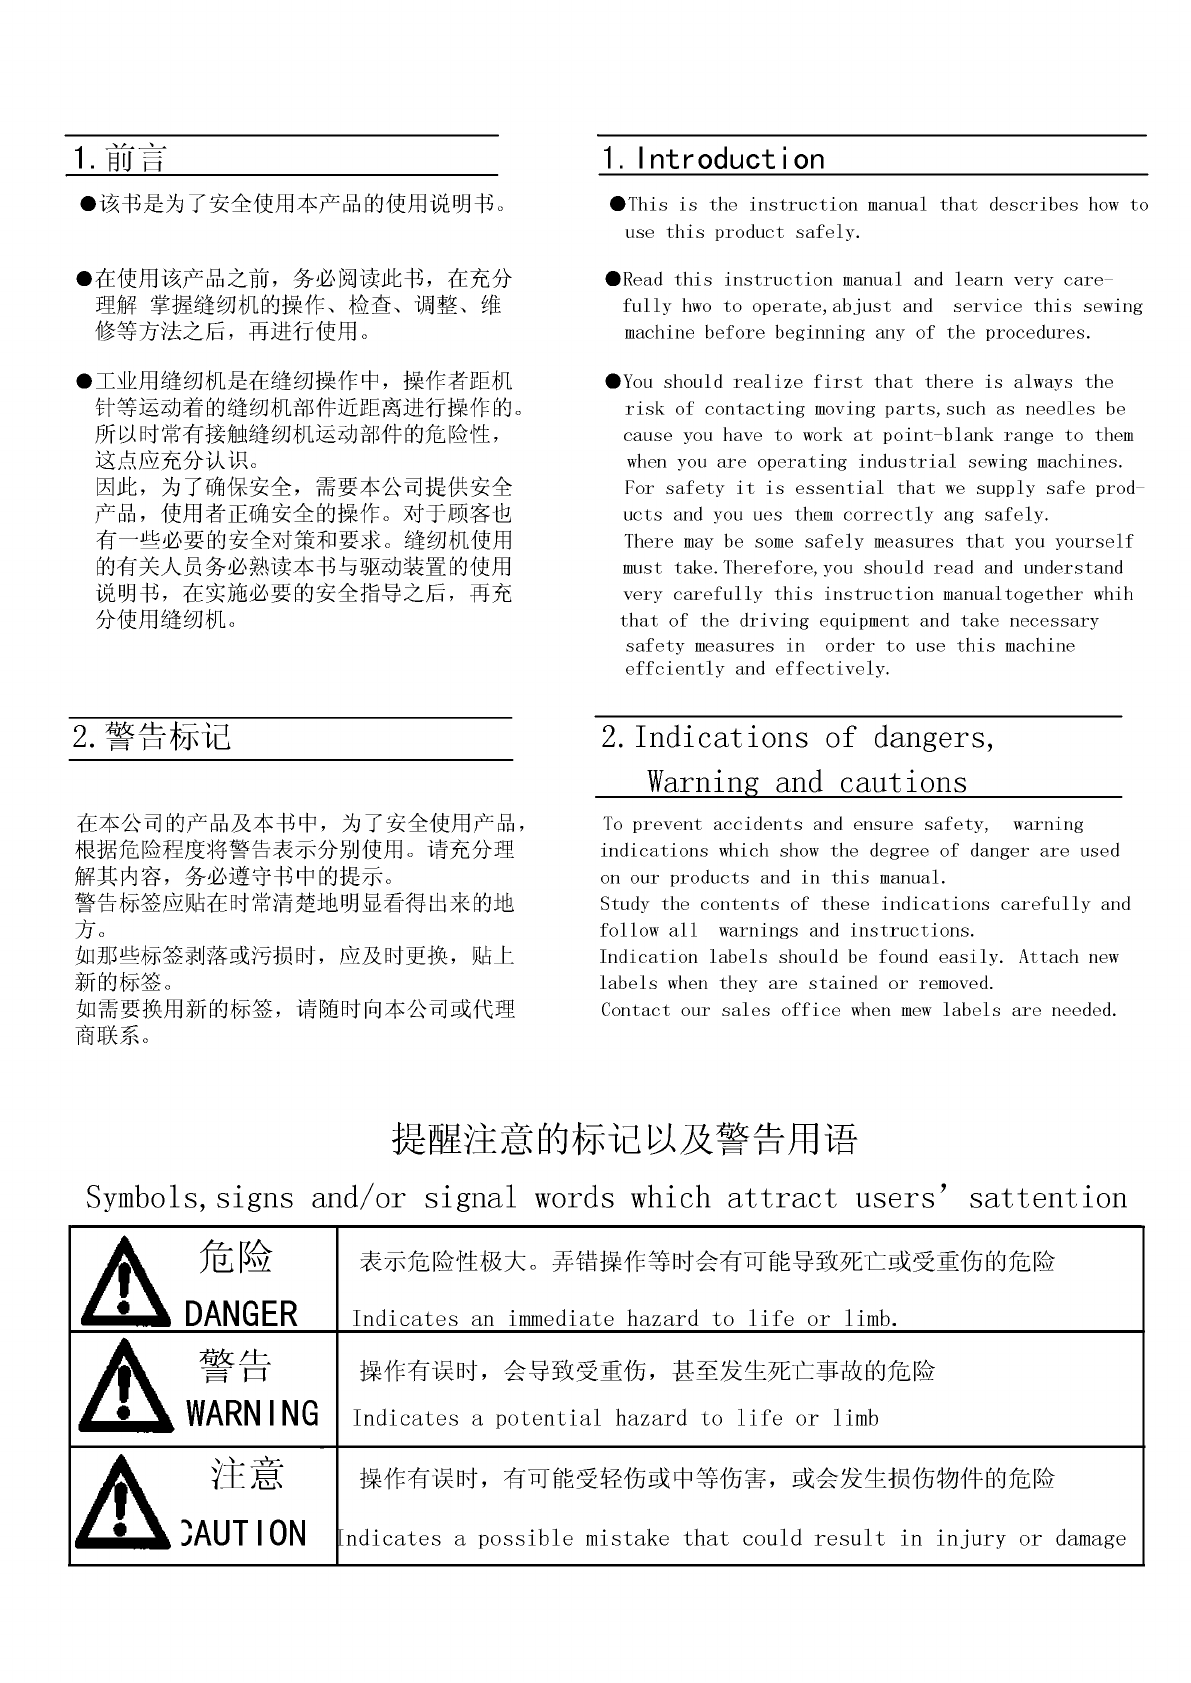
Symbols,
signs
and/or
signal
words which
attract
users'
sattention
~
frt~ft
*~~~ttm*"*m~~~~~~m~~~~~~~mm~~~
DANGER
Indicates
an immediate
hazard
to
life
or
limb.
~
~LL
~~~w~,
~~~~mm,
~~~~~~-$~~~
WAR~I
NG
Indicates
a
potential
hazard
to
life
or
limb
~
"·~·
1r}fi1,
~~~w~,
~m~~~m~~~m~,
~~~~~m~#~~~
~AUT
I
ON
ndicates
a
possible
mistake
that
could
result
in
injury
or
damage

~~~
~n
iw7t1f~
1J?J
ig;
in
S)j
[!!*i2%
Be
sure
to
study
very
carefully
for
safety
Symbols
and
messages
~
&/m:il~1b~
'/1), 'if"
C!
7J\'
}_Ill
Be
;It
pg
~~it
Wll
1*
fp:
)';]
~
0
Be
sure
to
follow
the
instructions
when you
operate
the
machine
and/or
labor
saving
device.
&
Jj
-f*fP:~i!R,
~
1U!l!
~
Efl
frt
~B:
o
If
you
use
the
machine
and/or
labor
saving
device
incorrectly,
you
may
get
an
electrical
shock
&
f*fP:~-i!R,
~~~Y:'¥1~'3t1%
0
If
you
use
the
machine
and/or
labor
saving
device
incorrectly,
you
hands
and/or
fingers
may
be
injured.
1f
11(
~!!!
~
~_ffi\3~
'¥
'3t
1%
Etj
frt
~B:
0
&
Indicates
a
danger
of
bum
injury
due
to
hightemperature.
(9
~TI
xt
::f
PJ
1tY:
Never
do
this
'*<!It
itt"
-1~
:@_
-rm~
1T
~;;,.
,
im]~~~i1~I
fP:Si,
g!G:ffPJ~~jij
~Si,
@~7tre~~M~~~~EflM~~~,
~JG~3J~o
~
Unplug
the
machine
or
shut
off
the
power when
checking,
adjusting
and/or
repairing
the
machine
and/or
labor
saving
device,or
when
lightning
may
strike.
&,~NJi11(:1:-fui~,
~
1~1?
)';]
~
0
e
Be
sure
to
ground
the
machine
and
labor
saving
device
securely.
*
7J\
~ii
~JJ
tJL
1t
i)J
~
JJJE
~
:1f
rl:iJ
0
-+
Denotes
the
normal
rotating
direction
of
the
machine
pully.
ICDffl~,
§
B"J
I
**~Efli~m~wm,
~~•~m~~Eflm
;~~~$7'1§Efl®M~H~Eflm~,
~~~
~_tmJi~3J~,
ifi~Tixt::f~1~m
0
l®1~ffl£fit
I
**~Efli~m~wm,
~r~mEfl~~,
:ffPJ
~~~WmEfl%~,tt~&~~ttm*::f~~~o
2.
r"'~~~~fCE!j:l:-fu:1f,
&'3t~~
lS'!~:I:-fu:1f
1~fflM1~1ro
3.
ffij~,
~~_fiji_~~~'
]~j1(Sj:SjlljE!j:l:-fu:1f
o
4.
)jlfj!JE!j~_g,~t,
~~lt1tt:7c,
~~~ii~JJtJLm*w
~
QrPJ
Etj
:1:-fu
:1f
0
5.
~9!5E
~ff';%~)1±
10%~_tE!j
~ff1E~)J~JJJ'@:
Etj
:1:-fu
:1f
0
6.
~~~
;x~tW!l1~~ffiu
~itsJJilt!
_tpfiffi~
Efl
3.Safety
precautions
ICDApplication.purpose
I
Our
industrial
sewing machines have been developed
in
order
to
increase
quality
and/or
produ
ction
in
the
sewing
industry.Accordingly
never use our prod
-ucts
for
other
than
intened
use
described
above.
!®Circumstances
I
The
environment
in
which our
industrial
sewing
mach
-ines
are
used
may
seriously
affect
their
lives,
functions,performance
and/or
safety.
(S;)
For
safety,
to
not
use
the
machine under
the
circumstances
below.
l.Do
not
use
the
machine
near
objects
which
make
noise
such as a
high-frequency
welder,
etc.
2.Do
not
use
or
store
the
machine
in
the
air
which
has vapor from chemicals,
or
do
not
expose
the
device
to
chemicals.
3.Do
not
leave
the
machine
outside,
in
high
tempera
-tures
or
the
dirct
sun.
4.Do
not
use
the
machine
in
the
places
of
high
ambient
temperature
and humidity
that
seriously
affects
sewing machines.
5.Do
not
use
the
machine
on
the
condition
that
the
voltage
fluctuation
range
is
more
than±
10%
of
the
rated
voltage.
®1Z~m~
~
(1)
Jt!:1-JM!d~1~*'
,fft~S1Eflidt1~1?
·~~~wmJtJ:fifft~-~~-m~~~~~~
~,
~~~~~H~,
~~~M~MM~~~
T,
*~~R~wm•~~~~~~~€,~
Jt!:1-Jf*fp:
0
@~,
~~~~~~~Jt!:fif*~~'
~~~~
~~wm•*~~~f*~~m~oo~~~~Efl
idtf*fP:i1tlJ1U,
#:iJ!~-tJJidt~1?1J\llJ1U
o
0
)Jp~ffi
0
~i~
.
1H3
~iiiJJ
tJL
0
:jj(
tJL
'tf
.
Jt!:1-J1it~ffi5G1£t1~13~PJ!:jj(Si
o
.
J!
:jj(
tJL
~rn
e~Jt!:fi~Tf*~~,
~*~~~~~H~~
€Jtl:1fo
.
iml
11
'tf
H!il
Si
.
im]
11
&
Z:)J
tt
Si
-~~~Mfft~-~*~'
@~~~*~~~
j]
%t'i:
~
RJiiiJJ
tJL
Efl
Mid~
I
fp:
Efl
~
1'1
VZ::;f
~
*Jtl:if0
-~~~~~Etjff·~~®~~~~~J!~,
~
~
~)C$i&
EfJ@:
l!L
t<:\
*izP~e~~~J!e~Eflffi~,
@~J1:**?&'ff'g
\:::1
m~~~'§']'§f~?JTimi'PJ
0
~
(2)
tJL~H~i1~~1WEflfft~1JrN
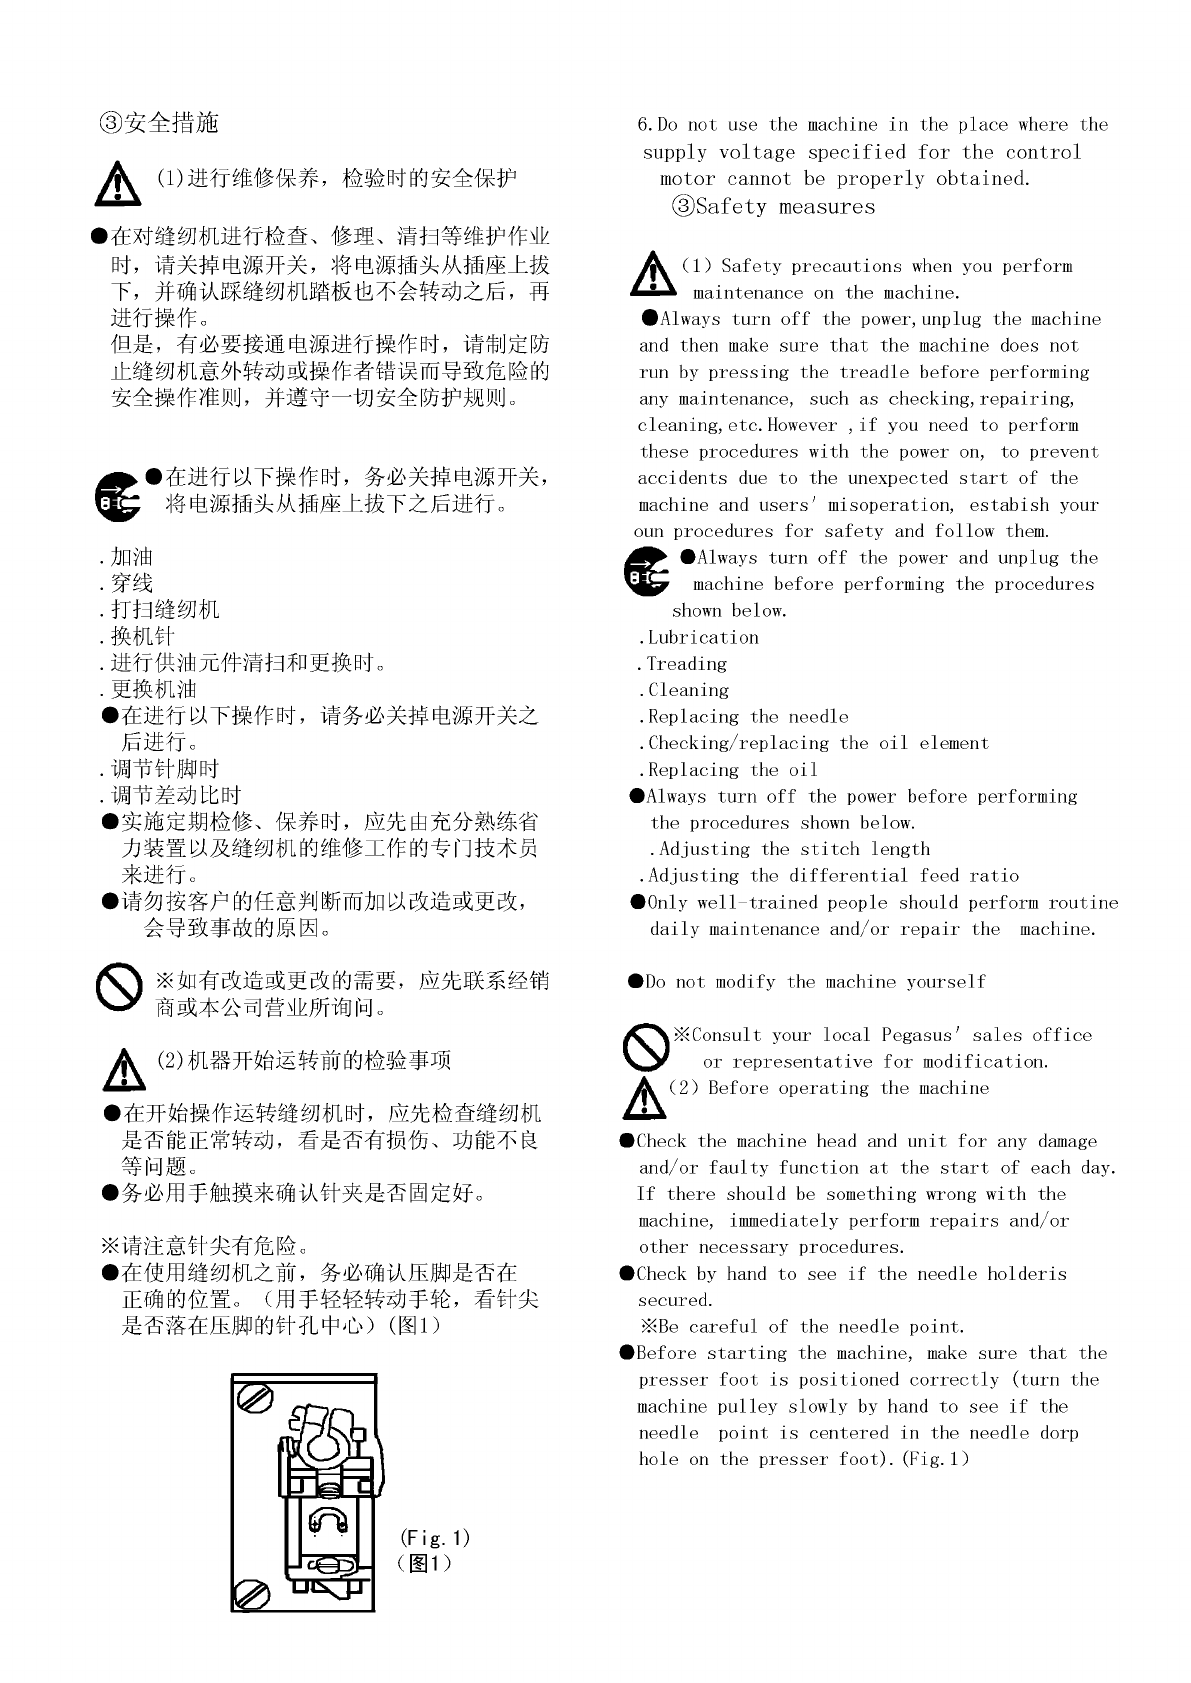
·~*~f*~~~~wm~,
m~fft~~wm
~~~~~~~,
~~~~~m-~~~~
l:r££
':;1
"'"'
>:t
I
Pj
!Eli
0
•*~ffl~~-*~~'tf~~~~~~o
(Fig. 1)
(~1)
6.Do
not
use
the
machine
in
the
place
where
the
supply
voltage
specified
for
the
control
motor
cannot
be
properly
obtained.
@Safety
measures
~
(1)
Safety
precautions
when
you perform
~
maintenance
on
the
machine.
eAlways
turn
off
the
power,unplug
the
machine
and
then
make
sure
that
the
machine does
not
run
by
pressing
the
treadle
before
performing
any maintenance, such
as
checking,repairing,
cleaning,
etc.
However,
if
you need
to
perform
these
procedures
with
the
power
on,
to
prevent
accidents
due
to
the
unexpected
start
of
the
machine and
users'
misoperation,
estabish
your
oun
procedures
for
safety
and
follow
them.
~
4tAlways
turn
off
the
power and unplug
the
~
machine
before
performing
the
procedures
shown
below.
.Lubrication
. Treading
. Cleaning
.Replacing
the
needle
.Checking/replacing
the
oil
element
.Replacing
the
oil
4tAlways
turn
off
the
power
before
performing
the
procedures
shown
below.
.Adjusting
the
stitch
length
.Adjusting
the
differential
feed
ratio
4tOnly
well-trained
people should perform
routine
daily
maintenance
and/or
repair
the
machine.
4tDo
not
modify
the
machine
yourself
t<:-\~Consult
your
local
Pegasus'
sales
office
\:::1
or
representative
for
modification.
~
(2)
Before
operating
the
machine
4tCheck
the
machine head and
unit
for
any
damage
and/or
faulty
function
at
the
start
of
each day.
If
there
should be something wrong
with
the
machine, immediately perform
repairs
and/or
other
necessary
procedures.
4tCheck
by
hand
to
see
if
the
needle
holderis
secured.
~Be
careful
of
the
needle
point.
4tBefore
starting
the
machine,
make
sure
that
the
presser
foot
is
positioned
correctly
(turn
the
machine
pulley
slowly
by
hand
to
see
if
the
needle
point
is
centered
in
the
needle
dorp
hole
on
the
presser
foot).
(Fig.
1)

~
~
~jl
m
iff7t1f~
,'#,]
ig;
e
*&,1ft
1"f
£EJ!p
~
~
4-
[!I!]
Efl
[!I!]
5E~f
o c
1~JiHil'
ff~m~~~ff~,
m~~€~~~M,
1ft
1"f:WffH!p~~tt~JJ)
(~2)
_&
(3)
±~iJII.
n!:1~
(~2)
(Fig
2)
e~T~K$~,
~wmm~M~W*~Efl~
~A~&~~~~~~,
m7t~~m~~~
m~~~~~'
*~~I~Efl~~o
~~'
iff
E8~
P
Efl1fJJ.l'J!1lz:~~tR11'J~flF:hffiJ!I
it:JGU,
rm
*J1fu
JE
7J\.
Efl
v
!I
t~
0
A\
,;±
:Ir.
~
i-=c}~,
I
CD3Tt§
l
1.
~ii~JJ
tJLtJL~:fr
t±:l}
Si
~*~f
€
%tAt~;f§
~
t±:l
Efl,
JJ-f=~!rjliJ:frt~;f§_tt1Ficr¥fcfWiliA_t
T
€,
iff
}J__t~iJTEcJI[fJV~lf;f§
o
2.
1E~ii~JJtJLtJL~£iirr~*M*-lEI!.*t±:l
Si,
~'@xt
~~m*~mn~~Mrl~~~~~Efl~~o
~
1J1U~bt!±.frt~B:M1fl11%t!L~o
3.
:frltZt±:l~Ji~JJtJLtJL~Si,
iff~i~]~>l,'Efl1lz::'i:,
!J\Jl,\ilt~EflllZt±l
0
4.
3f;f§fflrlE!jt~;f§izp*~€~fflE!ji!,
iff*~
1~f¥J])(:~f
0
~**H4Efl~~
·~*M*-4~115*~'
t~5-!C
t~;f§,
VCE
HML
~~~~~~~ffEfl~~*M~~~~~Efl
JttiT~~o
;jig!JJ
~Jl~
1m
a~
~J~
1.
~ii~JJtJLEfl~~,
iff~l'iD~~Jt!:1-J~~o
2.
ffiiJmjJi~JJtJL?JT1~ffl
Efl:f~H-4~~,
'f§L
ff&~
*rf1~*4o
3.
~ii~JJ
tJL
Etj
~~@if~~
:1:-fulf
~
1~1?
Etj
~
~j;Jil
5EJt!:1-J~~o
&,~Si~f£;~1'1
Efli%Jt1:1-J~
~0
*~~~Etj~#*~:il~~~lf~~~Etj~~
j;Jil)E,
JJ\.:'fJijJt!:iT~~o
•
:tt~~~~~3M~wm~~~Efl~~**
~&~~ffo3M~~7~~~wm~~~
w,
iff~i~~~{~~4~Ji~J}fJLo
Be
sure
to
study
very
carefully
for
safety
4tCheck
to
see
if
the
presser
foot
is
secured
(raise
the
presser
foot
by
the
foot
lifter
and
press
it
by
hand
front
to
back and
left
to
right.
)
(Fig
2)
,&(
3)
Tr a in i
ng
4tTo
prevent
accidents,
operators
and
service/mainte
-nance
personnel
should
have
proper
knowledge and
skills
for
safe
operation.
To
ensure
so, managers
must
design
and conduct
training
for
these
people.
4.Notes
for
each
procedure
_&
CAUTION
l
CD
Unpacking
I
1.
The
machine
is
packaged
in
a
cardboard
box
before
shipping.
Unpack your machine
in
orderly
sequence
while
checking
them
right-side
up
by
referring
to
the
indications,
such
as
logo,
etc.
printed
on
the
boxes.
2.Never
hold
the
area
near
the
needle
and/or
thread
guide
related
parts
when
taking
out
the
machine
from
the
cushion.Otherwise
it
may
cause
injury
and/or
damage
to
the
machine .
3.
Take
out
the
machine
very
carefully
while
checking
the
position
of
the
center
of
the
gravity.
4.Keep
the
cardboard
box and
packing
carefully
in
case
secondary
transport
is
needed
in
the
future.
Disposal
of
the
packaging
4tThe packaging
material
of
the
machine
consists
of
wood
,paper,
cardboard
and
VCE
fiber.
The
proper
disposal
of
the
packaging
is
the
responsibility
of
the
customer.
Disposal
of
machine
waste
1.
The
proper
disposal
of
machine
waste
is
the
respon
-sibility
of
the
customer.
2.
The
materials
used
on
the
machine
are
steel,
aluminum,
brass
and
various
plastics.
3.
The
machine waste
is
to
be
disposed
of
in
accordan
-ce
with
the
locally
valid
environmental.
protection
regulations.
A
specialist
should
be
commissioned
if
necessary.
~The
parts
contaminated
with
lubricants
should
be
disposed
off
separately
according
to
the
locally
valid
environmental
protection
regulations.
Transport
within
the
customer'
s
premiss
eThe
manufacturer
assumes
no
liability
for
transport
within
the
customer'
s
premises.Careshould
be
taken
to
transport
the
machine
in
an
upright
position
avoiding
it
from dropping
or
falling
down
to
the
ground
when
it
is
moved.

~
¥15
I®DiE I
1.
~ii~JJtJLtJL~Efl1M~-5E~VJJ1'
A~_LJt!:if
o
:13
*'
mA~~•~mR~~-tt~wm~~~
~~$o~M-~*~~ffl~~$Jtl:fio
2. ;j$
~;Mii~JJ
tJLtJL~
si, m
k1
:f-tJJH±
1t~JJ
~,
1e
'¥
~~m~~,
~~*~Efl-~o~wm_t~~
~~~-~~3~m~~$,
-~~~~~•
i¥tJL~LEfJ~ffJ~o
(~3)
(~3)
(Fig
3)
3.
~11~ii~JJtJL
~t)Z_t~,J\~$_L1M~Si,
ilf~1~
~~M*~*~RM,
~~~Wm~~~~~
4.
izP*~~=ij(~*~ii~JJtJL:3f~~*Si,
iJ-)E
•
T-i¥tJL~_tE!j~ffi~
o
~lJlU,
1M~s1~11U£~
$tJL~~~ffi~{t~~**H41EJ9i~
Jf£
o
' '
.:Ir.
~
1£}~~
I®
1Z*·
it~
I
gitJHJl
E'
tP.
1.
iw1~ffl
~~JE)J\.7f~'3t~ii~JJtJLtJL~!ItS.R.1M~Si?"'
~Efl&~fflnEfl~Wm~~c~~,~~)o
2.
mJE
7J\.~
m~ii~JJ
tiL*
we
'lr!Wt
~o
1*
fp:
:lt~~
Efl
a)j
~
~'
~~~3~:f*~Etj~m~o~*:lt~~~
+*ajj~~'
@@~~~~*~a)j~no
3. ~
~ ~
~ii
~JJ
tJL
Si
,
7'11))]
lt:f*
11:
1'r
~*lfMJZ
Si
H!il
1l'f
~~~-~,
-5E~~~wm•~_t~*I))]Jt
11'r
n£
Efl
m
~
0
4.
~~m1*1t:i'r~~Etj~:JttT,
~5E~t1ZTIITEfli'1'11
~
CI
11:SiE!ji'1'1J~)
o
A\
~&.
.l.!.}.
i="'i
l=t
~~
1.
iii$~
Efl1m~Hii~JJtJLtJL~~
~tJLJit1(~~Efl1m~o
~wmm~~~mmJt~~JtJ:fiii~~,
*~
~~~*~~~~EfJ~~TJt!:fi:f*~o
2.
~1~ffl
~ilf~~~Jit1(~~M$Eflh
o
3
<S)
iw~~tt~~a±JJtt1(~~
4.11(Jli~~JJ'Iffl1tt
cizo1t~JJ~,
v~lt'fff~)
Eflii
11(~~,
JffuHr2/l16@~25mm~Jtl:1f~*o
~
WARNING
I®
Transportation
!
1.
The
machine
should
be
carried
by
at
least
more
than
two
people
when
it
is
mounted
on
the
table
and/or
a hand
truck.Be
sure
to
use hand
truck
for
other
transportation.
2.
To
carry
the
machine
,hold
the
machine
pulley
tightly
with
your
right
hand and
the
machine
arm
with
your
left
upper
arm.
If
the
machine
and/or
your hands
are
stained
with
oil,
the
machine
may
be
easy
to
slip
out
of
your hands and
fall
to
the
floor.Therefore,
wipe
off
the
oil
carefully.
(Fig
3)
3.Care
should
be
taken
to
avoid
excessive
shock and
shake
when
the
machine
is
mounted
on
the
table
and/or
transferred
using
a hand
truck.Otherwise
the
machine
may
fall
down.
4.
Wipe
off
the
oil
from
the
machine
before
packaging
it
again
for
secondary
transport.
Otherwise
the
machine
may
easily
slip
out
ofyour
hands
or
the
bottom
of
the
box
may
come
off
while
in
transit.
~
CAUTION
I®
installation,
preparation
I
Machine
table
1.
Use
the
machine
table
(table
board. metal
legs)
that
completely
carries
the
machine and
is
fully
resistant
to
warping
while
the
machine
is
running
.
2.Arrange
the
working environment
for
easy
operation
by
considering
where
to
place
the
machine and
the
brightness
around working
area
if
the
illumination
is
insufficient,control
or
change
lighting
as
requ
-ired.
3.Attach
a
non-slip
pad
to
the
treadle
(foot
switch).
Otherwise
the
operator
may
slip
off
the
treadle
while
running
the
machine,causing
trouble.
4.Adjust
the
height
of
the
table
according
to
a
working
posture
of
the
operator.
~
WARNING
Cables
1.
When
connecting
the
cables
between
the
machine and
the
motor, be
sure
to
turn
off
the
power and
connect
each
cable
connectors
securely
.
2.Do
not
strain
the
cables
in
use.
~-
{S)
Do
not
bend
the
cables
escessively
4.
When
connecting
the
cables
that
are
close
to
the
moving
parts.
such
as
pully
or
V
belt,
keep a
distance
of
25mm
at
least
between them.
5.Protect
each
cable
using
a
cover
or
adjusting
its
position
if
necessary.

~~~
~n
iff7t1f~
1J?J
ig;
5.
&,
~
s1
~
mJtt1(£~
11r::'i:WG1JP
iJtt?
mHI~1~t?
Jt
:J'~£~o
6.
{S)
[!ll]5EJit1(i~Si~Tixt::f~1~JiHJi=HL
~Jr.
btl±.
1,m
~MJ<.xo
A\
,;±
:Ir.
~
ii}ff.J,
~±-fu
1.
:J'1(:1:-fui~~~4lt-El~iiiJJ]UJE7J\.:'fJ'J*i3t~
JtJ
Ef1t1(
:1:-fui~
,
::f@
~
Jt1tMJl
~~
JtJ
o
2.
e
:fr~iiiJJ
tfltfl~
Etj
j;Jil)E:I:-fu
,8
i'i
Wll
:1:-fu*
i)t
11(
:1:-fui~
7'1
~
0
~
~15
I@
1~m
g)i~J],ffl11B
I
1.
:tt~rn:m:
r*J
;~Jt:ff1iA~rn
~IW~Tixt::f~JtJ:1-r~~
0
m~~~mm5EEf1~mm~m~m~cffi~
~IS0f~nt~~VG22)o
2.
tfl~ffiJti:A§~~~1~§~~/5t:ik_,
?JT
~:fr1~ffl
Si
iffmi))Jt?§~lt
~Jc.tfl~rnJtJ:A§~~
0
*-li
-Jti:A§~~,
iff
JtJ
T-i¥7kirF~15)J\.~rfl~
iff
~!±.Jtl:if~r'lfi
0
3.
f}1}ffj:j:1(~!l!Bl~Jcf§'
iff
~_t}tJJ](~p~~!g~Tf¥o
4.
(S)
~Tixt::f~1~tfl~ffiJt!:A
Q
~~0
5.
tfl~rniff1~1f:tt~.:=t-m::f~u
Ef1:t-fu:1f
0
*-li-Jti:AQ~,
::f~~tt~~,
~_t~~!±.
JtJ:1-r
~a
rr
0
6.
~~rn,
~~~Ef1~Jm:1f~t:ff
&,~N:il~~t~Ef1
2*'~@~~~~Wil~Jmo~::f~m~~
~1Jll;j~tfj)i'1J1:**J§'
~WIJJttiT~:@.o
7.
l'JTI))]Jttk~,
7](7J\.Ef11rtA,
1~ffl5GJ§1~1f
m~~~m~~~m,
~:fr;~Jt:ff~~~MEf1
IW&:~1~1f
o
A\
~&..
~
i="'i
l=t
I®
)E~g)i~J],ffl!WB"Jli~$JUf
I
gji
t)]
~Jl
E'
tP.
1.
1J7f~iJj!W'
iffW!liAt1(£~gl(;:j:1(~~~:fftfl11%,
~£~,
tt~JJ~j~,XJrl_LE!j:ff';%
0
2.
:tEH
7f
~iJj
Siiff::f~~:it:f-
J])(:frtfl'ff
JYftJliWG1t
~)J~JYffJlio
3.
~f}]lf~il~~~JiiJJtJlSi,
1J7f~iJjW!JiA
1t~)J
~Ef1~~:1frJ:iJ
o
~iiiJJtflEf1~~~JA1t~JJ~11JlU
*:W~[Q]k]JJJE~
0 (
~4)
(~4)
(Fig
4)
Be
sure
to
study
very
carefully
for
safety
5.Protect
cable
using
a cover
of
adjuting
its
position
if
necessary.
6.
{S)
Never
use
staples
to
fasten
the
cables.Othe
-rwise
it
causes
a
short
circuit
and/or
a
fire.
~
CAUTION
Ground
l.Connent
each
of
the
ground
wires
in
the
sewing
machine system
to
the
ground
terminal.Do
not
connect
to
another
devices'
.
2.
~
Connect
the
ground
wires
securely
to
the
indicated
ground
points
on
the
machine head.
~
WARNING
I®Handing machine
oil
l.Never
start
the
machine
with
no
oil
the
reservoir.
Use
HIGH
SPEED
SEWING
MACHINE
OIL
(Equivatent
of
ISO
requirements:
Viscosity
index
of
Vg22).
2.
If
machine
oil
gets
in
your eyes,
it
may
cause
eye
irritation.
To
prevent
the
machine
oil
from
getting
in
your eyes, wear a
pair
of
protective
glasses.
~
Shonld machine
oil
gets
in
your eyes,wash them
with
fresh
water
for
15
minutes and
then
go
to
see
a
doctor.
3.Avold
skin
contact.
Immendatelywash
contacted
areas
completely
with
water
and soap
4.
~
Never
swallow machine
oil.
5.Keep machine
oil
out
of
the
reach
of
children.
~If
swallowed,
do
not
induce vomiting.
Immediately
go
to
see
a
doctor.
6.Dispose
of
the
waste
oil
and/or
containers
properly
as demanded
by
law.
If
you have
further
questions
on
its
dispasal,
consult
the
store
or
shop
at
which you
purchased
it.
7.After
opening
the
oil
container,
be
sure
to
seal
it
to
prevent
dust
and
water
from
getting
into
the
oil
and keep
it
in
the
dark
to
avoid
direct
unlight.
~
WARNING
I®
Before
starting
the
machine I
Machine
table
l.Before
turning
the
power
on,visually
check
the
cables
and
connctors
for
defective
conditions
,
such as
damage
,
disconnection
and/
or
loosening.
2.Never
bring
your hands
close
to
the
needle.
and/or
pulley
when
turning
on
the
power.
3.When
the
machine
is
used
for
the
first
time,
turn
on
the
power and
then
check
the
rotaing
direction
of
the
machine
pulley.
The
machine
pulley
should
turn
clockwise
as
seen from
the
machine
pulley.
(Fig
4)

4.
1*
11:
~ii
~JJ
tJL
1't
mz
J';J
'3t
u:lf!
'3v
11
t~,
JE
7J\.
;@_m
*~ffl~~~~~3~€,
~*fif*~~m"
5.
~r~ii~JJtJLtJL~_t~frt~:~L
Wi5t1FitillZ~Mg;
:3f:@.m
c
"2"
Wi5*~'
&,.~simzxt1~m
1'r*1fiz:~~F'f
0
6.
~fJJ1~ffl
~-1'
}j
JIIZ~11£J!lto
iff1~fflft~
n'lJ~J!~3/4~
T~~J!o
!@:
ili~~~iif9HJl$
s~5i~~r.w
I
1.
(.S}
:tE1~1EPT[))J1?tJZ,
1?1~~,
1tiJJ~1?'!'J
~iz:~~~~~~T,
~~~~~~Wm"
2.
(9
~ii~JJtJL:tt~~9="
~1~trt~B:~,
?;Tixt~~
~~
'¥
nJ<:AtJL
'ITT"
3.
1~ffl
ll16il~J'\
~tJLSi~1ljl:~iJj~€
~tJL1JJ~
~~~U~JJJE
~-~
J
L"
J25:
Si
~JiHii~JJ
tJLlftUJZ€
~ii
~JJtJL~~z:JJ~i~trt~B:~,
iff*f:'IJ'J'J\.c,,"
4.
<9
~ii~JJtJL:tt~~9="
~1~trt~B:~,
?JT
~?;Tixt
~~~~'¥1~,
~'JY:.,
:;&~JH1(Jli:f-~,
V~it
m,
~m~M~,m~~,'tf$"
~~"~
~~~~n,m~,IA~~:fr~_tm~"
5.
&
1~mm1rtJJn~~~~ii~JJtJLsi,
iff~~
~'¥-m~aJlimnm~,!Mf~:tt~mm9="~
3~'JY:.!±.$i0/:,
~1~m~B:~"
6.
iff~
1~ffl
~ii~JJ
tJL
Si
giG
:i'rf*11:
1'r
r'l16
3Hii~JJ
tJL
Si,
-}E~~~~iJjJf~~1lj[o
7.1~~Si*IJZ\~~~iJj~1ljl:o
8.
:frf*11:~ii~JJtJLSi,
iff~~~~*ffi:tJL~~A~
~J....~o
9.
c:Y
~ii~JJtJL:fr~~9="'
iff~~:tE~ii~JJtJL
-EltJZ
_t~~IA&~m~~Wx~~~~"
I
C7)
~1H?'
~~'
fi~!l
I
1.
Mid~,
fft1"f,
1~:@.~11:~JIIZE8'3trl~~iJllt~
~A:3f:tE1E*:@.m*~m~~~~~3~€
'
~*1J11:~o
2.
~
J';JTMH?,
fft1"f,
1~:@.~~~~ii~JJtJLtJL~
~~~,*~~~iJjlf~~~,
re~iJjM~
MM~_t~r,
:3f~~~~R~mm•~~
:{'Jlifl~~~~Z:)J~€~*1Tf*1"Fo
3.
C
:ttiz:~M1~1EPV~ltmsi,
*&'~~~iJj
lf~~~,
re~iJjM~MM~_t~r,
:3f~
~~~R~mm•~,
~wm~~~~M~
€
~
*11'1*11:
0
4 .
xtr~ii~JJtJLtJL~
~
B
';%{ft1"t~D
)E;ItJ]{ft1"t,
mz~~*~&~m~~~~m~,
m~~~
~*iTo
4.
Well
trained
operators
should
use
the
machine
after
studying
these
precautions
and
the
instruction
manual
carefully.
5.Regarding
symbols
that
indicate
a danger
or
a warn-
ing
,read
and
study"
2.
Waning
indications"
carefully
and
give
training
on
safety
to
the
operators
as
required.
6.Run
the
machine
at
the
speed
less
than
3/4
of
its
maximum
for
the
first
one month.
_&
WARN
lNG
~
Precautions
while
you
are runn1ng
the
machine
1.
(S;)
Do
not
run
the
machine
with
the
safety
devices
removed, such
as
eye guard
,finger
guard,
pulley,
cover
etc.
2.
{S)
Never
bring
your hands under
the
needle
while
running
the
machine.
3.A
cluth
motor keeps
on
running
for
a
while
after
the
power
is
turned
off.
Therefore,
be
careful
even
after
the
power
is
turned
off
as
the
machine
could
start
running
by
pressing
the
machine
treadle.
4.
(S;)
To
prevent
accidents.
never
bring
any
part
of
your
fingers.
hair
and
clothes
near
the
machine
pulley
,
thread
take-up
and
needle
bar. Also
never
leave
sclssors,
tweezers,
tools,etc.
around
these
areas.
5.
~
If
you
use
the
machine
with
knife
device
,
do
not
bring
any
part
of
your hands and
fingers
too
close
to
the
knife
during
sewing. Otherwise
it
may
cause
accidents
and
physical
in
jury.
6.Always
turn
off
the
power
while
the
machine
is
not
used
or
before
leaving
the
machine
table.
7.
In
the
event
of
a power
failure,
be
sure
to
turn
off
the
power.
8.
While
operating
the
machine,wera
clothes
that
cannot
be
caught
in
the
machine.
9.
~
Do
not
put
any
tools
or
other
unnecessary
obj-
ects
on
the
machine
table
while
running
the
machine.
_&
CAUTION
I
CO
Maintenance,
check,
repa1r
1.
Well
trained
people
should
perform maintenance,
check and
repiar
of
the
machine
after
studying
these
~
autions
and
the
instruction
manual
carefully.
2.
:
If
it
is
necessary
to
lay
the
machine backward
for
maintenance, check and
repair,
always
turn
off
the
power,unplug
the
machine and
press
the
treadle
to
make
sure
that
the
machine does
not
operate
before
hP~inning
any
of
the
procedures.
3.
~
Before
installing/removing
the
V
belt
,always
turn
off
the
power,unplug
the
machine and
press
the
teradle
to
the
make
sure
the
machine does
not
operate.
4
..
Carry
out
daily
maintenance work and
periodical
inspections
propperly
by
folloeing
these
precautions
and
the
instruction
manual.
~~~§~~7~**m~m~~~~~~~
:'§':,
:3fic~7
~tm7J\.Er-J~i~1Jr1JL
A\
,j±:TL.
~
ii}ff.J,
1Z~15!HP
*][
r
1)
1?§1H1Z
{9
::f~Hlf
~rmdEr-J~~,
~~::f~~Hlf~m~Er-J~
~T-~~wmo~m~~~7~~W~~~
Si,
1~~~/F~lSA§~drm~~
EfJ1J'1§~'§Jo
(2)
1?1~~
0
::f~1E:f-1~1$A
~7~~~T~MEr-Jm~~A~~rm~~~~,
~m~ffl~~~7~m~o@~,
~~m~~
~~7~~~~rmm~~~,
~*~'f-mM~
~~A,
m~~~~~~m'¥-m~~~~o
(3)
1t~)J~
m~~~wm~M~Er-J~~~~,
tt~Er-J~~
~~~1t~JJ~1~~~Si~ki~Er-J
o
r4)
ffH!il
(S)
::f~1E:f-1~1$A
M~~*OOff~Er-J~*;~sm~~'
~~~
~~~:f-mEr-J~~o~m~mlf~~*ff~~
~m•~~M~*ff~~,
m::f~~:f-m~A
ffH!!JT~
o
r~)
!W1?m
<S>
::f~
1T
7f
qftEr-J~MM~WmttOO~~,
~*fi~kitt
~Er-J~W~Mo
~7M~*fi~W~MEr-Jq~
~A~~,
*~m~!Wm~~~Er-J~~T•~
~)i~J}fJLo
(f))
tSfftJZ
(S)
::f~Hlf
T~m~B~~W~~7mili-~;Er-JT~~
M~~~M,
~7M~*fi~~~MEr-JT~m
~ft~A~~,
*~m~M~~~Er-J~~T
fp:
~ii
~JJ
tJL
0
6.
Protectors
for
safety
This
chapter
describes
each
protector
for
safe
-ty.
Therefore,
read
and
study
the
following
carefully.
~
CAUTION
Protectors
for
safety
(11Eye
guard
{S)
Never
leave
the
eye guard open.
For
the
safety
of
eyes,
do
not
operate
the
machine
with
the
eye guard open.
The
eye guard
will
prevent
any
pieces
of
the
broken
needle
from
getting
into
your eyes
if
the
needle
should
break
during
sewing.
(2)
Finger
guard
0 Never
insert
any
of
your
fingers.
To
prevent
the
needle
that
moves
up
and
down
from
contacting
any
of
your body,
the
finger
guard
is
installed
close
to
the
needle.
However,
there
is
clearance
above
the
finger
guard
for
easy
threading.
Be
careful
that
the
needle
may
penetrate
any
of
your
fingers
if
you
insert
it
into
this
clearance.
(3)
Pulley
Check
the
direction
in
which
the
machine
pulley
rotates.
It
should
rotate
clockwise
as
seen
from
the
pulley.
(4)
Presser
foot
(9 Never
insert
any
of
your
fingers.
There
is
a
clearance
of
more
than
5mm
between
the
top
surface
of
the
needle
plate
and
the
press
-er
foot.Be
careful
that
none
of
your
fingers
are
caught
in
this
clearance.Never
insert
any
of
your
fingers
under
the
presser
foot
when
raising
the
presser
foot
with
the
knee
switch
or
automatically
raising
it
with
the
treadle.
( 5)
Front
cover
(S)
Never
leave
the
front
cover
open
The
looper
travels
left
to
right
while
drawing
an
arc
as
seen
from
the
front
of
the
machine.
To
prevent
the
looper
from
contacting
any
part
of
your body, be
sure
to
operate
the
machine
whith
the
front
cover
closed
securely.
(6) S I i
ding
pI
ate
0 Never I
eave
the
s I i
ding
pI
ate
open
The
looper
thread
take-up
rotates
in
order
to
supply
the
required
amount
of
looper
thread
during
sewing.
To
prevent
the
looper
thread
take-up
from
contacting
any
of
your body, be
sure
to
operate
the
machine
with
the
front
cover
closed
securely.

Ei'~:bUIOO
Schematic
diagram
of
the
machine
table
Cut
the
table
referring
to
the
diagram.(Fig6)
~18
5 -
4
~25
5
cr.>
I I
~l
I I I I
:i:
I
I
II
I I
I,
I I
I
4-~13
I
300
=
r-
70
038
73
0
2-R10
2-R10
234
409
1------+--+---+--+---+---+--+--+----+------+900
8::
1.
:fr1Z*
-05M8Cw:fft:JJ7J*][)
B"Jg}i~JJ,fJUrt.
i~~WAa
2.
:fr1Z*
-1
UTD*lCS1,
i~~WBa
~
oj
Q)
;....,
oj
+-'
;:::l
u
Q)
u
.,.-,
>
Q)
'"d
00
::2:
LD •
oo:l
I
oj
~
,...c::
Q)
(.0
+-'
;....,
bJJ
.,.-,
oj
.,....,
~
+-'
~
'"d
;:::l
'-.../
Q) u
0,
Q)
0,
.,.-,
u
(.0
;:::l
.,.-,
0'
>
till
Q) Q)
'"d
-~
Cl
I'-<
Q)
~.
~,......,
.,.-,
I
,...c::
u Q)
oj
rJl
a
;:::l
Q)
;:::l
,...c::
0
+-'
>..
'+-< '+-<
.,.-,
,.._.,
,_......,
N
..
+-'
0
z
IE'imUipi!I~
£
1
1~
Qt
~~;iig!JJ~Jla1,
*&:
'
~%
;jig!JJ
~Jl
a~
~
7JJt~
1~,
~%
tffi
~
;.;._
~
7JJHffi
!~
...t
Mtl'
Z.
!§"{I}
i1H:r
o
;ji
g!JJ
~Jl
a~
7l.fE~~
1J
loJ
;.;._
-¥~t-f9!1J~~
JoJ
tJ
J].fE
~~a~o
£11~
~
:fr)Jp
tfl
~ffi
Si
QX:
:jj(
tfl
~ffi
Si,
iff*
&Ht~ffl
~
~
~m~~m~o~*~fflm~~*~m~,
~
PJ
~~tfl1
W~ii~JJtfl
o
1.
f!ffls"J
~rn
~
iJ1~ffl~~~t~~~
(HIGH
SPEED
SEWING
MACHINE
OIL)
Cn'l]J!
11£;f~,lt~ilJ1l'Hffi
ISO;f~,ft~&',&
/VG22) o
2.
f~~rn
s"JJJ~!
mH~~Q~m~1,
~~~~oo~~~~R~
H~~~ou~~
rBJ
0
1JP5c~rnJ§,
iwm~t~~rn
Q
~m
~1.
3.
~rn
s"J
1Jtl
IE
_m
1hH1FR2
~H~~~DU~*~~~ffi
£
~
_1JlUDT
~~
o
J';J1~~rn00?&1t1~M':tEH~~~ou~zJBJ,
iw1t1tfft
;i''H:E~)Jp~ffi
o
C~
·
8)
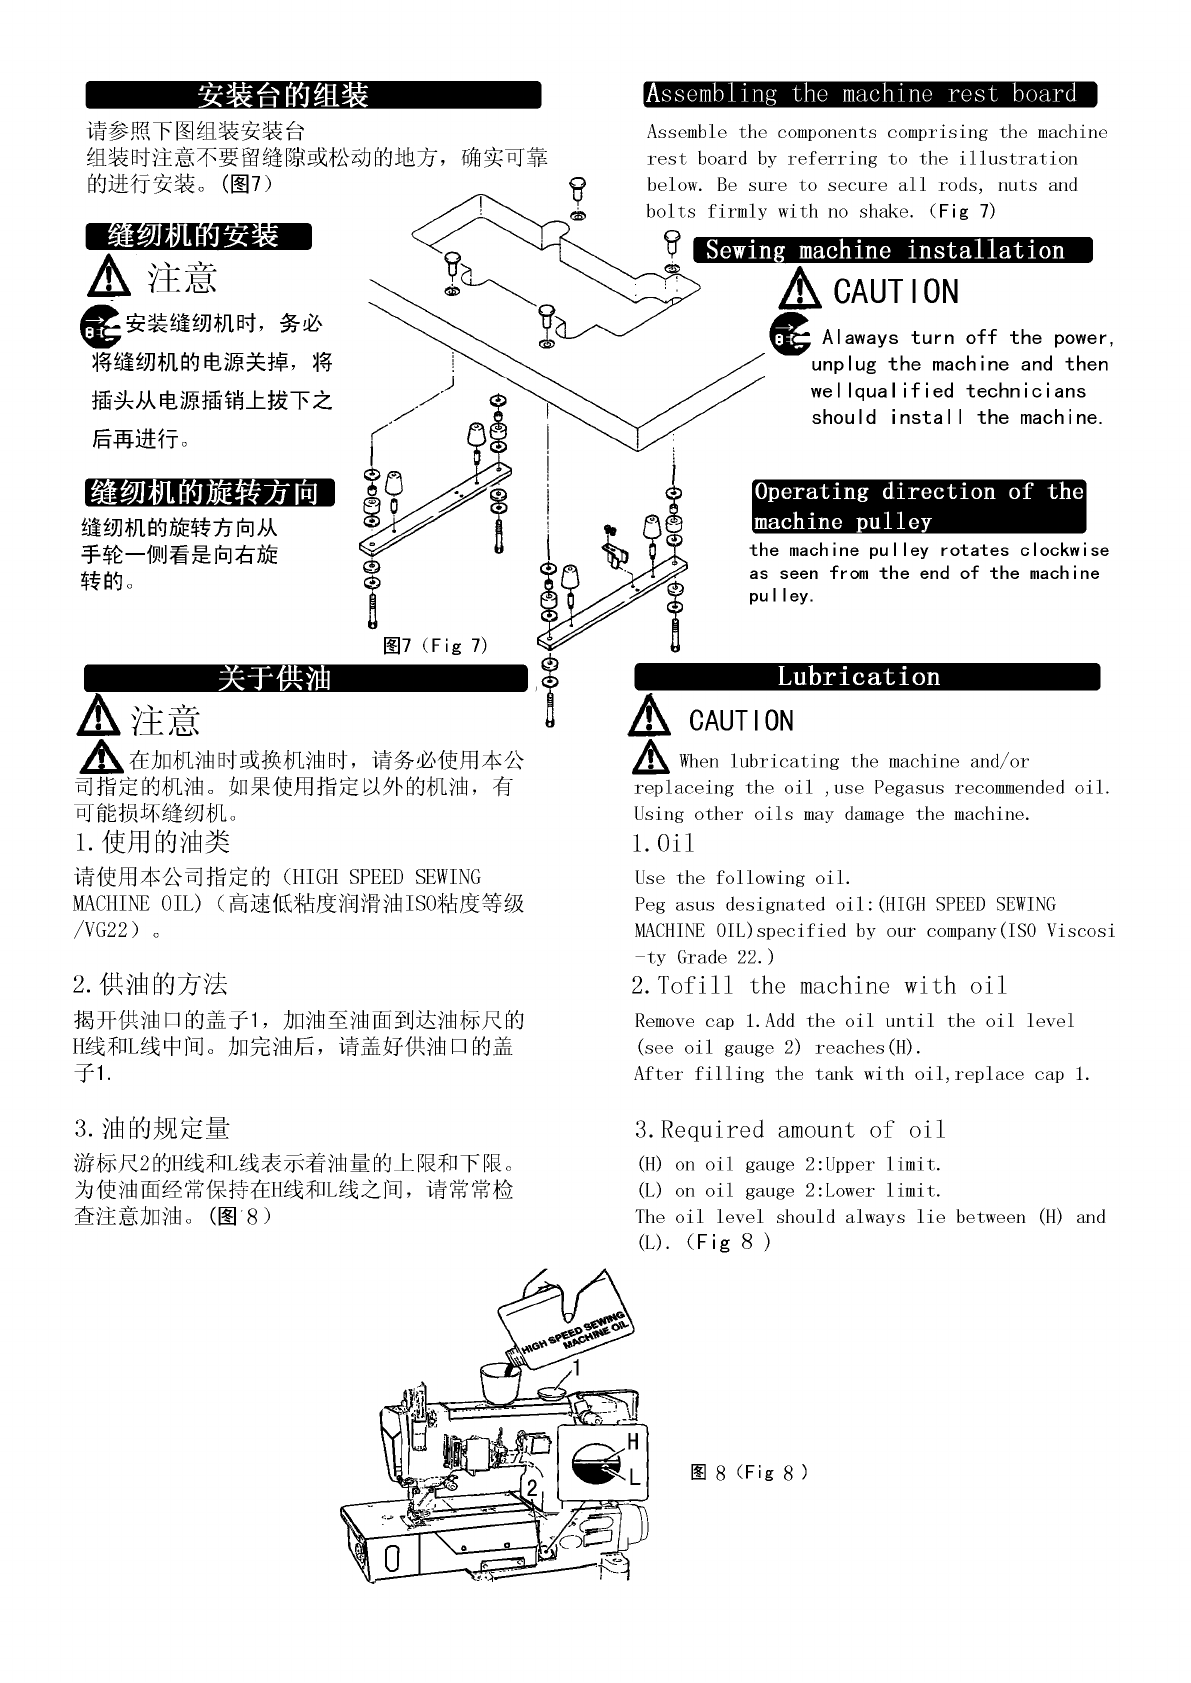
Assembling the machine
rest
board
Assemble
the
components comprising
the
machine
rest
board
by
referring
to
the
illustration
below.
Be
sure
to
secure
all
rods,
nuts
and
bolts
firmly
with
no
shake.
(Fi
g
7)
Sewing
machine
installation
£
CAUTION
C Alaways
tu
rn
off
the
power,
un
plug
the
m
achine
and
then
wei
lqual
ifi
ed
tech
nicians
sh
ould
i
nstal
I
the
machi ne.
Operating
direction
of
the
machine
pulley
the
machine
pulley
rotates
clockw
ise
as
seen
from
the
end
of
th
e
mach
ine
pu
I ley.
Lubrication
£
CAUT
ION
~When
lubricating
the
machine
and/or
replaceing
the
oil
,use
Pegasus recommended
oil.
Using
other
oils
may
damage
the
machine.
1.
Oil
Use
the
following
oil.
Pegasus
designated
oil:
(HIGH
SPEED
SEWING
MACHINE
OIL)specified
by
our company(ISO
Viscosi
-ty
Grade
22.
)
2.
Tofill
the machine
with
oil
Remove
cap l.Add
the
oil
until
the
oil
level
(see
oil
gauge
2)
reaches(H).
After
filling
the
tank
with
oil,replace
cap
1.
3.Required amount
of
oil
(H)
on
oil
gauge 2:Upper
limit.
(L)
on
oil
gauge 2:Lower
limit.
The
oil
level
should always
lie
between
(H)
and
(L).
(Fig
8 )
1!1
8 (
Fig
8)
4.
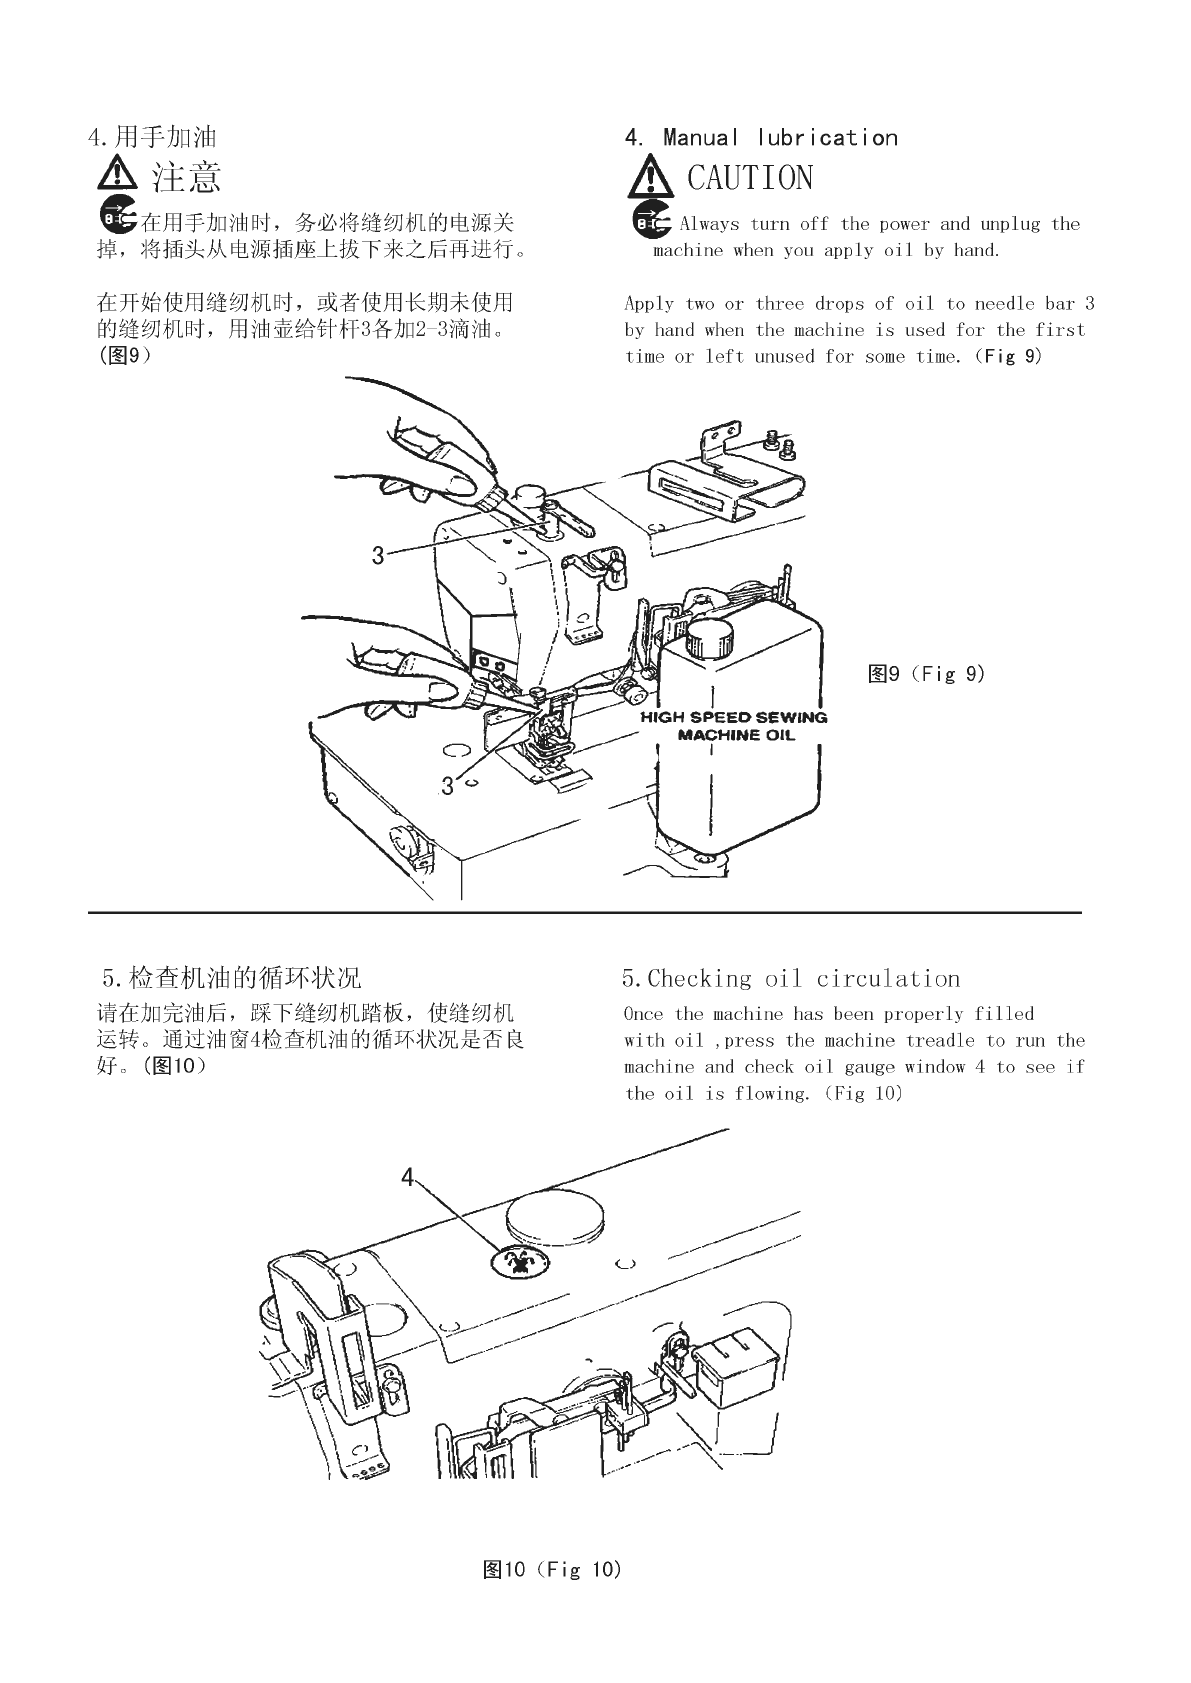
Jil¥
:1Jo
~rn
~
11~
C:frffl'¥
)Jp
~ffi
Si,
~&'
~:iHii~JJ
tJL
Efl
~
iJj
~
~,
~M~M~iJjM~~~T*~€~*fi"
:tEH~~ffl~Wm~,
~~~ffl*M*~ffl
Efl
~ii
~JJ
tJL
si,
JtJ
~rn
w
~'IT
tt
31'5-
1JP
2-
31i'lii
~rn
"
(~9)
s.
1ft~
~;urn
s"J
tm
:Ef~
m.
~:tt~~~€,
RT~mm•~,
~~wm
~~"~M~$4~~m~Efl~~~~~~~
~fo
(~10)
~10
(Fig
10)
4.
Manual
lubrication
Li
CAUTION
CAlways
turn
off
the
power and unplug
the
machine
when
you apply
oil
by
hand.
Apply
two
or
three
drops
of
oil
to
needle
bar
3
by
hand
when
the
machine
is
used
for
the
first
time
or
left
unused
for
some
time.
(Fig
9)
I
HIGH
SPEED
SEWING
MACHINE
OIL
I
~9
(Fig
9)
5.Checking
oil
circulation
Once
the
machine has been
properly
filled
with
oil
,press
the
machine
treadle
to
run
the
machine and check
oil
gauge
window
4
to
see
if
the
oil
is
flowing.
(Fig
10)
A.
...
.:::6:::.
Lll
/.I,~
..
Gt
:frJt!:iT
~
i~
Si,
:%-&'
~~
~JiiJJ
tfl
EfJ
~
iJj
~
tljl:,
~~tm~JJ.~iJjtSff~_tf&:rzJ§~JtJ:if.
1.
iwtT3ft?§~'!'JUDt?.ffir:2,
3,
4.
2.
iwBcilZ:¥5.
J25:SiT
£~1;/t£~~6~1;/tt±:l
*o
~~~J§,
:fr~~~*Efl~~~,
~BeT
T£~1;/ti~~-
C~
12)
~12
CF
ig
12)
Silicone
oil
for
H.R.device
~
CAUTION
~
Always
turn
off
the
power and unplug
the
machine
when
you
fill
the
HR
device
with
silicone
oil.
Fill
silicone
oil
tanks
l,
2
with
silicone
oil.
To
prevent
thread
breakage
or
fabric
damage,
and
the
silicone
oil
before
it
is
too
low.
(Fig
11)
~11
(Fig
11)
Threading
~
CAUTION
Qt
Always
turn
off
the
power and unplug
the
machine
when
you
thread
the
machine.
l.Open eye guard 1 and
covers
2.
3 and
4.
2.Press
lever
5 and
bracket
6
comes
out
toward
you.
After
threading,
press
bracket
6
into
(Fig
12)

3.
(:${Q~B~~H
:
U1
)
(1!1
13
)
A~:
~~B~M
~
~~-Wffl~~~~*
·
8~~:
lt!i;
~~~
~
#~~~#~~€
,
~*~~'
~
lfff#T~#~.
c~~=
~lt!i;,
L.~itn~i;
ey
-
B~~~
~
~~~M€
,
~m~n~*
~t~l'lfH
.
•wm~~&~~~
~
~
,
~~~~~oo~
PJ~.
(!Ji!.
16
Di)
1!113
(
Fig
13)
3. In
case
the
machine
is
threaded
prev
ius
Iy
(
Fig15
)
A:
Kn
ot
t he p
reset
th
rea
d and the th
rea
d be
in
g
u
se
d
toget
her
to
th
rea
d t he mac
hin
e .
B:Needle
thread
Tri
m t he
kn
ots
off
n
eat
l y b
efore
p
assing
t h
ro
ugh the eye
of
the nee
dl
e
to
th
rea
d.
C:Looper
thread,
Top
cover
thread
Tr
im
the
kn
ots
off
n
eat
l y af t er p
assi
ng
th
ro
ugh the eye
of
t he l oop
er
.
Be su
re
to
th
rea
d the mac
hin
e
correct
l y by
referr
in
g
to
the th
rea
d
ing
d
iagr
am
. (
see
page
15)
~
1$i:lil::k:8{]~
at
ffl
,~;i;:~A::If
iP:J
o
~:
For more
stretchable
thr
ead.
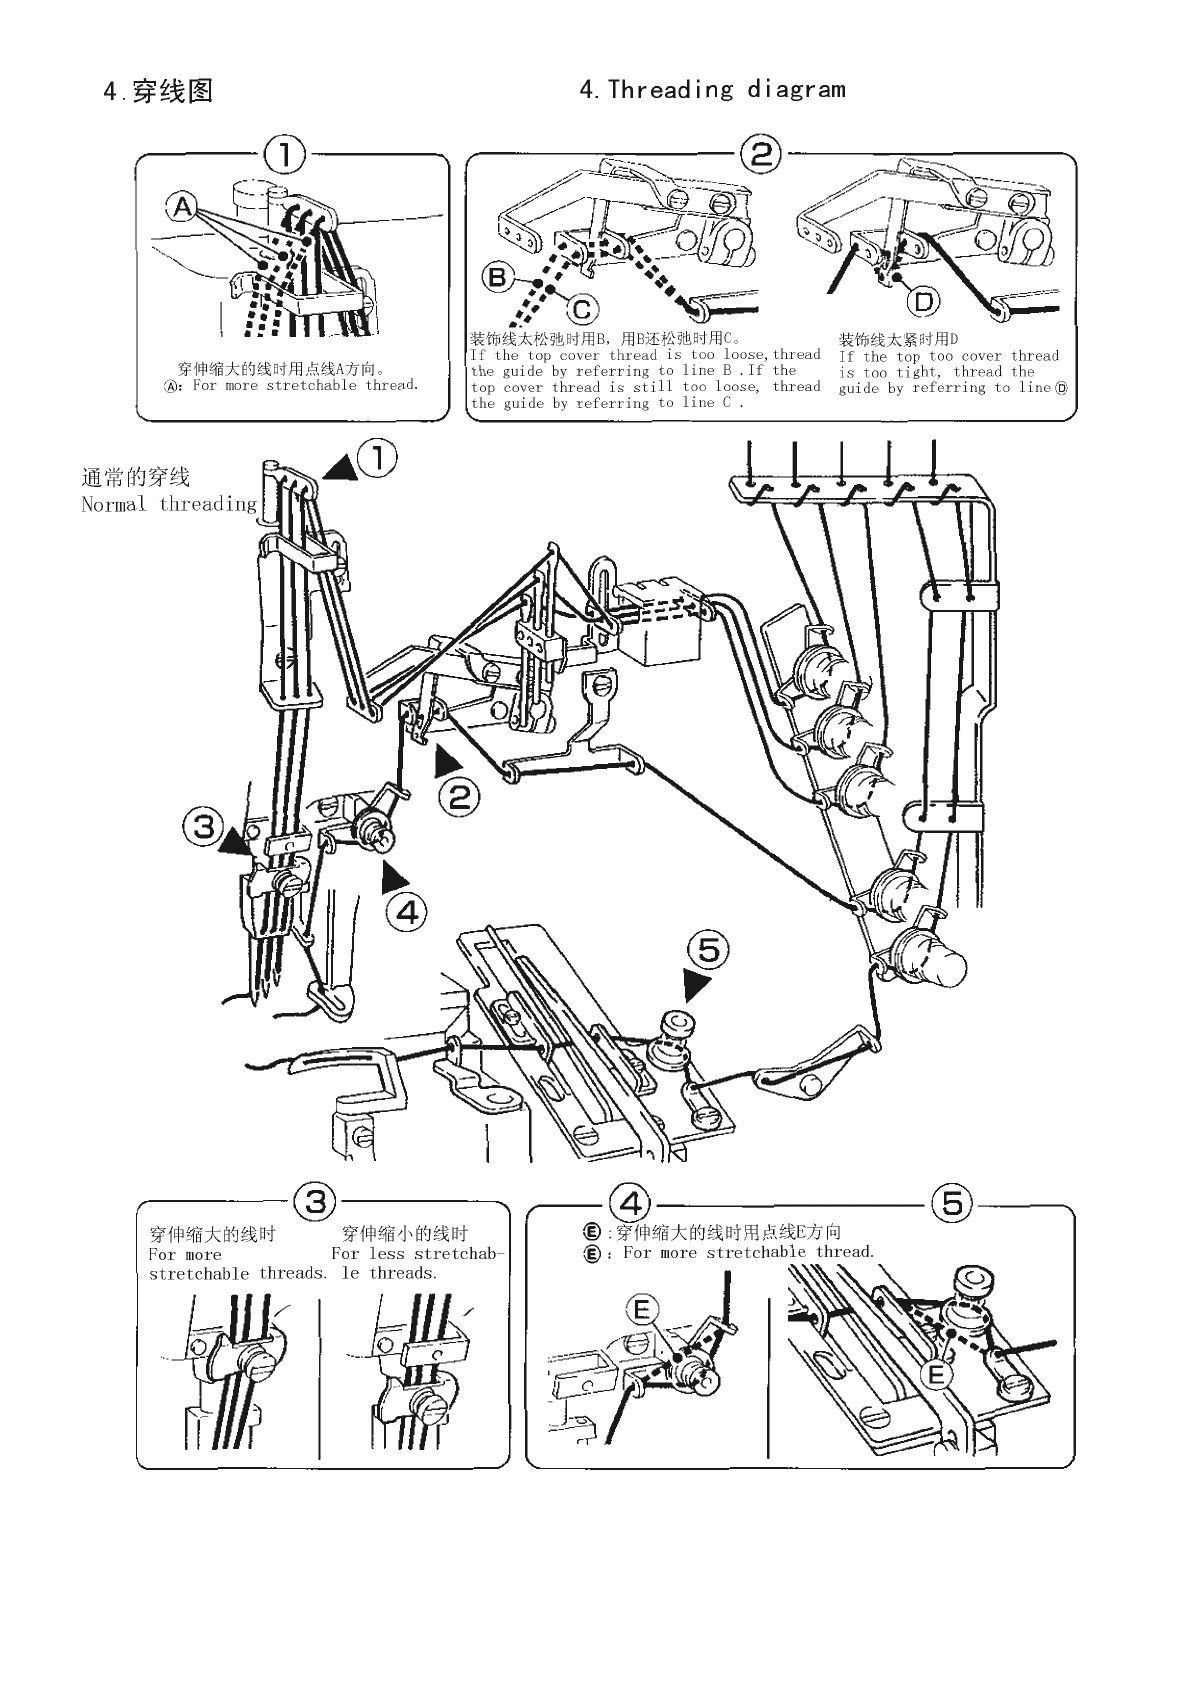
4.
Threading diagram
{'·
-·
-. ®
--
,
-
_-:
-
---::
-~
::::::-
-
-
~
--
:;.
··
--
-
---
- ._
-
_
~
s~~~
~~!j
_
.•
:
..
·"'@
·~
~~
-----
~'dii
~il:fl9iJ1MfflB
,
fflB:kE
;fl91J1M
ffl
Co
~'dii
~il:~
a
tfflD
If
the
top
cover
thr
ead
is
too
loos
e,
thread
If
the
top too
cover
thread
the
guid
e
by
refe
rri
ng
to
line
B .
If
the
is
too
tight,
thread
the
top
cov
er
thread
is
still
too
laos~
thread
guide
by
referr
ing
to
line@
the
guide
by
refe
rrin
g
to
line
C .
,--@------.....
,.---@----@-----...
~
1$
~:k
a"J~Bt
~
1$
~
1
H"J~Bt
@ :
~1$
~:ka"J
~BtJtL
8~E/7r'iJ
For
mor
e For l
ess
stretc
hab- @ :
Fo
r
mo
re
st
ret
chable thread.
stretc
hable
threads.
le
threads.
~
ff~~ffh~*~~~~~*fi,
#~~~ili
~~~~~m~~,
~~;~m~~~ffh~
'§:o
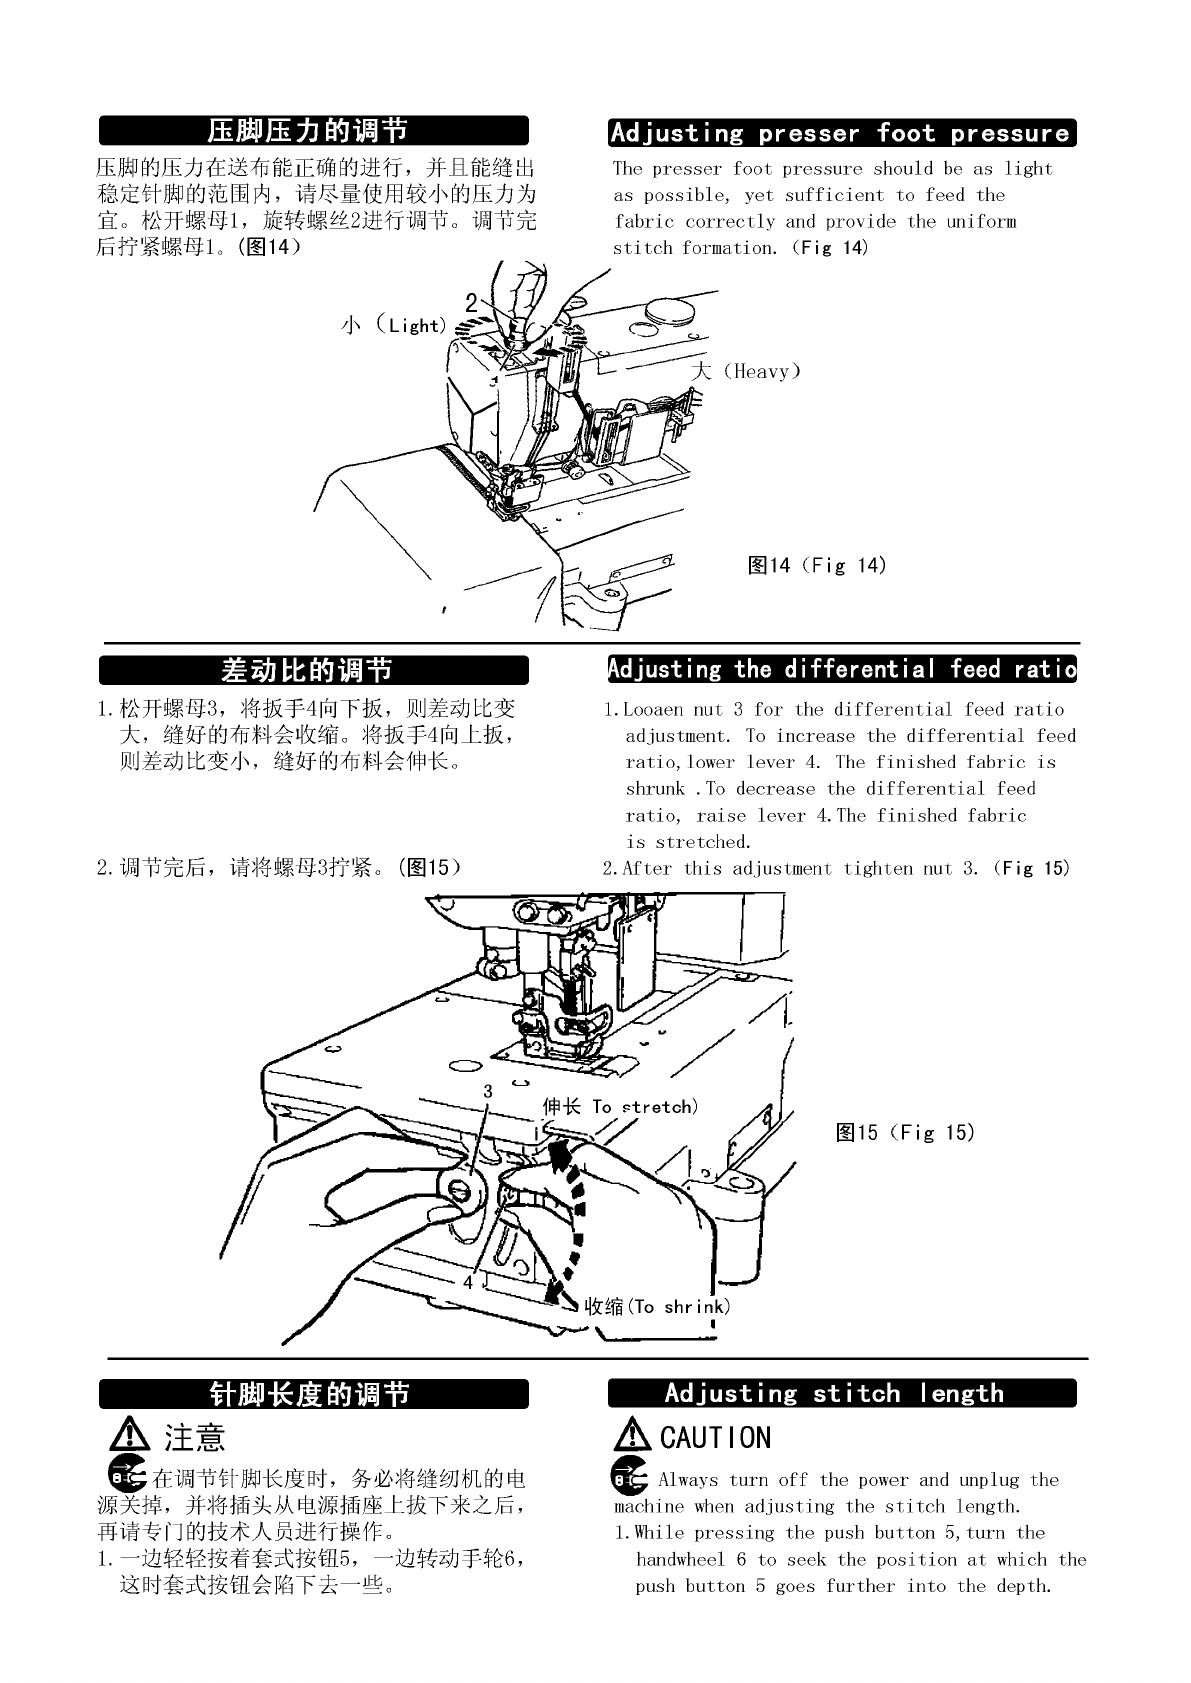
ttJf~J-BJ:l,
JJJE~~~f'f'2*1-JiJ1W1J
o
imJlJfG
J§rr~~~-BJ:L
c~14)
1.
tt7f~J-BJ:3,
~:iHlZ:¥4
rJ:iJ
TillL
lJlU&~JJ
tt1E
J:-:,
~ii~t~~*-l~t&mr
0
~:it:t&'¥4rJ:iJ_Lf&,
lJlU&~JJ
rt1E!J\'
~Ji~f~~*-l~1$*o
Adjusting
presser
foot
pressure
The
presser
foot
pressure
should
be
as
light
as
possible,
yet
sufficient
to
feed
the
fabric
correctly
and
provide
the
uniform
stitch
formation. (Fig
14)
~14
(Fig
14)
djusting the
differential
feed
ratio
l.Looaen
nut
3
for
the
differential
feed
ratio
adjustment.
To
increase
the
differential
feed
ratio,
lower
lever
4.
The
finished
fabric
is
shrunk .
To
decrease
the
differential
feed
ratio,
raise
lever
4.
The
finished
fabric
is
stretched.
2.After
this
adjustment
tighten
nut
3.
(Fig
15)
~15
(Fig
15)
Adjusting
stitch
length
A
cAUTION
~
Always
turn
off
the
power and unplug
the
machine
when
adjusting
the
stitch
length.
1.
While
pressing
the
push
button
5,
turn
the
handwheel 6
to
seek
the
position
at
which
the
push
button
5 goes
further
into
the
depth.
2.
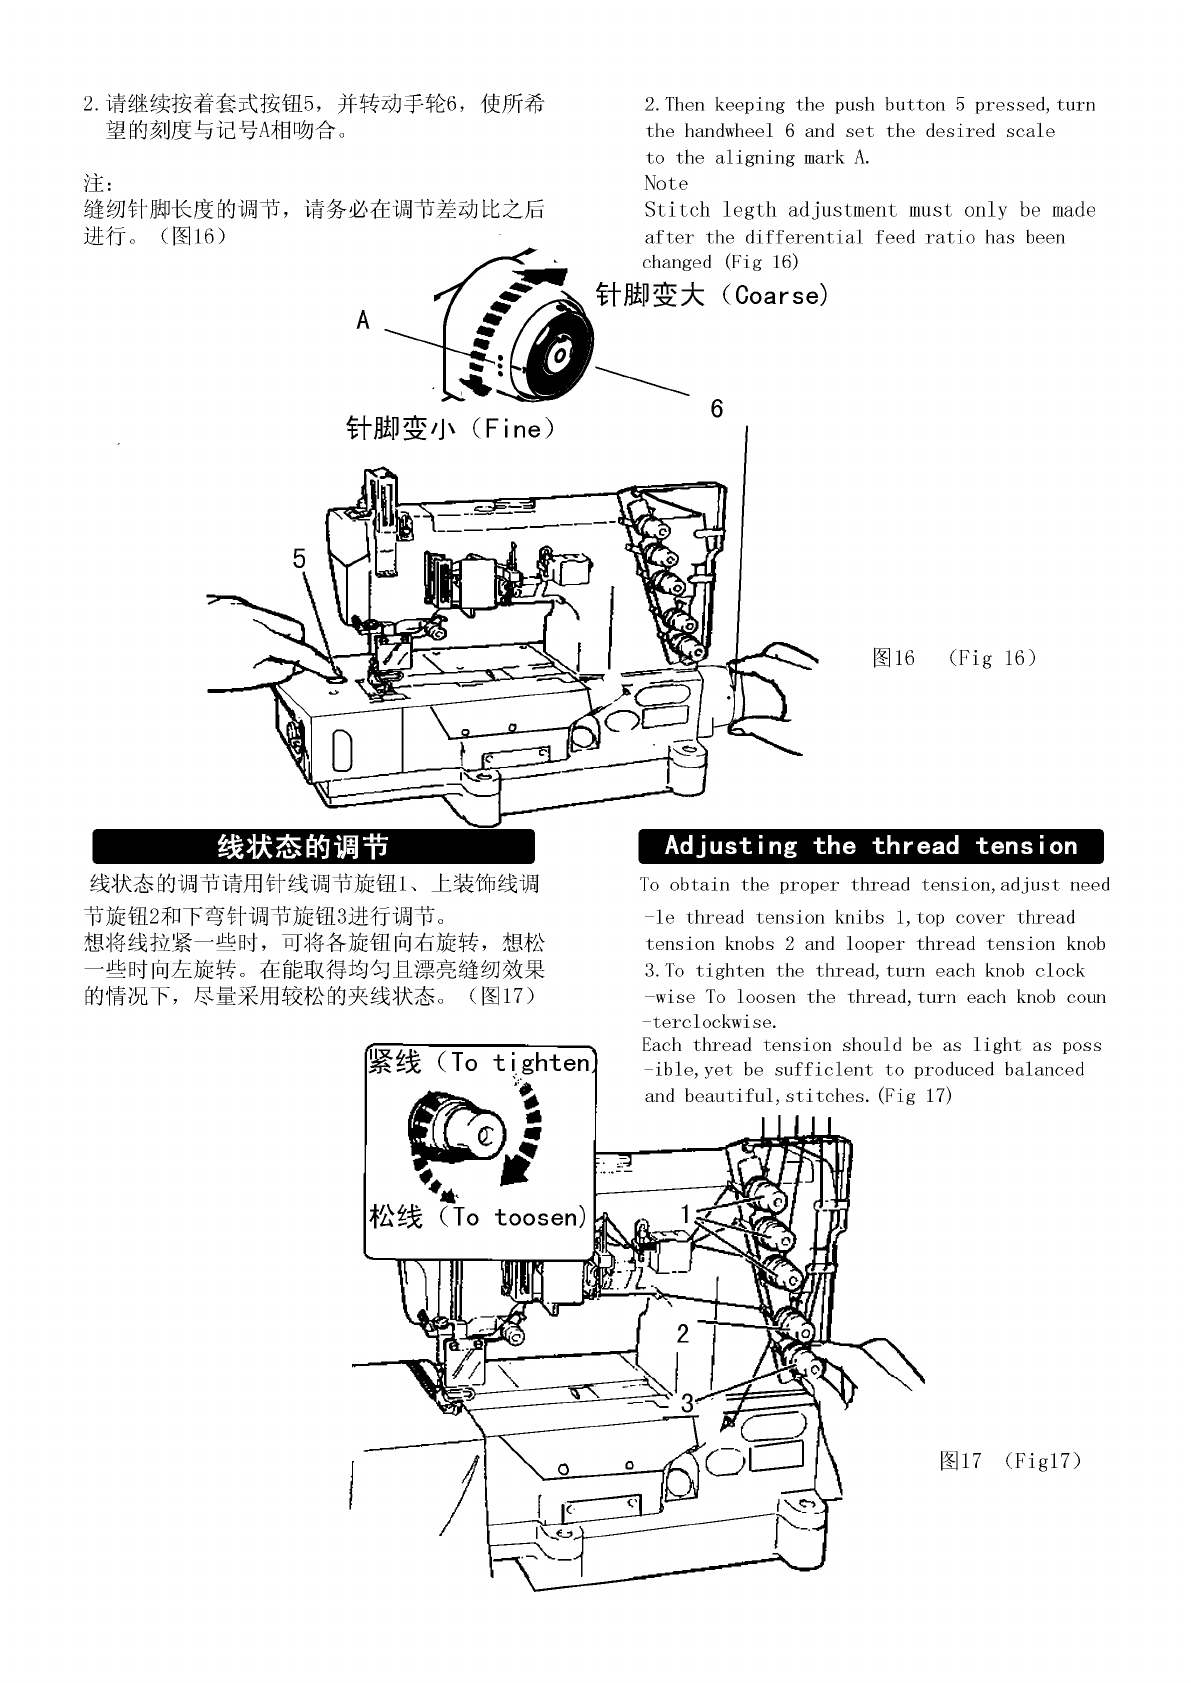
iJ~!*~~~~~:r\:~~Rs,
:3f~~)J:f-~6,
1~?JT$
-tfl
Efl
~u
tt
E1
ic
-5
Affi
om
il
0
~i:
~w~~*ltEfl~~,
~*~~~~~M~~€
Jtl:if
0 (
~
16)
2.
Then
keeping
the
push
button
5
pressed,
turn
the
handwheel 6 and
set
the
desired
scale
to
the
aligning
mark
A.
Note
Stitch
legth
adjustment
must
only
be
made
after
the
differential
feed
ratio
has been
~
changed (Fig
16)
71
,...
~t~PS£*
(Coarse)
~
A
..
• 0
.
~:
------
6
~t~PS£1j\
(Fine)
~~~Efl~~~m~~~~~m1.~~~~~
~JJJE~R2~DT~
~iJlll~JJJE~R3Jtl:1fiJlll~
o
m~~~~-®~,
ey~~~m~~~~,
m~
-@~~~~~o~~~~~~~~~~W~*
Efl'twiJGT,
~£*ffl~ttEfl:'k:iiAfi:~o
C~17)
~~~
(To
t i
ghten
~
·
-..
~i
..
-
•·
*]}~~
(To
too
sen)
~16
(Fig
16)
Adjusting
the
thread
tension
To
obtain
the
proper
thread
tension,adjust
need
-le
thread
tension
knibs
1,top
cover
thread
tension
knobs 2 and
looper
thread
tension
knob
3.
To
tighten
the
thread,
turn
each
knob
clock
-wise
To
loosen
the
thread,turn
each
knob
coun
-terclockwise.
Each
thread
tension
should be as
light
as poss
-ible,yet
be
sufficient
to
produced balanced
and
beautiful,
stitches.
(Fig
17)
~17
(Fig17)
1.
1J3f!W'!'J;fJZ4~DtSfi;fJZ5,
iritt7f~JtJ6,
iEPT'tt
;fJZ7
0
2.
iff
1H3
'tttJZ
Efl
2tJIUD*
::tH
3f
)jlfJ
II
o
3.
iJJtJ~JtT6iz:*'tt;fJZ7,
:3f
ll~i~IW'!'J;fJZ4~Dtm
fJZ5o
(~18)
A..
'"'
__.__
L.ll
/I~
El!;
:tt~~tfl'ttSi,
~&'~~Hii~JJ;fJlE!j
~iJj~j:ljl:,
~~Hm~JA
~iJjtSff~_LW:T
*ZJ§
~
Jtl:if
0
1.
ii1~fflwfr3
c1.
smm)
EfJ;\}MJf'f'JJtt7f[llli5E~J
tTL
2.
JtJ
JYft
wI~
;f§
EfJ
tl.:=t"
~:it
IB
'tt
.!lZ
T *o
3.
~:it
tfl
'tt
Efl
[!I]
tl!l!
~jj
~
~ii
~JJ
tfl
J§
00
Jt!:
if
iz:
* o
4.
JtJtl.:=t-~:it¥JT'tttmA~U'ttfiT!FJLEfl~~~L
s.
~J§1~fflwfr3
c1.
smm)
EfJ;\ftl~Jf'f'JJrr~[llli'!E
~Jtrlo
(~19)
Cleaning
the
machine
Li
AUTION
El!;
~lways
turn
off
the
power
and
unplug the
machine
when
you
clean
the machine.
1.0pen
front
cover 4
and
slide
plate
5.
Loosen
screws 6
and
remove
needle
plate
7.
2.Clean the grooves of the needle
plate
and
the
area
around the feed dogs.
3.Replace needle
plate
7 with screws
6.
Then
close
front
cover 4
and
slide
plate
5.
(Fig
18)
~
18
(Fig
18)
Replacing
the
needle
Li
CAUTION
EI!;
Always
turn
off
the
power
and
unplug the
machine
when
you
replace
the
needle(s).
1.Loosen screw(s) 1 using a red-handled key
wrench (1.
5mm).
2.Remove
the old needle(s)
by
using a
pincette
(provided as
accessories).
3.Fix
the needle so
that
its
scarf
faces the
rear
side
of machine.
4.
Insert
a
new
needle
into
the needle hole as
far
it
will
go
by
using a
pincette.
5.
Tighten screw(s) 1 using a red-handled key
wrench (1.
5mm).
(Fig
19)
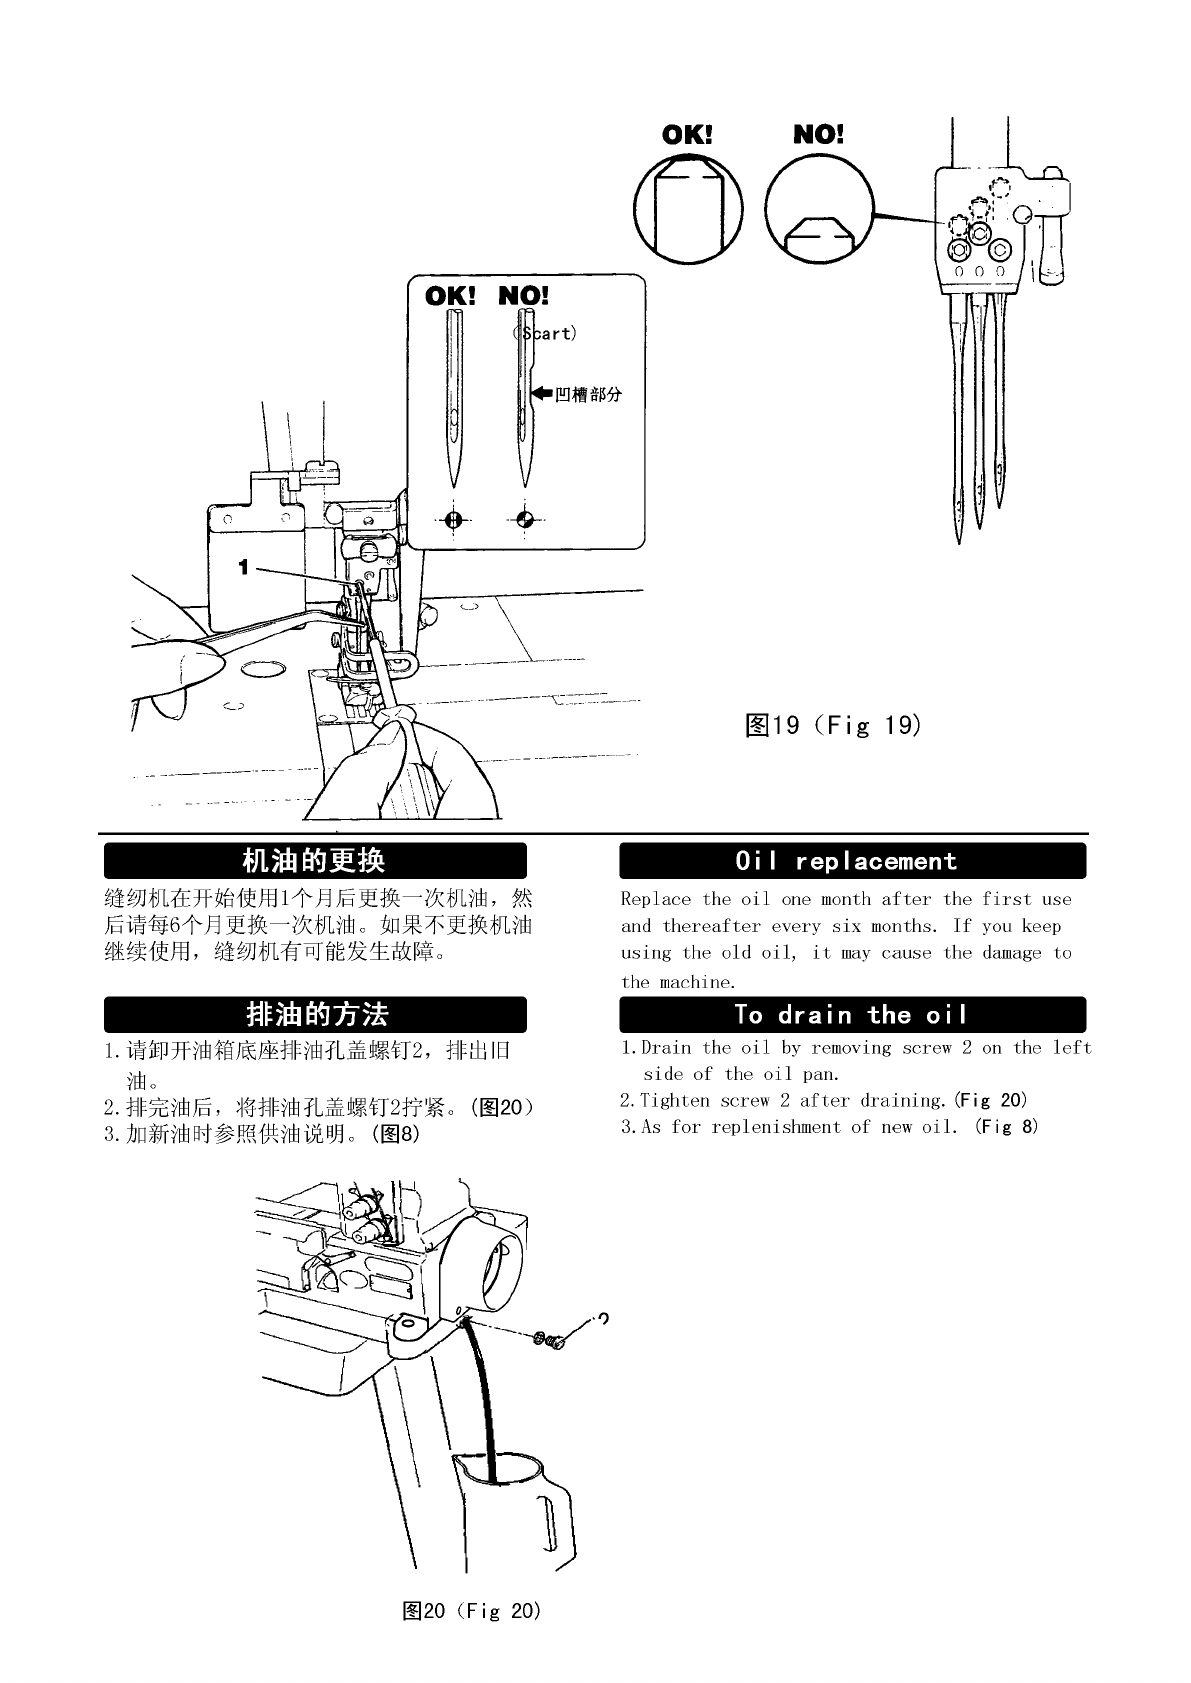
OK!
NO!
·+··+·
.
---
-
----
~wm~H~~m~~~€~~-~m~,
~
€~~6~~~~-~m~o~*~~~m~
~JH~1~ffl,
~ii~JJtfl1fPJ~~bt!±.iOI:Il!iio
1.
iJiEPH~ffi;f§Jf£~flF~ffi:JL.ffirJJ!fJ2,
flFt±:liB
~rn
0
2.
flF5c~rn€,
~:itflF~ffi:JL.ffirJJtr2rr~
0
c~2o)
3.
1JP¥JT~ffiSi~~'(jt~ffii£a)j
o
(~8)
~20
(Fig
20)
OK!
NO!
0
~19
(Fig
19)
0 i I
rep
I
acement
Replace
the
oil
one month
after
the
first
use
and
thereafter
every
six
months.
If
you keep
using
the
old
oil,
it
may
cause
the
damage
to
the
machine.
To
drain
the
o i I
l.Drain
the
oil
by
removing screw 2
on
the
left
side
of
the
oil
pan.
2.
Tighten
screw 2
after
draining.
(Fig
20)
3.
As
for
replenishment
of
new
oil.
(Fig
8)
Table of contents
Other Hikari Sewing Machine manuals

Hikari
Hikari H9199 Product guide

Hikari
Hikari H99S User manual

Hikari
Hikari HX6800TD User manual

Hikari
Hikari HW740TA Owner's manual

Hikari
Hikari H9300 Series User manual

Hikari
Hikari HK2900 User manual

Hikari
Hikari H8800E User manual

Hikari
Hikari H93SF-7D User manual

Hikari
Hikari H9990 User manual

Hikari
Hikari H8800-7P User manual


Popular Sewing Machine manuals by other brands


Singer
Singer 4423CL instruction manual

Duerkopp Adler
Duerkopp Adler 524-101 Spare parts

frister & rossmann
frister & rossmann EURO-21 instruction manual

Dürkopp Adler
Dürkopp Adler 884-xxx-M series Service instructions

Brother
Brother KE-430D Service manual

Singer
Singer 119W2 Instructions for using and adjusting