Hikari HX6800TD User manual

- 1 -
目录
一、 显示及操作界面 …………………………………………2
二、 用户区参数的修改 ………………………………………3
三、 自动/半自动模式的修改…………………………………3
四、 吸气模式的修改 …………………………………………3
五、 剪线模式的修改 …………………………………………3
六、 拉布模式的修改 …………………………………………3
七、 抬压脚模式的修改 ………………………………………3
八、 最高转速的修改 ………………………………………3~4
九、 用户及技术区参数的修改 ………………………………4
十、 操作参数说明表 ………………………………………4~7
十一、 电控相关的要求及操作使用注意事项………………8

- 2 -
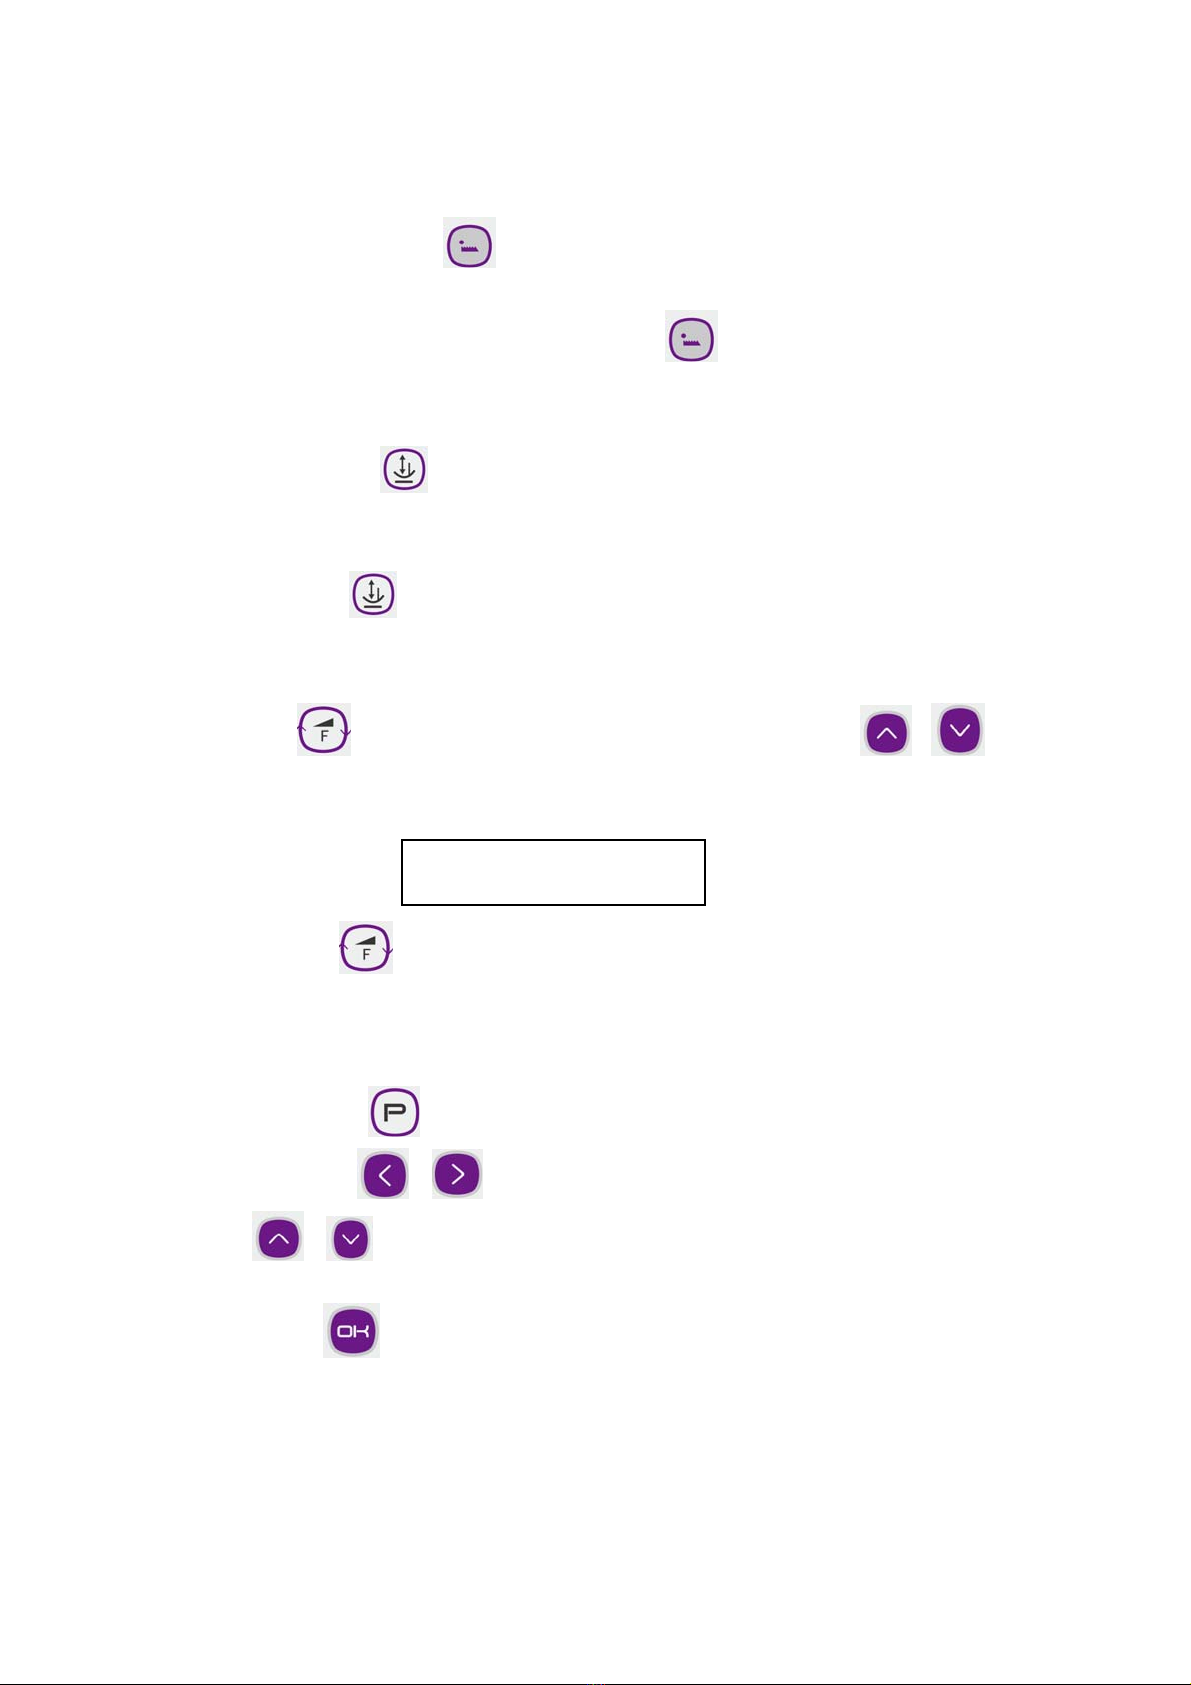
一、显示及操作界面
序号 图标 说明 备注
1 用户参数设定键 点按为选择参数的快揵;长按为设值
参数的快揵
2 左移键
3 技术参数设定键/速度设定键 点按为选择参数的快揵;长按为设值
参数的快揵
4 上移键
5 确认键
6 下移键
7 右移键
8 LED 亮度调整键 点按为选择参数的快揵;长按为设值
参数的快揵
9 模式转换键 点按为选择参数的快揵;长按为设值
参数的快揵
10 剪线模式调整键 点按为选择参数的快揵;长按为设值
参数的快揵
11 吸气模式调整键 点按为选择参数的快揵;长按为设值
参数的快揵
12 拉布模式调整键 点按为选择参数的快揵;长按为设值
参数的快揵
13 抬压脚模式调整键点按为选择参数的快揵;长按为设值
参数的快揵

- 3 -
二、用户区参数的修改
当用户长按下 键时,进入用户参数模式;通过按键 、 修改对应的
参数号,通过按键 、修改对应的参数值,按键确认。显示相应的
参数序号及参数内容;当用户点按下 键,退回到待机界面。
三、自动/半自动模式的修改
当用户点按下 键时,进入人工、半自动和全自动模式的修改状态,不断
按键时,模式循环如以下三种状态:人工、半自动和全自动;长按 键时,相关
参数调整的快揵键。
四、吸气模式的修改
当用户点按下 键时,即可修改吸气模式。不断点按时,模式循环如以下
几种状态:前吸气、后吸气、前后吸气、关闭;长按 键时,相关参数调整的快
揵键。
五、剪线模式的修改
当用户点按下 键时,即可修改剪线模式。不断点按时,模式循环如以下
几种状态:前剪线、后剪线、前后剪线、关闭;长按 键时,相关参数调整的快
揵键。
六、拉布模式的修改
当用户点按下 键时,即可修改拉布模式。不断点按时,模式循环如以下
几种状态:前拉、后拉、全拉、拉轮关闭;长按 键时,相关参数调整的快揵键。
七、抬压脚模式的修改
当用户点按下 键时,即可修改抬压脚模式。不断点按时,模式循环如以下几
种状态:前抬压脚、后抬压脚、前后抬压脚、关闭;长按 键时,相关参数调整
的快揵键。
八、最高转速的修改
按一下 键即可进入最高转速修改模式。按键 、 可以修改最高速度,

- 4 -
按一下递增/减100rpm。显示如下:
长按 键时,相关参数调整的快揵键。
九、用户及技术区参数的修改
当用户长按住 键不放,则显示“密码:0000 ”。要求用户输入参数密码,用户通
过按键 、 修改对应的密码位。通过按 键、 修改对应的密码值。
每调整一个密码值,对应的字符位显示相应的数值。密码输入完成后,按 键确认。
若密码输入正确,则进入用户及技术参数修改模式。显示相应的参数序号及参数
内容。
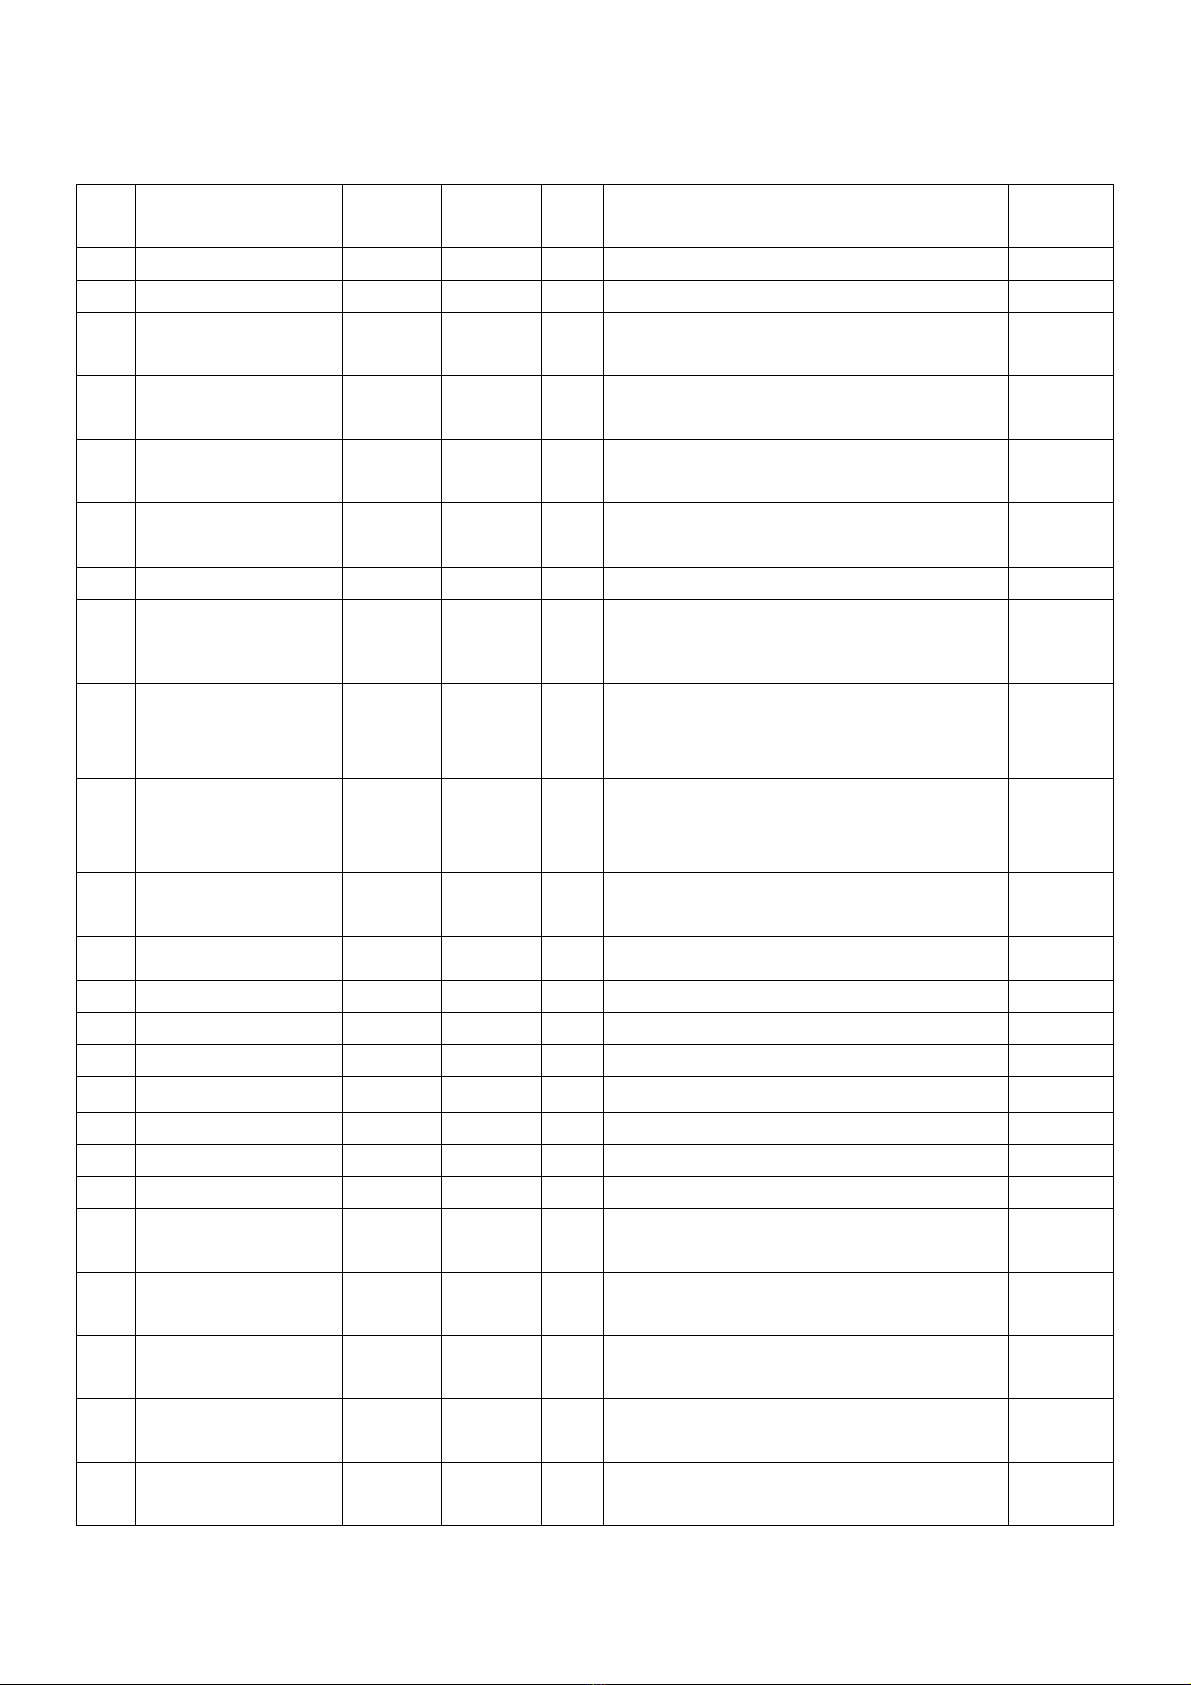
十、操作参数说明表
序号 功能参数 默认值 设定范围 单位 参数说明 备注
U1 工作模式 0 0~1
0:半自动 1:全自动
U2 电眼选择 1 0~1
0:关闭 1:开启
U3 自动剪线 3 0~3
0:关闭剪线 1:前剪线开
2:后剪线开 3:前、后剪线开
U4 自动吸气 3 0~3
0:关闭吸气 1:前吸气开
2:后吸气开 3:前、后吸气开
U5 自动吸屑 0 0~3
0:关闭吸屑 1:前吸屑开
2:后吸屑开 3:前、后吸屑开
预留
U6 自动抬压脚
0 0~3
0:关闭自动抬压脚 1:前抬压脚
2:后抬压脚 3:前、后抬压脚
U7 松线开关 1 0~1
0:关闭 1:开启 KSC
松线开关 3 0~3
0:关闭 1:前松线开
2:后松线开 3:前、后松线开
83BL
U8 吸线开关 3 0~3
0:关闭 1:前吸线开
2:后吸线开 3:前、后吸线开
83BL
U9 半自动动作 2 0~3
0:普通缝 1:略(必须先踩踏板
再放布)2:连续缝 3:自由缝
U10 半自动速控模式 0 0~1
0:关闭 1:开启
U11 电机调速锁定 0 0~1
0:关闭 1:开启
U12 最高速度 5800 200~7000 RPM
U13 按键音 1 0~1
0:关闭 1:开启
U14 运行锁 1 0~1
0:关闭 1:开启
最高转速 5800 rpm
- 5 -
U15 起缝速度 5000 200~6000 RPM 根据客户需求适当自行做调整
U16 起缝针数 10 0~200
根据客户需求适当自行做调整
U17 吸气自动调整 0 0~1
0:关闭 1:开启 预留
U18 中途吸气模式 0 0~2
0:关闭 1:长吸气 2:间吸气
U19 间歇吸气开启针数 25 0~1000
U20 间歇吸气关闭针数 25 0~1000
U21 两传感器间针数 55 0~99
U22 前剪线延迟针数 20 0~100
“10” 根据要求客户可自行调整参数
U23 后剪线延迟针数 10 10~250
“10” 根据要求客户可自行调整参数
U24 前吸气开启针数 1 1~99
根据要求客户可自行调整参数
U25 前吸气关闭针数 1 1~99
根据要求客户可自行调整参数
U26 后吸气开启针数 1 1~99
根据要求客户可自行调整参数
U27 后吸气关闭针数 200 10~9999ms
根据要求客户可自行调整参数
U28 吸屑启动针数 0 0~99 预留
U29 吸屑关闭针数 0 0~99 预留
U30 松线开启针数 0 0~99
U31 松线关闭针数 250 0~5000
U32 松线运行针数 10 0~99
U33 松线运行速度 5000 200~6000
U34 连续布料间针数 0 0~99 预留
U35 间歇吸屑开启针数 5 2~99 预留
U36 间歇吸屑关闭针数 5 2~99 预留
U37 传感器检测模式 0 0~2
0:常规模式 1:网布模式
2:自适应模式
U38 自动停车 0 0~2
0:关闭 1:开启 2:自动计算停车
U39 停车延迟针数 12 5~200
根据要求客户可自行调整参数
U40 前抬压脚延迟时间 0 0~6000
U41 前抬压脚保留时间 180 5~6000 MS
U42 后抬压脚启动时间 0 0~6000
U43 后抬压脚保留时间 500 0~9999
U44 预留 0
U45 中途间歇吸屑停留 350 0~9999 预留
U46 自动切刀保留时间 40 15~9999
根据要求客户可自行调整参数
U47 后踏吸气时间 500 50~9999
U48 后踏剪线时间 45 0~5000
U49 手动吸气时间 10 10~5000
U50 手动切线时间 60 0~5000
U51
后踏吸气开关
0 0~7
0全关;1 人工开;2 半自动开;3 全
自动开;4 人工和半自动开;5 半自
动和全自动开;6 人工全自动开;7
人工、半自动和全自动开

- 6 -
U52 后踏剪线开关
1 0~7
0全关;1 人工开;2 半自动开;3 全
自动开;4 人工和半自动开;5 半自
动全自动开;6 人工和全自动开;7
人工半、半自动和全自动开
U53 手动吸气开关
7 0~7
0全关;1 人工开;2 半自动开;3 全
自动开;4 人工和半自动开;5 半自
动和全自动开;6 人工全和自动
开;7 人工、半自动和全自动开
U54 手动切线开关
7 0~7
0全关;1 人工开;2 半自动开;3 全
自动开;4 人工和半自动开;5 半自
动全自动开;6 人工全自动开;7 人
工半自动全自动开
U55 手动切线动作有效 0 0~2
0 无布时动作;1 有布时动作 ;2
随时动作
U56 手动松线动作有效 0 0~2
0 无布时动作;1 有布时动作 ;2
随时动作
U57 后踏切线动作有效 0 0~2
0 无布时动作;1 有布时动作 ;2
随时动作
U58 后踏松线动作有效 0 0~2
0 无布时动作;1 有布时动作 ;2
随时动作
U59 后踏松线开关
0 0~7
0全关;1 人工开;2 半自动开;3 全
自动开;4 人工和半自动开;5 半自
动全自动开;6 人工全自动开;7 人
工半自动全自动开
U60 手动松线开关
0 0~7
0全关;1 人工开;2 半自动开;3 全
自动开;4 人工和半自动开;5 半自
动全自动开;6 人工全自动开;7 人
工半自动全自动开
U61 侧吸切刀传动 0 0~1
0:电机传动 1:电磁铁传动 预留
U62 拉轮模式 3 0~3
0:拉布功能关闭;1:前拉;
2:后拉;3:全拉
U63 前拉布轮开启针数 12 0~100
前松线开启针数 0 0~100 83BL
U64 前拉布轮关闭针数 35 5~100
前松线关闭针数 1 1~100 83BL
U65 后拉布轮开启针数 1 0~100
后松线开启针数 0 0~100 83BL
U66 后拉布轮关闭针数 25 5~100
后松线关闭针数 800 5-9000
Ms 83BL
U67 刹车拉轮位置 0 0-1
0:中途停止不抬;
1:中途停止拉轮抬起、放下
U68 前吸线开启针数 1 0~99
根据客户需求适当自行做调整 83BL
- 7 -
U69 前吸线关闭针数 25 0~99
根据客户需求适当自行做调整 83BL
U70 后吸线开启时间 300 0~359 83BL
U71 后吸线关闭时间 580 0~9000 83BL
U72 后踏吸气时间 580 0~9000 83BL
U73 速度调控 4200 200~6000 83BL
U74 预留 0
U75 刹车针杆位置
0 0~1
0:缝制中途上针位,缝制结束
停上针位 1:缝制中途下针位,
缝制结束停上针位;
U76 全自动启动模式 0 0~1 0:光感应 1:脚控
U77 前通道响应时间 30 30~500
U78 中通道响应时间 20 20~200
U79 后通道响应时间 5 2~200
U80 前通道灵敏度 65 0~99
根据要求客户可自行调整参数
U81 中通道灵敏度 60 0~99
根据要求客户可自行调整参数
U82 后通道灵敏度 40 0~99
根据要求客户可自行调整参数
U83 前通道响应值 30 5~120
U84 中通道响应值 40 5~120
U85 后通道响应值 40 5~120
U86 安全开关
5 0~7
0全关;1 人工开;2 半自动开;3 全
自动开;4 人工和半自动开;5 半自
动全自动开;6 人工和全自动开;7
人工、半自动和全自动开
U87 压脚安全开关电平 0 0~1
0:开启 1:取消开关
U88 缝台安全开关电平 0 0~1
0:开启 1:取消开关
U89 压脚保护时间 30s 5~9999s
U90 界面恢复时间 120 0~9999 0~~9999:
U91 背光对比度 3 0~6
U92 背光亮度 3 0~6
U93 机头灯亮度 3 0~6
U94 参数密码 0~9999
U95 恢复出厂设置 0 0~9999
U96 语言 0 0~4 0:中文 1:英文
U97 软件版本 1 0~9999
U98 软件版本 2 0~9999
U99 软件版本 3 0~9999

- 8 -
十一、电控相关的要求及操作使用注意事项
0.主要技术数据
供电电压范围:AC220V±15%
供电电源频率:50Hz/60Hz
1、安全注意事项
1.1 使用范围
本伺服控制器是为工业缝纫机开发设计的,如果在其它方面使用,请注意使
用者的安全。
1.2 工作环境
1.2.1 电源电压请遵照电控电压±15%范围内。
1.2.2 请远离高频电磁波发射器等,以免所产生的电磁波干扰本控制器
而发生错误动作。
1.2.3 温湿度 :
a.请在室温 5°C 以上、 45°C 以下的场所操作。
b.禁止在日光直接照射的场所或室外运作。
c.请不要过于接近暖气 (电热器) 旁运作。
d.请保持 30 % ~ 95 % 相对湿度(无凝露)。
1.2.4 请不要在可燃气体或爆炸物附近操作。
1.3 安装
1.3.1 控制器请遵照说明书进行正确安装。
1.3.2 安装前请先关闭电源并拔掉电源线插头,然后进行安装。
1.3.3 装钉电源线时请避免靠近会转动部件,最少要离开3公分以上。
1.3.4 为防止噪声干扰或触电事故,请将缝纫机、控制箱接地。
1.3.5 打开电源之前,确定此供应电压必须符合电控指定电压±15%范围内。
1.4 保养维修的规定
1.4.1 在操作保养或维修动作前,请先关闭电源。
1.4.2 当翻抬机头,更换机针或穿线时,请确认电源已关闭。
1.4.3 控制箱里面有危险高压电,所以关闭电源后要等 5 分钟以上方可打开控
制箱。
1.4.4 修理及保养的作业,要请经过训练的技术人员执行。
1.4.5 不能在电机及控制箱运转的狀态下进行保养或维修。
1.4.6 所有维修用的零件,须由本公司提供或认可,方可使用。
- 9 -
1.5 危险提示
这个标示符号表示机器在安装时,安全上需要
特别加以注意的事项,忽视此标记而进行错误操作
可能会导致人员或是机器损伤。
1.6 其它安全规定
1.6.1、在第一次接通电源后,请先以低速操作缝纫机并检查转动方向是否正确。
1.6.2、缝纫机运转时,请不要去触摸手轮、机针等会动作的部位。
1.6.3、所有可动作的部份,必须以所提供的防护装置加以隔离,防
止身体接触,请勿在装置内塞入其它物品。
1.6.4、请不要在拆下电机护罩及其它安全装置的情形下操作。
1.6.5、不要使电机或控制箱掉在地上。
1.6.6、不要让茶水等液态物体流入控制箱或电机内部。
2. 安装与调整
2.1 控速器的安装
1).将脚踏控速器安装于台板下方 2). 将踏板与控速器安装连结 3).安装后示
意图
2.2 停针位的调整
2.2.1、 由专业的技术人员通过操作界面的学习界面,可调整到合理的停针位置;
- 10 -
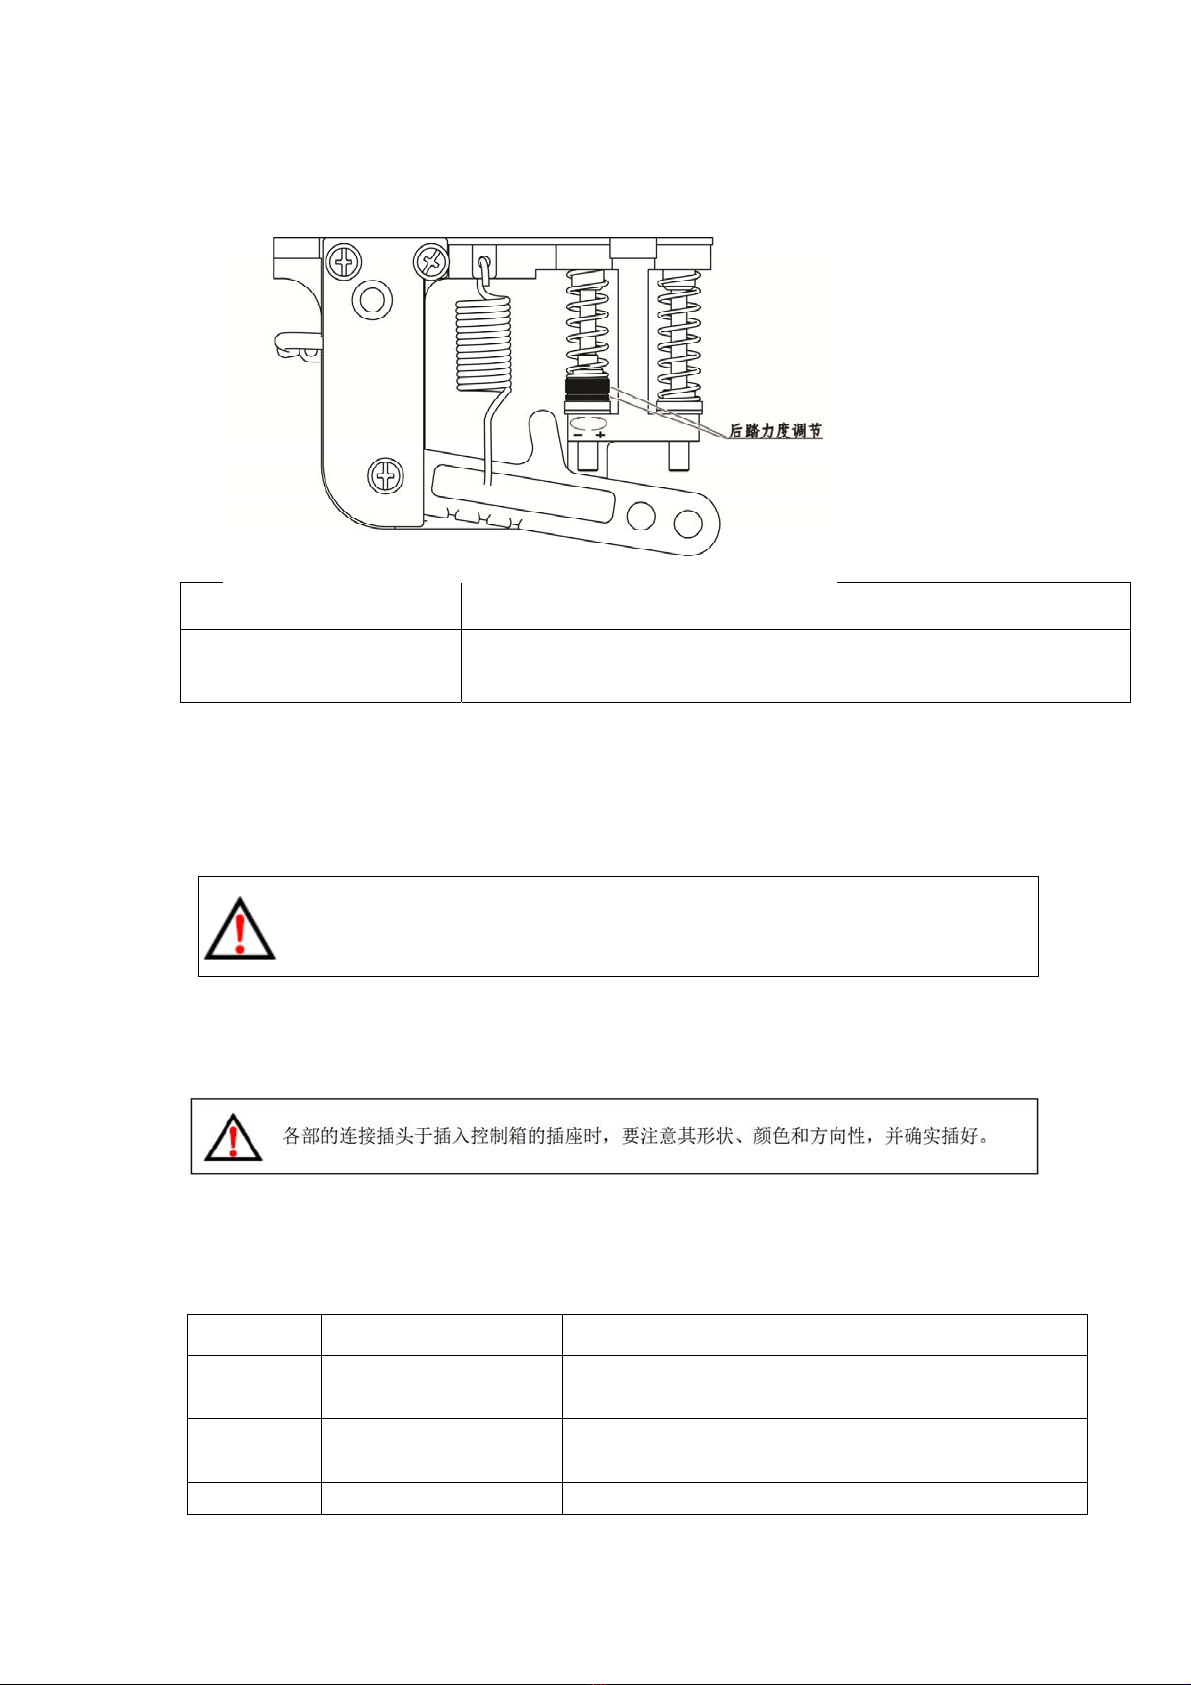
2.3 脚踏板后踏力量的调整
调整需求
调整结果
踏板后踏力量的调整
当螺栓愈向上时,则后踏力量愈重。当螺栓愈向下时,则后踏力量愈轻。
3. 接线与接地
3.1 电源线的接法
本控制器适用于AC220V单相电源,电压输入范围为电控电压±15%。
注意:
黄/绿色电源线为接地线,为了人员安全及设备可靠工作,一定要
做好系统的接地工程。
3.2 控制器接线端子图:(略)
图2-1
4. 故障分析和故障表
故障显示代码 故障原因 故障排除方法
E1 系统故障 断电后检查机头是否卡住,然后重新上电,如果还不能解决,请
联系售后服务人员
E2 系统过压 请检查电源电压是否正常。如果电源电压高于 265V,请关机,等
电源电压恢复正常再开机
E3 系统欠压 请检查电源电压是否正常。如果电源电压低于 160V,请关机,等

- 11 -
电源电压恢复正常再开机
E4 电机码盘故障 请检查电机连线是否正常。
E5 系统故障 重新上电,如果还不能解决,请联系售后服务人员
E6 系统故障 重新上电,如果还不能解决,请联系售后服务人员
E7 电机缺相 请检查电机电源线是否脱落或松动。
E8 电机堵转 1、请检查机头是否被卡住
2、电机电源端子脱落或松动
E9 电机过载 1、请检查机头是否被卡住
2、请检查布料是否太厚
E10 电机码盘故障(电角度错误) 请检查电机码盘线是否松动
E12 脚踏脱落故障 请检查电机脚踏连接线是否松动
E13 脚踏上电时被踩下 请检查电机脚踏是否被卡住
E16 电机通讯故障
1.电机重新标定;
2.检测电机电源线是否松动;
重新上电,如果还不能解决,请联系售后服务人员
E17 电磁铁过流故障 电磁铁故障,请检查电磁铁是否损坏或短路。
E15、E18 刹车控制电路故障 请检查刹车电阻连接线是否松动
E19、E20、E21 定位系统故障
电机可继续运转,但无针数记数、针位定位及电磁铁无输出功能
请检查手轮传感器连线是否正常。
请检查机头是否被卡住。
E22 上位机通信故障 请检查控制面板与驱动器的连线是否正常
E23 EEPR0M 故障 重新上电,如果还不能解决,请联系售后服务人员
......
E33 接口板通讯故障 重新上电,如果还不能解决,请联系售后服务人员
E34 接口板效验故障 重新上电,如果还不能解决,请联系售后服务人员
E35 压脚安全开关断开 请检查压脚安全开关
E36 缝台安全开关断开 请检查缝台安全开关
E37 操作故障 按模式键切换人工模式或半自动模式,解除报警,以当前模式正
常缝纫;
E38 版本查询限制 请联系售后服务人员
E39 上位机 EEPR0M 故障 重新上电,如果还不能解决,请联系售后服务人员
E40 电磁铁过流(包缝机) 电磁铁故障,请检查电磁铁是否损坏或短路。
E41 传感器故障 传感器接收外部频率信号
5.此说明书仅作参考,如有更改恕不另作通知。

- 12 -
Contents
1、Display and operation panel............................................... - 2 -14
2、Modification of user parameters................................................14
3、Modification of auto & semi-auto mode ...................................14
4、Modification of the suction mode..............................................14
5、Modification of the trimming mode ....................................14~15
6、Modification of the cloth-pulling mode.....................................15
7、Modification of the mode for lifting presser foot......................15
8、Modification of the max speed..................................................15
9、Modification of the parameters for user and technicians...........15
10、Form of the operation parameters.......................................16~20
11 、Electrical control related requirements and operating
precautions..............................................................................20~24

- 13 -
1、Display and operation panel
No. Icon Explanation Notes
1 Parameter setting Click the shortcut key to select the
parameter, long press the shortcut
key for setting the parameter.
2 Left-Moving
3
Technical parameter setting
/Speed setting
Click the shortcut key to select the
parameter, long press the shortcut
key for setting the parameter.
4 Up-moving
5 Confirm
6 Down-moving
7 Right-moving
8 Light brightness setting Click the shortcut key to select the
parameter, long press the shortcut
key for setting the parameter.
9 Mode-shift Click the shortcut key to select the
parameter, long press the shortcut
key for setting the parameter.
10 Trimming mode Click the shortcut key to select the
parameter, long press the shortcut
key for setting the parameter.
11 Suction mode Click the shortcut key to select the
parameter, long press the shortcut
key for setting the parameter.
12 Puller mode Click the shortcut key to select the
parameter, long press the shortcut
key for setting the parameter.
13 the mode of lifting presser foot Click the shortcut key to select the
parameter, long press the shortcut
key for setting the parameter.

- 14 -
2、Modification of user parameters
When the user long press , enter the user parameter mode;Through ,
modify the corresponding parameter number; Through , modify the
corresponding parameter number; Confirm with ;When the user clicks ,
it will return to the standby interface.
3、Modification of auto & semi-auto mode
When the user clicks , enter the manual, semi-automatic and fully
automatic mode of modification; When the keys are cycled, the modes are circulated
in the following three states: manual, semi-automatic and fully automatic;Long press
,related parameters to adjust the shortcut keys.
4、Modification of the suction mode
When the user clicks , you can change the inspiration Inhale mode; When
the keys are cycled, the modes are circulated in the following states::Front suction
back suction, front-back suction, off; Long press , related parameters to adjust
the shortcut keys.
5、Modification of the trimming mode
When the user clicks ,You can modify the trimming mode .When the keys
are cycled, the modes are circulated in the following states:Front trimming, back
trimming , front-back trimming , off;Long press , related parameters to adjust
- 15 -
the shortcut keys.
6、Modification of the cloth-pulling mode
When the user clicks ,You can modify the cloth-pulling mode。When the
keys are cycled, the modes are circulated in the following states:Front pulling, back
pulling, whole pulling , pulling off;Long press , related parameters to adjust
the shortcut keys.
7、Modification of the mode for lifting presser foot
When the user clicks ,You can modify the mode of lifting presser foot; When the
keys are cycled, the modes are circulated in the following states:Front lifting presser
foot , back lifting presser foot lift, front-back lifting presser foot. Lifting presser foot
off;Long press , related parameters to adjust the shortcut keys.
8、Modification of the max speed
Press to enter the maximum speed modification mode; Through ,
You can change the maximum speed,ClickAdd / Reduce 100rpm, display as follows:
Long press , related parameters to adjust the shortcut keys.
9、Modification of the parameters for user and technicians
When long press ,"Password: 0000" is displayed. Requires user to enter parameter
password.,Through 、you can modify the corresponding password bit.
Through 、Modify the corresponding password value. Each time a password value is
adjusted, the corresponding character bit shows the corresponding value. After entering the
password, press to confirm. If the password is entered correctly, then enter the
user and modify the technical parameters. Display the corresponding parameter
number and parameter content.
maximum speed 5800 rpm
- 16 -
10、Form of the operation parameters
No Function Default
value Setting
range Uni
t Explanation Notes
U1 Work mode 0 0~1 0:Semi-Auto 1:Auto
U2 Sensor selection 1 0~1 0:Off 1:On
U3 Auto trimming 3 0~3
0:Trimmer Off 1:Front trim
2:Reartrim 3:Front & Rear trim
U4 Auto air suction 3 0~3
0:AirOff 1:Front Suction
2:Rear Suction 3:Front &Rear suction
U5 Auto dust suction 0 0~3
0:Suction Off 1:Front Suction
2:Rear Suction 3:Front &Rear suction
Reserve
U6 Auto lift presser foot 0 0~3
0:Lifter Off 1:Front lifting foot
2:Rear lifting foot 3:Front & Rear lifting foot
U7 Loose switch 1 0~1 0:Off 1:On KSC
Loose switch 3 0~3
0:Loose Off 1:Front Loose
2:Rear Loose 3:Front & Rear Loose
83BL
U8 Suction line Switch
3 0~3
0:Off 1:Front Suction line
2:Rear Suction line
3:Front & Rear Suction line
83BL
U9 Semi-automatic action
2 0~3
0:General Sewing 1:Omit(Must Feed The Cloth
After pressing Pedal)2:Continuous Sewing; 3:
Free Sewing
U10 Semi-auto mode speed
control 0 0~1
0:Off 1:On
U11 Motor speed control lock 0 0~1
0:Off 1:On
U12 Top speed 5800 200~7000 RPM
U13 The key tone 1 0~1 0:Off 1:On
U14 Operation lock 1 0~1 0:Off 1:On
U15 Rev sewing speed 5000 200~6000 RPM
U16 Start stitches number 10 0~200 Adjusting parameters to customer requirements
U17 Air suction auto adjust 0 0~1 0:Off 1:On Reserve
U18 Internal Suction Mode 0 0~2
0:Off 1:Long Suction 2:Internal Suction
U19 Internal Suction
open stitches Number 25 0~1000
U20 Internal Suction
close stitches Number 25 0~1000
U21 Stitches Number
between two sensors 55 0~99
U22 Front trimming delay
stitches Number . 20 0~100
“10
”Adjusting parameters to customer requirements
U23 Back trimming delay
stitches Number 10 10~250
“10
”Adjusting parameters to customer requirements

- 17 -
U24 F-Air suction open
stitches number 1 1~99
Adjusting parameters to customer requirements
U25 F-Air suction close
stitches number 1 1~99
Adjusting parameters to customer requirements
U26 B-Air suction open
stitches number. 1 1~99
Adjusting parameters to customer requirements
U27 B-Air suction close time 200 10~9999 ms Adjusting parameters to customer requirements
U28 Dust suction open
stitches number 0 0~99
Reserve
U29 Dust suction close
stitches number 0 0~99
Reserve
U30 Loose open stitches
number 0 0~99
U31 Loose close stitches
number 250 0~5000
U32 Loose run stitches
number 10 0~99
U33 Loose run speed 5000 200~6000
U34 Continuous cloth
stitches number 0 0~99
Reserve
U35 Internal dust suction
open Stitches number 5 2~99
Reserve
U36 Internal dust suction
close Stitches number 5 2~99
Reserve
U37 Sensor detection
Mode 0 0~2
0:General Mode
1:Mesh Mode2:Self-adaption Mode
U38 Auto stop 0 0~2
0:Off 1:On 2: Automatic count to stop sewing
U39 Stop delay stitches
number 12 5~200
Adjusting parameters to customer requirements
U40 F-lift foot delay time 0 0~6000
U41 F-lift foot retention time 180 5~6000 MS
U42 B-lift foot start time 0 0~6000
U43 B-lift foot retention time 500 0~9999
U44 Reserve 0
U45 Mid interim D-suction
holding 350 0~9999
Reserve
U46 Auto cutter retention
time 40 15~9999 Adjusting parameters to customer requirements
U47 Back pedal A-suction
time 500 50~9999
U48 Back pedal Trimming
time 45 0~5000
U49 Manual suction time 10 10~5000

- 18 -
U50
Manual trimming time
60 0~5000
U51
Back Pedal suction
switch
0 0~7
0 Off ;1ManualOn ;2Semi-AutomaticOn;3Automatic
On ;4ManualAndSemi-AutomaticOn ;5Semi-Autom
aticandAutomaticOn ;6ManualandAutomaticOn ;7M
anual and Semi-Automatic andAutomatic On
U52
Back Pedal trimming
switch
1 0~7
0 Off ;1ManualOn ;2Semi-AutomaticOn;3Automatic
On ;4ManualAndSemi-AutomaticOn ;5Semi-Autom
aticandAutomaticOn ;6ManualandAutomaticOn ;7M
anual and Semi-Automatic andAutomatic On
U53
Manual suction switch
7 0~7
0 Off ;1ManualOn ;2Semi-AutomaticOn;3Automatic
On ;4ManualAndSemi-AutomaticOn ;5Semi-Autom
aticandAutomaticOn ;6ManualandAutomaticOn ;7M
anual and Semi-Automatic andAutomatic On
U54
Manual trimming
switch
7 0~7
0 Off ;1ManualOn ;2Semi-AutomaticOn;3Automatic
On ;4ManualAndSemi-AutomaticOn ;5Semi-Autom
aticandAutomaticOn ;6ManualandAutomaticOn ;7M
anual and Semi-Automatic andAutomatic On
U55 Manual trimming
works 0 0~2
0 Action Without Cloth;1Action With Cloth;2Action
Momentarily
U56 Manual loose line
works 0 0~2
0 Action Without Cloth;1Action With Cloth;2Action
Momentarily
U57 Back Pedal trimming
works 0 0~2
0 Action Without Cloth;1Action With Cloth;2Action
Momentarily
U58 Back Pedal loosing
works 0 0~2
0 Action Without Cloth;1Action With Cloth;2Action
Momentarily
U59
Back Pedal loosing
switch
0 0~7
0 Off ;1ManualOn ;2Semi-AutomaticOn;3Automatic
On ;4ManualAndSemi-AutomaticOn ;5Semi-Autom
aticandAutomaticOn ;6ManualandAutomaticOn ;7M
anual and Semi-Automatic andAutomatic On
U60
Manual loose line
switch
0 0~7
0 Off ;1ManualOn ;2Semi-AutomaticOn;3Automatic
On ;4ManualAndSemi-AutomaticOn ;5Semi-Autom
aticandAutomaticOn ;6ManualandAutomaticOn ;7M
anual and Semi-Automatic andAutomatic On
U61 Side knife drive
0 0~1
0:motor Transmission 1:Electromagnet
Transmission
Reserve
U62 Puller Mode
3 0~3
0:Off;1:Front Pull;2:Rear Pull;3:Both Pull
U63 F-Puller open stitches
number 12 0~100
F-thread release open
stitches number 0 0~100
83BL
U64 F-Puller close stitches
number. 35 5~100
- 19 -
F-thread release close
stitches number. 1 1~100
83BL
U65 B- Puller open stitches
number. 1 0~100
B-thread release open
stitches number. 0 0~100
83BL
U66 B- Puller close stitches
number. 20 5~100
B-thread release close
stitches number. 800 5~9000
83BL
U67 Position pulle As stop
sewing 0 0~1
0:No lift As Stop;
1:Puller is up and downAs Stop
U68 F-suction open stitches
number 1 0~99
83BL
U69 F-suction close stitches
number 25 0~99
83BL
U70 B-Suction open time 300 0~359 83BL
U71 B-Suction close time 580 0~9000 83BL
U72 Pedal suction time 580 0~9000 83BL
U73 Limiting speed 4200 200~6000 83BL
U74 Reserve 0 0
U75 Needle bar Up or Down
0 0~1
0:Stay Up As Sewing, Stay Down As Stop Sewing
1:Stay Up As Sewing, Stay Down As Stop Sewing
U76 Auto Start mode 0 0~1 0:Sensors1:Foot-control
U77 Front sensor response
time 30 30~500
U78 Middle sensor response
time 20 20~200
U79 Back sensor response
time 5 2~200
U80 Front sensor sensitivity 65 0~99 Adjusting parameters to customer requirements
U81 Middle sensor sensitivity 60 0~99 Adjusting parameters to customer requirements
U82 Back sensor sensitivity 40 0~99 Adjusting parameters to customer requirements
U83 Front sensor response
value
30 5~120
U84 Middle sensor response
value
40 5~120
U85 Back sensor response
value
40 5~120
U86
Safety switch 5 0~7 0 Off ;1 Manual On ;2 Semi-Automatic
On;3Automatic On ;4 Manual And Semi-Automatic
On ;5 Semi-Automatic andAutomatic On ;6 Manual
and Automatic On ;7Manual and Semi-Automatic
Table of contents
Other Hikari Sewing Machine manuals

Hikari
Hikari H9199 Product guide

Hikari
Hikari H9990 User manual

Hikari
Hikari HW762T Owner's manual

Hikari
Hikari HXT6800T User manual

Hikari
Hikari HW740TA Owner's manual

Hikari
Hikari H8800E User manual

Hikari
Hikari HW782TA Owner's manual

Hikari
Hikari HK2900 User manual

Hikari
Hikari H93SF-7D User manual

Hikari
Hikari HX8V Serles User manual


Popular Sewing Machine manuals by other brands


Janome
Janome M7050 Instruction book

Singer
Singer 991B3 Service manual

Janome
Janome Elna Lotus owner's manual

Strobel
Strobel 218D-TP-R operating instructions

DeLuxe Stitcher
DeLuxe Stitcher M30 Series Operation and maintenance manual

Baby Lock
Baby Lock Embroidery Professional BMP8 Instruction and reference guide