manuals.online logo
Brands
  1. Home
  2. •
  3. Brands
  4. •
  5. Hobby
  6. •
  7. Pet Care Product
  8. •
  9. Hobby Steward Rondo User manual

Hobby Steward Rondo User manual

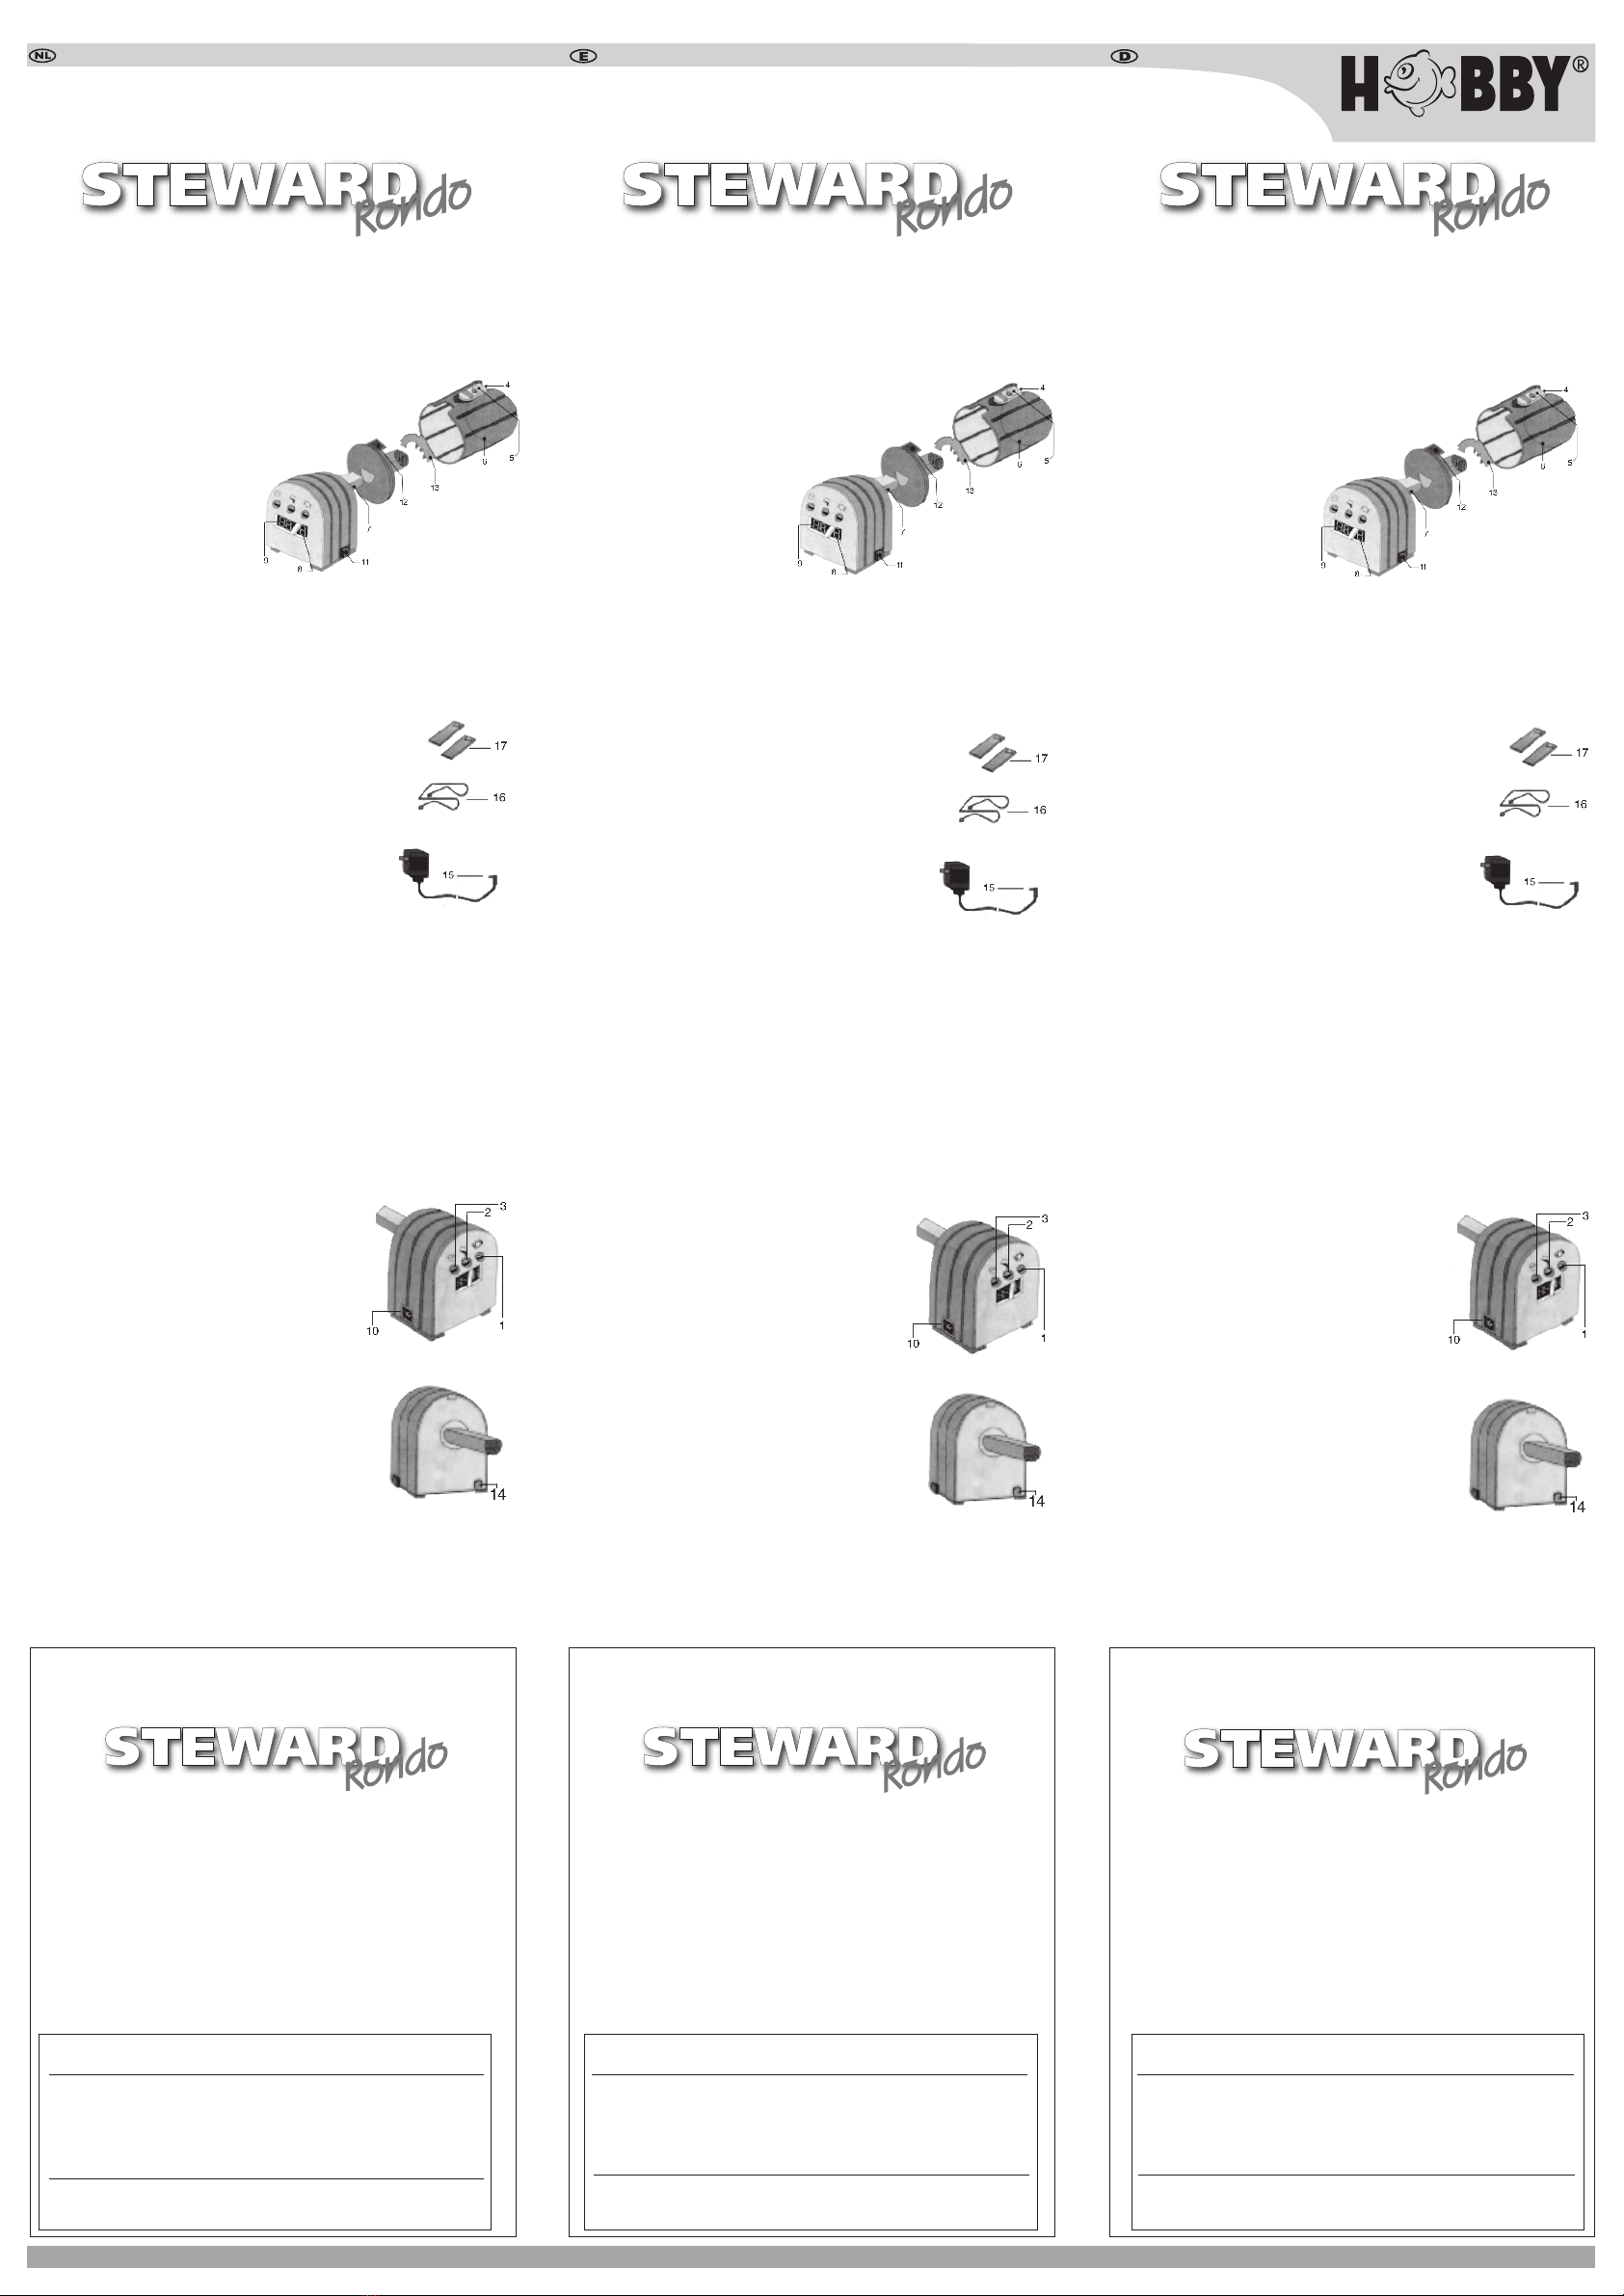
Aanduiding van de onderdelen
1. Schakelaar voor het aantal trommelomwentelingen
2. Schakelaar voor de handmatige activering van het voeren
3. Schakelaar voor het programmeren van de voedingsintervallen
4. Opening voor het uitwerpen van voer
5. Schuif voor het instellen van de uitwerpopening voor het voer
6. Voertrommel
7. Verwarmingsstaaf tegen het vastplakken van voer
8. LED-weergave van de ingestelde trommelomwentelingen
9. LED-weergave van het voedingsinterval
10. Aansluiting voor transformator
11. Schakelaar voor het voeren ’s nachts
12. Afdekking van de voertrommel
13. Uitwerpschachtdeksel
voor voertrommel
14. Sensor CdS
15. Transformator
16. Bevestigingsbeugel voor glazen afdekplanchet
17. Plakstrip
Bevestiging en plaatsing
De voerautomaat Steward Rondo moet zo worden geplaatst dat
deze niet in het aquarium kan vallen. De automaat kan op twee
manieren worden bevestigd.
1. Met een plakstrip (17): de beschermstrip van het aan beide
kanten klevende plakband verwijderen en de voerautomaat met
de onderkant op een stevige ondergrond plakken.
2. Met de bevestigingsbeugel (16): rechthoekig gebogen uiteinden
parallel in de geleiderails op de onderkant van de voerautomaat
schuiven. Daarna de voerautomaat over de aan het aquarium
ingelijmde glazen steun voor afdekplaten schuiven.
Steek de klinkstekker van de transformator (15) in de daarvoor
bestemde opening (10) aan de behuizing. Steek de transformator
in het stopcontact. Het LED begint nu te knipperen (8/9), de
voertrommel (6) maakt een omwenteling tot deze zich in de
goede uitgangspositie bevindt en de aanduiding 12/1 verschijnt
op het LED display (8/9).
Het vullen
Sluit eerst de voertrommel (6) met de schuif (5). Trek de voertrommel (6) van de
behuizing. Verwijder de afdekking (12) van de voertrommel (6). Vul de trommel
(6) slechts tot maximaal 2/3. Schuif de voertrommel (6) met de weer aangebrachte
afdekking (12) over de verwarmingsstaaf (7) tot deze in de behuizing vastzit. Via de
schuif (5) voor het instellen van de voeropening (4) bepaalt u de bij elke omwenteling
vrijkomende hoeveelheid voer.
Programmering
Druk op schakelaar (3) voor het programmeren van de
voedingsintervallen. Elke keer dat u drukt geeft het linker
deel van de LED-weergave (8) na elkaar 12, 24, 48, 3, 4,
6 en 8 aan. Zo betekent 12 dat om de 12 uur, vanaf het
begin van de instelling, het voeren geactiveerd wordt. Druk
op schakelaar (1) voor het aantal trommelomwentelingen.
Elke keer dat u drukt geeft het rechter deel van de LED-
weergave (9) na elkaar 1, 2 en 3 omwentelingen aan. Met
schakelaar (2) kan op elk gewenst moment het handmatig
voeren worden geactiveerd.
Activering / deactivering van de lichtsensor
Wanneer de rode schakelaar (11) rechts op de behuizing
wordt ingedrukt, wordt de lichtsensor (14) gedeactiveerd en
kan ook in het donker worden gevoerd. Wanneer schakelaar
(11) verder naar buiten staat is de lichtsensor (14) geactiveerd
en wordt het voeren in het donker niet geactiveerd.
Technische gegevens:
Steward Rondo: Afmetingen: 85 x 118 x 170 mm, Gewicht: 600 g
Voercapaciteit: tot 100 g
AC Transformator: Input: 230 V, Output: DC 9 V, Watt: 2,5 W
Aanwijzing: alle gegevens gelden bij benadering. Technische wijzigingen blijven
voorbehouden.
Garantiebewijs
De eindafnemer van dit apparaat bieden wij 24 maanden garantie vanaf de
dag van levering. Als voorwaarde geldt dat dit garantiebewijs ingevuld is. De
garantie geldt voor materiaal- en productiefouten en niet voor schades door
externe invloeden, verkeerde behandeling of oneigenlijk gebruik. In geval van
garantieclaims besluiten wij naar eigen inzicht tot vervanging of reparatie van de
defecte of beschadigde onderdelen. Onze aansprakelijkheid blijft hiertoe beperkt.
Met name stellen wij ons – voor zover wettelijk toegestaan – niet aansprakelijk voor
vervolgschades die door dit apparaat ontstaan. Stuur in geval van garantieclaims
het ingevulde garantiebewijs met het te controleren apparaat naar ons op. U dient
het apparaat franco huis naar ons te verzenden (verzendkosten voor uw rekening).
De retourzending zal zo spoedig mogelijk plaatsvinden.
DOHSE AQUARISTIK KG
Otto-Hahn-Strasse 9 • D-53501 Grafschaft-Gelsdorf
Verkoopdatum
Stempel en handtekening
Denominación de las distintas piezas
1. Interruptor para el número de revoluciones del tambor
2. Interruptor para activación manual de la alimentación
3. Interruptor para la programación de los intervalos de alimentación
4. Abertura para la salida de la comida
5. Corredera para la regulación de la abertura de salida de la comida
6. Tambor de comida
7. Barra calentadora para evitar el pegado de la comida
8. Display LED de las revoluciones de tambor ajustadas
9. Display LED del intervalo de alimentación
10.Conexión para el transformador
11.Interruptor para
la alimentación nocturna
12.Cubierta del tambor de comida
13.Compuerta de salida para
el tambor de comida
14.Sensor CdS
15.Transformador
16.Estribo de fijación para el soporte de cristal cobertor
17.Tiras adhesivas
Fijación y montaje
El comedero automático Steward Rondo se deberá montar de
forma que no pueda caer al acuario. Existen dos posibilidades
para su fijación.
1. con tiras adhesivas (17): retirar las tiras protectoras de la cinta
adhesiva de dos caras y pegar el comedero automático con la
cara inferior sobre una base fija.
2. con estribo de fijación (16): Introducir los extremos doblados
en ángulo recto, de forma paralela, en los rieles de guía en la cara
inferior del comedero automático. Después, empujar el comedero
automático a través de las tiras de cristal de soporte pegadas en
el acuario para placas de cubierta.
Introducir ahora el interruptor de gatillo del transformador (15)
en la apertura prevista para ello (10) en la carcasa. Enchufar el
transformador toma de corriente. Ahora tendrá intermitencia el
LED (8/9), el tambor de comida (6) da una vuelta hasta la posición
inicial correcta y aparece la indicación 12/1 en el display LED (8/9).
Llenado
Cerrar primeramente el tambor de comida (6) con la corredera (5). Extraer el tambor
de comida (6) de la carcasa. Soltar la cubierta (12) del tambor de comida (6). Llenar
el tambor (6) sólo hasta como máximo 2/3. Desplazar el tambor de comida (6) con la
cubierta (12) colocada de nuevo a través de la barra calentadora (7) hasta que encaje
en la carcasa. Mediante la corredera (5) para la regulación de la abertura de comida (4)
se determina la cantidad de comida que cae en cada vuelta.
Programación
Presionar el interruptor (3) para la programación de los
intervalos de comida. Con cada pulsación aparece en la
parte izquierda del display LED (8) consecutivamente 12,
24, 48, 3, 4, 6 y 8. Por ejemplo, 12 significa que a partir del
comienzo del ajuste, se activará la alimentación cada 12
horas. Presionar el interruptor (1) para regular el número
de revoluciones del tambor. Con cada pulsación aparece en
la parte derecha del display LED (9) consecutivamente 1,2
y 3 revoluciones. Es posible una activación manual de la
alimentación en cualquier momento con el interruptor (2).
Activación / Desactivación del sensor de luz
Si se presiona el interruptor rojo (11) en la parte derecha de
la carcasa, se deactiva el sensor de luz (14) y la alimentación
puede tener lugar también en la oscuridad. Si el interruptor
(11) sobresale hacia afuera, el sensor de luz (14) estará
desactivado y no se producirá alimentación alguna durante
la fase de oscuridad.
Datos técnicos:
Steward Rondo: Medidas: 85 x 118 x 170 mm, Peso: 600 g
Capacidad de comida: hasta 100 g
Transformador AC, Input: 230V, Output: DC 9 V, Vatios: 2,5 W
Advertencia: Todos los datos son aproximados.
Nos reservamos el derecho a efectuar modificaciones técnicas.
Certificado de Garantia
para
Al consumidor final de este aparato le concedemos una garantía de
24 meses a contar de la fecha de entrega, siempore que se haya rellenado este
certificado de garantía. La garantía comprende todos los defectos del material y
errores demontaje, excepto los daños causados por influencias externas o manejo
inadecuado.Dicha garantía la concedemos a nuestra opción, o bien cambiando
o bien reparandolas piezas defectuosas. No se admitirán otras reclamaciones. En
cuanto legalmenteadmisible, especialmente no nos hacemos responsables de los
daños consecutivos quepuedan producirse por este aparato. En caso de garantía
sirvase enviarnos el certificadode garantía rellenado junto con el aparato a revisar.
Sírvase efectuar los envíos a portespagados. La devolución se realiza tan pronto
como posible.
DOHSE AQUARISTIK KG
Otto-Hahn-Str. 9 • D-53501 Grafschaft-Gelsdorf
Fecha de venta
Sello y firma
Bezeichnung der Einzelteile
1. Schalter für Anzahl der Trommelumdrehungen
2. Schalter für manuelle Auslösung der Fütterung
3. Schalter für Programmierung der Fütterungsintervalle
4. Öffnung für Futterauswurf
5. Schieber zur Einstellung der Futterauswurf Öffnung
6. Futtertrommel
7. Heizstab gegen das Verkleben des Futters
8. LED Anzeige der eingestellten Trommelumdrehungen
9. LED Anzeige des Fütterungsintervalls
10.Anschluss für Transformator
11.Schalter für Nachtfütterung
12.Abdeckung der Futtertrommel
13.Auswurfschachtabdeckung
Futtertrommel
14.CdS Sensor
15.Transformator
16.Befestigungsbügel für Abdeckglasauflage
17.Klebebestreifen
Befestigung und Aufstellung
Der Futterautomat Steward Rondo ist so aufzustellen, dass er
nicht ins Aquarium fallen kann. Es gibt zwei Möglichkeiten der
Befestigung.
1. mit Klebestreifen (17): Schutzstreifen des doppelseitigen
Klebebandes entfernen und Futterautomat mit der Unterseite
auf eine feste Unterlage kleben.
2. mit Befestigungsbügel (16): Rechtwinklig gebogene
Enden parallel in die Führungsschienen an der Unterseite des
Futterautomaten schieben. Dann Futterautomat über die am
Aquarium eingeklebten Auflageglasstreifen für Abdeckplatten
schieben.
Stecken Sie nun den Klinkenstecker des Transformators (15) an
die dafür vorgesehene Öffnung (10) am Gehäuse. Stecken Sie
den Transformator in die Steckdose. Nun blinkt die LED (8/9) auf,
die Futtertrommel (6) macht eine Umdrehung bis in die richtige
Ausgangsposition und es erscheint die Anzeige 12/1 im LED
Display (8/9).
Befüllung
Schließen Sie zuerst die Futtertrommel (6) mit dem Schieber (5). Ziehen Sie die
Futtertrommel (6) vom Gehäuse ab. Lösen Sie die Abdeckung (12) der Futtertrommel
(6). Befüllen Sie die Trommel (6) nur bis maximal 2/3. Schieben Sie die Futtertrommel
(6) mit wieder aufgesetzter Abdeckung (12) über den Heizstab (7) bis sie am Gehäuse
einrastet. Über den Schieber (5) zur Einstellung der Futteröffnung (4) bestimmen Sie die
bei jeder Umdrehung herausfallende Futtermenge.
Programmierung
Drücken Sie den Schalter (3) für die Programmierung
der Fütterungsintervalle. Mit jedem Druck zeigt der linke
Teil der LED Anzeige (8) nacheinander 12, 24, 48, 3,
4, 6 und 8 an. Zum Beispiel bedeutet 12, das alle 12
Stunden, vom Beginn der Einstellung an, eine Fütterung
ausgelöst wird. Drücken Sie den Schalter (1) für die Anzahl
der Trommelumdrehungen. Mit jedem Druck zeigt der
rechte Teil der LED Anzeige (9) nacheinander 1,2 und 3
Umdrehungen an. Eine manuelle Auslösung der Fütterung
ist jeder Zeit mit Schalter (2) möglich.
Aktivierung / Deaktivierung des
Lichtsensors
Wird der rote Schalter (11) rechts am Gehäuse eingedrückt,
wird der Lichtsensor (14) deaktiviert und es kann auch bei
Dunkelheit gefüttert werden. Steht der Schalter (11) weiter
nach außen, ist der Lichtsensor (14) aktiviert und Fütterungen
werden während der Dunkelheit ausgesetzt.
Technische Angaben:
Steward Rondo: Maße: 85 x 118 x 170 mm, Gewicht: 600 g
Futterkapazität: bis zu 100 g
AC Transformator: Input: 230 V, Output: DC 9 V, Watt: 2,5 W
Hinweis: Alle Angaben sind circa Angaben.
Technische Änderungen bleiben vorbehalten.
Garantie Schein
für
Dem Endabnehmer dieses Gerätes leisten wir 24 Monate Garantie, die mit dem
Tag der Lieferung beginnt. Voraussetzung ist, dass dieser Garantieschein ausgefüllt
ist. Die Garantie erstreckt sich auf Material- und Montagefehler, nicht auf Schäden
durch äußere Einflüsse oder unsachgemäße Behandlung. Sie wird nach unserer
Wahl durch Austausch oder Reparatur der mangelhaften Teile geleistet. Weitere
Ansprüche gegen uns bestehen nicht. Insbesondere übernehmen wir, soweit
gesetzlich zulässig, keine Haftung für Folgeschäden, die durch dieses Gerät
entstehen. Senden Sie im Garantiefall den ausgefüllten Garantieschein mit dem
zu prüfenden Gerät an uns. Sendungen müssen für uns portofrei erfolgen.
Rücksendung erfolgt dann schnellstens.
DOHSE AQUARISTIK KG
Otto-Hahn-Str. 9 • D-53501 Grafschaft-Gelsdorf
Verkaufsdatum:
Stempel und Unterschrift des Händlers
GebrauchsanleitungGebruiksaanwijzing Instrucciones de uso
Eine Marke der Dohse Aquaristik KG
Fax +49 (0)2225-946494 www.dohse-aquaristik.de DOHSE AQUARISTIK KG
Description of components
1. Switch for number of drum rotations
2. Switch for manual feed triggering
3. Switch for feeding interval programming
4. Feed ejection hole
5. Slide for feed ejection hole adjustment
6. Feeding drum
7. Heating element for the prevention of sticky feed
8. LED display of the set drum rotation
9. LED display of the feeding intervals
10.Transformer connection
11.Switch for night feeding
12.Feeding drum cover
13. Ejection shaft cover for feed drum
14.CdS sensor
15.Transformer
16.Fastening bow for sight glass rest
17.Adhesive strips
Securing and setup
The Steward Rondo automatic dry feeder should be secured so as
not to fall into the aquarium. There are two ways of securing it.
1. with adhesive strips (17): remove the protective liner of
the double-sided adhesive tape and secure the bottom of the
automatic feeder to a firm base.
2. with fastening bow (16): slide right-angle ends parallel into
the guide rails at the bottom of the automatic dry feeder. Then
slide the automatic dry feeder over the supporting glass strips for
covers glued to the aquarium.
Now, place the jack plug of the transformer (15) in the appropriate
opening (10) on the casing. Plug in the transformer. The LED (8/9)
should now light up, the feeding drum (6) should turn once and
stop in the correct starting position, and the the LED display (8/9)
should read 12/1.
Filling
First, close the feeding drum (6) using the slide (5). Pull the feeding drum (6) off the
casing. Remove the cover (12) of the feeding drum (6). Fill up to 2/3 of the drum (6).
Now slide the feeding drum (6) with the cover replaced over the heating element (7)
until it engages on the casing. The amount of feed falling out at each revolution can be
determined using the slide (5) for feed ejection hole adjustment (4).
Programming
Press the switch (3) for feeding interval programming. At
each press of the switch (3), the left side of the LED display
(8) will show 12, 24, 48, 3, 4, 6, and 8, in succession. 12,
for example, means that feeding will be triggered every
12 hours once set accordingly. Press the switch (1) for the
number of drum rotation. At each press of the switch (1),
the right side of the LED display (9) will show 1, 2, and 3
rotation, in succession. A manual triggering of the feeding
is possible at any time by pressing switch (2).
Activating / deactivating the light sensor
When the red switch (11) on the right of the casing is
pressed, the light sensor (14) is deactivated to continue
feeding throughout the dark. If the switch (11) is set further
outward, the light sensor (14) is activated to prevent feeding
in the dark.
Technical data:
Steward Rondo: Dimensions: 85 x 118 x 170 mm, Weight: 600 g
Feeding capacity: up to 100 g
AC transformer: Input: 230 V, Output: DC 9 V, Wattage: 2,5 W
Note: All details are approximates. The technical data are subject to change.
Guarantee Certificate
for
We grant the customer a 24 months guarantee, which begins on the day
of delivery, assuming that the guarantee certificate has been filled in. The
guarantee is given for material and assembly failures not for damages caused
by inappropriate treatment. lt is for the company to decide whether to
exchange the apparatus or to repair it. No further claims are admissible. We
cannot be held responsible for any damage caused by the apparatus. In case
of guarantee claims please send your complete certificate together with the
apparatus which has to be examined. Send it post-free. We will return it as
soon as possible.
DOHSE AQUARISTIK KG
Otto-Hahn-Str. 9 • D-53501 Grafschaft-Gelsdorf
Date of sale:
Stamp and signature
Désignation des différents éléments
1. Commutateur pour le nombre de tours de tambour
2. Commutateur pour le déclenchement manuel de la distribution
3. Commutateur pour la programmation des intervalles de distribution
4. Ouverture pour l’éjection de la nourriture
5. Vanne pour régler l’ouverture pour l’éjection de la nourriture
6. Tambour
7. Baguette chauffante pour empêcher le collage des produits alimentaires
8. Affichage LED des tours de tambour réglés
9. Affichage LED des intervalles de distribution
10. Raccordement pour transformateur
11. Commutateur pour distribution la nuit
12. Couvercle du tambour
13. Couvercle du conduit d'éjection
pour tambour
14. Capteur CdS
15. Transformateur
16. Etrier de fixation
pour la vitre de recouvrement
17. Bandes adhésives
Fixation et mise en place
Le distributeur automatique Steward Rondo doit être mis en place
de manière à ce qu’il ne puisse pas tomber dans l’aquarium. Il y
a deux possibilités de fixation.
1. avec des bandes adhésives (17): enlever les papiers de protection
de la bande adhésive des deux côtés et coller le distributeur par le
bas sur un support stable.
2. avec un étrier de fixation (16): pousser les extrémités coudées
parallèlement dans les rails de guidage dans le bas du distributeur.
Ensuite pousser le distributeur sur les bandes de verre de support
collées sur l’aquarium pour les plaques de recouvrement.
Ensuite brancher le connecteur du transformateur (15) dans
l’ouverture prévue à cet effet (10) sur le boîtier. Brancher le
transformateur à la prise de courant. Maintenant la LED (8/9)
clignote, le tambour (6) fait un tour jusqu’à la bonne position
initiale et il apparaît l’affichage 12/1 à l’écran à LED (8/9).
Remplissage
Fermer d’abord le tambour (6) avec la vanne (5). Retirer le tambour (6) du boîtier.
Enlever le couvercle (12) du tambour (6). Remplir le tambour (6) jusqu’au 2/3 maximum.
Pousser le tambour (6) avec le couvercle (12) sur la baguette chauffante (7) jusqu’à ce
qu’il s’enclenche dans le boîtier. Avec la vanne (5) pour régler l’ouverture de distribution
(4), vous pouvez déterminer le volume de produits alimentaires qui tombe à chaque
tour.
Programmation
Appuyer sur le commutateur (3) pour la programmation
des intervalles de distribution. A chaque pression, la partie
gauche de l’affichage LED (8) indique à la suite 12, 24,
48, 3, 4, 6 et 8. Par exemple 12 signifie que toutes les
12 heures, à partir du début du réglage, une distribution
est déclenchée. Appuyer sur le commutateur (1) pour le
nombre de tours de tambour. A chaque pression, la partie
droite de l’affichage LED (9) indique à la suite 1, 2 et 3
tours. Un déclenchement manuel de la distribution est
possible à tout moment avec le commutateur (2).
Activation / Désactivation du capteur de lumière
En appuyant sur le commutateur rouge (11) à droite du boîtier,
cela désactive le capteur de lumière (14) et la distribution
peut aussi se faire lieu la nuit. Si le commutateur (11) n’est
pas enfoncé, le capteur de lumière (14) est activé et aucune
distribution n’est déclenchée pendant la nuit.
Caractéristiques techniques:
Steward Rondo: Dimensions: 85 x 118 x 170 mm, Poids : 600 g
Capacité de distribution: jusqu’à 100 g
Transformateur AC: Entrée: 230 V, Sortie: DC 9 V, Watt: 2,5 W
Indication: Toutes les indications sont approximatives.
Sous réserve de modifications techniques.
Certificat de Garantie
pour
Nous accordons à l’acheteur final de cet appareil une garantie de 24 mois
à partir de la livraison. Cette garantie est seulement valable si le bulletin
de garantie est rempli. La garantie touche exclusivement des défauts de
matériel et de montage. Cette garantie ne couvre pas les dommages résultants
d’influences extérieures ou de fausses manipulations. Nous nous réservons
la décision de remplacer l’appareil complet ou les parties défectueuses de
l’appareil. Cette garantie ne couvre en aucune sorte les dommages pouvant
résulter de la défaillance éventuelle d’un appareil. En cas de réclamation,
veuillez nous retourner l’appareil et le bulletin de garantie rempli franco de port
à l’adresse suivante: Nous ferons le nécessaire dans les plus brefs délais.
DOHSE AQUARISTIK KG
Otto-Hahn-Str. 9 • D-53501 Grafschaft-Gelsdorf
Date de vente:
Timbre et signature
Denominazione dei pezzi
1. Interruttore numero rotazioni tamburo
2. Interruttore erogazione manuale mangime
3. Interruttore di programmazione intervalli di distribuzione mangime
4. Apertura uscita mangime
5. Saracinesca di regolazione apertura uscita mangime
6. Tamburo
7. Resistenza riscaldante (perché il mangime non aderisca)
8. Display a LED delle rotazioni tamburo impostate
9. Display a LED degli intervalli di erogazione mangime
10. Attacco trasformatore
11. Interruttore per erogazione
mangime notturna
12. Copertura tamburo
13. Coperchio a botola a espulsione
per tamburo del mangime
14. Sensore CdS
15. Trasformatore
16. Staffa di fissaggio supporto vetro di copertura
17. Nastro adesivo
Fissaggio e installazione
Installare il distributore mangime automatico Steward Rondo
in modo che non possa cadere nell’acquario. Il fissaggio può
avvenire in due modi:
1. con il nastro adesivo (17): rimuovere le strisce protettive sui due
lati del biadesivo e applicare il nastro al distributore con la parte
inferiore su una base rigida.
2. con la staffa di fissaggio (16): spingere le estremità (ad angolo
retto) nelle guide del lato inferiore del distributore. Spingere
quindi il distributore sulle strisce di supporto del vetro fissate
all’acquario per le piastre di copertura.
Inserire quindi la spina del trasformatore (15) nell’apposita
apertura (10) sulla scatola. Inserire il trasformatore nella presa. A
questo punto si accende il LED (8/9) , il tamburo (6) effettua una
rotazione fino a raggiungere la corretta posizione d’uscita e sul
display (8/9) compare l’indicazione 12/1
Riempimento
Chiudere il tamburo (6) con la saracinesca (5). Sfilare il tamburo (6) dalla scatola. Staccare
la copertura (12) del tamburo (6). Riempire il tamburo (6) fino ad un massimo di 2/3.
Spingere il tamburo (6) con la copertura (12) sulla resistenza (7) fino ad agganciarlo alla
scatola. Con la saracinesca (5) di regolazione dell’apertura (4) determinare la quantità
di mangime che verrà erogata ad ogni rotazione.
Programmazione
Premere l’interruttore (3) di programmazione degli intervalli
di erogazione mangime. Ad ogni pressione il settore sinistro
del display (8) visualizza in successione 12, 24, 48, 3, 4, 6
e 8 . Esempio: 12 significa che il mangime verrà erogato
ogni 12 ore a partire dall’inizio dell’impostazione. Premere
l’interruttore (1) per impostare il numero di rotazioni del
tamburo. Ad ogni pressione il settore destro del display
(9) visualizza in successione 1, 2 e 3 rotazioni. E’ possibile
erogare il mangime manualmente in qualsiasi momento
con l’interruttore (2).
Attivazione / disattivazione del sensore luminoso
Premendo verso destra l’interruttore (11) posto sulla
scatola si disattiva il sensore luminoso (14) che sospende
l’erogazione del mangime avviene anche di notte. Riportando
l’interruttore (11) verso l’esterno si attiva il sensore luminoso
(14) e l’erogazione notturna del mangime.
Dati tecnici:
Steward Rondo: Dimensioni: 85 x 118 x 170 mm, Peso: 600 g
Capacità mangime: fino a 100 g
Trasformatore AC: alimentazione: 230 V, uscita: DC 9 V, Watt: 2,5 W
N.B.: Tutti i dati sono indicativi. Con riserva di variazioni.
Certificato di Garanzia
per
Questo apparecchio è coperto da garanzia di 24 mesi, a partire dal giorno
della consegna. Condizione essenziale per la validità di tale garanzia è la
compilazione del presente certificato. La garanzia copre i difetti del materiale
e gli errori di montaggio, ma non si estende ai danni riconducibili ad agenti
esterni o ad un impiego inappropriato. A nostra discrezione provvederemo
a sostituire o riparare i pezzi difettosi. Non sussistono altri diritti nei nostri
confronti. Ai termini di legge non ci assumiamo alcuna responsabilità per
danni indiretti causati dall’apparecchio. In caso di ricorso alla garanzia
preghiamo spedirci il presente certificato, dovutamente compilato, insieme
all’apparecchio da sottoporre a controllo. La spedizione deve avvenire in
porto franco per noi. L’apparecchio sarà restituito in breve tempo.
DOHSE AQUARISTIK KG
Otto-Hahn-Str. 9 • D-53501 Grafschaft-Gelsdorf
Data della vendita
Timbro e firma
Mode d’emploiInstructions for use Istruzioni per l’uso
Eine Marke der Dohse Aquaristik KG
Otto-Hahn-Str. 9 D-53501 Gelsdorf Telefon: +49 (0)2225-9415-0

Other Hobby Pet Care Product manuals

Hobby Genius User manual

Hobby

Hobby Genius User manual

Hobby Terra Fix & Easy XL 3 User manual

Hobby

Hobby Terra Fix & Easy XL 3 User manual

Hobby TropicFog User manual

Hobby

Hobby TropicFog User manual

Hobby Ceramic Socket Set Datasheet

Hobby

Hobby Ceramic Socket Set Datasheet

Hobby ReptiBreeder User manual

Hobby

Hobby ReptiBreeder User manual

Hobby Easy Breeder User manual

Hobby

Hobby Easy Breeder User manual

Hobby Terra Fix & Easy XXL 3 User manual

Hobby

Hobby Terra Fix & Easy XXL 3 User manual

Hobby Nido II User manual

Hobby

Hobby Nido II User manual

Popular Pet Care Product manuals by other brands

Zolux 487041 user guide

Zolux

Zolux 487041 user guide

Pettec FUNK SPRAY TRAINER operating manual

Pettec

Pettec FUNK SPRAY TRAINER operating manual

E-Collar Technologies Pro Educator PE-900 quick start guide

E-Collar Technologies

E-Collar Technologies Pro Educator PE-900 quick start guide

Petsafe PBC19-11794 operating guide

Petsafe

Petsafe PBC19-11794 operating guide

neno Pesca user manual

neno

neno Pesca user manual

Canine Innovations Pet Convincer Lite user guide

Canine Innovations

Canine Innovations Pet Convincer Lite user guide

D.E. Systems Border Patrol TC1 owner's manual

D.E. Systems

D.E. Systems Border Patrol TC1 owner's manual

FINDSTER DUO PLUS user guide

FINDSTER

FINDSTER DUO PLUS user guide

Blue Dog Designs Help 'Em Up manual

Blue Dog Designs

Blue Dog Designs Help 'Em Up manual

Omlet eglu go hutch 1m run instruction manual

Omlet

Omlet eglu go hutch 1m run instruction manual

Mania PET GROOMING KIT instruction manual

Mania

Mania PET GROOMING KIT instruction manual

Veterinary Ventures Drinkwell 360 operating instructions

Veterinary Ventures

Veterinary Ventures Drinkwell 360 operating instructions

SportDOG SBC-10 operating guide

SportDOG

SportDOG SBC-10 operating guide

MGG Maxi quick start guide

MGG

MGG Maxi quick start guide

SportDOG WetlandHunter SD-2000 operating guide

SportDOG

SportDOG WetlandHunter SD-2000 operating guide

Vetpropet Relaxocat manual

Vetpropet

Vetpropet Relaxocat manual

Petsafe PIFOO-13672 operating guide

Petsafe

Petsafe PIFOO-13672 operating guide

Richell 30000 instruction manual

Richell

Richell 30000 instruction manual

manuals.online logo
manuals.online logoBrands
  • About & Mission
  • Contact us
  • Privacy Policy
  • Terms and Conditions

Copyright 2025 Manuals.Online. All Rights Reserved.