Hoggi DURO Operating instructions

en
DURO / DURO Cross
Service instructions
Partnerschaft für mobile Kinder

DURO / DURO Cross - Service and maintenance instructions
Content page
1 Model identication & basic conguration
1.1 Model identication (label)_____________________________________________________ 4
1.2 Basic conguration___________________________________________________________ 4
2Overview DURO / DURO Cross ___________________________________________________5-6
3Common information____________________________________________________________ 8
3.1 Preface ___________________________________________________________________ 8
3.2 Application_________________________________________________________________ 8
3.3 Declaration of conformity______________________________________________________ 8
3.4 Terms of warranty___________________________________________________________ 8
3.5 Customer service ___________________________________________________________ 9
3.6 Service and repairs__________________________________________________________ 9
3.7 Packing and shipping instructions_______________________________________________ 9
4Safety instructions _____________________________________________________________ 10
3.1 Meaning of symbols ________________________________________________________ 10
3.2 Common safety instructions___________________________________________________ 10
5Required tools and maintenance schedule__________________________________________ 11
5.1 Required tools______________________________________________________________11
5.2 Maintenance schedule ____________________________________________________12-13
Seat settings __________________________________________________________________ 14
6.1 Seat width_________________________________________________________________14
6.2 Seat depth______________________________________________________________ 15-16
6.3 Back height _______________________________________________________________ 16
6.4 Seat angle________________________________________________________________ 17
6.5 Recline adjustment _________________________________________________________ 17
6.6 Thorax width ______________________________________________________________ 18
6.7 Headrest width __________________________________________________________18-19
6.8 Footrest angle _____________________________________________________________ 19
7Maintenance schedule __________________________________________________________ 20
7.1 Front frame _______________________________________________________________ 20
7.2 Rear frame and rear axle ____________________________________________________ 20
7.3 Push bar _______________________________________________________________20-21
7.4 Seat and back bearing ______________________________________________________ 21
7.5 Seat surface and seat frame __________________________________________________ 21
7.6 Thigh supports_____________________________________________________________ 22
7.7 Hip supports ______________________________________________________________ 22
7.8 Back base ________________________________________________________________ 22
7.9 Back insert________________________________________________________________ 23
7.10 Individual upholstery system __________________________________________________ 23

7.11 Footrest hanger ____________________________________________________________ 23
7.12 Footrest holder __________________________________________________________23-24
7.13 Footrests _________________________________________________________________ 24
7.14 Front wheels ____________________________________________________________24-25
7.15 Swivel lock________________________________________________________________ 25
7.16 Rear wheels ______________________________________________________________ 25
7.17 Braking system __________________________________________________________25-27
7.18 Accessory bag_____________________________________________________________ 27
7.19 Tie down kit _______________________________________________________________ 27
7.20 Headrest pads___________________________________________________________27-28
7.21 Thorax pads_ _____________________________________________________________ 28
7.22 Abduction block ____________________________________________________________ 28
7.23 Retainer for accessories _____________________________________________________ 28
7.24 Grab rail__________________________________________________________________ 28
7.25 Therapy tray ______________________________________________________________ 29
7.26 Belt xations ____________________________________________________________29-30
7.27 Winter warmer _____________________________________________________________ 30
7.28 Canopy __________________________________________________________________ 31
8 Operating life _________________________________________________________________ 32
9 Specications _________________________________________________________________ 32

4
1.1 Model identication
1.2 Basic conguration
- DURO // DURO Cross rehab pushchair
- Front and rear wheels with air or PU tires
- Drum brake wheels with PU tyres or pneumatic tyres (only for DURO Cross)
- Padding (IUS)
- Thigh supports
- Support angle
- Footrest hanger
- Foot rest bracket und footrest with heel stop
The label is attached on the upper side of the seat plate (front left).
Hoggi GmbH
Eulerstr. 27
56235 Ransbach-Baumbach
MADE IN GERMANY
(01)04047349096062(21)202178999
321X-0001-052
DURO / DURO Cross
Gr. X
2021178999
2021/04/22
max. load
75kg
Hoggi GmbH
Eulerstr. 27
56235 Ransbach-Baumbach
MADE IN GERMANY
(01)04047349096062(21)202178999
321X-0001-052
DURO / DURO Cross
Gr. X
2021178999
2021/04/22
max. load
75kg
Hoggi GmbH
Eulerstr. 27
56235 Ransbach-Baumbach
MADE IN GERMANY
(01)04047349096062(21)202178999
321X-0001-052
DURO / DURO Cross
Gr. X
2021178999
2021/04/22
max. load
75kg
Colour code
Size / variant
Serial number
Classication / Product name
Year of manufacture
Manufacturer
Place of manufacture
Date of manufacture
Maximum load / load capacity
CE label
Article number
UDI code

5
2 Overview DURO
2.1 DURO

6
2.2 DURO Cross

7

8
3 Common Information
3.1 Preface
Thank you for selecting the DURO / DURO Cross rehab pushchair. We have designed this high-quality product to make
your life safer and easier, and we’ve included this manual to help you use and care for it.
Please read the following instructions to make sure you use this product as recommended. If you have any further
questions, or if you have any problems, please contact your healthcare provider.
We hope thatDURO / DURO Cross meets your expectations.
We reserve technical modications regarding the specied model in this manual. Before using the rehab pushchair the rst
time, this manual has to be read and understood by patient and support personnel in oder to ensure asafe handling with
the rehab pushchair.
Regular maintenance is important -it increases safety and prolongs the life of the product. Every rehab product should be
checked and serviced once ayear.
However, it is recommended to check, readjust and, if necessary, service products with ahigh frequency of use, with users
in growth or users with achanging clinical picture at 6-month intervals.
Only original spare parts should be used for all service and maintenance work.
The service and maintenance work described here should only be carried out by trained specialist personnel and not by the
user of the aid.
These service and maintenance instructions refer to the respective spare parts catalogs and operating instructions of the
products described. Please use all documents together.
Use the maintenance schedule (Chapter 5.2, Checklist to tick off) as acopy template.
Retain completed maintenance schedules and provide acopy to the customer.
DURO User manual 1910-0048-EN
DURO Spare parts catalog 1910-1048-EN
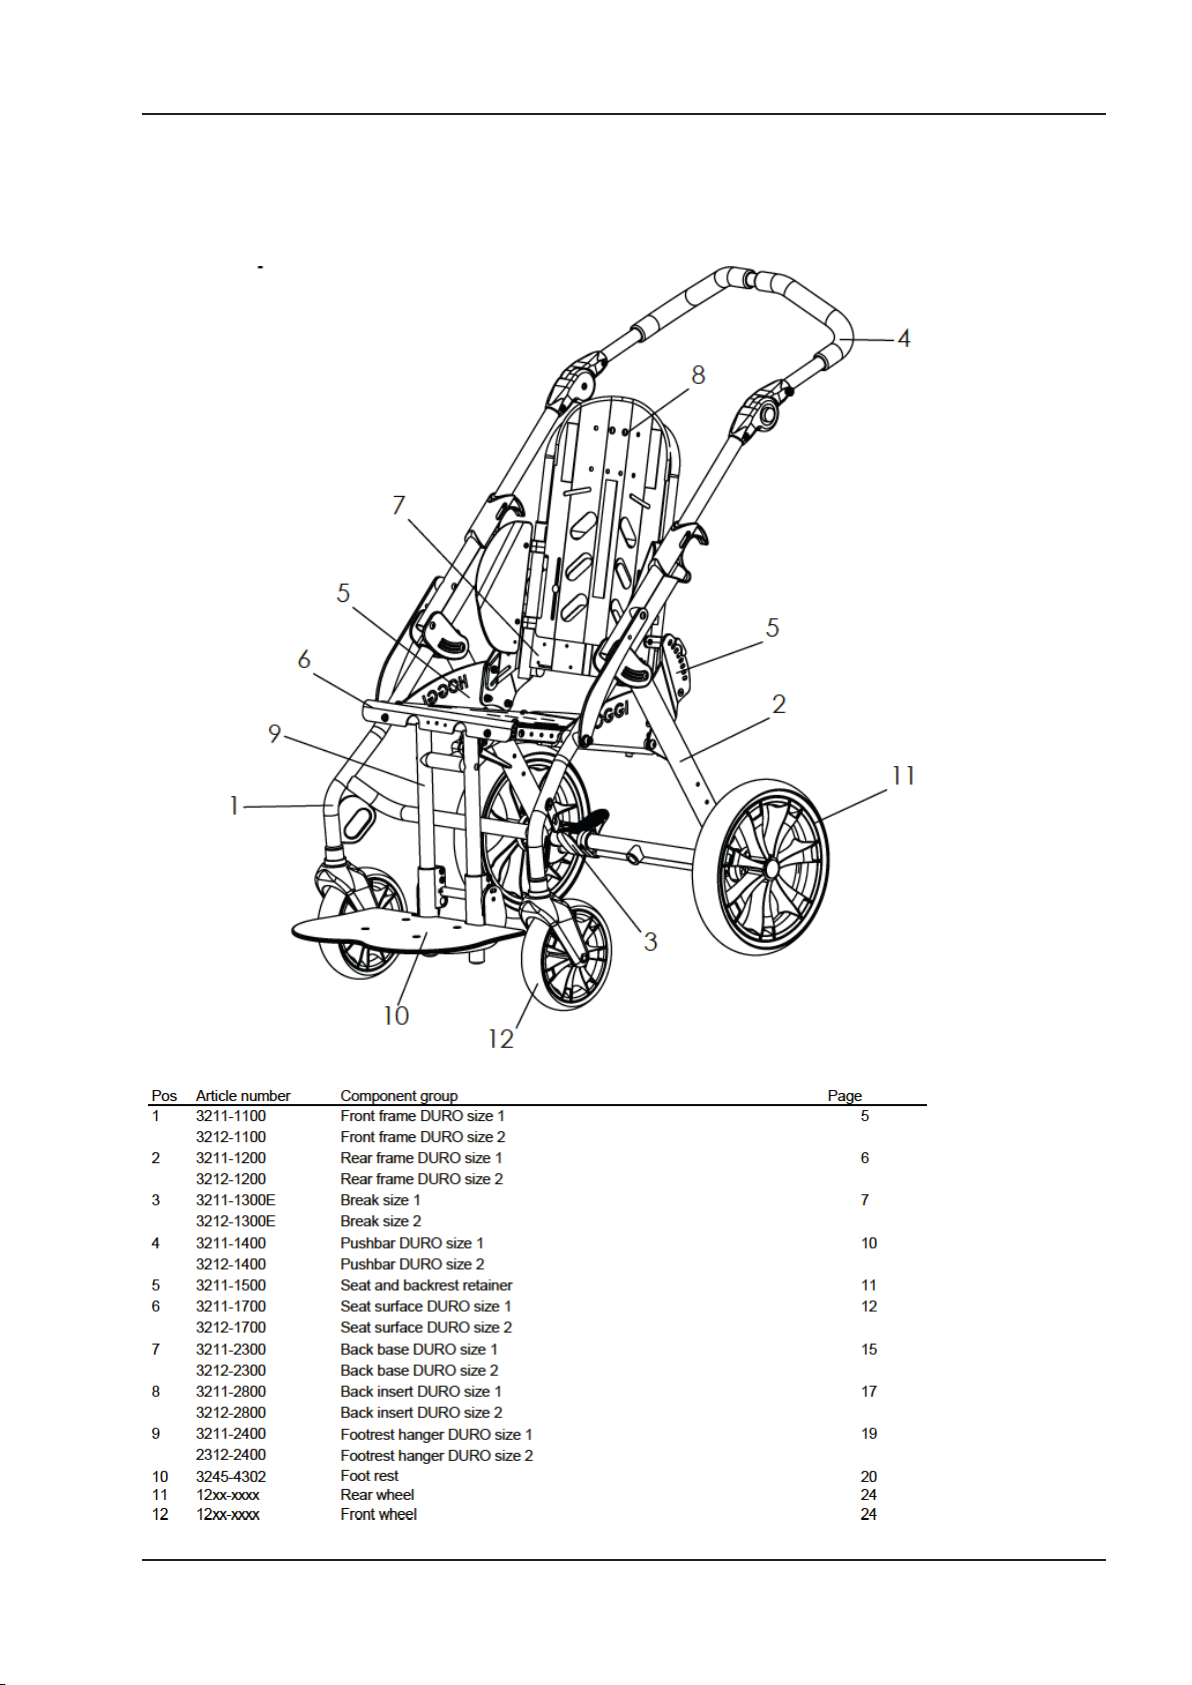
3.2 Application
Rehab pushchairs, paediatric postural positioning systems or strollers are appropriate for childern
and adolescents who are unable to walk or who have a walking impediment and thus requiring mobility assistance.
Assistance may be required due to:
• Atypical muscle tone
• Loss of limbs (dysmelia/lower limb amputation)
• Limb defect and / or deformity
The DURO / DURO Cross rehab pushchair is able to be used indoor and outdoor as well as for further service. For
further service the product has to be cleaned and sanitised efciently. Afterwards the product has to be checked
concerning condition, wearout and damage by an authorised technician. All damaged and inapropptiate parts need to be
changed. Please see also the service manual for detailled information.
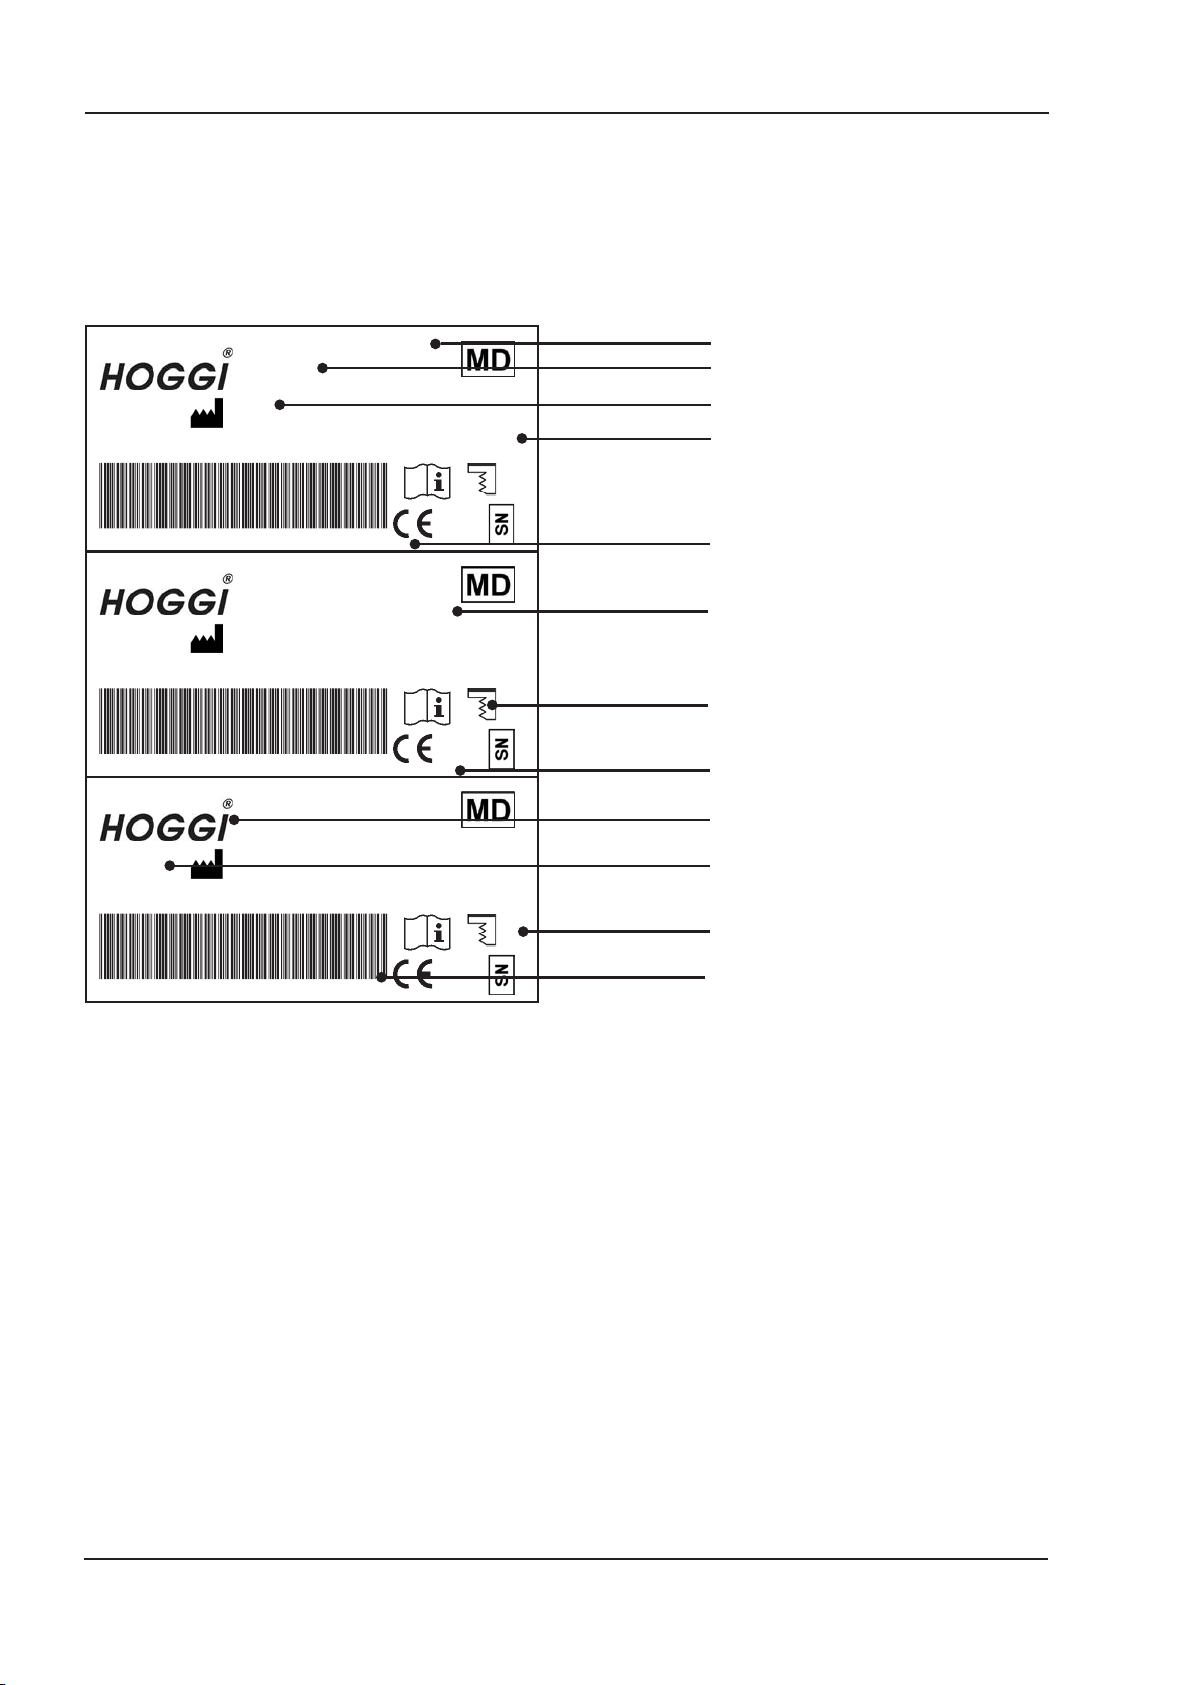
3.3 Declaration of Conformity
HOGGI GmbH as manufacturer declares under sole responsibility that the rehab-pushchair for kids and adolescents
DURO / DURO Cross meets the general safety and performance requirements to Annex I of the Regulation (EU)
2017/745 of the European Parliament and of the Council. Harmonised European Standards have been applied.
Applicable harmonized standards have been applied. DURO / DURO Cross meets the requirements of ISO 7176-8,
DIN EN ISO 12182 and DIN EN ISO 12183.
3.4 Terms of Warranty
Warranty applies only when the product is used according to the specied conditions and for the intended purposes,
following all manufacturer’s recommendations.The manufacturer is not responsible for damages caused by components
and spare parts not approved by the manufacturer. See also § 8 of terms and conditions on: www.hoggi.de
• Joint contractures
• Joint defects
• Other diseases

9
3.5 Customer service
Our customer service will be happy to answer any technical questions you may have.
Please refer to the last page for contact addresses and telephone numbers.
3.6 Service and repairs
Service and repairs on the DURO / DURO Cross rehab pushchair may only be carried out by your specialist dealer. In
case of problems, contact your responsible specialist dealer. In case of repairs, you will only receive original spare parts
there. Spare parts and replacement units are available during the entire service life of the product, but only for a maxi-
mum of 2 years after the sale of the last product in this series.
The wheelchair is custom made for the rst time user. Therefore, no replacement wheelchair is available in the
initial conguration. In order to ensure a correct spare parts delivery the serial no. of your wheelchair is required.
We are happy to help you nd a dealer close to you.
You can reach us at: [email protected]
3.7 Packing and shipping instructions
If DURO / DURO Cross has to be sent back to the manufacturer for repair or exchange, the product must be thoroughly
cleaned/disinfected beforehand and put in a hygienically safe condition.
Packaging is done by wrapping the product in a clean lm, ideally with air cushions and the subsequent use of a
sufciently large cardboard box, so that no transport damage can occur.

10
4 Safety instructions
4.1 Meaning of symbols
Caution!
Warning of possible danger of accident and injury. Warning of possible technical
damage.
Information!
About use of product.
Information!
For service-personnel.
Attention!
Read manual before use!
4.2 Common safety instructions
For all maintenance and repair work, you should generally observe afew points:
Attention!
Familiarize yourself with the functions of the product. If you are not familiar with the
product, study the user manual before testing. If no user mauals are available, request
them from us. You can also download documents from our homepage at: www.hoggi.de
Attention!
Study the service and maintenance instructions before starting work.
Attention!
Use suitable tools (see page 4 ff.).
Attention!
Wear suitable clothing and, if necessary, gloves and protective goggles.
Attention!
Secure the product from tipping over or falling down, e.g. from the workbench.
Attention!
Clean / disinfect the product before starting the test. If necessary, observe the instructions
in the user manual and product-specic test instructions.
Note!
Screws and nuts with thread locking are used for alarge number of screw connections.
If you have to open such screw connections, replace the respective nut or screw with
one with new thread locking. If new nuts or bolts with thread locking are not available,
use liquid thread locking compound with medium strength (e.g. Loctite 241 or Euro Lock
A24.20).

11
5 Required tools and maintenance schedule
5.1 Required tools
The following list shows the tools and utilities required for service.
Reversible ratchet and sockets
size 8-24 Torque wrench
Measuring ranges 5-50 Nm
Wrench
Size 6 - 24
Hexagon wrench
Gr. 3 - Screwdriver
Blade width 2.5 3.5 and 5.5
Phillips screwdriver
Size 2
Plastic hammer Hammer approx. 300 gCarpet knife with sickle and
standard blade
Side cutter Liquid thread locking
„medium strength“
Riveting pliers for rivets up to
5mm

12
5.2 Maintenance
schedule DURO / DURO Cross
Basic product
Customer:
...............................................
Pos. Area Check (Checklist to tick off )
Serial number:
.......................................
1.)
Function / Setting
2.)
none
damage / defor-
mation
3.)
Screw connections
Basic product
1.1 Front frame o o o
1.2 Rear frame and rear axle - Parking brake o o o
1.3 Push bar - Folding mechanism
- Locking
- Angle adjustment of the
push handle
o
o
o
o
o
o
o
1.4 Seat and back bearing - Back angle adjustment
- Seat angle adjustment
- Seat depth adjustment
o
o
o
o
o
o
o
o
o
1.5 Seat base and seat frame - Seat depth adjustment o o o
1.6 Thigh support/ Hip support - Seat width adjustment
- Depth adjustment hip supports
- Remove (hip supports)
o
o
o
o
o
o
o
o
o
1.7 Back base - Recline
- Remove back
o
o
o
o
o
o
1.8 Back insertion - Back height adjustment o o o
1.9 Individual upholstery system - Damage o o
1.10 Footrest - Angle adjustment
- Height adjustment
- Footrest angle
- Locking (optional)
o
o
o
o
o
o
o
o
o
o
o
o
1.11 Front wheels - Tires
- Air pressure
- Running behavior of the wheels
- Swivelling the wheel forks
o
o
o
o
o o
1.12 Swivel lock - Locking device
- Straight run
o
o
o
o
o
o
1.13 Rear wheels - Tires
- Air pressure
- Running behavior of the wheels
- Quick release
o
o
o
o
o o
1.14 Braking system - Brakes o o o
Do the settings on the base frame
meet the user‘s requirements? o
Notes:

13
DURO / DURO Cross
Accessories
Customer:
...............................................
Pos. Area Check (Checklist to tick off )
Serial number:
.......................................
1.)
Function / Setting
2.)
none
damage / defor-
mation
3.)
Screw connections
Accessories
2.1 Storage bag - Fold with o o o
2.2 Tie down kit - Damages o o o
2.3 Headrest pads - Width adjustment o o o
2.4 Thorax support - Width & height adjustment o o o
2.5 Abduction block (accessories) o o
2.6 Retainer o o o
2.7 Grab rail (accessories) - Locking (tripod springs) o o o
2.8 Therapy tray (accessories) - Locking (tripod springs)
- Angle adjustment
- Depth adjustment
o
o
o
o o
2.9 Belt xings:
Lap belt, ve-point harness, foot
belts, ankle huger, groin strap,
xation jacket, chest-shoulder pad
- Closures o o o
2.10 Winter warmer - Damage o o
2.11 Canopies (accessories) - Angle adjustment of canopy
- Plug connection to the adapter
o
o
o o
Do the seat unit settings meet the
user‘s requirements? o
Notes:
The maintenance was performed by: .............................................................. on: ......................................
5.2 Maintenance
schedule

14
6. Seat settings
6.1 Seat width
The seat width of the DURO / DURO Cross can be adjusted by moving
the thigh - or the hip supports.
The following adjustment ranges result for the two sizes:
Size 1: 23 -34 cm
Size 2: 28 -39 cm
Wing nut screws on the underside of the seat plate secure the
connection.
An additionally attached nut serves as protection against loss and
should always be mounted.
The pad is secured to the seat panel by a screw connection.
The desired seat widths can be achieved by shifting in 2 slotted holes.
In addition, the depth positioning can be adjusted.
Adjustment range narrow and front
Adjustment range wide and rear

15
6.2 Seat depth
Bingo Evolution offers an enormous ability to grow with the seat depth.
The following adjustment ranges result for the two sizes:
Size 1:
Size 2:
Measuring point front edge of seat panel to back tube
In order to adjust the seat depth, a total of 4 screw connections
must be loosened.
These are located on the underside where the seat frame is bolted to the
support brackets.
First, the front screws are loosened.
Then loosen the rear screw connections.
26 - 40 cm
31 - 45 cm
The seat panel can now be moved forwards or backwards to the desired
size.
Finally, tighten all screw connections again!
Smallest seat depth

16
6.3 Back height
Depending on the size, DURO / DURP Cross offers different adjustable
back heights.
Size 1:
SIze 2:
45 - 63 cm
61 - 83 cm
By opening the indicated wing nut screws, the upper back section can
be pulled out or pushed in opposite the base.
Back height low
Back height low
Back telescoped
Largest seat depth

17
6.4 Seat angle
DURO / DURO Cross allows two different seat angles to be preset.
16° and 20°.
The adjustment is made by screwing the rear strut opposite the support
angle.
Depending on which of the indicated holes the screw connection is
made, a different seat angle is set.
Screw connection in the upper hole: 20°
Screw connection in the lower hole: 16°
The desired back angle can be set with the help of the locking bolt.
6.5 Recline
The back angle of the DURO /DURO Cross can be adjusted between
78° and 120° in 8positions relative to the seat surface.
In addition, the back section can also be easily folded down and remo-
ved.

18
Standard:
In addition to the adjustment range in the beam, offers an additional
adjustment possibility by gluing in 3x1 cm wide foam inserts per side.
6.7 Width headrests
DURO &DURO Cross can be equipped with the standard headrests,
as well as with alow form
Low form:
Provides a total adjustment range of 2cm by sliding in 1cm slotted
holes in the pad support. Distance between supports:
Size 1:14-16 cm
Size 2:18-20 cm
By loosening the indicated wing nut, the distance between both pads
and also the height can be adjusted.
The minimum and maximum adjustable distance for the sizes:
Size 1:12-22 cm
Size 2:17-27 cm
6.6 Width thorax
Optional thorax pelotte pads can be used to generate lateral upper body
support. The pads can be adapted precisely to the user. They are
adjustable in width, height and angle.
By loosening the front screw connection the angle of the pad can be
adjusted.

19
3 foam inserts with self-adhesive lm. If the inserts are glued to the
inside of the pad support, the distance between the sides is reduced
by 1 cm. This means that with a maximum of 6 inserts, the area can be
additionally reduced by a total of 6 cm.
This results in for:
Size 1:8-16 cm
Size 2:13-21 cm
Adjustment range of the slotted holes in the pad support.
6.8 Footrest angle
The footrest angle is preset to 90°. The adjustment range is +- 10°
(80° - 100°).
After loosening the four marked screw connections on the footrest holder
the footrest can be adjusted in depth.
This changes the anchor point of the footrest and thus also the footrest
angle. The further the footrest is pulled out to the front, the the greater
the angle. If the procedure is reversed the angle decreases accordingly.

20
7.2 Rear frame and rear axle
Rear frame DURO
- Check for general damage
- Brake function of the parking brake
- Brake rod bearing and brake pedal retention
- Checking the screw connections to the slider, rear axle tube and to the
connector
Rear frame DURO Cross
- Check for general damage
- Checking the screw connections to the slider and the clamp
7.3 Push bar
- Check for general damage
- Folding in via the release button
- Angle adjustment of the upper part of the push bar via the ratchet joints
- Latching of the push bail in unfolded state
7. Maintenance schedule
7.1 Front frame
- Check for general damage, bending
- Checking the screw connections to the support bracket
- Locking of the push bar in the unfolded state, bolt must release from
the lock when folded and lock in the rear frame joint when unfolded.
Other manuals for DURO
2
This manual suits for next models
1
Table of contents
Other Hoggi Mobility Aid manuals