Holman DLRGB3003 User manual

User Guide
ø30mm RGB Colour
Deck Lights
30mm DLRGB3003
DOWNLOAD THE
LATEST MANUAL!

2 of 16
Holman RGB Colour Deck Lights use a 4-Pin Plug + Socket connection.
Only other Holman 4-Pin Plug + Socket products are compatible with these
lights. These lights are not compatible with other brands and will void your
warranty if used with other brands.
4-Pin Plug + Socket Connection
Contents
Overview 3
Introduction 3
Package Contents 3
Setup 4
Choosing your controller 4
Mounting your controller 5
Installation 6
Main Lighting Cable (Extension Cable) 6
Connection Tee 7
Deck Light Spacing 8
Drilling Holes 9
Inserting Deck Lights 10
Deck Lights Connection Drawing 11
Inserting Multiple Deck Light Packs 12
Specifications 14
Warranty 15
PRODUCT CODE: DLRGB3003
ÁPlease read these instructions in full before proceeding with setup.
iOS is a trademark of Apple Inc. Android is a trademark of Google LLC. The
Android robot is reproduced or modified from work created and shared by
Google and used according to terms described in the Creative Commons 3.0
Attribution License. All other content is Copyright©HolmanIndustries2023

3 of 16
Overview
Introduction
Thank you for purchasing Holman 30mm RGB Colour DeckLights.
Our system is completely DIY and designed to help illuminate and add
ambience to your outdoor space. These can also be used to light up
wooden steps or create a safety barrier around the edge of your decking.
®This instruction manual contains useful information on the proper use
and care of this product. Please read through all instructions before
attempting assembly. Keep this user guide handy for future use.
Package Contents
1. 5× 30mm DAISY-CHAIN deck lights
2. 1× 30mm END deck light
3. 1× 4-Pin Connection Tee
2
3
1

4 of 16
Setup
Choosing your controller
Holman have a range of lighting controllers to suit all users. Choose the
correct RGB Colour Lighting Controller that suits your requirements.
RGB Colour Wi-Fi Garden Light Controller
Our latest Lighting Controller features Wi-Fi
connectivity, allowing access to your Garden
Lights from anywhere in the world. Smart
automations and custom scene options allow
you to light up your garden, however you want.
RGB Colour Bluetooth®Garden Light
Controller. Our Garden Light Controller
gives you custom scenes and full brightness
control with a Bluetooth®connection
and the iGardener™ app. Connect up
to 4 controllers to one device.
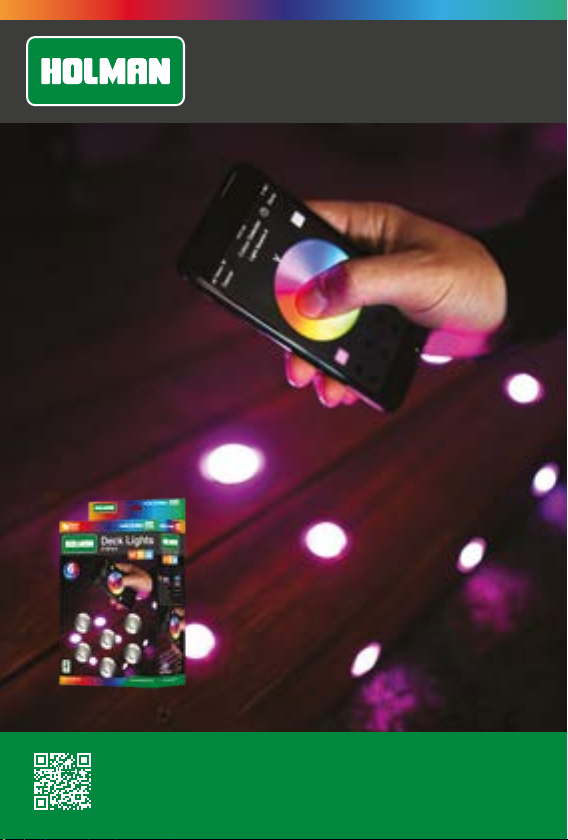
Control your garden from anywhere in the world, day or night, with
Holman Home Wi-Fi control. Enjoy complete control of your irrigation
and garden lighting, wherever internet access is available.
Take full control of your garden watering and lighting with a Bluetooth®
connection and a tap of your iPhone or Android, with the iGardener™
smartphone app!

5 of 16
Setup
Mounting your controller
Before beginning installation of your Deck Lights, you will need to
install your LightingController to determine your starting point.
For ease of use, eye level placement is recommended.
Ideally, your controller location should not be exposed to
rain or areas prone to flooding or heavy water.
1. Install the Lighting Controller [a] near a
240V AC power point ideally located in a
house, garage, or exterior electrical cubicle
®All Holman controllers have a 60w capacity.
Lighting set-ups that include more that 60w of
garden lights will require additional controllers
a

6 of 16
Installation
Main Lighting Cable (Extension Cable)
Once the Lighting Controller is mounted, you can connect
your main lighting cable. This cable is where you will ‘branch’
off your Deck Lights or other Holman lighting products.
1. Connect your first Extension Cable [a]
to the Lighting Controller [b]
2. Secure the Extension Cable by hand tightening the
weather proof end cap [c] on the end of the cable
®Extension Cables are available in 1m, 2m, 5m and
10m. Choose the correct length to reach from your
LightingController to your first lot of Deck Lights
c
a
b

Installation
Connection Tee
Each pack of Deck Lights comes with a ConnectionTee.
This is what connects your DeckLights to the main lighting cable.
1. Join one end of the Connection Tee [a] to the Extension Cable [b]
2. Secure the Connection Tee by hand tightening
the weather proof end cap [c]
3. ConnectionTees come with one mini cable end [d],
this end connects to your lighting product
ÁDo not use more than one (1) pack of Deck Lights per
Connection Tee. Doing so may result in wattage loss
®If you are connecting more than one pack of DeckLights,
refer to the connection diagram on page 12 and 13
c
b
a
d

8 of 16
Installation
Deck Light Spacing
Deck Lights come with 1800mm of space between each light when
connected. Before installation, we suggest marking your decking exactly
where you want to install your lights to ensure the spacing is correct.
1800mm
1800mm
1800mm
1800mm
1800mm
900mm
1. Main cable size ø15mm 2. Mini cable size ø10mm
11
2
2

9 of 16
Installation
Drilling Holes
Deck panels will need to be
removed to hide lighting cables
underneath. For safety, we
also recommend removing
deck panels to ensure no
other cabling is behind.
®Refer to our sizing chart
below to determine the
correct spade drill bit size
1. Remove the deck panels
that you will be drilling into
2. Drill the required holes
into your deck that were
marked previously [a]
18mm
Deck Lights
30mm
Deck Lights
45mm
Deck Lights
SPADE DRILL
BIT SIZE 14mm 22mm 30mm
a
Extend your garden
lighting without any limits.
Our 2m Spacer Cable is
perfect for adding extra
space in-between your
Deck Lights, or branching
out further from the main
garden lighting cable.
2m
Mini
Spacer
Cable
USE WITH MINI
CABLE ONLY
ø10mm

10 of 16
Inserting Deck Lights
1. Insert both cable
ends of one of your
Daisy-Chain Deck Lights
[a] through the first drill hole
2. Push the Deck Light into
your drill hole [b] until it is
flush with your decking.
The metal arms will secure
against the back of your deck
3. Connect this Deck Light to
your Connection Tee [c]
with the mini cable end
4. Insert the rest of your
Daisy-Chain Deck Lights
into your deck using
steps 1 and 2
5. Insert the End Deck Light
into the 6th drilled hole
and connect to the last
Daisy-Chain Deck Light
6. Connect the cabling of all
Deck Lights together
®Refer to the opposing drawing
for correct installation
®Refer to the steps
on page 12 to 13 for
installing multiple packs
of Deck Lights
Installation
a
b
c

11 of 16
Installation
Deck Lights Connection Drawing
1. Garden Light Controller
2. Extension Cable
3. Connection Tee
4. Daisy-Chain Deck Lights
5. End Deck Light
1
2
3
4 5
4 4
44
The Holman website has a host of additional information on features. Head to
support.holmanindustries.com.au for more tips, tricks and support content.
If you still need help, feel free to email our friendly Customer Service team at

12 of 16
Installation
Inserting Multiple Deck Light Packs
1. Attach your second Extension Cable [a] to the
free end of your first Connection Tee [b]
®If you are continuing your row of Deck Lights from earlier, ensure
that this Extension Cable is long enough to reach from your
first Connection Tee, to your next empty deck light space
2. Join the Connection Tee [c] from your second pack of
Deck Lights to your second Extension Cable
3. Install your second set of Daisy-Chain Deck Lights [d] and
End Deck Light [e] as per the previous steps on page 10
4. If you are ending your lighting system here, ensure to attach the
weatherproof end cap [f] onto the end of your Connection Tee
®To expand your lighting system further, join additional
Extension Cables, Expansion Tees or Connection
Tees to your second Connection Tee

13 of 16
Installation
a
d
e
Pack #2
Existing System
Extension
Lead
b
c
f

14 of 16
Specications
30mm RGB Colour Deck Lights
Input 12 V
Light Output 0.3w per light
Pack Output 1.8w total
Size ø30mm
Height 25mm
Drill Bit Size 22mm
Brightness 6 lm
Beam Reach 1m max
Colour Range RGB
Beam Angle 120º
Lifespan 50,000 hrs
Waterproof Rating IP67
Connection 4-Pin Plug + Socket
Housing Stainless steel and polycarbonate
Deck Light Cable Length 1800mm
Deck Light Cable Diameter 10mm
Leader Cable Length 900mm

15 of 16
Warranty
2 Year Replacement Guarantee
Holman Industries offers a 2 year
replacement guarantee with this product.
In Australia our goods come with
guarantees that cannot be excluded
under the Australian Consumer Law. You
are entitled to a replacement or refund
for a major failure and compensation for
any other reasonably foreseeable loss or
damage. You are also entitled to have the
goods repaired or replaced if the goods
fail to be of acceptable quality and the
failure does not amount to a major failure.
As well as your statutory rights referred
to above and any other rights and
remedies you have under any other laws
relating to your Holman product, we also
provide you with a Holman guarantee.
Holman Industries guarantees this
product against defects caused by faulty
workmanship and materials for 2 years
domestic use from the date of purchase.
During this guarantee period Holman
Industries will replace any defective
product. Packaging and instructions
may not be replaced unless faulty.
In the event of a product being replaced
during the guarantee period, the
guarantee on the replacement product
will expire 2 years from the purchase
date of the original product, not 2years
from the date of replacement.
To the extent permitted by law, this Holman
Replacement Guarantee excludes liability
for consequential loss or any other loss
or damage caused to property of persons
arising from any cause whatsoever. It
also excludes defects caused by the
product not being used in accordance with
instructions, accidental damage, misuse,
or being tampered with by unauthorised
persons, excludes normal wear and tear
and does not cover the cost of claiming
under the warranty or transporting the
goods to and from the place of purchase.
Should you suspect your product may
be defective and need some clarification
or advice please contact us directly:
1300 716 188
support@holmanindustries.com.au
11 Walters Drive,
OsbornePark 6017 WA
If you are certain your product is
defective and is covered by the terms
of this warranty, you will need to
present your defective product and
your purchase receipt as proof of
purchase to the place you purchased
it from, where the retailer will replace
the product for you on our behalf.

We really appreciate having you as a customer, and
would like to say thank you for choosing us.
We recommend registering your new product on our website. This will ensure we have
a copy of your purchase and activate an extended warranty. Keep up to date to with
relevant product information and special offers available through our newsletter.
www.holmanindustries.com.au/product-registration/
Copyright © 2023 Holman Industries
Thanks for being a
#SMARTGARDENER
Table of contents
Other Holman Lighting Equipment manuals