Holzstar TKS 254 E User manual

Instruction Manual
TKS SERIE
Circular Table Saw
TKS 254 E - 230V
TKS 254 E

Imprint
Product identification
Manufacturer Stürmer Maschinen GmbH
Dr.-Robert-Pfleger-Str. 26
D-96103 Hallstadt
Fax:
E-mail:
Internet:
0049 (0) 951 96555 - 55
www.holzstar.de
Information on Operating Instructions Original operating instructions
Issue: 02/07/2018
Version: 1.01
Language: English
Author: SN
Copyright Information
Copyright © 2018Stürmer Maschinen GmbH, Hallstadt, Germany.
The contents of these Operating Instructions are under the exclusive ownership of Stürmer Maschinen GmbH.
Distribution and copying of this document, and any usage and communication of its content are prohibited unless
expressly permitted. Any breach commits to damage compensation.
Technical changes and errors reserved.
Item number: 5902025
Circular Table Saw
TKS 254 E - 230V

- 1 -
TKS 254E CIRCULAR SAWBENCH
VER 2015-05
Table of content
CAUTION: Read the instruction manual before using the appliance............................................1
Safety Rules.......................................................................................................................................2
……The Operator............................................................................................................................5
……Before working.........................................................................................................................5
……While working...........................................................................................................................5
……After working............................................................................................................................5
……Machine maintenance..............................................................................................................6
Grounding Instructions........................................................................................................................6
Features.............................................................................................................................................7
Receiving............................................................................................................................................7
Mounting and adjusting the splitting wedge ......................................................................................9
Adjusting the cutting height...............................................................................................................10
Adjusting the Pivot............................................................................................................................11
Working with the circular table saw...................................................................................................11
Cutting narrower work pieces, edges and strips…............................................................................12
Diagonal limit stop ............................................................................................................................12
Angular limit stop..............................................................................................................................12
WIRING DIAGRAM...........................................................................................................................14
Spare parts drawings........................................................................................................................15
EU Declaration of Conformity.............................................................................................................23

- 2 -
TKS 254E CIRCULAR SAWBENCH
VER 2015-05
This manual has been prepared for the owner and operators of Model TKS 254E. Its purpose, aside from
machine operation, is to promote safety through the use of accepted correct operating and maintenance
procedures.
Completely read the safety and maintenance instructions before operating or servicing the machine. To obtain
maximum life and efficiency from your circular saw bench, and to aid in using the machine safely, read this
manual thoroughly and follow instructions carefully.
Safety Rules
As with all machines, there is a certain amount of hazard involved with the use of this circular sawbench. Use
the machine with the respect and caution demanded where safety precautions are concerned. When normal
safety precautions are overlooked or ignored, personal injury to the operator can result.
Read, understand and follow the safety and operating instructions found in this manual. Know the
limitations and hazards associated with this circular sawbench.
Electrical grounding. Make certain that the machine frame is electrically grounded and that a ground lead
is included in the incoming electrical service. In cases where a cord and plug are used, make certain that the
grounding plug connects to a suitable ground. Follow the grounding procedure indicated in the local electrical
code.
Eye safety. Wear an approved safety shield, goggles, or glasses to protect eyes. (NOTE: Common eye
glasses are not safety glasses.)
Personal protection. Before operating the machine, remove tie, rings, watch and other jewelry and roll up
sleeves above the elbows. Remove all loose outer clothing and confine long hair. Protective type footwear
should be used. Do not wear gloves.
Guards. Keep the machine guards in place for every operation for which they can be used. If any guards are
removed for maintenance, DO NOT OPERATE the machine until the guards are re-installed.
Work area. Keep the floor around the machine clean and free of scrap material, saw dust, oil and other liquids
to minimize the danger of tripping or slipping. Be sure the table is free of all scrap, foreign material and tools
before starting to cut. Make certain the work area is well lighted and that a proper exhaust system is used to
minimize dust. We recommend the use of anti-skid floor strips on the floor area where the operator normally
stands and that each machine’s work area is marked off. Provide adequate work space around the machine.
Operator position. Maintain a balanced stance and keep your body under control at all times. Do not stand in
line with the saw blade or work piece and do not allow anyone else to do so. Never climb on or near the saw.
Do not overreach. Use a support table or have a helper or “tailman” take stock away from the back side of
the blade.

- 3 -
TKS 254E CIRCULAR SAWBENCH
VER 2015-05
Housekeeping. Before turning on machine, remove all extra equipment such as keys, wrenches, scrap, and
cleaning rags away from the saw.
Careless acts. Give the work you are doing your undivided attention. Looking around, carrying on a
conversation, and “horseplay” are careless acts that can result in serious injury.
Disconnect machine before performing any service or maintenance or when changing blades. A machine
under repair should be RED TAGGED to show it should not be used until the maintenance is complete.
Alignment. Check the alignment of the splitter, fence and miter slot to the blade. A caution decal is installed
on each guard and splitter to remind the operator of the dangers of mis-alignment.
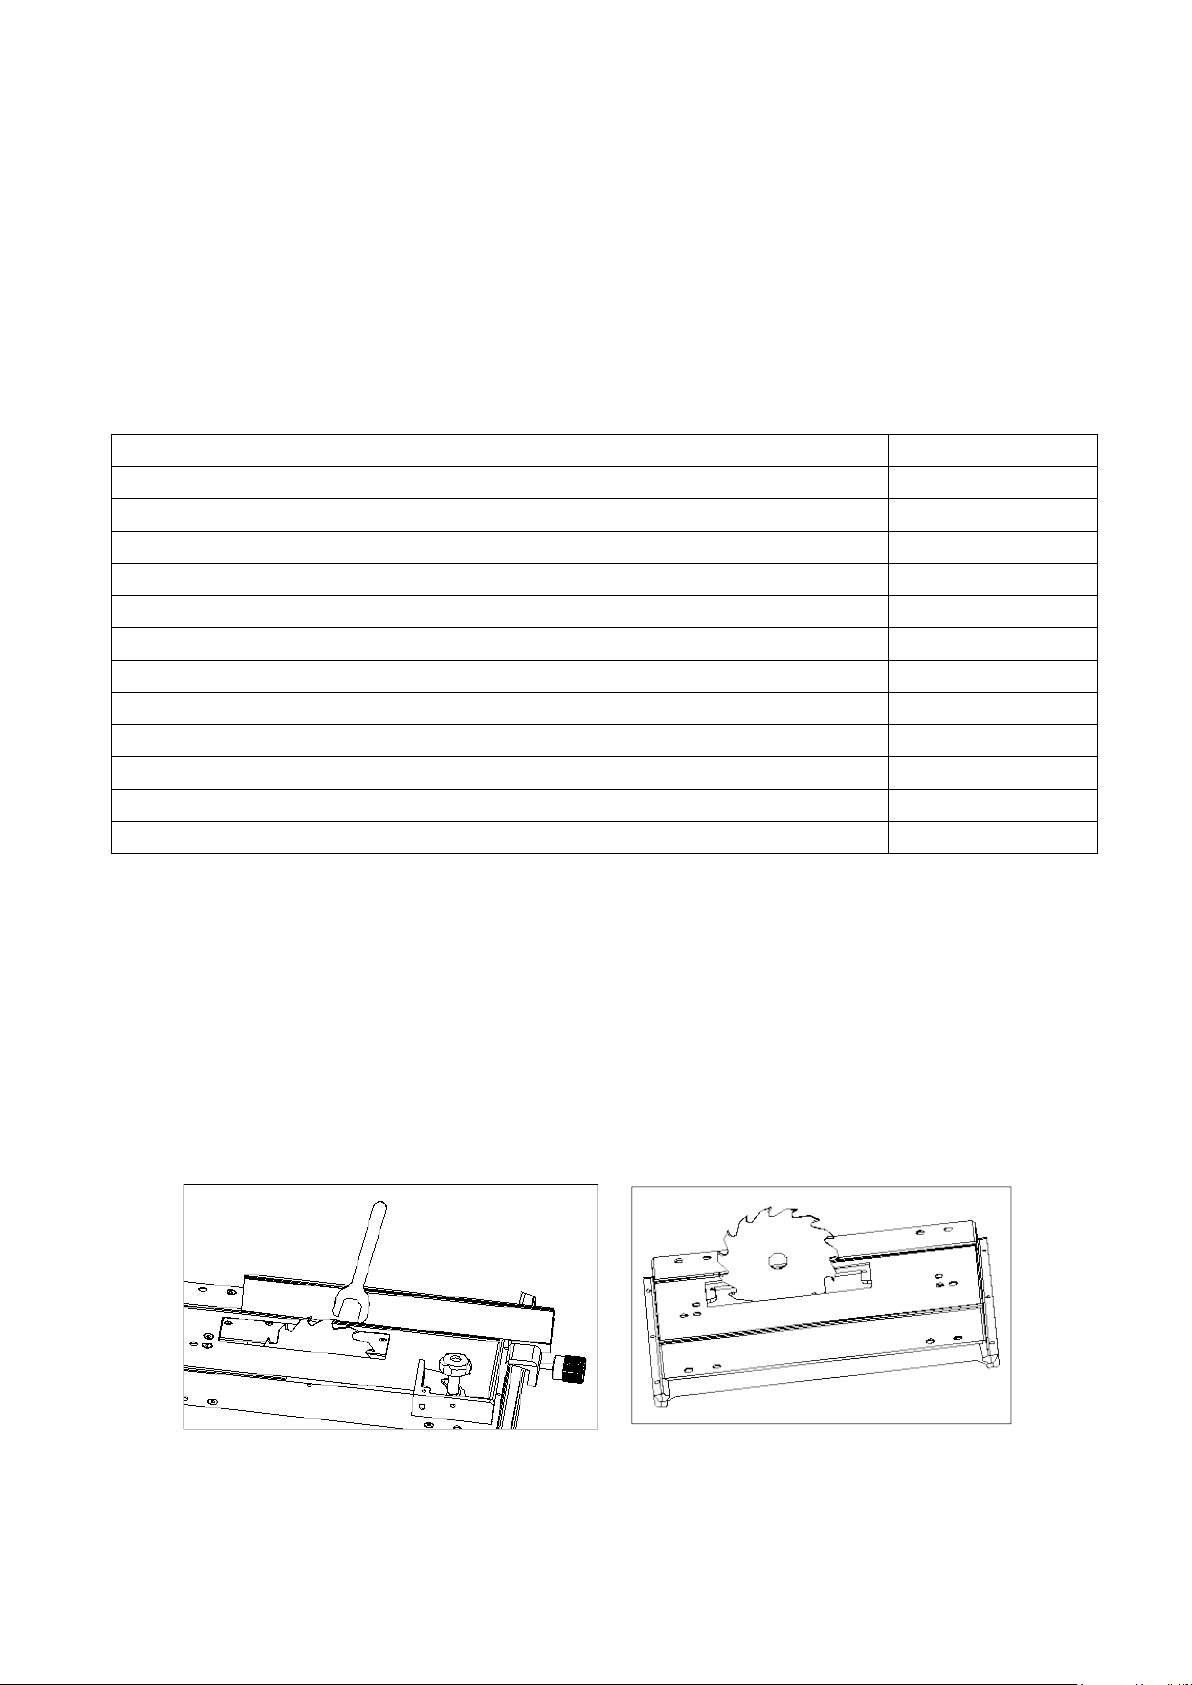
Maintain tools in top condition. Check the saw blade for cracks or missing teeth. Do not use a cracked or
dull blade or one with missing teeth or improper set. Make sure the blade is securely locked on the arbor.
Hand safety. Keep hands clear of the blade area. Do not reach past the blade to clear parts or scrap with the
saw blade running. Never saw free hand. Avoid awkward operations and hand positions where a sudden slip
could cause your hand to contact the blade.
Safety devices. Always use the splitter, blade guard, push stick and other safety devices for all operations
where they can be used. On operations such as dadoing or molding where the blade guard cannot be used,
use feather boards, fixtures and other safety devices and use extreme caution. Reinstall the splitter and blade
guard immediately after completing the operation that required their removal.
Saw blade rotation. Be sure the saw blade rotates clockwise when viewed from the motor side (left side) of
the machine.
Adjustments. Make all adjustments to the machine and operational setup with the power off. Never remove
the insert with the blade running.
Material condition. Do not attempt to saw boards with loose knots or with nails or other foreign material, on
its surface. Do not attempt to saw twisted, warped, bowed or “in wind” stock unless one edge has been jointed
for guiding purposes prior to sawing.
Large stock. Do not attempt to saw long or wide boards unsupported where spring or weight could cause the
board to shift position.
Job completion. If the operator leaves the machine area for any reason, he should turn “off” the power to the
table saw motor and wait until the saw blade comes to a complete stop before his departure. In addition, if the
operation is complete, he should clean the table saw and the work area. NEVER clean off the table saw with
power “on” and NEVER use the hands to clear sawdust and debris; use a brush.
If you are not thoroughly familiar with the operation of this circular sawbench, obtain advice from your
supervisor, instructor or other qualified person.

- 4 -
TKS 254E CIRCULAR SAWBENCH
VER 2015-05
Drugs, alcohol, medication. Do not operate this machine while under the influence of drugs, alcohol, or any
medication.
Health hazards. Some dust created by power sanding, sawing, grinding, drilling and other construction
activities contains chemicals known to cause cancer, birth defects or other reproductive harm. Some
examples of these chemicals are:
*Lead from lead-based paint.
*Crystalline silica from bricks and cement and other masonry products.
*Arsenic and chromium from chemically-treated lumber.
Your risk from these exposures varies, depending on how often you do this type of work. To reduce your
exposure to these chemicals, work in a well-ventilated area, and work with approved safety equipment, such
as those dust masks that are specifically designed to filter out microscopic particles.
Use proper extension cord: Make sure your extension cord is in good condition. When using an extension
cord, be sure to use one heavy enough to carry the current your product will draw. An undersized cord will
cause a drop in line voltage resulting in loss of power and overheating. If in doubt, use the next heavier gauge
the smaller the gauge number, the heavier the cord.
Familiarize yourself with the following safety notices used in this manual:
Familiarize yourself with the location of these decals on your table saw.
CAUTION: (This means that if precautions are not heeded, it may result in minor or moderate injury
and/or possible machine damage)
WARNING: (This means that if precautions are not heeded, it could result in serious injury or possibly
even death).
General Safety Procedures for Table Saw
This machine has been built exclusively for woodworking. Do not alter the design of the machine or use it for
purposes not intended by the manufacturer. The manufacturer is not liable for damage or injury, which results
from incorrect assembly, operation or electrical connections. This machine must be operated under strict
safety regulations. This is the only way to reduce the risk of accidents.

- 5 -
TKS 254E CIRCULAR SAWBENCH
VER 2015-05
……Location
Certain types of woods. press boards, etc. produce hazardous dust emissions when being
processed. For this reason, processing procedures must be performed with an exhaust unit (air
speed at the connection points: 20m/s) Be sure to switch on the machine and the exhaust unit
simultaneously. The main cable plug must be connected as appropriate for the electrical installation
and must have an earth lead (or a directly earth conductor for 380 V). It is advisable to have a
qualified electrical connection. Appropriate lighting must be provided in the work area.
……The Operator
Read the operating manual carefully to prevent machine accidents. Never work while under the influence of
drugs, alcohol or medications. Wear tight-fitting work clothes, safety goggles and safety shoes and tie back
long hair. Remove rings, wrist watches and bracelets before working.
Ear protection is recommended. Never climb onto the machine table: the machine may fall and cause injuries.
Keep children and visitors out of the workarea.
……Before working
Check that the sawing tool type is suited for the intended work. Immediately replace damaged or dull sawing
tools. Only work with the appropriate standard accessories. Always work with well-sharpened sawing tools
increase the risk of wood kick back. Note the correct rotational direction. As a general rule, check that sawing
tool wrenches and other items have been removed. Check that the sawing tool can rotate freely and does not
contact the limit stop, the safety equipment, the work piece or other objects. Keep out of the kick-back zone.
……While working
Wood must be hand fed uniformly and without jerking into the sawing tool, slightly more slowly when
processing hard wood or work pieces, which produce large amounts of dust. Never move the work piece
during a processing operation. Avoid uncomfortable working stances to reduce the risk of contacting the
rotating sawing tool. Do not bend over the rotating sawing tool. Remove debris from the machine table only
when the machine is off. Never use the machine table as a worktable while the sawing tool is rotating.
……After working
Never leave the machine operating without supervision. Remain at the machine until the sawing tool has
come to a complete stop. Remove debris and clean the machine and surrounding area so that the machine is
ready to use the nexttime.

- 6 -
TKS 254E CIRCULAR SAWBENCH
VER 2015-05
……Machine maintenance
Unplug the mains cable before any mechanical or electrical work is per-formed or when the sawing tool is
changed. Regularly lubricate mechanical parts: threaded rods, gears, driving chains, hinges, sliding parts,
etc.
Grounding Instructions
Caution: This tool must be grounded while in use to protect the operator from electric shock.
In the event of a malfunction or breakdown, grounding provides a path of least resistance for electric current
to reduce the risk of electric shock. This tool is equipped with an electric cord having an equipment-grounding
conductor and a grounding plug. The plug must be plugged into a matching outlet that is properly installed
and grounded in accordance with all local codes and ordinances.
Do not modify the plug provided. If it will not fit the outlet, have the proper outlet installed by a qualified
electrician.
Improper connection of the equipment-grounding conductor can result in a risk of electric shock. The
conductor, with insulation having an outer surface that is green with or without yellow stripes, is the
equipment-grounding conductor. If repair or replacement of the electric cord or plug is necessary, do not
connect the equipment-grounding conductor to a live terminal.
Check with a qualified electrician or service personnel if the grounding instructions are not completely
understood, or if in doubt as to whether the tool is properly grounded. Use only three wire extension cords that
have three-prong grounding plugs and three-pole receptacles that accept the tool’s plug.
Repair or replace a damaged or worn cord immediately.

- 7 -
TKS 254E CIRCULAR SAWBENCH
VER 2015-05
Features
FIG.1
Specifications

- 8 -
TKS 254E CIRCULAR SAWBENCH
VER 2015-05
Contents of the box
Saw body with switch 1 set
Saw blade guard with hose 1 pc
900 mitre gauge 1 pc
Host support 1 pc
Handwheel 1 pc
Guide fence 1 set
Slide rail 1 pc
Sliding carriage 1 set
Side extension table 2 set
Floor stand 1 set
Assembly and operating instruction/parts list 1 pc
Outstretched arm 2set
Tools 1 set
Installation & assembly
Remove the table insert
Block the spindle with current sawing tool; remove the flange (Fig. 2) & (Fig. 3) (thoroughly clean
when reassembling).
Note the direction of the teeth when replacing the saw blade. Replace the various connection elements
Fig. 2 Fig. 3
Receiving
Remove the saw and accessories from the shipping carton and inspect for damage. Any damage should be
reported to your distributor and shipping agent immediately. Before proceeding further, read your instruction
manual thoroughly to familiarize yourself with proper assembly, maintenance and safety procedures.

- 9 -
TKS 254E CIRCULAR SAWBENCH
VER 2015-05
Mounting and adjusting the splitting wedge
Fig. 4 Fig. 5
Loosen the flange base with a 13 mm wrench and insert the splitting wedge. Adjust the splitting
wedge and be sure to maintain a distance of approx. 3mm to the saw blade (Fig. 4). Securely fasten
the splitting wedge with screw. Check that the splitting wedge is parallel to the saw blade by means
of the table insert (Fig. 5).
Adjusting the longitudinal limit stop
The longitudinal limit stop must be adjusted so that it is exactly parallel to the saw blade. Firstly, set
the longitudinal limit stop to zero on the limit stop guide rail scale and then set the limit stop with
the guide rail precisely with respect to the saw blade. Secure the adjustment with the left hexagonal
socket screw (Fig. 6). (This procedure should be repeated each time the saw blade is replaced.)
Fig. 6 Fig. 7 Fig. 8

-10 -
TKS 254E CIRCULAR SAWBENCH
VER 2015-05
Use the right guide notch as an optical reference to check that the longitudinal limit stop setting is
parallel. (Fig. 7) & (Fig. 8). Then longitudinal limit stop can be moved or turned for flat work
pieces by loosening the lower M8 clamp screw in the limit stop holder. (Fig. 9) & (Fig. 10).
The longitudinal limit stop can be used on the left or the right side of the saw blade.
NOTE: Regularly check that the longitudinal limit stop is parallel to ensure perfect cutting.
Fig.9 Fig. 10
Adjusting the cutting height
Adjust the height with the hand wheel (Fig. 11)
Select a cutting height such that the saw blade teeth still protrude from the work piece to be processed.
(Fig.12)
Fig. 11 Fig. 12

-11 -
TKS 254E CIRCULAR SAWBENCH
VER 2015-05
Adjusting the Pivot
Release the lock knob A (Fig.13). The saw blade can be lowered by up to 45º by applying pressure to the
hand wheel B (Fig.14). The height can then be adjusted as the pressure on the hand wheel is removed.
Fig. 13 Fig. 14
Note: The maximum height adjustment must be reduced by 10 mm at pivot angles of 30ºor more.
Working with the circular table saw
Only use sharp, uniformly and sufficiently crossed circular saw blades. Adjust the splitting wedge and fasten it
securely. Adjust the protective cover appropriately for the sawing tool thickness. Adopt a working stance as
indicated in the figure. Keep out of the danger zone. (Fig 15)
Feed the work piece with both hands (be sure to use the feeding rod near the saw blade) until it is behind the
splitting wedge. Secure longer work pieces so that they do not flip after the cutting procedure (i.e. with a table
extension).(Fig.16)
Fig. 15 Fig. 16

-12 -
TKS 254E CIRCULAR SAWBENCH
VER 2015-05
Cutting narrower work pieces, edges and strips…
Use the flat edge of the longitudinal limit stop for work pieces narrower than 120 mm. Use a parallel
intermediate piece if necessary. Secure longer work piece so that they do not flip after the cutting procedure
(i.e. with a table extension). (Fig 17)
Diagonal limit stop
The diagonal limit stop can be mounted on the left or right hand side of the saw blade in the T-groove.
Diagonal cuts between 90ºand 45ºcan be exactly made due to the optional diagonal positioning. ( Fig.18)
Diagonal positioning is made possible by the 90ºorientation of the two supporting surface of the limit stop.
Fig. 17 Fig. 18
Cross-cutting narrower work pieces
Adjust the guard rail so that the work piece parts are not able to contact the upwards rotating part of the saw
blade. Feed work pieces only with a cross limit stop or a cross feeder.
(CAUTION: Do not remove pieces of debris from the sawing tool area with your hands.)
Angular limit stop
The angular limit stop can be inserted into the machine table T-grooves on the right or left hand side of the
saw blade. Cross-cuts can be made at all angles by pivoting the limit stop. The 90ºmilled angular limit stop is
especially suited for exact miter cuts. See the frame-cutting example.

-13 -
TKS 254E CIRCULAR SAWBENCH
VER 2015-05
FIG.19
Malfunctions
Machine vibrates
Clamping levers for height and diagonal adjustment are not tightly screwed.
Sawing tool is not tightly screwed.
Cuts are not clean/wood is burned
Sawing tool is dull.
Sawing tool is incorrectly mounted.
Rapid sawing tool wear
Sawing tool is incorrectly sharpened.
Contaminated wood (cement, sand, nails).
Motor becomes too warm (It is too hot to touch with bare hands, it continuously shuts itself off.)
By all means have a qualified electrician inspect the motor.

-14 -
TKS 254E CIRCULAR SAWBENCH
VER 2015-05
Machine comes to a stop
Overloading (feeding too rapid, sawing tool is dull).
Wood is raised by the rear side of the saw blade
Longitudinal limit stops are not parallel.
Splitting wedge is not aligned or crossing is too weak.
The spindle height is difficult to adjust
Thoroughly clean and lubricate the threaded rod, gears and slide tracks.
Check the operation of the clamping lever.
Miscellaneous
Bearings make unusual noises. Inspect the bearings and replace if necessary.
Check the tension of the poly-v belt (poly-v belts are accessible when the exhaust cover is removed).
WIRING DIAGRAM

-15 -
TKS 254E CIRCULAR SAWBENCH
VER 2015-05
FINAL ASSEMBLY

-16 -
TKS 254E CIRCULAR SAWBENCH
VER 2015-05
FINAL ASSEMBLY PART LISTS
NO. CODE DESCRIPTION QTY NO. CODE DESCRIPTION QTY
1
T0814
Underprop
4
2
TS2706
Supporting plate
2
3
Hex nut M6
12
4
Washer
φ6
12
5
TS2707
Linking plate I
1
6
TS2707A
Linking plate II
1
7
Hex bolt M6X16
12
8
Hex nut M5
4
9
Washer
φ5
4
10
Screw M5X12
4
11
TS2708
Three-way pipe
1
12
Screw M6X16
4
13
Washer
φ6
4
14
TS25
Saw faceplate
1
15
Big washer
φ6
4
16
Hex nut M6
4
17
Screw M5X14
2
18
K41942
Threaded shaft
support
1
19
Washer
φ5
2
20
Hex locking nut M5
2
21
K41937
Threaded nut
1
22
K41936
Limitative bush
2
23
Set screw M8X6
2
24
TS41
Threaded shaft
1
25
Set screw M5X8
2
26
TS39
Bearing rack
1
27
Washer
φ5
3
28
Hex bolt M5X12
3
29
Bearing 6000
1
30
“C” ring
φ
26
1
31
C ring
φ
10
1
32
K41923
Hand wheel
1
33
Set screw M6X12
1
34
Screw M6X45
4
35
K41901
Sliding table
assembly
1
36
Hex nut M8
2
37
Washer
φ8
2
38
Screw M8X10
2
39
K41913
Guide rail
1
40
Screw M6X16
2
41
Washer
φ6
2
42
Screw M6X10
4
43
Washer
φ6
4
44
TS24
Protective cover
1
45
Hex nut M6
4
46
Washer
φ6
4
47
Hex bolt M6X16
4
48
Switch box
1
49
TS27
Box assembly
1
50
TS26
Protective cover
1
51
Washer
φ6
4
52
Screw M6X10
4
53
K41917
Outstretched arm
2
54
K41916
Angle iron
4
55
Big washer
φ6
8
56
Hex nut M6
8
57
Hex nut M6
8
58
Washer
φ6
8
59
Hex bolt M6X16
8
60
K41906
Miter gauge
1
61
K4192102
Locking handle
1
62
Pin 3X12
1
63
TS2103
Locking shaft
1
64
Big washer
φ8
2
65
K41922
Space bush
2
66
TS07
Saw assembly
1
67
Big washer
φ8
1
68
Hex locking nut M8
1
69
Hex nut M8
1
70
Hex nut M6
4

- 17 -
TKS 254E CIRCULAR SAWBENCH
VER 2015-05
71
Washer
φ6
4
72
TS32
Supporting rear
2
73
Screw M6X30
4
74
Hex nut M6
8
75
Big washer
φ6
8
76
TS11
Extending table
2
77
Hex bolt M6X16
8
78
Screw M4X6
1
79
Tooth washer 4
1
80
K41912
Pointer
1
81
Screw M6X16
8
82
Washer
φ6
8
83
Hex nut M6
8
84
Washer
φ6
8
85
K41904
Supporting plate
4
86
Hex locking nut M6
4
87
Washer
φ
6
4
88
TS34
Main table
1
89
Screw M6X45
4
90
K41909
Vertical fence
2
91
K41905
Fence assembly
1
92
Hex bolt M6X16
8
93
TS31
Insert
1
94
Screw M6X10
2
95
Screw M4X10
3
96
TS0716
Aluminous plate
1
97
Throat banding
φ
70
2
98
Dust tube 70
1
99
Throat banding
φ
32
100
Dust tube 32
1
101
Plug
1
102
Metric bushing
M16
1
103
Screw ST3.8X10
2
104
Switch
1
105
Screw ST3.8X16
4
106
Switch box cap
1
107
Hex nut M5
4
108
MX1614
Fixing plate
2
109
Screw M5X12
4
110
111
Hex bolt M6X12
1
112
Metric bushing
M16
2
113
K419Y05
Pipe support
1
114
Hex nut M6
1
115
K419Y05
Pipe support
1
116

-18 -
TKS 254E CIRCULAR SAWBENCH
VER 2015-05
SLIDING TABLE ASSEMBLY
SLIDING TABLE ASSEMBLY PART LISTS
NO.
CODE
DESCRIPTION
QTY
NO.
CODE
DESCRIPTION
QTY
1
K0105
C-shaped ring
1
2
K0104
sliding axle
1
3
K0103
Eccentric bush
1
4
GB6172-86
Hex thin nut M8
1
5
GB77-85
Set screw M8X25
1
6
K0118
Eccentric nut
2
7
K0117
Trolley
4
8
GB97.1-85
Washer
φ
6
4
9
K0112
T-shaped bolt
1
10
GB78-85
Set screw M8X10
1
11
K0120
Homocentric nut
2
12
CTLS
screw M6X35
4
13
K0107
Rhombic handgrip
2
14
GB97.1-85
Washer
φ
6
3
15
K0113
Connecting block
2
18
K0113
Plastic block
1
19
GB5783-86
Hex bolt M6X25
1
20
K0106
Angle fence
1
21
GB896-86
“E” ring
φ
12
1
22
K0115
Press handle
1
23
GB6170-86
Hex nut M6
2
24
K0119
Angle.ruler
1
25
K0109
Sliding table
1
26
ZSM10
Locking nut M10
1
27
GB97.1-85
Washer
φ
10
1
28
K0111
Turing plate
1
29
K0102
Small handgrip
2
30
GB97.1-85
Washer
φ
6
1
31
K0101
Locating pole
1
32
GB5783-86
Hex bolt M6X35
1
Table of contents
Other Holzstar Saw manuals

Holzstar
Holzstar KGZ 305 E User manual

Holzstar
Holzstar TKS Series User manual

Holzstar
Holzstar HBS 400 User manual

Holzstar
Holzstar HBS 231-1 User manual

Holzstar
Holzstar KGZ210 E User manual

Holzstar
Holzstar TKS 316 E User manual

Holzstar
Holzstar FKS 315-2000 E User manual

Holzstar
Holzstar ADH 2540 230V User manual

Holzstar
Holzstar HBS Series User manual

Holzstar
Holzstar TKS 250 SC User manual