manuals.online logo
Brands
  1. Home
  2. •
  3. Brands
  4. •
  5. HOMCOM
  6. •
  7. Indoor Furnishing
  8. •
  9. HOMCOM 839-275 User manual

HOMCOM 839-275 User manual

EN_IMPORTANT, RETAIN FOR FUTURE REFERENCE: READ CAREFULLY.
FR_IMPORTANT:A LIRE ATTENTIVEMENT ET À CONSERVER POUR CONSULTATION
ULTÉRIEURE.
ES_IMPORTANTE, LEA Y GUARDE PARA FUTURAS REFERENCIAS.
PT_IMPORTANTE, RETER PARA REFERÊNCIA FUTURA: LEIA ATENTAMENTE.
DE_WICHTIG! SORGFÄLTIG LESEN UND FÜR SPÄTER NACHSCHLAGEN AUFBEWAHREN.
IT _ IMPORTANTE! CONSERVARE IL PRESENTE MANUALE PER FUTURO RIFERIMENTO E
LEGGERLO ATTENTAMENTE.
US_CAUS_CA
IN220800285V01_GL_839-275
Tools Recommended
839-275
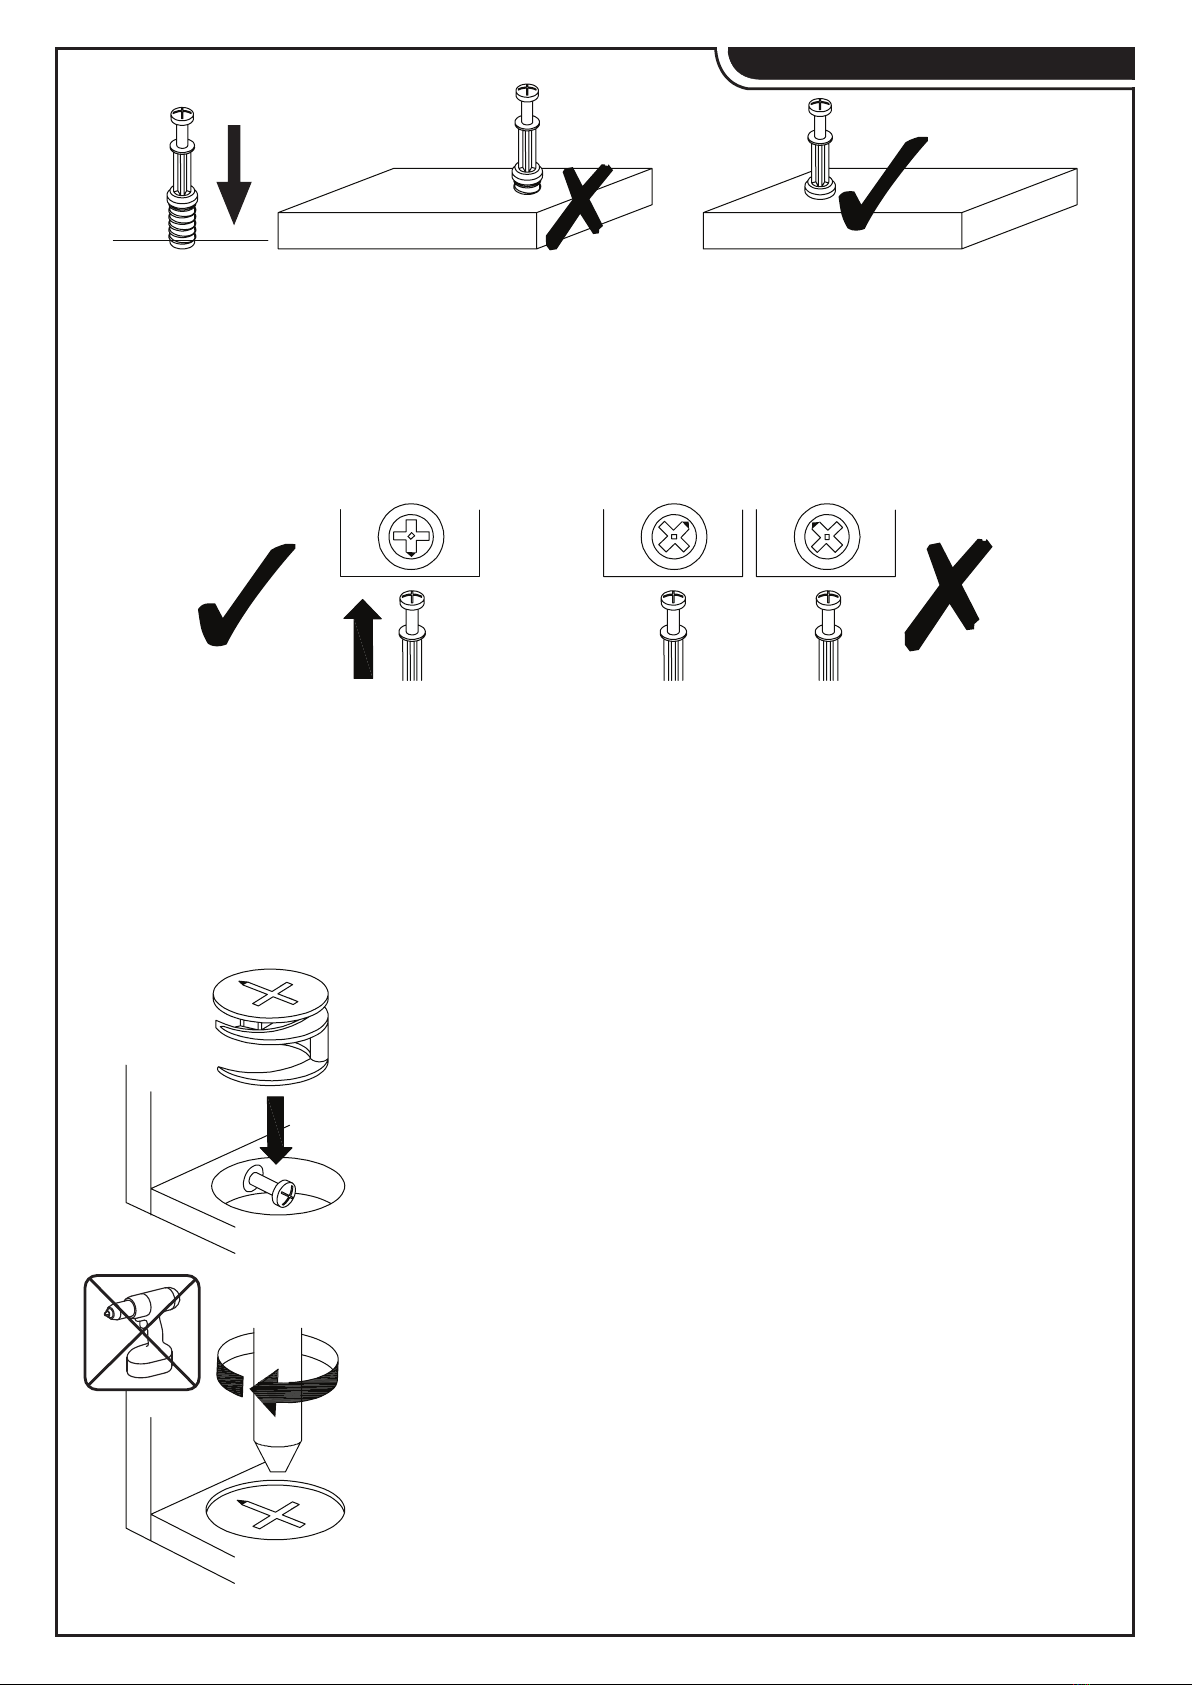
EN_QUICKFIT:Tighten quickfit until shoulder is flush with panel.Do not overtighten or undertighten.
FR_RACCORD RAPIDE:Faites serrer le raccord rapide jusqu'à ce que l'épaulement soit
parfaitement encastré dans le panneau. Il ne faut ni trop serrer ni insuffisamment serrer.
ES_QUICKFIT:Apriete quickfit hasta que el hombre se descargue con el panel. NO lo sobreapriete
ni lo apriete poco.
PT_AJUSTE RÁPIDO: Aperte o ajuste rápido até estar nivelada com o painel. Não apertar
demasiado ou excessivamente.
DE_QUICKFIT:Ziehen Sie den Quickfit fest, bis die Schulter mit der Platte bündig ist. Bitte nicht zu
fest oder zu schwach anziehen.
IT_MONTAGGIO RAPIDO:Stringere il montaggio rapido fino a quando la spalla è a filo con il
pannello, non stringere troppo o troppo poco.
EN_CAM LOCK:When fitting cam lock, ensure starting position is correct before you insert
connecting quickfit.
FR_SERRURE BATTEUSE:Avant d'insérer la serrure batteuse, veillez à la bonne orientation avant
d'insérer le raccord rapide.
ES_CIERRE DE LA CÁMARA:Cuando instale el cierre de la cámara, asegúrese de que la posición
de inicio es correcta antes de que inserte el quickfit conector.
PT_BLOQUEIO: Ao instalar o bloqueio, assegurar-se de que a posição inicial está correcta antes
de inserir o encaixe de ligação rápida.
DE_CAM-LOCK:Achten Sie bei der Montage des Cam-Locks auf die richtige Ausgangsposition,
bevor Sie den Quickfit einsetzen.
IT_BLOCCAGGIO A CAMMA:Quando si monta il bloccaggio a camma, assicurarsi che la posizione
iniziale sia corretta prima di inserire il montaggio rapido di collegamento.
EN_Quickfit head should be in the centre of the cam lock when the two
panels are joined.
Cam lock should be inserted before quickfit.
FR_Lorsque les deux panneaux sont assemblés, la tête du raccord
rapide doit reposer au centre de la serrure batteuse.
Il faut insérer la serrure batteuse avant le raccord rapide.
ES_El cabezal del quickfit debe estar en el centro del cierre de la cámara
cuando se unan los dos paneles.
Se debe insertar el cierre de la cámara antes que el quickfit.
PT_A cabeça de ajuste rápido deve estar no centro da fechadura quando
os dois painéis estão unidos.
A fechadura de cames deve ser inserida antes de ser rápida.
DE_Der Quickfit-Kopf sollte sich in der Mitte des Cam-Locks befinden,
wenn die beiden Platten zusammengefügt sind.
Der Cam-Lock sollte vor dem Quickfit eingesetzt werden.
IT_La testa del montaggio rapido deve trovarsi al centro del bloccaggio a
camma quando i due pannelli sono uniti.
Il Bloccaggio a Camma deve essere inserito prima del montaggio rapido.
EN_Turn cam lock clockwise to tighten.
FR_Faites tourner la serrure batteuse dans le sens des aiguilles d'une
montre pour la resserrer.
ES_Gire el cierre de la cámara en sentido horario para apretarlo.
PT_Rodar o bloqueio no sentido dos ponteiros do relógio para o apertar.
DE_Drehen Sie den Cam-Lock im Uhrzeigersinn, um ihn festzuziehen.
IT_Ruotare il bloccaggio a camma in senso orario per stringere.
USING CAM LOCK AND QUICKFIT
PARTS
1
4
3
8
5
67
2
9
9
4
3
10
11
12
14
13
Ax24 Bx16
x 1
x 1
Cx12
Ex 8
F
●
x 8 Hx16
+2(spare)
HARDWARE
300mm
+1(spare)
M8*40
M3.5*14
J
+1(spare)
+1(spare)
M7*50
300mm
Gx 4
M3.5*35
+1(spare)
D1 D2
EN_Do not confuse similar screws.
FR_Ne pas confondre des vis similaires.
ES_No confunda tornillos similares.
PT_Não confundir parafusos semelhantes.
DE_Verwechseln Sie ähnliche Schrauben nicht.
IT_Non confondere le viti simili.
NOTE
1
2
●
D1x 1
Fx 4
M3.5*14 300mm
Ax 4
6
7D1
F
8
6
7
F
F
F
F
A
A
A
A
EN_Please find the exact hole for installation, otherwise it will be misaligned.The screws on the drawer
slide must be leveled , otherwise it will affect the smoothness of the d rawer.
FR_Identifiez le trou exact pour l'installation, sinon il sera mal aligné. Les vis de la glissière du tiroir
doivent être nivelées, sinon cela affectera le fonctionnement du tiroir.
ES_Al instalar, encuentre el orificio exacto; de lo contrario, estará desalineado. Los tornillos en las
correderas del cajón deben estar nivelados, de lo contrario, afectará la suavidad al deslizar el cajón.
PT_Por favor encontre o orifício exacto para instalação, caso contrário será desalinhado. Os parafusos
na corrediça da gaveta devem ser nivelados, caso contrário afectará a suavidade da abertura da gaveta.
DE_Bitte finden Sie das genaue Loch für die Installation, sonst wird es falsch ausgerichtet werden. Die
Schrauben an der Schubladenführung müssen nivelliert werden, da sonst die Leichtgängigkeit der
Schublade beeinträchtigt wird.
IT_individuare il foro esatto per l'installazione, altrimenti ci sarà un disallineamento. Le viti sulla guida del
cassetto devono essere allineate, altrimenti influirà sulla scorrevolezza del cassetto.
3
4
●
Cx 4
Bx 4
M8*40
Ax 4
Bx4
M8*40
5
8
6
7
2
●
6
5
B
A
AA
B
B
B
B
B
B
C
C
C
M7*50
5
6
●
Cx 8
9
9
6
4
3
4
6
9
9
5
3
Ax 4
Bx4
M8*40
Hx 8
M7*50
A
A
A
A
B
B
B
B
C
C
C
C
C
C
C
C
H
H
H
H
H
H
H
H
7
8
●
Gx 4
4
4
9
9
5
3
3
1
Ax 8
Bx4
M8*40
10
11
12
Hx8
M3.5*35
A
A
A
A
AA
B
B
B
G
H
H
G
G
G
9
10
●
Ax 4
Fx4
M3.5*14
4
●
93
1
13
1
2
3
13
10
11
12
F
F
A
A
A
A
D2 x1
300mm
D2
EN_Be careful to push in the board when the both sides slide way been aligned.
FR_Prenez soin d'enfoncer la planche lorsque les deux côtés de la glissière sont alignés.
ES_Empuje con cuidado el tablero después de que los dos lados se hayan alineado.
PT_Ter o cuidado de empurrar a placa quando os dois lados estiverem alinhados.
DE_Achten Sie darauf, dass Sie die Platte einschieben, wenn die beiden Seiten so ausgerichtet sind,
dass sie gleiten.
IT_Fare attenzione quando si spinge il cassetto quando le due guide di scorrimento sono state allineati.
11
Ex 8
Done
●
E
E
E
E
E
E

Other HOMCOM Indoor Furnishing manuals

HOMCOM 801-204 Installation guide

HOMCOM

HOMCOM 801-204 Installation guide

HOMCOM 838-337V80 User manual

HOMCOM

HOMCOM 838-337V80 User manual

HOMCOM 312-061 User manual

HOMCOM

HOMCOM 312-061 User manual

HOMCOM 820-090V01 User manual

HOMCOM

HOMCOM 820-090V01 User manual

HOMCOM 311-029 User manual

HOMCOM

HOMCOM 311-029 User manual

HOMCOM 312-043 User manual

HOMCOM

HOMCOM 312-043 User manual

HOMCOM 312-001 User manual

HOMCOM

HOMCOM 312-001 User manual

HOMCOM 831-495 Installation guide

HOMCOM

HOMCOM 831-495 Installation guide

HOMCOM 831-496V90 Installation guide

HOMCOM

HOMCOM 831-496V90 Installation guide

HOMCOM 820-305V00 User manual

HOMCOM

HOMCOM 820-305V00 User manual

HOMCOM 713-127V80 Installation guide

HOMCOM

HOMCOM 713-127V80 Installation guide

HOMCOM 836-385 Installation guide

HOMCOM

HOMCOM 836-385 Installation guide

HOMCOM 836-198 Installation guide

HOMCOM

HOMCOM 836-198 Installation guide

HOMCOM 836-230 User manual

HOMCOM

HOMCOM 836-230 User manual

HOMCOM 311-022 User manual

HOMCOM

HOMCOM 311-022 User manual

HOMCOM 836-501 Installation guide

HOMCOM

HOMCOM 836-501 Installation guide

HOMCOM 312-090V00 User manual

HOMCOM

HOMCOM 312-090V00 User manual

HOMCOM 831-337V81 User manual

HOMCOM

HOMCOM 831-337V81 User manual

HOMCOM 331-022V00 User manual

HOMCOM

HOMCOM 331-022V00 User manual

HOMCOM 833-408 User manual

HOMCOM

HOMCOM 833-408 User manual

HOMCOM 801-300V00 User manual

HOMCOM

HOMCOM 801-300V00 User manual

HOMCOM 831-408 User manual

HOMCOM

HOMCOM 831-408 User manual

HOMCOM 831-494V90 User manual

HOMCOM

HOMCOM 831-494V90 User manual

HOMCOM 833-638 User manual

HOMCOM

HOMCOM 833-638 User manual

Popular Indoor Furnishing manuals by other brands

Regency LWMS3015 Assembly instructions

Regency

Regency LWMS3015 Assembly instructions

Furniture of America CM7751C Assembly instructions

Furniture of America

Furniture of America CM7751C Assembly instructions

Safavieh Furniture Estella CNS5731 manual

Safavieh Furniture

Safavieh Furniture Estella CNS5731 manual

PLACES OF STYLE Ovalfuss Assembly instruction

PLACES OF STYLE

PLACES OF STYLE Ovalfuss Assembly instruction

Trasman 1138 Bo1 Assembly manual

Trasman

Trasman 1138 Bo1 Assembly manual

Costway JV10856 manual

Costway

Costway JV10856 manual

moss DESIGN Caisson Credenza Assembly instructions

moss DESIGN

moss DESIGN Caisson Credenza Assembly instructions

Aquaglide FULL DECK 15.0 owner's manual

Aquaglide

Aquaglide FULL DECK 15.0 owner's manual

AREBOS AR-HE-SW30 user manual

AREBOS

AREBOS AR-HE-SW30 user manual

Till-Hilft Fulda 87005.330 Assembly instructions

Till-Hilft

Till-Hilft Fulda 87005.330 Assembly instructions

Twoey Outside 2010 quick start guide

Twoey Outside

Twoey Outside 2010 quick start guide

Hettich Easys 200 operating instructions

Hettich

Hettich Easys 200 operating instructions

The bedboss RELAX 404 Series owner's manual

The bedboss

The bedboss RELAX 404 Series owner's manual

Oeseder Möbelindustrie Bern 991 720 Assembly instructions

Oeseder Möbelindustrie

Oeseder Möbelindustrie Bern 991 720 Assembly instructions

Costway HW68469 user manual

Costway

Costway HW68469 user manual

Next ALIX A27743 Assembly instructions

Next

Next ALIX A27743 Assembly instructions

BROSA Hans Assembly guide

BROSA

BROSA Hans Assembly guide

Prodigg MINIKA PBA015T-FUR installation manual

Prodigg

Prodigg MINIKA PBA015T-FUR installation manual

manuals.online logo
manuals.online logoBrands
  • About & Mission
  • Contact us
  • Privacy Policy
  • Terms and Conditions

Copyright 2025 Manuals.Online. All Rights Reserved.