HOMCOM 853-020V70 Installation guide

ASSEMBLY & INSTRUCTION MANUAL
INcsa005_UK
IMPORTANT, RETAIN FOR FUTURE REFERENCE: READ CAREFULLY
853-020V70

Easy to use
Plug on power supply, and the machine immediately starts heating process. When it heats
to specified temperature, press the steam button, and steam will be sprayed out slowly. So
the machine is easy to operate.
With complete cleaning accessories supplied, the machine can be assembled and disas-
sembled easily. It can be used to clean the doors, windows, floor boards, and thus is
applicable widely.
PRODUCT CHARACTERISTICS
1. Power Indicator
2. Power cord and plug
3. Steam button
4. Safety cap
5. Short spray nozzle
6. Extended connecting spray
7. Measuring cup
8. Long spray cup
9.Funnel
10.Spray cup with round brush
11. Bent spray cup
12.Towel sleeve
13.Spray cup for door/window 14. Brush plate
2

SAFETY PRECAUTIONS
This icon represents “Prohibition” This icon represents “Warning”
1. Cleaning and user maintenance shall not be made by children
without supervision.
2. To prevent electrical shock, do not immerse power cord or power
plug in water or other liquids.
3. The mains lead of this appliance is not replaceable by the user. If
the supply cord is damaged, it must be replaced by the
manufacturer, its service agent or similarly qualified persons in
order to avoid a hazard.
4. This product is for only use in households and must not be used
for industrial applications.
5. Do not turn on power supply until the tank is full of water.
6. Used power supply should comply with the product requirements
of the manufacturer.
7. During operation, the tank mouth must be plugged hermetically
and safety cap should be tightened in position.
8. A socket with special earthing wire must be used.
9. In use, the machine body must not be inclined at more than 45
degrees. Or otherwise boiling water will be sprayed out together
with team.
10. Do not direct the steam towards persons, animals or other
3

11. Before refilling water, ensure to unplug the power cord to
disconnect power supply. It is necessary to unplug the power cord
after the machine is used, before it is cleaned and while it is
repaired.
12. Do not add any rust remover, odor counteracting agent,
alcohol and detergent into the tank, which will possibly cause
damage to the tank.
13. Do not clean swimming pools
14. This appliance can be used by children aged from 8 years and
above and persons with reduced physical sensory or mental
capabilities or lack of experience and knowledge if they have been
given supervision or instruction concerning use of the appliance in a
safe way and understand the hazards involved. Children shall not
play with the appliance.
15. The liquid or steam must not be directed towards equipment
containing electrical components, such as the interior of ovens.
16. WARNING: Danger of scalding.
17. Important: never overfill the tank, or otherwise the steam
generation will be affected or too high steam pressure will be
caused.
18. The filling aperture must not be opened during use
4

Rating of power supply: AC 220-240V, 50/60Hz,
Tank capacity:350ml
Max capacity of water cup: 250ml
Rated power:900-1050W
Steam pressure:0.25MPa~0.32 Mpa
Injected steam capacity: 28g/min
Temperature controller: functioning temperature: 132℃;
fuser: functioning temperature:169℃
Overall dimension: 300×150×210mm
Operation Procedures
1.Unpack the product, check the accessories and documents supplied with the product
and make sure that the product and accessories are not damaged.
2.Before use, please read the User Manual carefully. The steam cleaner is only for use in
households.
3.First, place the steam cleaner on a level platform, push down the safety cover, unscrew
the safety cap counterclockwise, and then install the funnel. The safety cap can not be
opened if there is scope of the pressure in boiler to ensure safety for users.
4.Take 175ml clean water with the measuring cup, and add the water into the tank. (Max.
capacity of the tank is 250ml. Do not overfill the tank and some space must be left in the
tank). Re-install the safety cap and tighten it in position
5.Check the power supply and socket, and confirm they comply with the requirements
given in the User Manual. Then turn on the power supply.
6.About 4 minutes after power supply is turned on, steam is ready. At this time lightly press
the steam button and check whether steam is sprayed out of the nozzle. (Do not aim the
spray nozzle at other persons or objects).
7.If there is steam sprayed out, please install suitable accessories according to your needs
after you release the button.
8.Press down the steam button again in order to carry out the operations required by you.
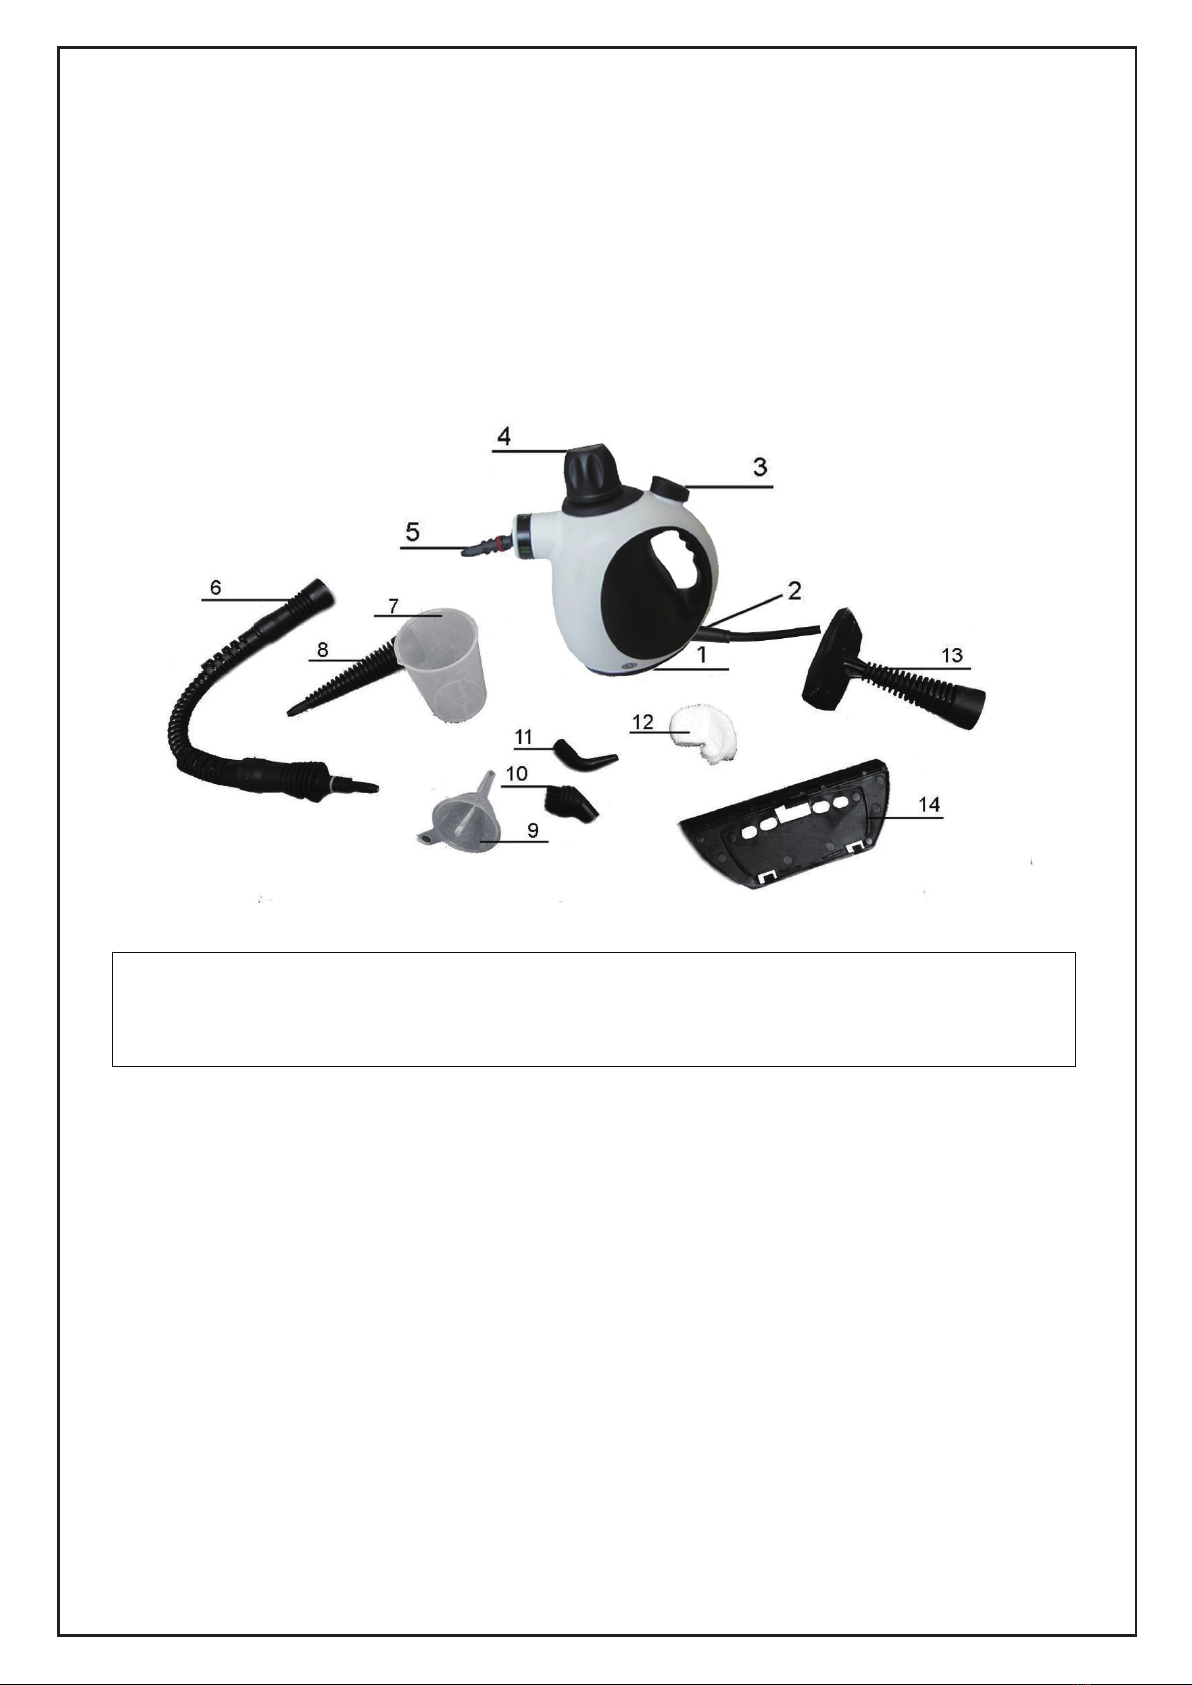
Installation of Accessories
1.Install the spray cup with hairbrush
Hold the pipe section of the spray cup with hairbrush in your hand, align the arrow on the
spray cup with the single-line mark on short spray nozzle on the machine body, and insert
the spray cup in position. Rotate the spray cup in clockwise direction, and align the arrow
on the spray cup with the double-line mark on short spray nozzle on the machine body, as
shown in Figure 1. Fix the spray cup on the machine body. To remove the spray cup with
hairbrush, please rotate the spray cup inversely (counterclockwise) as shown in Figure 2,
and align the arrow on the spray cup with the single-line mark on the machine body. Then
the spray cup with hairbrush can be pulled out.
TECHNICAL SPECIFICATION
OPERATING INSTRUCTIONS
5

(I) (II)
2.Install spray cup with round brush or bent spray cup
For direct installation on short spray nozzle, aim the spray cup with round brush or bent
spray cup at the top of spray nozzle, as shown in Figure 3, and push the spray cup
upwards until it is in position. As the short spray nozzle and spray cup are positioned in six
directions, the angle and direction can be adjusted during the installation. Or, first install
long spray cup and then the spray cup with round brush or bent spray cup. The long spray
cup is installed in the same method as the installation of spray cup with hairbrush. The
spray cup with round brush or bent spray cup and long spray cup can be installed in the
same procedures as the installation on short spray nozzle.
3.Installation of spray cup for door/window
First install the spray cup with hairbrush on short spray nozzle
As shown in Figure 4 and Figure 5, install the two small hooks of the spray cup for
door/window onto suspension lugs of the spray cup with hairbrush, and then trigger the big
hook of the spray cup for door/window, and push the spray cup for door/window up and
clutch it onto the body of the spray cup with hairbrush.
(III)
(IV) (V)
6

Refill water during operation
1.Unplug the power cord and disconnect the power supply
2.Press down the steam button to release the pressure until no steam is injected out.
3.Slowly unscrew the safety cap but do not remove it, and residual steam will be
discharged slowly until no steam comes out. Then place the machine in a cool place to
cool it down for about five minutes. Finally, completely remove the safety cap.
4.Use the funnel and measuring cup to refill a suitable quantity of cold or hot water into the
tank.
5.Re-install the safety cap onto the machine body and tighten it in position.
After the machine is used
1.After the cleaning machine is used, unplug the power cord and disconnect the power
supply.
2.Press down the steam button to release the pressure until no steam is injected out.
3.Slowly unscrew the safety cap but do not remove it, and residual steam will be
discharged slowly until no steam comes out. Then place the machine in a cool place to
cool it down for about five minutes. Finally, completely remove the safety cap.
4.Empty the residual water in the tank and clean the external surface with a piece of dry
cloth.
5.At last, re-install the safety cap onto the machine body and tighten it in position.
Notes: Re-install the safety cap onto the machine body and tighten it in position.
DISPOSAL
This marking indicates that this product should not be disposed with
other household wastes throughout the EU. To prevent possible harm to
the environment or human health from uncontrolled waste disposal,
recycle it responsibly to promote the sustainable reuse of material
resources. To return your used device, please use the return and
collection systems or contact the retailer where the product was
purchased. They can take this product for environmentally safe
recycling.
7
This manual suits for next models
1
Table of contents
Other HOMCOM Steam Cleaner manuals