manuals.online logo
Brands
  1. Home
  2. •
  3. Brands
  4. •
  5. HoneyGuaridan
  6. •
  7. Pet Care Product
  8. •
  9. HoneyGuaridan A25 Installation instructions

HoneyGuaridan A25 Installation instructions

Other HoneyGuaridan Pet Care Product manuals

HoneyGuaridan S68 User manual

HoneyGuaridan

HoneyGuaridan S68 User manual

HoneyGuaridan A36 User manual

HoneyGuaridan

HoneyGuaridan A36 User manual

HoneyGuaridan S36 User manual

HoneyGuaridan

HoneyGuaridan S36 User manual

HoneyGuaridan A40 User manual

HoneyGuaridan

HoneyGuaridan A40 User manual

HoneyGuaridan S40 User manual

HoneyGuaridan

HoneyGuaridan S40 User manual

HoneyGuaridan S68 User manual

HoneyGuaridan

HoneyGuaridan S68 User manual

HoneyGuaridan A36 User manual

HoneyGuaridan

HoneyGuaridan A36 User manual

HoneyGuaridan A56 User manual

HoneyGuaridan

HoneyGuaridan A56 User manual

HoneyGuaridan S56 User manual

HoneyGuaridan

HoneyGuaridan S56 User manual

HoneyGuaridan A303D User manual

HoneyGuaridan

HoneyGuaridan A303D User manual

HoneyGuaridan A68 User manual

HoneyGuaridan

HoneyGuaridan A68 User manual

HoneyGuaridan A68 User manual

HoneyGuaridan

HoneyGuaridan A68 User manual

Popular Pet Care Product manuals by other brands

PitPat PP02 user manual

PitPat

PitPat PP02 user manual

Schwinn Rascal owner's manual

Schwinn

Schwinn Rascal owner's manual

K&H Small Animal quick start guide

K&H

K&H Small Animal quick start guide

SHOR-LINE 006.3230.00 Product guide

SHOR-LINE

SHOR-LINE 006.3230.00 Product guide

Petsafe Stubborn Dog Receiver Collar operating guide

Petsafe

Petsafe Stubborn Dog Receiver Collar operating guide

juwel Rio 240 instruction manual

juwel

juwel Rio 240 instruction manual

Datamars OMNI MAX user manual

Datamars

Datamars OMNI MAX user manual

Trixie 24444 instructions

Trixie

Trixie 24444 instructions

Roverpet 30DDPP Assembly instructions

Roverpet

Roverpet 30DDPP Assembly instructions

SportDOG SD-105S-C manual

SportDOG

SportDOG SD-105S-C manual

Staywell 400 Series Magnetic user guide

Staywell

Staywell 400 Series Magnetic user guide

Dogtek Sonic Birdhouse user guide

Dogtek

Dogtek Sonic Birdhouse user guide

Togfit Deluxe Trigger Lock Door Gate Instructions for use

Togfit

Togfit Deluxe Trigger Lock Door Gate Instructions for use

Girafus 227PA user manual

Girafus

Girafus 227PA user manual

ubbink KoiFeeder Solar operating instructions

ubbink

ubbink KoiFeeder Solar operating instructions

Petsafe ST-100 operating guide

Petsafe

Petsafe ST-100 operating guide

CADOCA Deuba 106911 instructions

CADOCA

CADOCA Deuba 106911 instructions

Dogtra RR Deluxe owner's manual

Dogtra

Dogtra RR Deluxe owner's manual

manuals.online logo
manuals.online logoBrands
  • About & Mission
  • Contact us
  • Privacy Policy
  • Terms and Conditions

Copyright 2025 Manuals.Online. All Rights Reserved.

1
®Pressthetimebutton1®J ©
,the characters flashes, and then press
or Save button to set hours and minutes;
t^1tosetthecurrentlyfeedon*^'orofffi.
,setting the following meals.
●PresstheEnterkeytJtocompletesetting,thentheindicatorstopsflashing.
●long press the record button
then press display button
the plus button
Intelligent Automatic Pet Feeder
User's Instruction
®Pressthekey
E]
●Press the Set button
[3
to start recording, release it to stop recording.
to display.
(When recording, place mouth position as close to the microphone as possible to
speak loudly, it can record up to 12 seconds.
●ManualFeeding:Longpressthemanualkey!1
manual feeding.
f o r a b o u t 2 s e c o n d s t o s t a r t
Precautions
>If this product is not used for long-term, please turn off the power switch and
remove the battery, to avoid electrolyte leakage.
>Wipe it with clean water or soft cleaning aent, after wipping it need to be
completely dry before installing each component.
>Dont rinse the product direcely under the water to avoid leakage and damage
the board.
>Use asoft cloth to wipe the surface of the product.
>Dont disassemble components which can not be removed.
>Indicator: flashing green means set state, flashing red means the weak power
state (you need to replace high-quality alkaline batteries).
>After re-energized or replace the battery, you need to reset the current time
but other settings should remain unchanged.
Operating Instructions
^This product is used for feeding cats, dogs and other pets timing quantitative and
automaticly.
^Before using this product, please read these instructions carefully, and keep it.
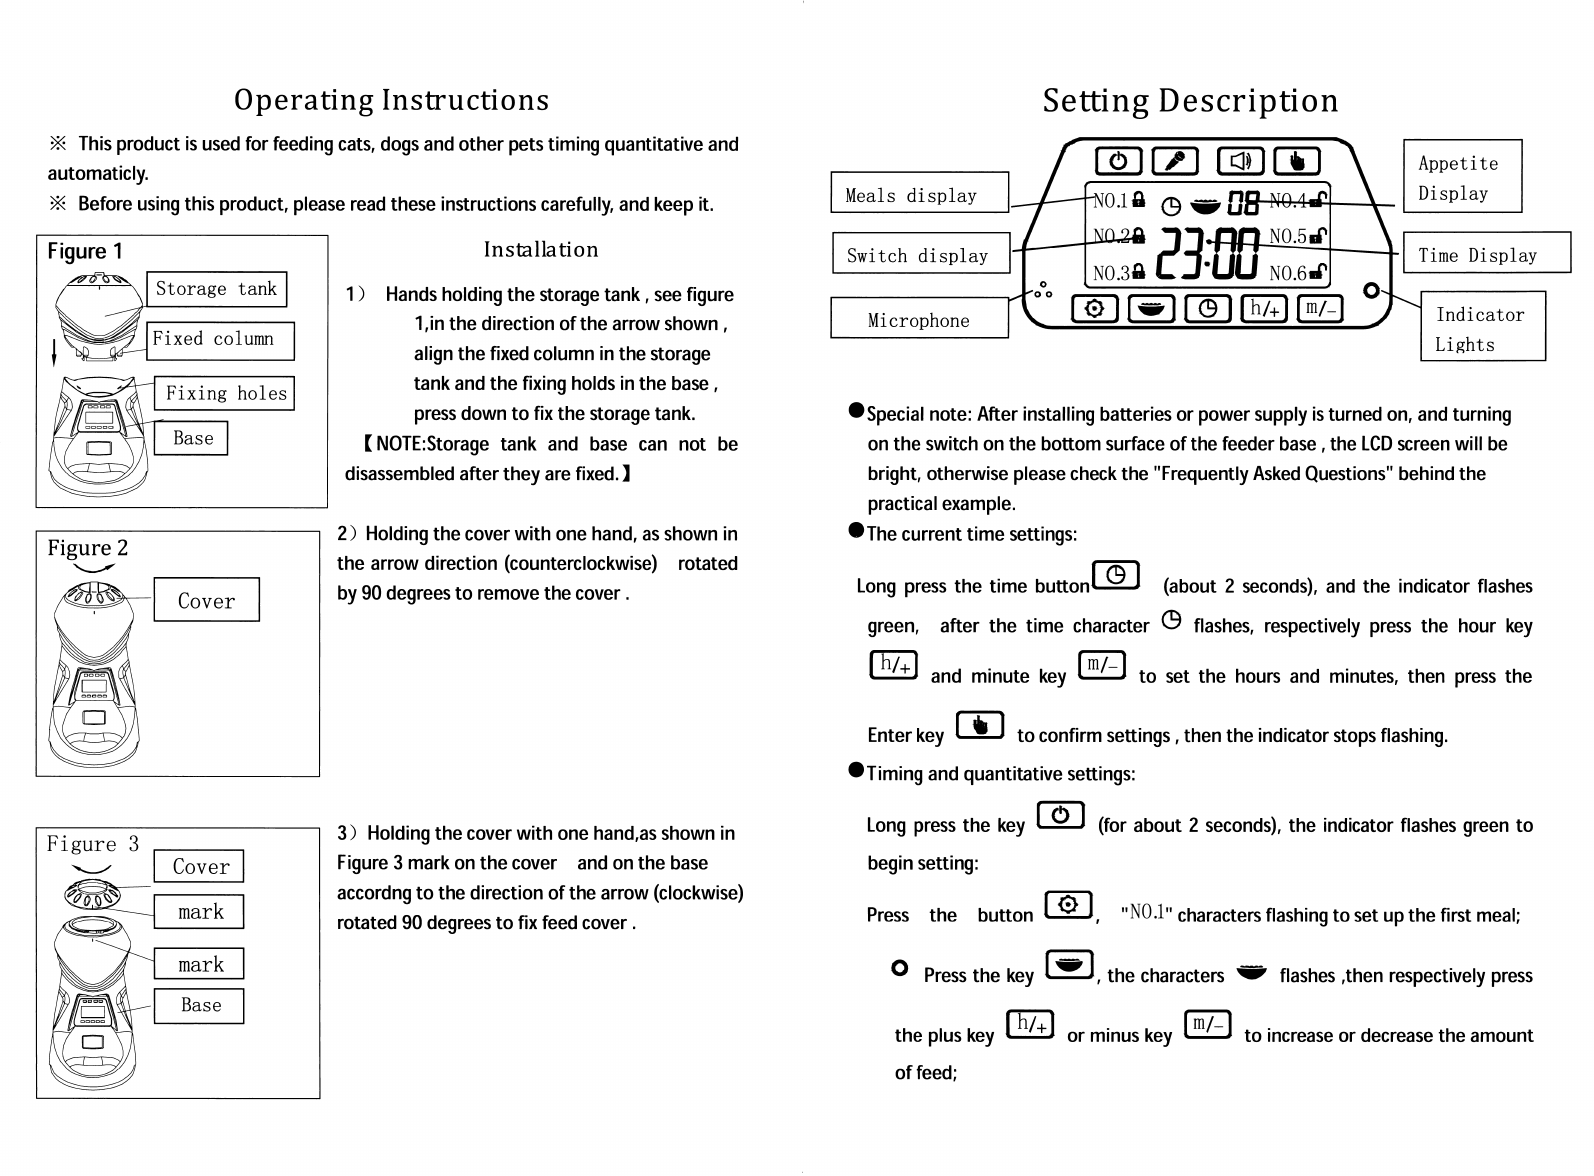
Setting Description
[IDCZ] EDCEl Appetite
Display
Meals display ng-W^
fo.ia ©
No.sa
no No.sif
Installation Iff
Switch display Time Display
No.ea’
o
1) Hands holding the storage tank, see figure
1,in the direction of the arrow shown ,
align the fixed column in the storage
tank and the fixing holds in the base,
press down to fix the storage tank.
[NOTE:Storage tank and base can not be
disassembled after they are fixed. ]
■"O O
®®[©][M)S Indicator
Lights
Microphone
●Specialnote:Afterinstallingbatteriesorpowersupplyisturnedon,andturning
on the switch on the bottom surface of the feeder base, the LCD screen will be
bright, otherwise please check the "Frequently Asked Questions" behind the
practical example.
●The current time settings:
2) Holding the cover with one hand, as shown in
the arrow direction (counterclockwise) rotated
by 90 degrees to remove the cover. Co] (about 2seconds), and the indicator flashes
Long press the time button
afterthetimecharacter©flashes,respectivelypressthehourkey
and minute key
Cover
green.
E3 to set the hours and minutes, then press the
Enter key
●Timing and quantitative settings:
to confirm settings, then the indicator stops flashing.
(for about 2seconds), the indicator flashes green toLong press the key
begin setting:
3) Holding the cover with one hand,as shown in
Figure 3mark on the cover and on the base
accordng to the direction of the arrow (clockwise)
rotated 90 degrees to fix feed cover. i^1,"NO.l"charactersflashingtosetupthefirstmeal;
P r e s s t h e b u t t o n
®Pressthekey ,the characters flashes ,then respectively press
the plus key
of feed;
or minus key t o i n c r e a s e o r d e c r e a s e t h e a m o u n t