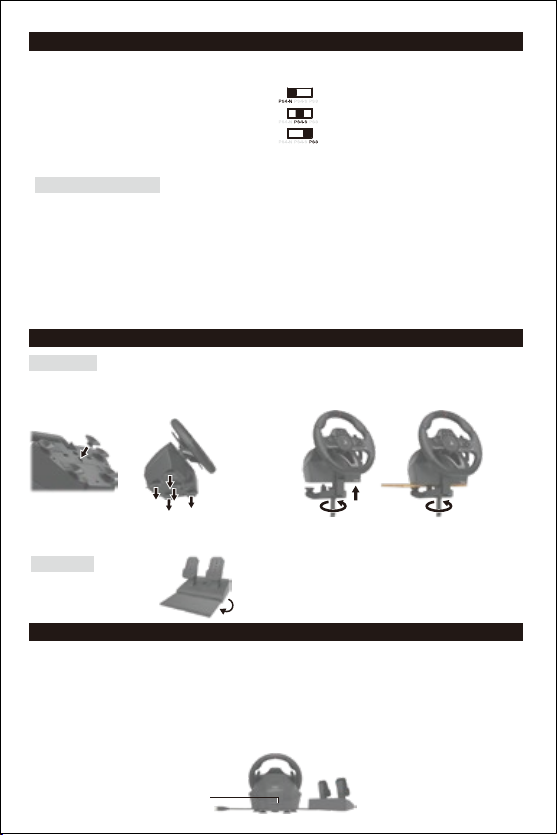
HORI Racing wheel APEX User manual

Included 2
Platform 2
Layout 2
Mode Toggle Switch 3
How to attach 3
How to connect 3
Quick Handling Mode 4
Directional Pad Control Toggle Switch 4
Adjustable dead zone 4
Adjustable sensitivity 5
Quick Handling Mode ・Dead Zone Adjustment
・Linearity Adjustment Reset All 7
Assign Mode 7
Main specifications 8
Table of Contents
Thank you for purchasing this product.
Before using this product please read the instructions carefully.
After reading the instruction manual, please keep it for reference.
1
1903-69
Instruction manual

■Included
Foot pedalsSteering unit Suction cups Clamp Instruction manualScrew
■Layout
Steering unit (Front View)
Controller cable
Modular plug connection port
Connector
Steering unit (Back View)
Directional Pad Control Toggle Switch
Mode Toggle Switch
L paddle (L1 button) R paddle (R1 button)
SHARE button
L2 button
L3 button
L1 button
R2 button
ASSIGN button
R3 button
Directional pad
OPTIONS button
△button
□button
○button
×button
Program LED [ R ]Program LED [ L ]
R1 button
PlayStation®3 : SELECT button PlayStation®3 : START button
PlayStation®3 : R2 buttonPlayStation®3 : L2 button
Foot pedals
Modular plug
L pedal
("PS4-N" : L2 button /
"PS4-S" : Brake)
PlayStation®3 : □button
R pedal
("PS4-N" : R2 button /
"PS4-S" : Accelerator)
PlayStation®3 : × button
■Platform
PlayStation®4/PlayStation®3
Please note the racing wheel information provided is for use with the PlayStation®3 and PlayStation®4 systems.
For further information on how to use your PlayStation®3 or PlayStation®4, please consult the relevant system manual.
PS button
* Same functionality as the PS button on the DUALSHOCK®4 wireless controller, but cannot be used to turn on your PlayStation®4 or
PlayStation®3, or return your PlayStation®4 from stand-by mode.
When your PlayStation®4 is returning from stand-by mode, please ensure you do not press the PS button on the wheel.
2

Steering unit
Option 1 : Suction cup
①Remove all dust and dirt from your tabletop before securing
the controller using the five suction cups.
②Attach suction cups to steering unit when setting up.
① ②
Foot pedals
Place foot pedals onto a flat surface.
■How to attach
① ②
Option 2 : Clamp
①Tighten the clamp screw into the steering wheel base.
②Use the clamp to secure the steering unit to a flat, hard surface (i.e. table).
* Do not combine both securing methods as it may damage the suction cups.
* Do not affix to furniture made from glass or other fragile materials.
* Detach from furniture carefully to prevent damage to furniture or product.
■Mode Toggle Switch
The Platform Toggle Switch toggles the RACING WHEEL APEX between PlayStation®4 Normal Mode (PS4-N),
PlayStation®4 Steering Mode (PS4-S), and PlayStation®3 compatibility mode (PS3).
Steering Mode Function
1. Set the Platform Toggle Switch (located above the SHARE Button) to "PS4-S" (Steering Mode)
2. Insert the USB plug of the RACING WHEEL APEX into the PlayStation®4 console.
3. Turn on the PlayStation®4 by pressing the power button on the PlayStation®4 console.
4. Make sure no DUALSHOCK®4 controllers are synced as the active controller.
5. Press and hold the "PS" button on the RACING WHEEL APEX, and select your PlayStation®account/login with
the RACING WHEEL APEX Directional Pad.
6. Navigate the PlayStation®menu with the Directional Pad on the RACING WHEEL APEX, and select your desired game.
* Do not switch between "PS4-N and PS4-S" while playing as this may disconnect the controller (repeat Step 5 to sync)
Experience heightened realism by using the Steering Mode.
Works only when connected to a PlayStation®4 system.
Functions only for “Steering Mode” in compatible titles.
Connecting to the PlayStation®4 system :Normal.
Connecting to the PlayStation®4 system : Steering Mode Function.
Connecting to the PlayStation®3 system.
Note : Please set the toggle switch to the desired platform before connecting.
■How to connect
1. Connect the foot pedals modular plug to the steering wheel modular connection port.
* This product can be used without the foot pedals.
2. Connect the steering wheel USB to the PlayStation®4 or PlayStation®3 system's USB port.
* Please make sure that the platform toggle switch is set to "PS4-N" / "PS4-S" when connecting to the PlayStation®4 system,
and set the toggle switch to "PS3" when connecting to the PlayStation®3 system.
3. Press and hold the "PS" button on the RACING WHEEL APEX, and select your PlayStation®account/login with
the RACING WHEEL APEX Directional Pad.
4. Turn the steering wheel to its maximum rotation position once in both directions.
5. Press down fully into each of the L pedal and R pedal once.
* Please repeat the process when you re-connect the controller or restart the PlayStation®4 or PlayStation®3 system.
Modular plug connection port. 3

4
■Adjustable dead zone
The dead zone play of centered wheel is adjustable to seven levels.
Program LED (Left) colour will change to indicate the dead zone value.
④Dead zone value increases by pressing up on the Directional Pad.
Narrow
⑤Dead zone value decreases by pressing down on the Directional Pad.
Wide
■Quick Handling Mode
Experience quicker handling by switching the max steering output from 270 degrees to 180 degrees.
Program LED (Left) will light
blue for 3 seconds.
Program LED (Left) will light
green for 3 seconds.
180°
270°
■Directional Pad Control Toggle Switch
Directional pad controls can be toggled to directional pad, left stick or right stick controls.
This product's directional pad toggle function is not guaranteed to work with all software.
* Please refer to software's instruction book. This product does not work with Analog mode.
②Program LED (Right)
will flash.
③Program LED (Left) colour
will change to indicate
the selected rotation angle.
①Program LED (Right)
will turn on.
3sec
Directional pad Left stick Right stick

5
■Adjustable sensitivity
Steering wheel sensitivity is adjustable to seven levels.
The Program LED (Left) colour will change to indicate the sensitivity value.
Steering unit
④Sensitivity value increases by pressing up on the Directional Pad.
Responsive
⑤
⑥
Sensitivity value decreases by pressing down on the Directional Pad.
Gradual
Program LED (Right)
will turn off.
Program LED (Left)
will turn off.
Wide NarrowDefault
123 56
LED color
4 7
Green Yellow Red Purple Blue Light Blue White
⑥Program LED (Right)
will turn off.
Program LED (Left)
will turn off.
①Program LED (Right)
will turn on.
3sec
②Program LED (Right)
will flash.
③
(The ASSIGN LED will light red when assigning buttons.)
* If you do not perform step ②after ①, the ASSIGN LED will turn off after four seconds and button assignment mode will
automatically end.
* During steps 2〜3, only the steering unit and foot pedal input are enabled.
Button input from the controller to the PlayStation®4 will be disabled.
* Controller settings are stored even if the USB is disconnected.
Program LED (Left) colour
will change to indicate
the selected rotation angle.

Foot pedals
Gradual (Steady steering) Responsive (Easy to turn)Default
123 56
LED color
4 7
Green Yellow Red Purple Blue Light Blue White
①Program LED (Right)
will turn on.
Gradual (Steady steering) Responsive (Easy to turn)Default
123 56
LED color
4 7
Green Yellow Red Purple Blue Light Blue White
Sensitivity value increases by pressing up on the Directional Pad.
Responsive
⑤
③
④Sensitivity value decreases by pressing down on the Directional Pad.
Gradual
Program LED (Right)
will turn off.
Program LED (Left)
will turn off.
Program LED (Right)
will flash.
②Program LED (Left) colour
will change to indicate
the selected rotation angle.
(The ASSIGN LED will light red when assigning buttons.)
* If you do not perform step ②after ①, the ASSIGN LED will turn off after four seconds and button assignment mode will
automatically end.
* During steps 2〜4, only the steering unit and foot pedal input are enabled.
Button input from the controller to the PlayStation®4 will be disabled.
* Controller settings are stored even if the USB is disconnected.
3sec
3sec
* If you do not perform step ②after ①, the ASSIGN LED will turn off after four seconds and button assignment mode will
automatically end.
* During steps 2〜3, only the steering unit and foot pedal input are enabled.
Button input from the controller to the PlayStation®4 will be disabled.
* Controller settings are stored even if the USB is disconnected.
6

Program LED (Right)
will flash.
①
②
③Program LED (Right)
will turn off.
Program LED (Left)
will turn on.
Programmable Buttons Assignable Functions
How to adjust
or
Left stick /
Right stick
* Press the direction
(Right, Down, Left or Up) to
assign the desired function.
■Assign Mode
You can remap the function of buttons using this feature.
■Quick Handling Mode ・Dead Zone Adjustment ・Linearity Adjustment Reset All
To simultaneously reset all of the following : Quick Handling Mode・Dead Zone Adjustment・Linearity Adjustment.
Program LED (Right)
will turn off.
Program LED (Left)
will turn off.
(The ASSIGN LED will light red when assigning buttons.)
①Program LED (Right)
will turn on.
3sec
②
③
* If you do not perform step ②after ①, the ASSIGN LED will turn off after four seconds and
button assignment mode will automatically end.
When Quick Handling Mode is canceled, steering wheel input value will default to 270°.
Dead zone and linearity default values are set to “4”.
Program LED (Right)
will turn on.
3sec
L2/ R2 / L paddle / R paddle / L pedal / R pedal
L2/ R2 / L paddle / R paddle /
L pedal / R pedal
○/ × / △/ □/ L1 / L2 / L3 / R1 / R2 / R3 / L paddle / R paddle / L pedal / R pedal
Left stick (Right / Down / Left / Up) / Right stick (Right / Down / Left / Up)
○/ × / △/ □/
L1 / L2 / L3 /
R1 / R2 / R3 /
L paddle / R paddle /
L pedal / R pedal
7
or
"LS" for Left stick "RS" for Right stick
* For step 3, to assign a specific direction input of the Left Analog Stick to a button,
set the Directional buttons toggle switch (DP/LS/RS) to [LS] and press the D-Pad
in the direction you want to assign. For Right Analog Stick, set to [RS].

②Program LED (Left / Right) will turn off and all button
assignments will reset to its default settings.
How to reset-2
How to reset-1
For step 3,press the same button from step 2 to individually reset buttons to default.
* After 4 seconds of inactivity between steps, Program LED (Right) will turn off and program mode will stop.
* During steps 2, button input from the controller to the PlayStation®4 will be disabled.
* When the Program LED (Left) turns on, it indicates that a button is remapped and will not turn off
until button function is reset to default.
* If you want to disable button function, press and hold for 3 seconds the same button you pressed in step 2
at the time of step 3.
* If you pressed multiple buttons during step 3, the last button you pressed will be assigned.
* Controller settings are stored even if the USB is disconnected.
①Program LED (Right)
will turn on.
3sec
■Main specifications
Steering unit
External dimensions:280 × 275 × 286mm
Steering diameter :280mm
Weight :1400g
Cable length :3m
Angle of rotation :270°
Foot pedals
External dimensions:234 × 305 × 180mm
Weight :700g
Cable length :1.5m
PRODUCT DISPOSAL INFORMATION
Where you see this symbol on any of our electrical products or packaging, it indicates that the relevant
electrical product or battery should not be disposed of as general household waste in Europe.
To ensure the correct waste treatment of the product and battery, please dispose of them in accordance
with any applicable local laws or requirements for disposal of electrical equipment or batteries. In so doing,
you will help to conserve natural resources and improve standards of environmental protection in treatment
and disposal of electrical waste. Applicable to EU countries only.
Warranty
For all warranty claims made within the first 30 days after purchase, please check with the retailer where the original
purchase was made for details. If the warranty claim cannot be processed through the original retailer or for any other
Please retain contact information for future reference.
The image on the package may differ from the actual product.
The manufacturer reserves the right to change the product design or specifications without notice.
The wires are not to be inserted into socket-outlets.
The packaging must be retained since it contains important information.
HORI & HORI logo are registered trademarks of HORI.
The normal function of the product may be disturbed by strong electro-magnetic interference.
If so, simply reset the product to resume normal operation by following the instruction manual (How to connect).
In case the function does not resume, please relocate to an area which does not have electro-magnetic interference
to use the product.
8
Table of contents
Other HORI Video Gaming Accessories manuals

HORI
HORI NSW-326 User manual

HORI
HORI RACING WHEEL PRO DELUXE User manual

HORI
HORI Racing Wheel Overdrive User manual

HORI
HORI HPC-042 User manual

HORI
HORI SPF-004 User manual

HORI
HORI Split Pad Compact User manual

HORI
HORI Ace Combat 7 User manual

HORI
HORI Fighting Stick Mini User manual

HORI
HORI SPF-013 User manual

HORI
HORI NSW-373U User manual