Horizont Agrar ranger A3000 User manual

85980J - 02/11
LEBEN MIT DEM TIER
horizont group gmbh
Division agrartechnik
Postfach 13 29
34483 Korbach
Homberger Weg 4-6
34497 Korbach
GERMANY
Telefon: +49 (0) 56 31 / 5 65-1 00
Telefax: +49 (0) 56 31 / 5 65-1 20
www.horizont.com
BETRIEBSANWEISUNG
Elektrozaungerät
de
OPERATING INSTRUCTION
Electric Fencer
en
MODE D‘EMPLOI
Électrificateur de Clôture
fr
MANUAL DE INSTRUÇÕES
Cerca Eléctrica
pt
ISTRUZIONI D’USO
Recinto Elettrico
it
ranger A2000
Type 10722
ranger A3000
Type 10589
12V DC

2
3
14041
Fig.1
98735
94581
91816
ranger A2000
89427
ranger A3000
94890
90463
ranger A2000
60147
ranger A3000
60148
83237
60266
90716
90150
90676U
91812
ranger A2000
60488
ranger A3000
60489
93100
93098
60151
97543
90764
94581
60056
91818
93225
93046
81716
98736 / 81739
84719 84718 90443
98676
rot
rouge
red
81045
schwarz
noir
black
90764
83237
60056
ranger A2000
89427
ranger A3000
94890
90463
ranger A2000
60147
ranger A3000
60148
60151
97543
90716
93098
93100
60266
90740
98676
rot
rouge
red
81045
schwarz
noir
black

4
5
Betriebsanweisung für Elektrozaungeräte ranger A2000 / A3000
(ranger A3000 = baugleich mit farmer A3000)
in Verbindung mit den Errichtungs- und Sicherheitshinweisen für Elektrozaungeräte
SECURA ANIMAL oder SECURA SECURITY (www.horizont.com)
Aufstellung und Anschluss:
Das Gerät wird an einer möglichst feuchten Stelle am Zaun auf den Boden gestellt und einen 1m
langen Erdungspfahl (Art.-Nr. 14041) neben dem Gerät möglichst tief in den Boden getrieben.
Eine gute Erdung (Fig.1) ist äußerst wichtig für den einwandfreien Betrieb und die optimale Lei-
stung des Gerätes, siehe auch SECURA.
Erd- und Zaunkabel werden gemäß der Skizze angeschlossen.
Das Gerät kann 12V-Akkus bis zu einer Größe von 250mm x 192mm x 225mm aufnehmen.
Größere 12V-Akkus müssen (geschützt, gesichert und belüftet) außerhalb des Gerätes aufgestellt
werden.
Inbetriebnahme und Kontrolle: (Fig.2)
Schalter in Stellung > 1 < drücken, nach einigen Sekunden hört man ein gleichmäßiges Ticken
und das Gerät gibt Spannung an den Zaun ab. Die Funktionskontrollampe leuchtet im Rhythmus
der elektrischen Impulse auf. Den Regler in die gewünschte Position bringen (Fig. 2a)
Die 6 Kontroll-Lampen ( a ) zeigen die Zaunspannung in 1000 V-Stufen an.
Zur Hütesicherheit sollten min. 3 Lampen (3000 V) aufleuchten, andernfalls ist die Spannung zu
gering.
Mögliche Ursachen: mit Zaun: starker Bewuchs am Zaun, schlechte Isolatoren,
Kurzschluss an Metallpfählen oder Zaun zu lang.
ohne Zaun: Gerät ist defekt, siehe Service
Prüfung des Akkuladezustandes: (Fig.2)
In Position > test < wird der Entladezustand des Akkus geprüft.
die Kontrollampe ( b ) zeigt Dauerlicht = ausreichende Akkuladung
kein Licht = Akku muss umgehend geladen werden
Nach der Überprüfung des Akkus muss der Umschalter wieder in die Position >1< gedrückt
werden.
Vorschriften:
Das Gerät entspricht den Sicherheitsvorschriften.
Akkuwechsel (Einbau):
Gerät gemäß Skizze (Fig.3) öffnen und Akkuwechsel vornehmen.
Solarversorgung (Fig. 4):
Auf Wunsch kann ein Solarpanel geliefert werden, das auf das Gerät montiert und mit diesem
zusammen nach Süden ausgerichtet wird. (Fig. 4)
Ein Solarpanel 12V / 5W muss immer an einen Akku 12V mit min. 25Ah angeschlossen werden
(alternativ bei 10W mit min. 35Ah und 15W mit min. 45Ah und 20W mit min. 60Ah)
Service:
Reparaturen dürfen nur von qualifizierten Personen durchgeführt werden.
Es sind nur die vom Hersteller vorgeschriebenen Ersatzbauteile zu verwenden !
Fig. 2
Fig. 4
Solarversorgung
Solar operation
Solarisation
Operação solar
Alimentazione solare
die angegebenen Werte sind von der Zaunlast abhängig
The values depend on the fence load
Les valeurs dépendre de l‘état de la clôture
Os valores dependem da carga do cercado
I valori riportati dipendono dal carico del recinto
Fig. 3
b)
de
ranger A2000 ranger A3000
max. 9200 V max. 9200 V
max. 8200 V max. 8500 V
max. 7200 V max. 7500 V
max. 6200 V max. 6500 V
max. 5200 V max. 5500 V
Erdanschluss
ground terminal
cable de raccordement terre
terminal de terra
Attacco per messa a terra
Zaunanschluss
fence terminal
cable de raccordement ligne
terminal do cercado
Attacco recinto
Schalter
switch
l‘interrupteur
Interruptor
Interruttore
a) Fig. 2a
Regler
regulator
le régulateur
Regulador
Regolatore

6
7
Instructions de mise en route de l’électrificateurs
ranger A2000 / A3000
(ranger A3000 = identique à farmer A3000)
en relation avec les conseils de sécurité SECURA ANIMAL ou SECURA SECURITY
(www.horizont.com)
Installation et branchement:
Connecter le piquet de terre avec le fil de terre. Enfoncer profondément le piquet de terre (1m),
ref. 14041, dans un endroit humide, à proximité de l’électrificateur. Une bonne prise de terre
(Fig.1) est une condition préalable et nécessaire pour l’installation dans de bonnes conditions.
Se conformer ici à SECURA.
Les câbles de terre et de ligne doivent être raccordés suivant l’illustration.
La boite de l’électrificateur peut contenir les accus suivants: 12V, dimensions max. pour l’accu
250 x 192 x 225 mm.
Mise en route et contrôle:
Appuyer sur l’interrupteur en le positionnant sur >1<. Après quelques secondes, on entend
un léger tic-tac. L’électrificateur donne du voltage à la ligne. La lampe témoin de la clôture cli-
gnote à la cadence des impulsions électriques. Mettre le régulateur dans la position désirée la
puissance (Fig. 2a): Les 6 lampes de contrôle de la clôture ( a ) Fig. 2 montrent la tension sur la
ligne. La tension est indiquée par tranche de 1000V. Si moins de 3 lampes (3000 Volts) s’allument
il faut contrôler la ligne et l’appareil.
Causes possibles:
Avec clôture: Végétation trop abondante ou court-circuit de la clôture sur un piquet métallique.
Sans clôture:L‘appareil est défectueux, voir service.
Contrôle de l’accumulateur:
Dans la position > test < vous pouvez en même temps contrôler
l’état du déchargement de l’accumulateur. Si la charge de l’accu est encore suffisante vous allez
voir de la lumière permanente ( b ) Fig. 2, si la charge ne suffit plus, la lumière s’arrête.
Après avoir testé l’accu il faut remettre l’interrupteur sur la position >1<.
Standards: l’électrificateur correspond au normes de sécurité.
Changement du type d´alimentation (accumulateur):
Ouvrir l’électrificateur selon Fig. 3 et opérér le changement.
Les câbles de connexion nécessaires sont fournis
Solarisation:
Sur demande, un panneau solaire peut être fourni. Une fois monté, il doit être orienté vers le sud
(Fig. 4). Un panneau solaire 12V / 5W est connecter de l‘accumulateur 12V avec 25Ah minimum
(alternative 10W avec 35Ah ou 15W avec 45Ah et 20W avec 60Ah)
Maintenance:
Seulement du personnel qualifié est autorize d‘effectuer des réparatures.
Il ne faut utiliser que des pièces de rechange ordonnées par le producteur.
fr
Operating instruction
for electric fence controllers ranger A2000 / A3000
(ranger A3000 = identical in construction to farmer A3000)
in connection with SECURA safety and installation hints for electric fence controllers
(www.horizont.com)
Installation and connection:
Install the unit in a rather moisty place of the fence on the ground.
Drive one earth stake (1 metre), ref. 14041, as much as possible into the ground. A good groun-
ding (fig.1) is very important for the trouble free operation and the ideal performance of the fencer,
see also SECURA. Earth and line cables are connected according to the illustration.
The energizer housing can take 12V-batteries with following dimensions:
max. 250mm x 192mm x 225mm.
Operation and control:
(fig.2) Press switch in position >1<.
After a few seconds you will hear a regular tic tac. The energizer is supplying voltage onto the
fence. The control lamp flashes with the pulses.
Press the regulator into desired position (Fig. 2a): The 6 controllamps ( a ) indicate the fence
voltage in 1000V steps. At least 3 lamps should flash (3000V) to ensure sufficient voltage and
fencing.
Possible reasons, when the voltage is too low:
with fence: heavy vegetation on the fence, insulator flash-over or fence too long.
without fence: the energizer is faulty, see service.
Battery test:
In position > test < you can check at the same time the state of discharge of the battery. If
the battery charge is still ok you will see a permanent indicator light ( b ) Fig. 2, if the charge is
no longer sufficient the light will stop flashing. After testing the battery the switch has to be put
back in the position >1<.
Requirements:
The energizer corresponds to the safety standards.
Change of battery:
Open the unit according to (fig.3) and change or insert battery.
Solar operation: (Fig. 4)
On request a solar panel is available that can be mounted on top of the energizer and be directed
with this one towards the south.
A solarpanel 12V / 5W must be always connected to a 12V-battery with minimum 25Ah (alterna-
tivly 10W with minimum 35Ah und 15W with minimum 45Ah and 20W with minimum 60Ah).
Service:
Servicing is only to be made by qualified service personell.
Only by the manufacturer commanded replacement parts must be used.
en

8
9
Istruzioni per l’uso per la centralina da recinto elettrico
ranger A2000 / A3000 (ranger A3000 = identico a farmer A3000)
Rispondente alle norme costruttive e di sicurezza per gli apparecchi elettrificatori di recinzioni
SECURA ANIMAL o SECURA SECURITY (www.horizont.com)
Montaggio e collegamento:
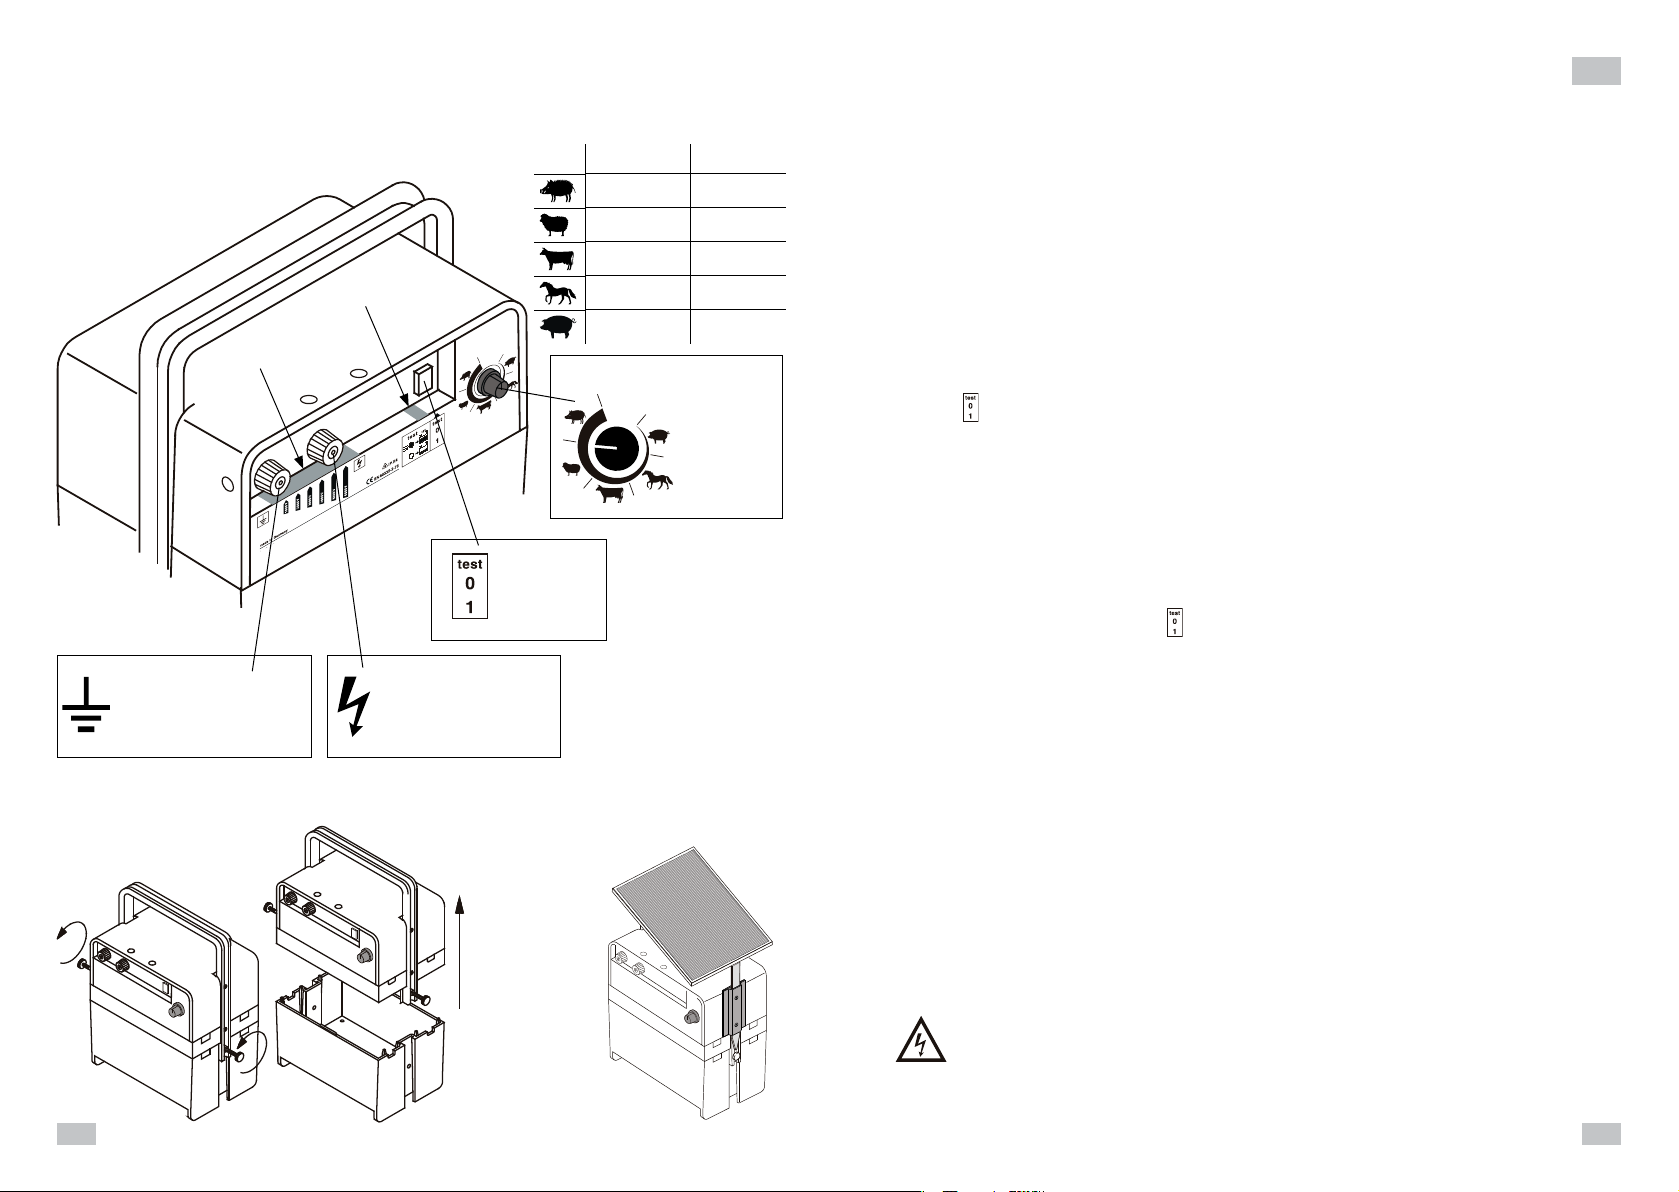
L’apparecchio viene posizionato per terra in un punto possibilmente umido del recinto ed accan-
to all’apparecchio conficcato in profondità un palo per la messa a terra (N. art. 14041) lungo 1m.
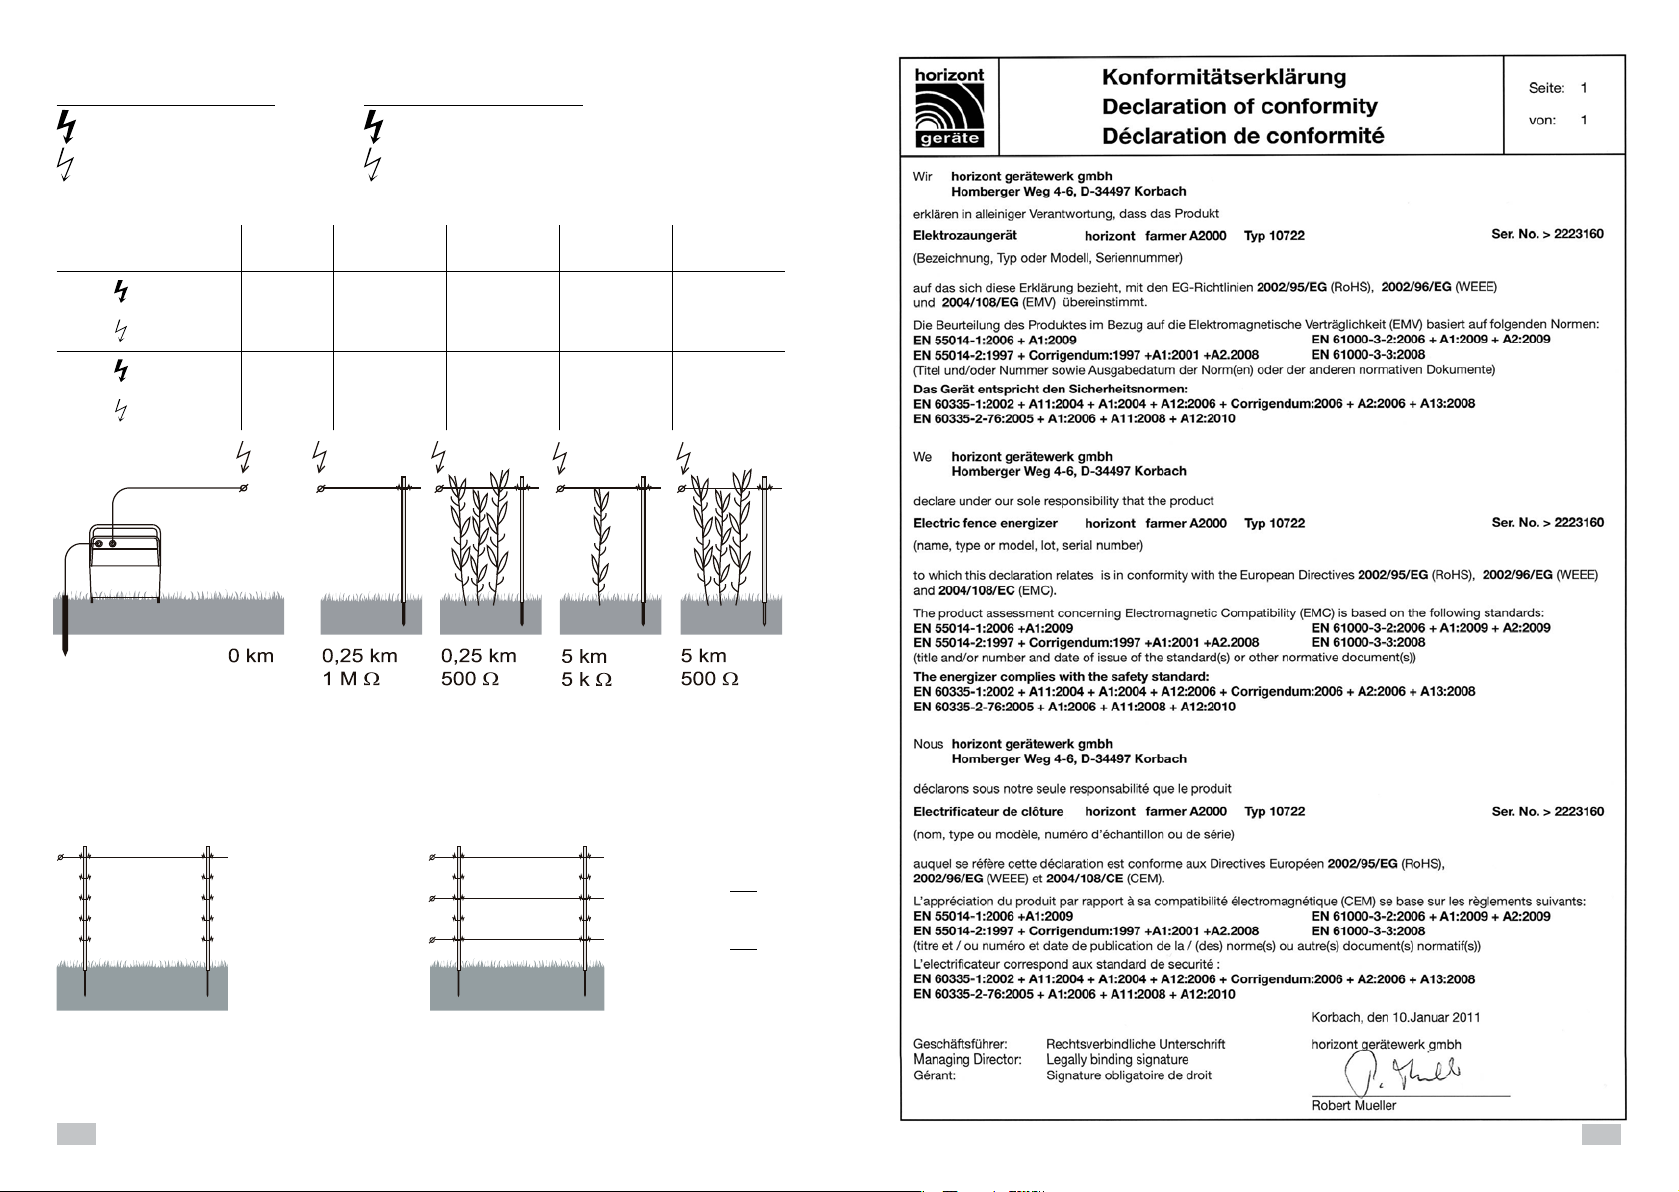
Una buona messa a terra (Fig. 1) è estremamente importante per il funzionamento a regola d’arte
e la potenza ottimale dell’apparecchio, vedere anche SECURA. Il cavo per la messa a terra e del
recinto devono essere collegati come illustrato nello schema. L’apparecchio può essere alimen-
tato con delle batterie da 12 V fino ad una grandezza di 250mm x 192mm x 225mm. Le batterie
da 12 V più grandi devono essere posizionate all’esterno dell’apparecchio (protette, bloccate ed
aerate).
Messa in funzione e controllo: (Fig.2)
Premere l’interruttore in posizione >1<, dopo qualche secondo si sente un ticchettio regolare
e l’apparecchio alimenta il recinto con della tensione. La lampada spia s´accende al ritmo degli
impulsi elettrici. Spostare il regolatore nella posizione desiderata (Fig. 2a)
Le 6 spie di controllo ( a ) indicano la tensione del recinto in livelli di 1000 V. Per sicurezza è ne-
cessario che siano accesi min. 3 spie (3000 V), altrimenti la tensione è troppo bassa.
Possibili cause: con recinto: forte vegetazione vicino al recinto, isolatori scarsi,
corto circuito dei pali di metallo o recinto troppo lungo.
senza recinto: l’apparecchio è difettoso, vedere Assistenza.
Controllo dello stato delle batterie: (Fig.2)
In posizione > test < viene controllato lo stato di carica delle batterie.
La spia di controllo ( b ) mostra luce fissa = carica sufficiente
luce spenta = La batteria deve essere caricata immediatamente
Dopo aver controllato la batteria è necessario che il selettore venga portato nuovamente in
posizione >1<.
Normative:
L’apparecchio corrisponde alle norme di sicurezza pertinenti.
Sostituzione batterie (Montaggio):
Aprire l’apparecchio come da schema (Fig. 3) e sostituire le batterie.
Alimentazione solare (Fig. 4):
A richiesta è possibile richiedere un pannello solare. Il pannello viene montato sull’apparecchio
ed orientato insieme a questo verso sud.
Il pannello solare 12V/5W deve essere sempre su una batteria 12V collegato con almeno 25Ah (in
alternativa a 10W con almeno 35Ah e 15W con almeno 45Ah e 20W con almeno 60Ah)
Assistenza:
La riparazione deve essere fatta soltanto da personale di servizio qualificato.
Utilizzare parti di ricambio originali.
itpt
Manual de instruções da cercas eléctrica ranger A2000 / A3000
(ranger A3000 = idêntica à farmer A3000)
em ligação com os conselhos de segurança SECURA ANIMAL ou SECURA SECURITY
(www.horizont.com)
Instalação e ligação:
instale o aparelho num local húmido junto ao cercado.Recomenda-se a utilização de 1 estacas
de terra de 1 metro (Ref.: 14041). Uma boa terra (fig. 1) é muito importante para um bom desem-
penho do cercado. A terra e os cabos de ligação devem ser ligados conforme a ilustração. O
compartimento para a bateria pode armazenar uma bateria de 12V com as seguintes dimensões:
máximo 250mm x 192mm x 225mm.
Operação e controlo (fig. 2):
Pressione o interruptor na posição >1<. Após alguns segundos ouvirá um tic-tac regular. O
aparelho está a fornecer voltagem ao cercado. A lâmpada de controlo pisca na sequência dos
impulsos. Coloque o regulador de potência na posição desejada (Fig. 2a): As 6 luzes de controlo
( a ) indicam a voltagem do cercado em passos de 1000V. Pelo menos 3 luzes (3000V) devem
estar acesas para assegurar uma voltagem suficiente no cercado.
Em caso de baixa voltagem existem várias possíveis razões:
com o aparelho ligado ao cercado: forte vegetação,
mau isolamento ou cercado demasiado longo
sem o aparelho ligado ao cercado: defeito no aparelho
Teste de bateria:
na posição >test< poderá verificar o estado de descarga da bateria. Se a carga da bateria
ainda estiver OK verá uma luz permanente ( b ) Fig. 2. Se o nível de carga for insuficiente a luz
deixará de estar visível.
Após testar a bateria deverá colocar o interruptor n posição >1<.
Requisitos:
Esta unidade foi concebida em conformidade com os standards respectivos.
Mudança da bateria:
abra o aparelho conforme ilustrado na página 4, fig. 3, e mude – ou coloque – a bateria.
Operação solar:
Como opção está disponível um módulo solar que pode ser fixado no topo do aparelho (fig. 4).
O módulo solar de 12V / 5W deve ser sempre ligado a uma bateria húmida de 12V com um
mínimo de 25Ah (em alternativa o módulo solar de 10W a uma bateria húmida de 12V com um
mínimo de 35AH, e o módulo solar de 15W a uma bateria húmida de 12V com um mínimo de
45Ah e o módulo solar de 20W a uma bateria húmida de 12V com um mínimo de 60Ah)
Serviço: A assistência técnica deverá ser efectuada por pessoal devidamente quali-
ficado. Só devem ser utilizadas peças de substituição devidamente autorizadas pelo
fabricante.

10
11
Gewicht (ohne Akku) - weigh (without accu) - poids (sans accu) - peso (s/bateria) ~ 3,6 kg
TECHNISCHE ÄNDERUNGEN VORBEHALTEN !
TECHNICAL CHANGES RESERVED !
SOUS RÉSERVE DE MODIFICATIONS TECHNIQUES !
RESERVAMO-NOS O DIREITO DE FAZER ALTERAÇÕES TÉCNICAS !
MODIFICHE TECNICHE RISERVATE !
Technische Daten - technical data - données techniques - datos tecnicos - data tecnici :
CEE: max. Zaunlänge - max. fence line length - longueur électrifée
máximo comprimento do cercado - lunghezza massima recinzione
0 km 0,25 km
1 M Ω 0,25 km
500 Ω 5 km
5 k Ω 5 km
500 Ω
ranger
A3000
~350 mA / 3,0 J max. 9500 V ~ 9500 V ~ 4500 V ~ 7000 V ~ 4500 V
~80 mA / 0,6 J max. 4000 V ~ 4000 V ~ 2000 V ~ 5000 V ~ 2000 V
ranger
A2000
~250 mA / 2,0 J max. 9500 V ~ 9500 V ~ 3800 V ~ 6000 V ~ 3800 V
~50 mA / 0,4 J max. 4000 V ~ 4800 V ~ 1500 V ~ 2200 V ~ 1500 V
60 km
3
40 km
3
ranger A3000 =
ranger A2000 =
ranger A3000 = 60 km
ranger A2000 = 40 km
12V / 350 mA / 3,0 J
12V / 80 mA / 0,6 J
ranger A3000, Type 10589
12V / 250 mA / 2,0 J
12V / 50 mA / 0,4 J
ranger A2000, Type 10722

12
This manual suits for next models
1
Other Horizont Agrar Farm Equipment manuals

Horizont Agrar
Horizont Agrar farmer B2 Type 10441 User manual

Horizont Agrar
Horizont Agrar RANGER N40 User manual

Horizont Agrar
Horizont Agrar EQUISTOP M3 User manual

Horizont Agrar
Horizont Agrar Scout N2 User manual

Horizont Agrar
Horizont Agrar ranger A70 User manual

Horizont Agrar
Horizont Agrar horiSMART N70 User manual