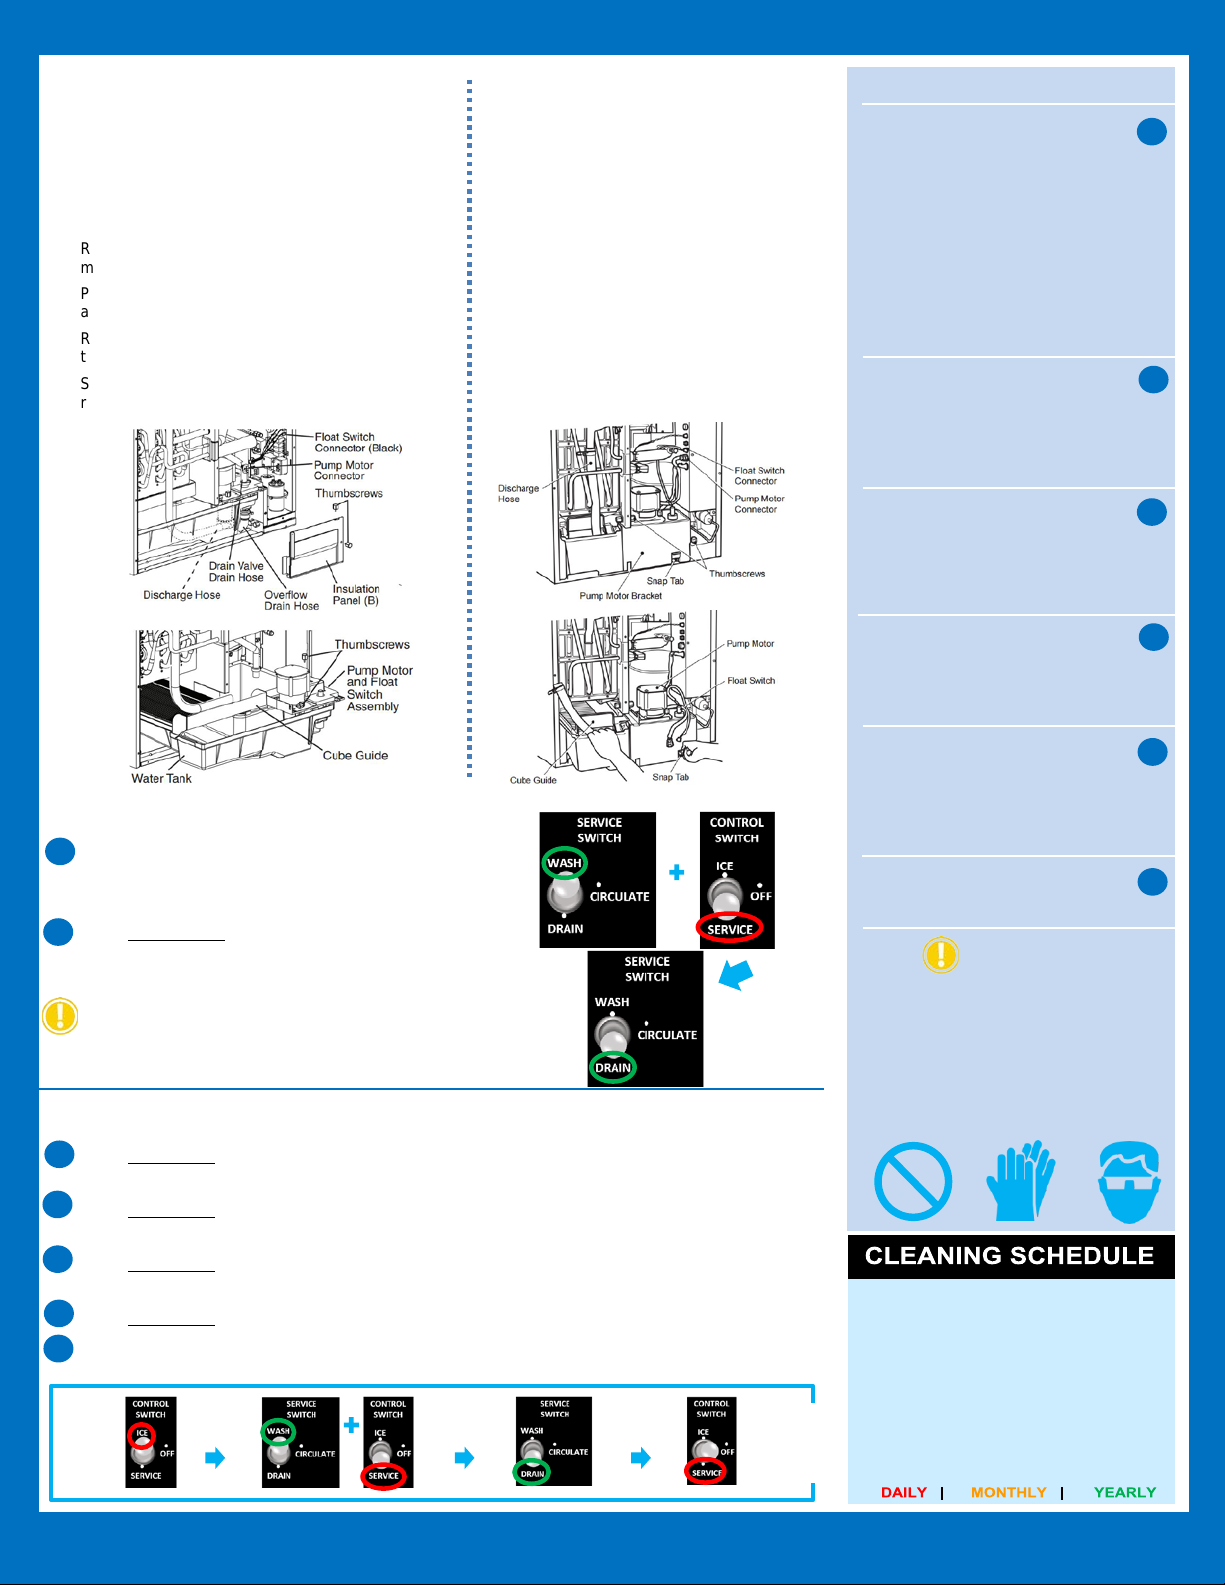
manuals.online logo
Brands
  1. Home
  2. •
  3. Brands
  4. •
  5. Hoshizaki
  6. •
  7. Ice Maker
  8. •
  9. Hoshizaki KMD-410MAH Service manual

Hoshizaki KMD-410MAH Service manual

Other manuals for KMD-410MAH

3

This manual suits for next models

8

Other Hoshizaki Ice Maker manuals

Hoshizaki FM-251AFE User manual

Hoshizaki

Hoshizaki FM-251AFE User manual

Hoshizaki KMD-530MRJZ User manual

Hoshizaki

Hoshizaki KMD-530MRJZ User manual

Hoshizaki KM-515MAH-E User manual

Hoshizaki

Hoshizaki KM-515MAH-E User manual

Hoshizaki IM-240ANE User manual

Hoshizaki

Hoshizaki IM-240ANE User manual

Hoshizaki C-101BAH User manual

Hoshizaki

Hoshizaki C-101BAH User manual

Hoshizaki KM-250BAF User manual

Hoshizaki

Hoshizaki KM-250BAF User manual

Hoshizaki KM-1300NRF User manual

Hoshizaki

Hoshizaki KM-1300NRF User manual

Hoshizaki DCM-700BAA User manual

Hoshizaki

Hoshizaki DCM-700BAA User manual

Hoshizaki F-450MAJ-C User manual

Hoshizaki

Hoshizaki F-450MAJ-C User manual

Hoshizaki IM-130BAB-21 User manual

Hoshizaki

Hoshizaki IM-130BAB-21 User manual

Hoshizaki DCM-270BAH User manual

Hoshizaki

Hoshizaki DCM-270BAH User manual

Hoshizaki DIM-40DE-HC User manual

Hoshizaki

Hoshizaki DIM-40DE-HC User manual

Hoshizaki KM-630MAF-E User manual

Hoshizaki

Hoshizaki KM-630MAF-E User manual

Hoshizaki KM-1301SAJ-E User manual

Hoshizaki

Hoshizaki KM-1301SAJ-E User manual

Hoshizaki DM-90A User manual

Hoshizaki

Hoshizaki DM-90A User manual

Hoshizaki IM-201-DU User manual

Hoshizaki

Hoshizaki IM-201-DU User manual

Hoshizaki KM-40B User manual

Hoshizaki

Hoshizaki KM-40B User manual

Hoshizaki KM-520MAJ-E User manual

Hoshizaki

Hoshizaki KM-520MAJ-E User manual

Hoshizaki DCM-270BAH-OS User manual

Hoshizaki

Hoshizaki DCM-270BAH-OS User manual

Hoshizaki KM-600MAH User manual

Hoshizaki

Hoshizaki KM-600MAH User manual

Hoshizaki FM-600ALHE User manual

Hoshizaki

Hoshizaki FM-600ALHE User manual

Hoshizaki KM-1600MRB3 User manual

Hoshizaki

Hoshizaki KM-1600MRB3 User manual

Hoshizaki DCM-450BAE User manual

Hoshizaki

Hoshizaki DCM-450BAE User manual

Hoshizaki KMD-460MAJ User manual

Hoshizaki

Hoshizaki KMD-460MAJ User manual

Popular Ice Maker manuals by other brands

camry CR 8073 user manual

camry

camry CR 8073 user manual

Sub-Zero 315I Planning information

Sub-Zero

Sub-Zero 315I Planning information

Kenmore 2217402A Use & care guide

Kenmore

Kenmore 2217402A Use & care guide

Cornelius WM600 Installation & owner's manual

Cornelius

Cornelius WM600 Installation & owner's manual

GE XPIO43SCSS owner's manual

GE

GE XPIO43SCSS owner's manual

Whynter FIM-450HA instruction manual

Whynter

Whynter FIM-450HA instruction manual

Unold 48945 Instructions for use

Unold

Unold 48945 Instructions for use

Andrew James AJ000522 manual

Andrew James

Andrew James AJ000522 manual

Scotsman CME1356 user guide

Scotsman

Scotsman CME1356 user guide

Scotsman ACM 25 Service manual

Scotsman

Scotsman ACM 25 Service manual

Kärcher IP 120 manual

Kärcher

Kärcher IP 120 manual

U-Line SS1095 Quick referenc guide

U-Line

U-Line SS1095 Quick referenc guide

Maytag MIM1554WRS - Ice Maker User instructions

Maytag

Maytag MIM1554WRS - Ice Maker User instructions

Igloo ICE102-WHITE user manual

Igloo

Igloo ICE102-WHITE user manual

Princess Yonanas user manual

Princess

Princess Yonanas user manual

Unold 48946 Instructions for use

Unold

Unold 48946 Instructions for use

Electrolux E15IM60GP Factory parts catalog

Electrolux

Electrolux E15IM60GP Factory parts catalog

Cornelius UC150 ICE ONLY Operator's manual

Cornelius

Cornelius UC150 ICE ONLY Operator's manual

manuals.online logo
manuals.online logoBrands
  • About & Mission
  • Contact us
  • Privacy Policy
  • Terms and Conditions

Copyright 2025 Manuals.Online. All Rights Reserved.

Cleaning Prep:
Remove the Front Panel, move the control switch to
OFF. After 3 min., move the control switch to ICE, then
replace the Front Panel
.
After 3 min., remove the Front Panel, move the
control switch to OFF. This removes the cubes from
the evaporator. Replace the Front Panel.
Remove all ice from the dispenser unit/ice storage bin.
ATTENTION! IF ON DISPENSER, turn off the dispenser power
supply after dispensing all the ice.
Cleaning:
Remove the Front Panel, move the service switch to
DRAIN. Move control switch to SERVICE. Replace the
Front Panel.
After 2 minutes, remove the Front Panel,move the
control switch to OFF.
Dilute Hoshizaki Scale Away with warm water (see Table below).
Remove the Insulation Panel (A) and pour cleaning solution into
the water tank.
KMD-410, 460, 530
Scale Away
9.5 fl. oz (281 ml)
Warm Water
1.8 gal. (6.8 l)
Inbad water conditions, a more thorough cleaning may
be required. Move control switch to OFF, then turn off
the power supply. Dilute 5 oz. of Scale Away to 1
gallon of warm water.Remove and clean the float
switch assembly (see Float Switch Cleaning on back),
water supply tubes, spray tubes, water tank, and pump
motor and float switch assembly. Rinse thoroughly,
then replace in their correct positions. Turn the power
supply back on. Otherwise, continue to Step ❽.
Ice Machine
KMD-410MAH, MWH, MRH
KMD-460MAH, MWH, MRH
KMD-530MAH, MWH, MRH
Sanitizing:
•Dilute 5.25% chlorine
bleach* with warm water
(see Table below)
KMD-410, 460, 530
Bleach
0.9 fl. oz (27 ml)
Warm Water
1.8 gal. (6.8 l)
* Use bleach without additives.
•Remove the front panel &
insulation panel (A)
•Pour the sanitizing solution
into the water tank
•Replace all the panels, except
the front panel
•Move service switch to
WASH and control switch to
SERVICE, replace the front
panel
•After 15 minutes, remove
front panel
•Move service switch to DRAIN,
replace the front panel
•After 2 minutes, remove
front panel
•Move control switch to OFF
3
min.
3
min.
Cleaning & Sanitizing
AMMONIA
Cleaners
The icemaker must be cleaned & sanitized at least once a year.
ATTENTION!
Do not leave icemaker
unattended when panels are off
continued on the back…
Tech Support: 1.800.233.1940
1
2
3
4
15
16
17
18
19
5
6
After 2 min.
7
Top
Service Switch
Control Switch
Water Tank
Right
Side
Front of icemaker
Insulation Panel (B)
Thumbscrews
Tech Support: 1.800.233.1940 Page 1
#51009 | 4.28.2017
KMD-460 & 530M_H:
Loosen the two thumbscrews on the pump insulation
panel (B) and remove the panel.
Disconnect the discharge hose, the drain valve hose,
and the overflow drain hose.
Disconnect the pump motor and then the float switch
connectors from the control board.
Remove the two thumbscrews securing the pump
motor and float switch assembly.
Pull out the water tank, cube guide, and pump motor
and float switch assembly all together.
Remove the screw securing the float switch to the
top of the assembly, remove the float switch*.
See Step ❼for cleaning steps. Reassemble in the
reverse order they were removed.
* Remove retainer rod (take care not to bend excessively) from bottom of the float switch housing & clean all float parts.
Replace all the Panels, except the Front Panel.
Move the service switch to WASH, and the control
switch to SERVICE. Replace the Front Panel.
After 30 minutes, remove the Front Panel, move
the service switch to DRAIN. Replace the Front
Panel.
ATTENTION! To prevent damage to the water pump,
do not leave the control switch on SERVICE for
extended periods when water tank is empty.
Cleaning Rinse:
After 2 minutes, remove the Front Panel, move the control switch to ICE. Replace
the Front Panel.
After 3 minutes, move the service switch to WASH, and the control switch to
SERVICE. Replace the Front Panel.
After 5 minutes, remove the Front Panel, move the service switch to DRAIN.
Replace the Front Panel
After 2 minutes, remove the Front Panel, move the control switch to OFF.
Repeat 3x (Steps ❿thru ⓭)to rinse thoroughly. Continue to Sanitation – Step ⓯
on front...
●Scoop
● Water Filters
●Exterior
● Bin Door/Top Kit
● Icemaker/Bin
● Water Supply Inlet
● Condenser
● Water Hoses
Dish soap, rinse well
Check psi, change if req’d
Dish soap & damp cloth
Warm water & clean cloth
Follow these instructions
Clean inlet screen
Inspect. Clean with brush
Inspect. Replace if req’d
●●●
Tech Support: 1.800.233.1940 Page 2
#51009 | 4.28.2017

sanitizing continued…
RINSE 1: (Steps 20-22)
•Move control switch to ICE,
replace front panel
•After 3 minutes, remove the
front panel
•Move service switch to WASH
and control switch to SERVICE,
replace the front panel
•After 5 minutes, remove the
front panel
•Move service switch to DRAIN,
replace the front panel
•After 2 minutes, remove
the front panel
•Move control switch to OFF,
replace the front panel
RINSE 2:
•Repeat RINSE 1 (Steps 20–22)
for complete ice/food safety
•Clean the dispenser unit /
ice storage bin liner with a
neutral cleaner (dish soap)
•Rinse thoroughly
•Move control switch to ICE,
replace front panel
8
9
10
11
12
AMMONIA
Cleaners
20
21
22
23
25
24
Need Service or Repair? Locate your closest Hoshizaki Certified Service Tech: hoshizakiamerica.com/locate-service-rep
After
30 min.
13
14
After
2 min.
After
3 min.
DO NOT use ammonia type cleaners
WEAR liquid-proof gloves and goggles
to protect skin & eyes from cleaning &
sanitizing chemicals
ATTENTION!
IF ICEMAKER IS ON DISPENSER,
remember to turn on the dispenser
after cleaning
KMD-410M_H:
Loosen the two thumbscrews securing the
pump motor bracket.
Disconnect the discharge hose.
Disconnect the pump motor and float switch
connectors from the side of the control box.
While pushing up on the snap tab, pull out the
water tank, cube guide, pump motor bracket,
and pump motor and float switch assembly all
together.
Remove the pump motor bracket securing the
float switch to the top of the assembly, remove
the float switch*.
See Step ❼for cleaning steps. Reassemble in
the reverse order they were removed.
FLOAT SWITCH CLEANING
After
5 min.
After
3 min.
Repeat
3x