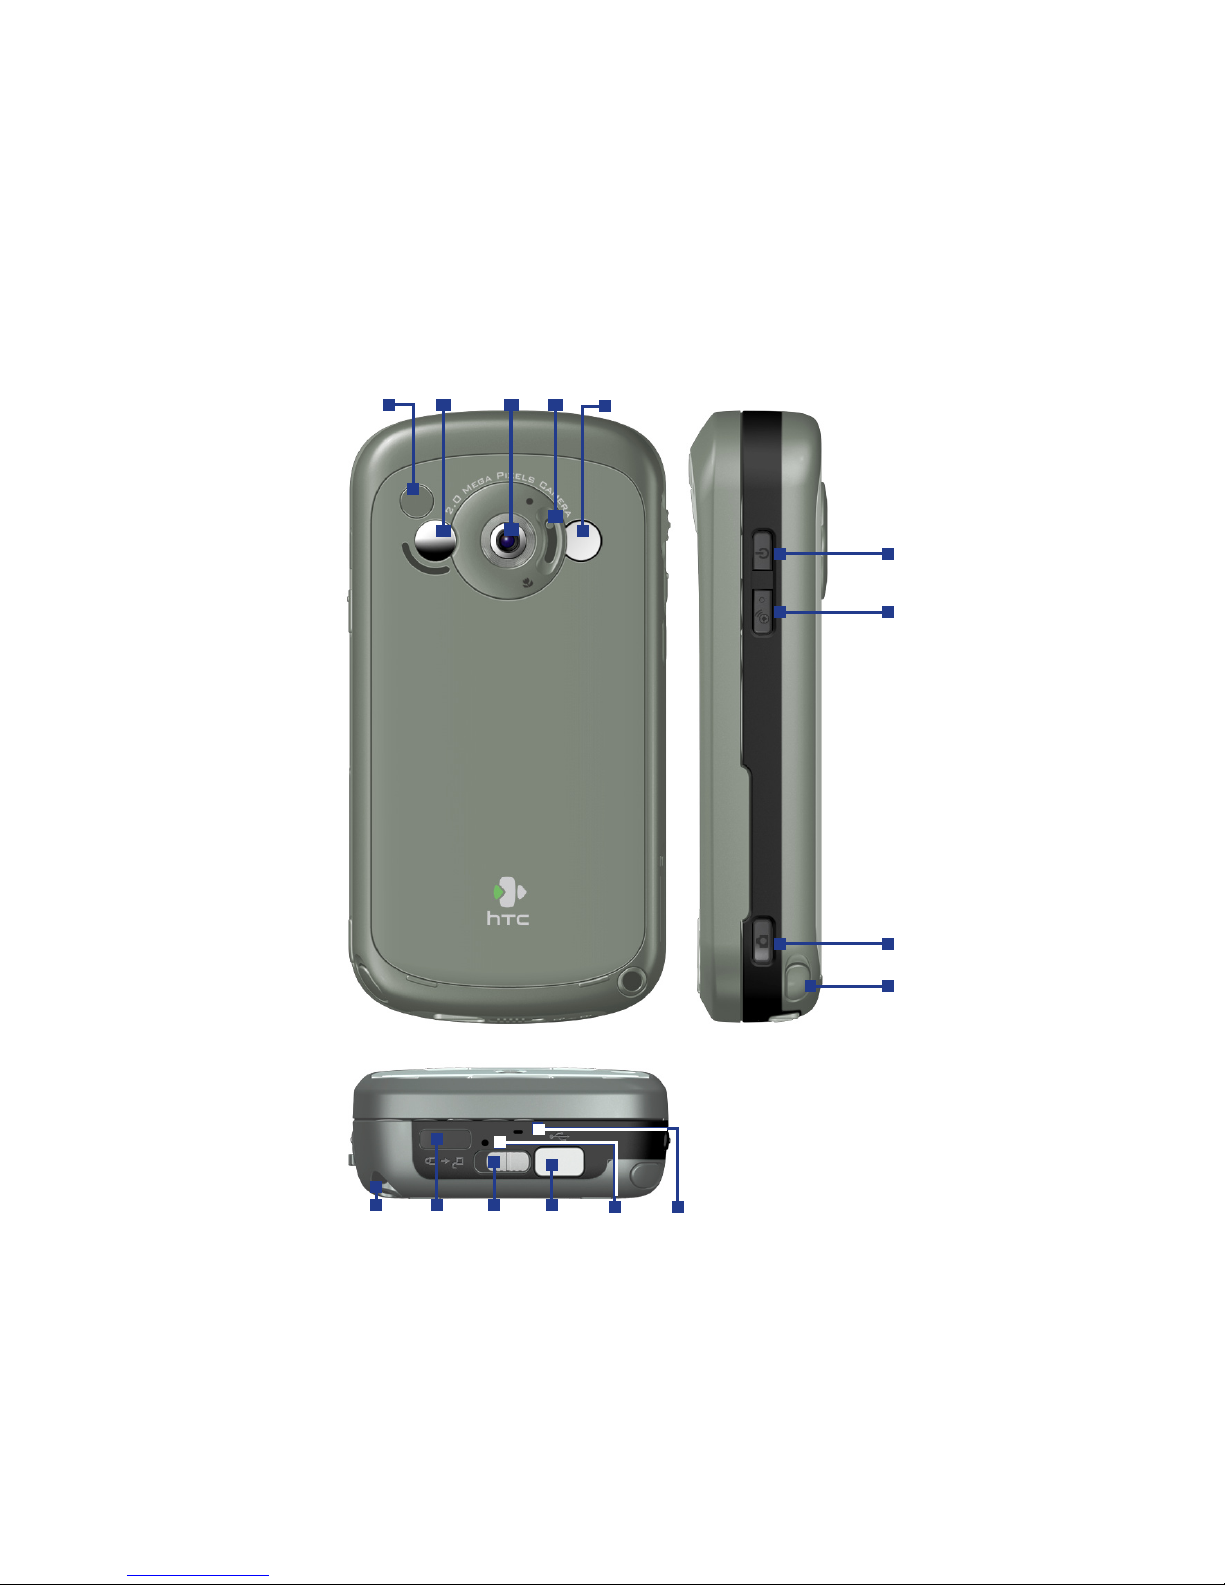
HTC Pocket PC Phone User manual

www.htc.com
Pocket PC Phone
Quick Start Guide

2
Contents
1. What’s in the Box? ............................................................................................ 3
2. The Pocket PC Phone ........................................................................................ 4
3. Getting Ready ................................................................................................... 8
4. Making a Call .................................................................................................. 12
5. Synchronizing Outlook Information ............................................................. 14
6. Setting Up an E-mail Account ........................................................................ 16
7. Sending a Message ......................................................................................... 17
8. Browsing the Internet .................................................................................... 18
9. Using the Camera ........................................................................................... 19
10. Using Pictures & Videos ................................................................................. 20
11. Entering Information ..................................................................................... 21
12. Status Indicators ............................................................................................. 23
13. Customizing Your Pocket PC Phone .............................................................. 24
14. Securing Your Pocket PC Phone .................................................................... 26
15. More Information ........................................................................................... 27

3
1. What’s in the Box?
AC Adapter
USB Sync Cable
Getting Started CD
User Manual and
Quick Start Guide
Battery
Pouch
Pocket PC Phone
Headset

4
2. The Pocket PC Phone
2 53 4 6
1
8
10
9
7
11
12
13
14
16 17 1815
19

5
No. Item Function
1 Hardware Keyboard See the user manual for details.
2 Messaging Button Press to quick start your Messaging.
3 Notification LED 1 This LED shows a blinking Blue light for Bluetooth system notification of powered-up and
ready to transmit radio frequency signal, and a blinking Green light for Wi-Fi status. When both
Bluetooth and Wi-Fi are enabled, their lights blink alternately.
4 Notification LED 2 This bi-color LED shows Green and Amber lights for UMTS/GSM standby, UMTS/GSM message,
UMTS/GSM network status, notification, and battery charging status.
5 INTERNET EXPLORER
Button
Press to launch Internet Explorer.
6 Second Camera Use this video camera for video call conversations.
7 Jog Wheel When in the Today screen or using applications, scroll up or down to navigate through menus,
program instructions; press the wheel to carry out selection. During a call or playing music,
scroll up or down to adjust the sound volume. And when receiving an incoming call, scroll
down to silence the audio notification.
8 OK Button Press to confirm your data entries, or to exit the program in use.
9 VOICE COMMAND Press to start Voice Speed Dial; press and hold to record a voice note.
10 Micro SD Card Slot In this card slot, insert a Micro SD memory card for storing data, or insert a Micro SD input/
output card such as a network card.
11 Touch Screen Tap the screen with the stylus to write, draw, or make a selection.
12 VIDEO CALL Button After entering a phone number in the Phone program, press this button to start a video call.
13 Left SOFT KEY Press to execute the command shown in the label above the button.
14 Right SOFT KEY Press to execute the command shown in the label above the button.
15 TALK Button Press to answer an incoming call or dial a number.
16 START Button Press to open the Start menu.
17 Navigation Control/
ENTER
Press this multi-directional control up, down, left, or right to move through menus and
program instructions; carry out the selection by pressing the center button.
18 OK Button Press to confirm your data entries, or to exit the program in use.
19 END Button Press to end a call or to return to the Today screen.

6
20 21 22 23
24
25
26
27
28
333230 3429 31

7
No. Item Function
20 Car Antenna Connector Connect your phone to the car antenna while in a car to have better reception quality.
21 Self-Portrait Mirror Turn the back side of your device to face yourself so that your image reflects on the mirror
when taking self-portrait shots.
22 Main Camera This camera takes still photos and records video clips. It provides two shooting modes: Normal
mode and Macro (close-up) mode.
23 Shooting Mode Switch Push the switch up for Normal mode or down for Macro mode.
24 Flash Light When turned on, it illuminates your subject and allows you to capture clear photos or video
even in a dark environment. It also flashes when a photo is taken.
25 POWER Button Press to turn off your device temporarily. This switches your device to sleep mode. To turn it off
completely, press and hold (for about 5 seconds).
You can still receive calls and messages even when your device is in sleep mode. When you turn
off the device completely, all functions including the phone will be unavailable for use.
26 COMM MANAGER Press to launch Comm Manager.
27 CAMERA Button Press to launch the camera; press again to take a photo or video clip, depending on the
specified capture mode.
28 Stylus Use the stylus to write, draw, or select items on the touch screen.
29 Strap Holder It lets you attach a strap for carrying your device.
30 Infrared Port It lets you exchange file(s) or data with other devices wirelessly.
31 Battery Cover Latch Slide this latch to release the battery cover.
32 Sync Connector/
Earphone Jack
Use this connector to synchronize data by connecting the provided USB Sync cable or to
recharge the battery via the provided AC adapter. You can also connect the provided USB
stereo headset for hands-free conversation or for listening to audio media.
33 RESET Button With the stylus, press the RESET button to soft-reset your device.
34 Microphone Speak into the microphone during a phone conversation or voice recording.
Accessory Function
AC adapter Converts AC to DC for recharging the battery.
USB Sync cable Connects your device to a PC and synchronizes data.
Stereo headset Provides a volume control slider and a Send/End button. Press the Send/End button to pick up a
call or put a call on hold; press and hold the button to end the call.

8
3. Getting Ready
Before you start using your device, you must install a USIM/SIM card and a charged battery. The
USIM/SIM card contains your phone number and service details, and it stores phonebook entries
and your messages.
Install the USIM/SIM card
1. Make sure your device is turned off.
2. Slide the cover latch to remove the battery cover.
Then remove the battery. Lift the battery up from the upper left side of the battery slot using
your finger.
Battery cover latch
3. Insert the USIM/SIM card into the SIM card slot with its gold contacts facing down (the cut-off
corner of the card should match the cut-off corner in the slot).
Slide the USIM/SIM
card into the SIM
card slot.

9
To take the USIM/SIM card out, use the stylus to press into the card slot hole, and then lightly
lift up the USIM/SIM card while pressing the left-most side of the card, and then slide it out.
Press lightly to slide the
USIM/SIM card out.
Use the stylus to
press into the SIM
card slot hole.
4. Replace the battery (see instructions in the next section).
5. Replace the battery cover.

10
Install and charge the battery
New batteries are shipped partially charged. Before you start using your device, it is recommended
that you install and charge the battery. To install the battery, remove the battery cover first,
and then insert the battery by aligning the exposed copper part of the battery pack with the
protruding copper conductor which is on the right side of the battery slot. Insert the right side of
the battery first, then gently push the battery into place, and replace the battery cover.
Some batteries perform best after several full charge/discharge cycles. You can charge the battery
in two ways:
• Connect your device directly to an electrical
outlet using the AC adapter.
• Plug the sync cable to the USB port on
your PC and to the sync connector on your
device.
When your device is turned off, charging is indicated by a solid amber light on the LED indicator.
When your device is turned on, charging is indicated by a solid amber light on the LED indicator as
well as a charging icon ( ) at the bottom right side of the Today screen.
After the battery has been fully charged, the LED indicator becomes green and a full battery icon (
) appears at the bottom right side of the Today screen.

11
Check the battery power
• Tap the battery level icon ( ) on the Today screen. The Power Settings screen will then
open where you can see the current battery power level.
Battery power indicator
When the battery power gets very low, a warning message will be displayed. When you see this,
immediately save your data by synchronizing with your PC, or save your data on a secondary
storage card, and then turn off your device. Do not attempt to restart your device until you have
connected it with the power adapter.

12
Turn on your Pocket PC Phone
Press POWER to turn on your device. When you turn on your device for the first time, you are asked
to complete a screen calibration process.
To turn off your device, press POWER again.
POWER button
4. Making a Call
Like a standard mobile phone, you can use your device to make, receive, and keep track of phone
calls and send SMS messages. In addition, you can make and receive video calls.
The Phone screen
From the Phone screen, you can access Call History, Speed Dial, and Phone settings. To open the
Phone screen, do one of the following:
• Use the stylus to tap Start > Phone.
• Press TALK on the device.
• Press VIDEO CALL on the device.
TALK button
VIDEO CALL button

13
Make a voice call
• On the Phone screen, tap the phone number you want to call, then tap or press the
TALK button.
Make a video call
• On the Phone screen, tap the phone number you want to call, then tap or press the
VIDEO CALL button.
Phone screen Video Call screen
Note The other party’s image will appear on the screen about 3 to 5 seconds after a connection is
established, depending on the signal strength. The streaming images quality may also be influenced by
the signal.

14
5. Synchronizing Outlook Information
Using Microsoft® ActiveSync®, you can synchronize information on your device with information
on your PC, such as Outlook content. ActiveSync is already installed on your device, but you need
to install it on your PC if you don’t already have it. Insert the Getting Started CD into the CD drive
of your PC. Follow the instructions on the installation wizard screen to install ActiveSync. Once
installation is completed, connect the sync cable to your device and plug it into your PC’s USB port.
To set up a partnership between your device and the PC, turn on your device. When the PC detects
a USB connection, it starts the ActiveSync Synchronization Setup Wizard. Follow the instructions
on the screen and select the Outlook items you want to synchronize.
Synchronization Setup Wizard
(Synchronization Options)

15
PC requirement to run ActiveSync 4.x
To connect your device to the PC, you must have the Microsoft® ActiveSync® program installed
on your PC. ActiveSync 4.x is included in the Getting Started CD, which is compatible with the
following operating systems and applications:
• Microsoft® Windows® 2000 Service Pack 4
• Microsoft® Windows® Server 2003 Service Pack 1
• Microsoft® Windows® Server 2003 IA64 Edition Service Pack 1
• Microsoft® Windows® Server 2003 x64 Edition Service Pack 1
• Microsoft® Windows® XP Professional Service Packs 1 and 2
• Microsoft® Windows® XP Home Service Packs 1 and 2
• Microsoft® Windows® XP Tablet PC Edition 2005
• Microsoft® Windows® XP Media Center Edition 2005
• Microsoft® Windows® XP Professional x64 Edition
• Microsoft® Outlook® 98, Microsoft® Outlook® 2000 and Microsoft® Outlook® XP, and Microsoft®
Outlook® 2003 messaging and collaboration clients
• Microsoft® Office 97, excluding Outlook
• Microsoft® Office 2000
• Microsoft® Office XP
• Microsoft® Office 2003
• Microsoft® Internet Explorer 4.01 or later (required)
• Microsoft® Systems Management Server 2.0

16
6. Setting Up an E-mail Account
Your Outlook E-mail account is ready to use. However, you need to set up an e-mail account that
you have with an Internet service provider (ISP) or an account that you access using a VPN server
connection (typically a work account) before you can send and receive mail.
Set up an e-mail account
1. Tap Start > Messaging.
2. Tap Menu > Tools > New Account.
3. Enter your e-mail address, and tap Next.
Auto configuration will help you download necessary e-mail server settings.
4. Once Auto configuration has finished, tap Next.
5. Enter your name (the name you want displayed when you send e-mail) and your password.
Setting up e-mail account
Tip Select the Save password check box if you want to save
your password so that you do not need to enter it again.

17
7. Sending a Message
Your device is capable of sending and receiving E-mail, SMS, and MMS messages as long as it is
connected to the network. Although you can send text messages (SMS) to only mobile phone
numbers, MMS messages can be sent to both mobile phone numbers and e-mail addresses.
Compose and send a message
1. In the message list, tap Menu > Switch Accounts and select an account.
2. Tap New.
3.
Enter the e-mail address or text message address of one or more recipients, separating them
with a semicolon. To access addresses and phone numbers from Contacts, tap To.
4. Enter your message.
•
To quickly add common messages, tap Menu > My Text and tap a desired message.
• To check the spelling, tap Menu > Spell Check.
5. Tap Send.
Composing message
Note SMS and MMS can only be sent if your device is connected
to a GSM/WCDMA network. E-mail messages can be sent
only if your device has Internet access (e.g. via GSM/WCDMA
network, USB/Bluetooth connection to computer, etc).

18
8. Browsing the Internet
You can set up connections to the Internet or to a corporate network to browse the Internet. The
pre-loaded browser, Internet Explorer Mobile, is a full-featured Internet browser, and optimized
for use on your device.
Use Internet Explorer Mobile
1. Tap Start > Internet Explorer.
2. To go to a web site, enter the URL address of the desired web site in the address bar that
appears at the top of the screen. Tap the down arrow ( ) to choose one web site from
previously entered addresses.
3. Tap the Go icon ( ) to go to the web address you entered.
4. Tap Back to go back to the previous page.
5. Tap Menu > Refresh to refresh the web page on the screen.
6. Tap Menu > Home to go back to the Home page.
7. Tap Menu > Favorites, and then select the favorite web site you
want to visit. To add a favorite link while browsing the Internet, go
to the page you want to add. Then, tap Menu > Add to Favorites,
or tap and hold on the page to select Add to Favorites from the
shortcut menu.
Internet Explorer Mobile

19
9. Using the Camera
Taking photos and recording video clips along with audio is easy with your device’s built-in camera.
Before capturing a photo or video clip, adjust the lens found at the back of the device to one of the
following modes:
Normal mode - to take shots at normal range
Macro mode - to take shots at close-up range
Launch the camera
• Tap Start > Programs > Camera.
• Tap Start > Programs > Pictures & Videos, then tap the Camera icon.
• Press the CAMERA button on your device.
To exit the camera, tap the Exit icon ( ) on the screen.
Camera screen

20
Capture a still image
1. After launching the camera, tap or at the upper left side of the screen or press
NAVIGATION left or right to select the Photo capture mode.
2. Press the CAMERA button, or the ENTER button on NAVIGATION to capture a still image.
Capture a video clip
1. After launching the camera, tap or at the upper left side of the screen or press
NAVIGATION left or right to select the Video capture mode.
2. Press the CAMERA button, or the ENTER button on NAVIGATION to start recording a video
clip. To stop recording, press the ENTER button or CAMERA button again.
10. Using Pictures & Videos
The Pictures & Videos program
collects, organizes, and sorts all of your
captured images and video clips on
your device.
You can use this program to view/play
pictures, GIF animation, and video
clips. You can even view pictures as a
slide show, beam them, send them via
e-mail, edit them, or set them as the
background on the Today screen.
The down arrow
The media icon
Tap to view the selected image
Other manuals for Pocket PC Phone
3
Table of contents
Other HTC Cell Phone manuals

HTC
HTC Desire 320 User manual

HTC
HTC Desire 12s User manual

HTC
HTC HTC Flyer User manual

HTC
HTC HTC Surround User manual

HTC
HTC Desire 310 dual sim User manual

HTC
HTC Amaze User manual

HTC
HTC Touch Pro User manual

HTC
HTC Mondrian User manual

HTC
HTC SMT5800 - Verizon Smartphone - Wireless User manual

HTC
HTC Vigor User manual

HTC
HTC 0P9O200 User manual

HTC
HTC EVO Shift 4G TC U250 User manual

HTC
HTC HD2 User manual

HTC
HTC DESIRE 20+ User manual

HTC
HTC Desire 620 dual sim User manual

HTC
HTC Desire 601 dual sim User manual

HTC
HTC Gratia User manual

HTC
HTC Vivid User manual

HTC
HTC Amadeus User manual

HTC
HTC PH44100 Installation and operating manual