Huawei X2331-CPI User manual

Packing List and Qualification Card
装箱清单和合格证
Additional Guides Available
资料获取路径
X2331-CPI
Issue: 07
版权所有 © 华为技术有限公司 2019。保留一切权利。
Copyright © Huawei Technologies Co., Ltd. 2019.
All rights reserved.
Quick Start Guide
快速入门
版本:07
部件名称 有毒有害物质或元素
Pb 铅 Hg 汞 Cd 镉 Cr6+ 六价铬 PBB 多溴联苯 PBDE 多溴二苯醚
结构件 ×○ ○ ○ ○ ○
单板/电路模块 ×○ ○ ○ ○ ○
线缆和线缆组件 ×○ ○ ○ ○ ○
纸质配件 ○ ○ ○ ○ ○ ○
○:表示该有害物质在该部件所有均质材料中的含量在GB/T 26572规定的限量要求以下。
×:表示该有害物质至少在该部件的某一均质材料中的含量超出GB/T 26572规定的限量要求。
This product has an environment friendly use period (EFUP) of 20 years. Some replaceable
parts have their own EFUP labels. The EFUP is suitable only for products that work in conditions
specified in the product manual.
本产品的环保使用期限为20 年。某些可更换的零部件会有一个不同的环保使用期贴在其产品上。此环保使
用期限只适用于产品是在产品手册中所规定的条件下工作。
电子电气产品有毒有害物质申明
本表格依据SJ/T 11364的规定编制。
1
Component
物品 PCS Component
物品 PCS
Camera
摄像机 1Power terminal
电源端子 1
Cable tie
扎线带 2Quick Start Guide
快速入门 1
M6 screws
M6螺钉 2H5 L-shaped hex key (for M6 screws)
H5内六角L型扳手(用于M6螺钉) 1
OT Terminal
OT接地端子 1Flat-head screwdriver (the width of the head is 2.5 mm)
一字螺丝刀(刀头宽度为2.5mm) 1
Sun shade
遮阳罩 1
限制物質含有情況標示聲明書,請登錄 http://support.huawei.com/enterprise網站,輸入對應的攝像機型號進行搜索,在
對應的產品文檔下選擇“安裝指南 > 附錄 > 限制物質含有情況標示聲明書”查看。
To obtain the latest documents, including the
Product Documentation
and
FOSS License
Information
, visit http://support.huawei.com/enterprise and enter the camera model to
search for related documents.
You can also log in to http://support.huawei.com/enterprise or scan the QR code using
your mobile phone to download the Huawei Enterprise Technical Support app. Then start
this app and choose Products > Video Surveillance to obtain the latest documents.
请登录 http://support.huawei.com/enterprise 网站,输入摄像机型号进行搜索,获取最新资料,
包括《产品文档》和《开源软件使用声明》等。
您也可以用手机登录 http://support.huawei.com/enterprise 网站或者扫描右侧二维码,下载
“华为企业服务 APP”,选择“产品 > 视频监控”获取最新资料。
Default Login IP
Adresse IP
IP accesso predefinito
默认 IP 地址
User Name
nom d'utilisateur
nome utente
用户名
192.168.0.120 admin
HiKnow Technical
Support APP
华为企业服务 APP

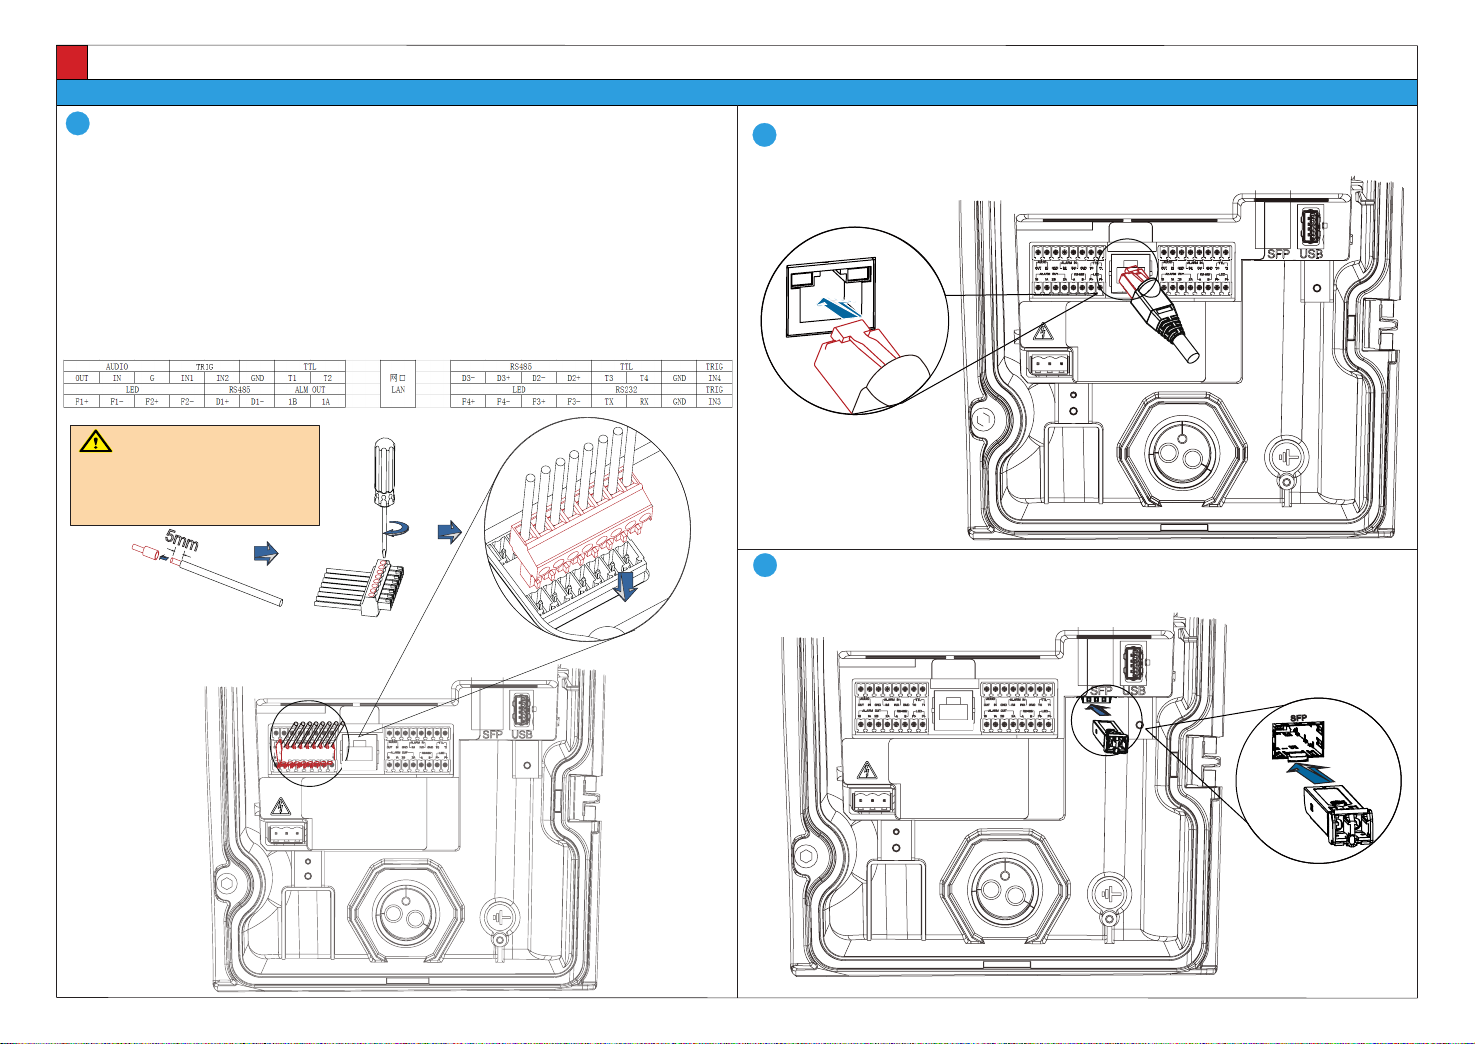
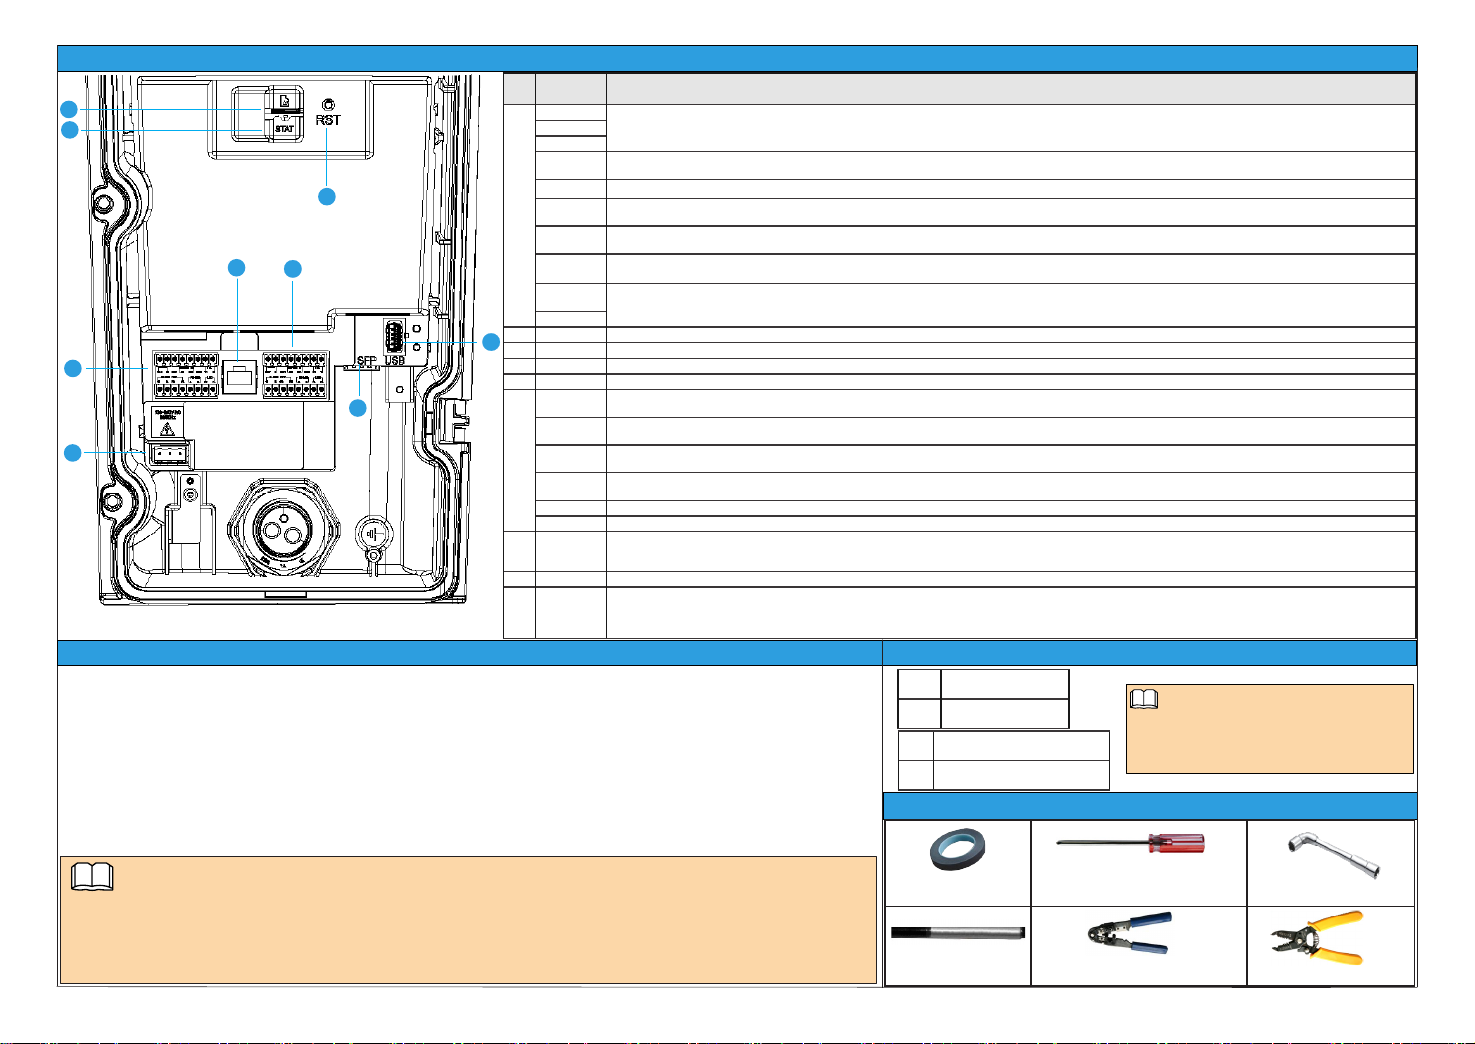
Interface Description/ 接口说明
Required Tools/ 准备安装工具
PVC insulation tape
绝缘胶带
Phillips screwdriver (There are two head
models: 1# and 2#)
十字螺丝刀(刀头型号为:1#和2#)
Socket wrench (M6)
套筒扳手(M6)
Marker
记号笔 RJ-45 connector crimp tool
水晶头压线钳 Cable stripper 剥线钳
4
6
1
2
3
8
5
7
9
NO.
序号
Item
名称
Description
说明
1
AUDIO_IN Indicates the video input/output interface.
音频输入、输出及接地接口。
AUDIO_OUT
GND
TRIG Trigger input interface (IN1 and IN2 indicate the positive pole), GND is the negative pole. Electrical requirements: The maximum voltage is 5 V, the maximum current
is 1 mA, and the impedance is greater than 1 megaohm. 触发输入接口(IN1、IN2为正),GND为负极。接口电气要求:最大耐压5V,最大电流1mA,阻抗>1MΩ。
GND Interface for connecting the ground cable. 用于连接接地线。
TTL Level output control interface (T1 and T2 are positive poles, corresponding to IO:5 and IO:6 respectively). Negative: GND. Electrical specification: 5V TTL.
电平量输出控制接口(T1、T2为正极,分别对应IO:5和IO:6补光灯),GND为负极,接口电气要求:5V TTL。
LED LED interface (F1+, F1-, F2+, F2-), which is used to connect to an external strobe light, corresponding to IO:1 and IO:2 respectively.
LED(F1+、F1-、F2+、F2-)光耦开关量输出接口,用于连接外置补光灯,F1、F2分别对应IO:1和IO:2补光灯。
RS485 RS485 interface (D1+, D1-), which is used to connect peripheral devices such as a vehicle detector, radar, or a traffic light reader.
RS485(D1+,D1-)接口。可用于连接车检器、雷达和红绿灯检测等外部设备。
ALM OUT 1A Alarm output interface. Electrical requirements: 200 mA@30 V DC or 200 mA@125 V AC. The rated power of the device driven by alarm output is less than or equal
to 30 W, and its rated voltage is less than or equal to 110 V DC or 125 V AC.
告警输出接口。接口电气要求:200mA@30VDC或200mA@125VAC。告警输出所驱动设备的额定功率不大于30W,额定电压不高于DC 110V或AC 125V。
ALM OUT 1B
2LAN Ethernet connection interface. 网络接口。
3AC Power input interface that supports 220 V AC (100 V to 240 V) power supply. 电源输入接口。支持AC 220V(100V~240V)。
4USB USB 3.0 interface. USB 3.0接口。
5SFP GE-SFP optical module Interface that supports single-mode optical modules. GE-SFP光模块接口。支持单模光模块。
6
RS485 RS485 interface (D2+, D2-, D3+, D3-), which is used to connect peripheral devices such as a vehicle detector, radar, or a traffic light reader.
RS485接口(D2+,D2-,D3+,D3-)。可用于连接车检器、雷达和红绿灯检测等外部设备。
TTL Level output control interface (T3 and T4 are positive poles, corresponding to IO:7 and IO:8 respectively). Negative: GND. Electrical specification: Standard TTL.
电平量输出控制接口(T3、T4为正极,分别对应IO:7和IO:8补光灯),GND为负极,接口电气要求:标准TTL电平。
TRIG Trigger input interface (IN3 and IN4 indicate the positive pole). GND indicates the negative pole. Electrical requirements: The maximum voltage is 5 V, the maximum
current is 1 mA, and the impedance is greater than 1 megaohm. 触发输入接口(IN3、IN4正极),GND为负极。接口电气要求:最大耐压5V,最大电流1mA,阻抗>1MΩ。
LED LED interface (F3+, F3-, F4+, F4-), which is used to connect to an external strobe light, corresponding to IO:3 and IO:4 respectively.
LED光耦开关量输出接口,用于连接外置补光灯,F3、F4分别对应IO:3和IO:4补光灯。
RS232 RS232 interface (TX, RX). RS232接口(TX,RX)。
GND Interface for connecting the ground cable. 用于连接接地线。
7SD CARD
SD card slot. The SD card slot supports only class 10 or higher Micro SD cards. To replace a Micro SD card, the device must be powered off. When a Micro SD card is
used for the first time, log in to the web client of the device and format the Micro SD card. For details, see the Configuration Guide. 仅支持Micro SD卡(Class 10及以
上)。请在设备断电的情况下插拔SD卡,否则会造成系统异常。首次使用时,请登录设备Web客户端,格式化SD卡,操作方法请参见《配置指南》。
8STAT System running status indicator. 系统运行状态指示灯。
9RST
Reset button. To restart the device, hold down the reset button (less than 3s). To restore the device to factory settings, hold down the reset button for at least 3s
while the device running. Exercise caution when restoring camera to factory settings. After the camera is restored to factory settings, user account and some other
configuration data may be lost.
运行时按住Reset键短于3秒重启设备;运行时按住RST键不短于3秒后恢复出厂配置。恢复出厂配置后将会导致用户的账号信息以及部分配置信息丢失,请谨慎操作。
2
The external illuminator is connected to the TTL interface (T1 to T4) or LED interface (F1 to F4) of a camera. Therefore, a camera can connect to a maximum
of eight external illuminators. The connection mode varies depending on the signal control cable type of the illuminator.
外置补光灯通过摄像机的 TTL 接口(T1 至 T4,共 4 个接口)或 LED 接口(F1 至 F4,共 4 对接口)与摄像机相连,因此,摄像机一共可连接 8 个外置补光灯。根据补
光灯的信号控制线类别的不同(电平量线或者开关量线),具体的连接方式有两种,参考如下:
1, The positive level output cable of the illuminator is connected to the TTL interface (T1, T2, T3, or T4) of the camera. The negative level output cable or
ground cable (If multiple illuminators are connected, multiple negative level output cables or ground cables need to be connected in parallel first.) to the
GND interface of the camera (T1 and T2 share one GND interface, and T3 and T4 share the other GND interface).
补光灯的电平量正极线连接摄像机的 TTL 接口(T1、T2、T3 或 T4 接口),相应的负极线或接地线(若接多个补光灯,则多根负极线 / 接地线先并联),接至对应的
摄像机 GND 接口(T1 和 T2 共用一个 GND 接口,T3 和 T4 共用另一个 GND 接口)。
2, The positive Boolean value cable of the illuminator is connected to the positive LED interface (F1+, F2+, F3+, or F4+) of the camera. The negative
Boolean value cable or ground cable is connected to the negative LED interface (F1-, F2-, F3-, or F4-) of the camera.
补光灯的开关量正极线连接摄像机的 LED 正极接口(F1+、F2+、F3+ 或 F4+),相应的负极线或接地线分别连接至对应的 LED 负极接口(F1-、F2-、F3- 或 F4-
)。
External Strobe Light Connection Description/ 外置补光灯接线说明
• If the signal control cable of the illuminator is not clearly identified as a level output or a Boolean value cable, check the illuminator instructions or
consult the illuminator supplier to confirm the signal control cable type.
若补光灯的信号控制线无明确标识是电平量线还是开关量线,请查看补光灯的说明书或咨询补光灯供应商,确认其信号控制线的类别。
• The TTL interface of Huawei ITS cameras can identify only level ranging from 0 V to 5 V. If the voltage of the illuminator signal control cable is
higher than 5 V, only the second connection method can be used.
华为ITS摄像机的TTL接口只能识别0~5V的电平量,若补光灯控制线电压高于5V,则接线方式只能使用第二种,即控制线连接至摄像机LED接口的连接方式。
NOTE/ 说明
Off
灯灭
The system is pwer off.
系统未上电。
Orange
橙色
The system is starting.
系统正在启动。 When the camera is enabled, the indicator is changed to:
Off → Orange → Green.
摄像机启动时,指示灯的变化为:灯灭→橙色→绿色。
NOTE/ 说明
STAT Indicator Description/STAT 指示灯说明
Green
绿色
The system is running properly.
系统运行正常。
Red
红色
An exception occurs in the system.
系统有异常。

3
Device Installation/ 设备安装
A. Device Installation Requirements/ 设备安装要求
Requirements for Installation Locations of Checkpoint camera:
卡口模式摄像机的架设点位要求:
• Ensure that all roads within the 50-meter scope in front of the camera are straight and there are no junctions so that the camera directly faces the head or rear of vehicles for snapshot taking.
点位前 50米范围道路为直线,没有分岔路口,保证抓拍图片车头或车尾正对摄像机。
• Ensure that there are no junctions within the 50-meter scope behind the camera to prevent situations when the camera cannot take snapshots of license plates due to vehicle queuing.
建议避免点位后 50米范围内存在分岔路,避免因车辆分流导致车辆排队而引起摄像机无法拍摄到后车车牌的情形。
• Ensure that there are no traffic lights within the 200-meter scope around the camera to prevent situations when the camera cannot take snapshots of license plates due to vehicle queuing or following.
建议点位前后 200米内不要有交通信号灯,车辆排队或跟车情况容易导致摄像机无法拍摄到后车车牌。
• Install the camera in a place where there are fewer lanes. Some cameras are installed at intersections where there are multiple lanes for scattering vehicles with different driving directions. Move these cameras to places that
are far away from the intersections and have fewer lanes to facilitate snapshot taking and license plate recognition.
选择车道数少的截面位置架设。某些路口为了分流各种行驶方向的车辆,车道数会增多,车辆行驶方向不一,此时安装点位建议朝向远离路口的方向缩进,使得截面车道数相对较少且单一,便于抓拍和检测。
• Cameras must be fixed to cope with the interference caused by special weather (strong wind) or normal vibration (caused by nearby vehicles) to the image stability.
摄像机必须固定,整体能够应对特殊天气(大风)或者常规震动(附近路过的车辆引起)对画面稳定性的干扰。
• In roadside installation mode, the camera installation location must be about 1 m away from the roadside (the deviation range is ±0.5 m). If a camera is installed in the middle of the road, ensure that the camera is installed
in the center of the road.
若使用道路侧装方式,摄像机安装位置距离道路侧边应在 1m左右(偏差范围为 ±0.5m);若使用道路中间装的方式,则应确保相机安装在道路中央。
1
Requirements for Installation Height and Distance:
摄像机的高度要求:
• Cameras must be installed at a height of 6±0.5 m.
摄像机的安装高度 H应在 6±0.5米之间。
• The distance (X) is recommended to be around 23–25 m.
摄像机的安装横向距离 X推荐在 23米至 25米之间。
• The distance of detection and recognition area L must be longer than 15 m.
摄像机的识别和抓拍区域的长度 L应大于 15米。
2
•
The installation location, height, and angle of the camera can directly affect the accuracy of traffic surveillance functions such as license plate recognition. The installation requirements
below are for references, should be optimized based on real situation.
摄像机的架设点位选择,以及安装高度和角度,直接影响到车牌识别等交通监控功能的准确率。以下的安装数据要求,具体需以场景实际情况为准。
•
For specific camera installation requirements, please log on to the http://support.huawei.com/enterprise website to get the
Huawei SDC ePolice Camera
and
Huawei SDC Standard
Checkpoint Camera
documents.
具体的摄像机安装要求,请登录 http://support.huawei.com/enterprise网站,获取《华为 SDC 电警摄像机专题》和《华为 SDC 标准卡口摄像机专题》文档。
•
Use the SiMS tool to perform site survey planning, batch upgrade, batch parameter setting, and maintenance for cameras. To obtain the SiMS tool, visit http://support.huawei.com/
enterprise and enter SDC iMS in the search box.
可使用 SiMS工具对摄像机进行工勘规划、批量升级、批量参数配置和维护。请登录 http://support.huawei.com/enterprise 网站,在搜索栏输入“SDC iMS”搜索获取该工具。
The camera supports the GPS function. If the GPS function is required, you need to install the camera
outdoors
and ensure that the camera is free of obstacles above to improve the positioning accuracy.
本款摄像机支持GPS 定位功能,如果需要使用到GPS 功能,为了确保GPS 效果,需将摄像机安装在室外,且摄
像机上方无遮挡。
NOTE/ 说明

Device Installation/ 设备安装
B. Beam-Mounted Installation/ 横臂抱装 C. Pole-Mounted Installation/ 立杆抱装
2
1Install the wall-mount bracket into No. 5 hole on the pole-mount bracket (for the
No.5 hole identifier, see the silk screen on the physical device).
将壁装支架安装到抱装支架 5 号孔位(5 号孔位标识请参见实物上的丝印)上。
2
1
Put the hold hoops through the installation holes
on the polemount bracket, place the hold hoops
around the pole and fasten the hold hoops. Use the
hold hoops to install the pole-mount bracket and the
camera on the cross arm.
使用喉箍将抱装支架和摄像机整体安装到横臂上,将喉箍环
穿过抱装支架的安装孔,并环绕在横臂上,拧紧喉箍。
3Adjust the surveillance angle. Fasten all screws on the universal joint
and use captive screws to fasten the four planes of the universal joint
to fix the universal joint.
调整好监控角度,拧紧万向节上的所有螺钉,再使用辅助紧固螺钉在万向节
的四个面上拧紧,使万向节固定。
a: Loosen the screw here. Then, you can adjust the tilt angle of the camera.
b: Loosen the screw here. Then, you can adjust the horizontal angle of the camera.
c: Loosen the screw here. Then, you can adjust the vertical angle of the camera.
a:通过拧松该处螺钉,可调节摄像机倾斜角度。
b:通过拧松该处螺钉,可调节摄像机水平角度。
c:通过拧松该处螺钉,可调节摄像机垂直角度。
NOTE/ 说明
Install the universal joint into No.2 hole (for the No.2 hole identifier, see the silk screen on the physical device) on the pole-mount
bracket, as shown in the following figure (properly adjust the horizontal monitoring angle during installation). Unfasten the screws
on the universal joint to enable the universal joint to rotate freely. Adjust the horizontal and vertical shooting angles and tighten all
screws on the universal joint.
将万向节安装到抱装支架 2 号孔位(2 号孔位标识请参见实物上的丝印,如下图,安装时注意调整好水平监控角度)。拧松万向节上的螺钉,使
得万向节可以自由转动。初步调整好水平和垂直监控角度,拧紧万向节上的所有螺钉。
3
Loosen the screws on the universal joint to make the universal joint rotatable. Then,
fix the camera on the universal joint.
拧松万向节上的螺钉,使得万向节可以自由转动。将摄像机固定到万向节上。
a: Loosen the screw here. Then, you can adjust the horizontal angle
of the camera.
b: Loosen the screw here. Then, you can adjust the vertical angle of
the camera.
a:通过拧松该处螺钉,可调节摄像机水平角度。
b:通过拧松该处螺钉,可调节摄像机垂直角度。
NOTE/ 说明
ab
Use a hold hoop to install the pole-mount bracket and the camera to the pole. Adjust
the surveillance angle. Fasten all screws on the universal joint and use captive screws
to fasten the two planes of the universal joint to fix the universal joint.
使用喉箍将抱装支架和摄像机安装到柱杆上。调整好监控角度,拧紧万向节上的所有螺钉,
再使用辅助紧固螺钉在万向节的两个面上拧紧,使万向节固定。
4
a
c
b

Cable Connection/ 连接线缆
Connecting Cables/ 连接线缆
(Optional) Insert the SD card.
(可选)插入 SD 卡。
3
• The SD card slot supports only Micro SD cards of Class 10 or higher classes.
SD卡卡槽,仅支持Micro SD卡(Class 10及以上)。
• When multiple camera storage services are enabled (for example, video recording and snapshot taking), high-speed cards are
recommended (for example, SDXC U3). This helps prevent losses of recordings or images stored on the Micro SD card due to
insufficient storage performance of the Micro SD card.
当同时开启多个摄像机存储业务时(如录像、抓拍同时开启),推荐使用高速卡(如 SDXC U3),避免因为 Micro SD卡存储性能不足导致存储在
Micro SD卡上的录像或者图片丢失。
• You can replace a Micro SD card only when the device is powered off. When a Micro SD card is used for the first time, log in to the web
page of the device and format the Micro SD card. For details, see the
Configuration Guide
.
请在设备断电的情况下插拔Micro SD卡,否则会造成系统异常。首次使用时,请登录设备Web客户端,格式化Micro SD卡,操作方法请参见《配置
指南》。
NOTE/ 说明
Connect device to the ground. The ground impedance must be less than or equal to 5 ohms, and the ground
cable length is less than or equal to 25 meters. Use the OT terminal with an inside diameter of 3 mm.
给设备做接地连线。要求接地阻抗≤ 5Ω,长度≤ 25 米。使用内径大小为 3mm 的 OT 端子。
4
CAUTION/ 注意
Tear the tape on the sunshield. Then use the Hex key to remove the sunshield from the camera and
open the shield.
撕掉遮阳板上的绑扎胶带,使用内六角扳手拆除摄像机的遮阳板,并将护罩打开。
1
Connect cables. Loosen the nut of the PC connector and remove the bushing isolator. Route all cables to be
connected through the nut and bushing isolator of the PG connector to connect to the camera. After the
cables are connected, place the bushing isolator to the PG connector again and fasten the nut of the PG
connector.
接入线缆。拧松摄像机 PG 头的螺母,拔出堵芯。将所有要与摄像机连接的线缆穿过 PG 头的螺母和堵芯后接入摄像机。
接线完毕后塞回堵芯,并拧紧 PG 头螺母。
2
There are three gaps on the side of the
bushing isolator. Cables can be routed
through the bushing isolator via the
gaps.
堵芯侧面有3条缝隙,可通过缝隙将线缆穿
过堵芯。
NOTE/ 说明
PCB board
单板
CAUTION/ 注意
Please do not touch the internal small PCB
board (as indicated in the left picture),
otherwise it could damage the circuit of
camera.
请勿触碰内部的单板电路(左图标示处),否
则将会有损坏摄像机电路的风险。
• In areas prone to lightning strikes, the lightning arrester must be installed and grounded.
在易受雷击的区域,必须安装避雷器,避雷器必须接地。
• Strong and weak current cables must be kept at least 5 cm apart from each other. When connecting the cables to the device, take
care to avoid connecting strong current cables to weak current interfaces or you will damage your device.
强电和弱电必须分开布线,两者间的距离不小于 5cm。线缆与设备连接时,禁止将强电接到弱电接口上,以免造成设备损坏。
• Wrap all pigtail cables in insulated, waterproof, rubber tape to prevent short circuits or water damage. Cutting off the pigtail cables
will void your warranty.
请务必使用绝缘胶带和防水胶带对所有尾线进行绝缘和防水处理,以免造成短路和漏水。尾线不能剪断,若剪断,则无法维保。
5
100~240V AC
50/60Hz

Cables Connection/ 连接线缆
Connecting Cables/ 连接线缆
Connect the network cable.
连接网线。
6
Insert the SFP optical module. Insert the adaptive optical fiber in the optical module interface.
插入 SFP 光模块,并在光模块接口插入适配的光纤。
7
6
100~240V AC
50/60Hz
100~240V AC
50/60Hz
5
5
mm
CAUTION/ 注意
Before connecting any cables, ensure
that the power is disconnected.
所有线缆连接的操作必须在完全断电的情况
下进行,禁止任何带电的安装。
(Optional) Connect the audio cable, alarm cable, and RS485 cable. To connect a camera to peripheral devices
such as a RS485 vehicle detector, radar, or a traffic light reader, connect the RS485 cables of the peripheral
device to the RS485 interfaces of the camera. Ensure that a positive cable is connected to a positive interface
and a negative cable is connected to a negative interface. For I/O vehicle loop detector, its output and input
cables correspond to the TRIG_IN and GND interfaces of camera respectively.
(可选)连接音频线缆、告警线缆、RS485 线缆。摄像机的 RS485 接口可通过连接 RS485 车检器、雷达或红绿灯检测
的 RS485 线,(正极接正极线、负极接负极线),来与这类外设相连。对于 IO 线圈车检器,其输出 / 输入线分别接入摄
像机的触发输入接口(即 TRIG_IN)和 GND 接口即可。
It is recommended that twisted pair cables be used as alarm cables. The diameter of the cable core ranges
from 22 AWG to 28 AWG. The impedance of the entire cable is less than or equal to 100 ohms.
告警线缆建议使用双绞线,线芯的线径为 22AWG ~ 28AWG,整条线路的阻抗≤ 100Ω。
The following figure shows the port distribution.
各端口的位置分布,可参考下图。
100~240V AC
50/60Hz

Cable Connection/ 连接线缆
Connecting Cables/ 连接线缆
Connect the power cable to No. 1 and No.3 interfaces that do not differentiate the polarities.
A bare wire supports the 1.5 mm² (length is less than or equal to 25 m) power cable at most, and a crimping
terminal supports the 0.5 mm² (length is less than or equal to 10 m) power cable.
连接电源线。将线缆连接在 1、3 接口,不区分正负极。
接裸线最大支持 1.5mm² (长度最大支持 25m) 电源线,配电源端子支持 0.5mm² (长度最大支持 10m) 电源线。
8
Power cable
电源线
5mm
A transparent protective film is attached on the lens of the camera. Do not remove the transparent
protective film during the installation to prevent the lens from being scratched or polluted. You can
remove the transparent protective film after the device installed and before the device is started.
The Wiper does not support dry brush, do not use it when there is no water on the lens window.
Otherwise it may damage the wiper or scratch lens window.
摄像机镜头表面贴有透明保护膜,切勿在安装过程中取下外层透明保护膜,以免造成摄像机球罩或视窗划伤或污
染,请在确认安装完成后在启动设备前取下该透明保护膜。
雨刷不支持干刷。请勿在视窗无水的情况下使用,否则容易损坏雨刷或者刮花视窗玻璃。
NOTE/ 说明
Installation Verification/ 安装后检查
Verifying the Installation/ 安装后检查
7
Waterproof the PG connector and make a drip loop as shown below to create an artificial lowest point of
the cable, avoiding water leakage.
PG 头连接处防水处理和制作滴水弯。滴水弯呈倒 Ω 型,形成线缆的最低点,防止漏水。
9
Waterproof tape
防水胶带
Drip loop
滴水弯
The waterproof tape must be wrapped
tightly and there must be no gaps in the
coverage or water will leak in.
防水胶带尽量缠紧,且覆盖到位,以免漏水。
NOTE/ 说明
100~240V AC
50/60Hz
After the power cables are connected, affix
them to the fixing hole using a cable tie.
电源接好后,应使用扎带将电源线固定在右侧图
中扎线孔处。
NOTE/ 说明
Fixing hole
扎线孔
5
mm
After the device installation, check the following items to ensure that the device is properly installed.
设备安装完成后,请确认如下事项,以保证设备安装正确。
Check Items/ 检查项 Result/ 检查结果
All screws are fully tightened.
确认所有螺钉已经完全拧紧,以接合处不能偏移为准。
Yes/ 是□ No/ 否□
The camera is securely installed on the mount or wall.
确认摄像机与支架或者墙壁等之间的安装是稳固可靠的。
Yes/ 是□ No/ 否□
The ambient temperature meets the device specifications.
确认工作的环境温度满足设备规格。
Yes/ 是□ No/ 否□
Insulation and waterproof measures have been taken to protect cables installed in humid
environment, and the drip loops are in correct positions.
设备安装在潮湿环境时,确认网线以及尾线已经做好绝缘防水处理,滴水弯位置正确。
Yes/ 是□ No/ 否□
If the camera has a ground cable, ensure that the camera is grounded. If it is powered by a
PoE switch, ensure that the PoE switch is also grounded.
对于有接地线的摄像机,确认摄像机已接地,如果是 PoE 交换机供电,则 PoE 交换机也已接地。
Yes/ 是□ No/ 否□
The protective film and fixing rubber strip have been removed from the lens and camera
body respectively.
对于有镜头保护膜和机身固定胶条的摄像机,确认已撕掉摄像机镜头保护膜和机身固定胶条。
Yes/ 是□ No/ 否□
The camera can power on properly.
确认设备能够正常上电运行。
Yes/ 是□ No/ 否□
You can access the camera web client using the IP address you configured.
确认能够使用配置好的 IP 地址登录设备 Web 页面。
Yes/ 是□ No/ 否□
On the camera web client, you can view live video from the camera.
确认能够通过 Web 页面浏览实况。
Yes/ 是□ No/ 否□
If the camera is a smart one, ensure that the captured vehicle image is clear. The
recommended horizontal resolution of a license plate is at least 80 pixels.
如果是智能款型摄像机,请确保抓拍到的车辆图片清晰,推荐车牌水平大小为 80 像素及以上。
Yes/ 是□ No/ 否□
In night vision mode, the surveillance area can be viewed clearly.
确认夜视情况下,能够看清楚监控区域。
Yes/ 是□ No/ 否□
1You can view the surveillance scene on the web page.
通过 Web 页面查看,被监控区域在镜头监控范围内。
2The delivered images are clear.
监控画面图像清晰。

8
Web Operations/ Web 操作
1
3
Open Internet Explorer, enter the camera IP address, and press Enter. The IP address can be set
automatically via DHCP, or a static IP address can be used (default: 192.168.0.120). To directly log in to
the camera using a computer, ensure that the computer is on the same network segment as the camera.
When a DHCP server exists in the network, an IP address is automatically allocated to the camera.
当通过 PC 机直连访问摄像机时,请保证 PC 机 IP 地址和摄像机 IP 地址在同一网段 。在 Internet Explorer 地址
栏里输入摄像机的 IP 地址,IP 地址可以手动进行设置(默认为 192.168.0.120),按“Enter”键。当网络中有
DHCP 服务器时 , 设备可以通过 DHCP 服务器自动获取 IP 地址。
Enter the user name (admin) and password. For the first login, set the password as prompted.
输入用户名 admin 和密码。首次登录,请按照提示设置密码。
Click Log In .
单击“登录”。
NOTE/ 说明
Network Settings/ 配置基本网络参数
Log in to the web client as the admin user.
以管理员登录 Web 客户端。
Choose Settings > Network.
选择“高级配置 > 网络”。
Set the network parameters as planned. For details about how to set basic network parameters, see the
Configuration Guide
.
根据规划的数据配置基本网络参数,基本网络参数的具体配置方式请参见《配置指南》。
1
2
Specifications/ 技术参数
Item
名称
Description
说明
Operating temperation
工作温度
For details about the temperature range, see the datasheet of the device model.
Note: If the operating temperature is higher than 40℃, the illuminator cannot be enabled.
If it is enabled, the camera may be damaged or its service life may be shortened.
具体温度范围请根据款型参见对应彩页。
注:工作温度大于40℃时不允许开补光,若使用会导致摄像机损坏或寿命下降。
Corrosion resistance
防腐等级
Cameras that meet the Class C anti-corrosion requirements can be installed in areas
1500 meters away from the seaside (far away from chemical industry or heavily polluted
areas).
Cameras that meet the Class D anti-corrosion requirements can be installed in areas
within 1500 meters from the seashore or on offshore platforms.
C类防腐的摄像机,安装在距离海边1500米以外的区域(远离化工、重污染区)。
D类防腐的摄像机,可安装在海边1500米以内区域或海上平台。
Logging In to the Web Client/ 登录 Web 客户端
2
• Supported browsers: Internet Explorer 10-11, Google Chrome 38 and later versions, and Mozilla Firefox
35-51. Google Chrome 45 and later versions require installation of Internet Explorer Tab plug-in.
支持的浏览器:Internet Explorer 10/11、Google Chrome 38及以上版本、Mozilla Firefox 35~51版本。其
中Google Chrome 45及版本以上需要安装Internet Explorer tab插件。
• When using HTTPS to access a camera, you must enable TLS 1.1 or TLS 1.2. Otherwise, the camera web
page cannot be displayed.
使用HTTPS协议访问摄像机时需要启用TLS 1.1或TLS 1.2,否则无法打开摄像机web页面。
• Please open the web browser on your PC as the administrator.
请使用PC的管理员身份打开浏览器。
IP Address/ IP 地址
Data Plan/ 数据规划
Parameter
参数名
Description
参数解释
IP address
assignment
method
获取IP方式
• Automatic: The system automatically configures the IP address, subnet mask, gateway IP address,
and DNS.
自动获取IP地址:系统将自动配置IP地址、子网掩码、网关地址和DNS。
• Manual: You need to manually set the IP address, subnet mask, gateway IP address, and DNS.
使用下面的IP地址:需要用户手动配置IP地址、子网掩码、网关地址和DNS。
IP address
IP地址
• IP addresses starting with 127 are not valid. You must enter an IP address starting with another
value from 1 to 223.
以127开头的IP地址无效,请输入介于1和223之间的其它数值。
• If the camera is passively registered with the platform using the ONVIF or SDK, only the IP address
needs to be configured.
通过ONVIF或SDK被动注册时,仅需要配置IP地址即可。
Web Operations/ Web 操作
NOTE/ 说明
The parameters listed in the table are for reference only. You can log in to http://e.huawei.com, download the
datasheet of the desired camera model, and obtain the detailed technical specifications.
表格中所列参数仅供参考,您可以登录http://e.huawei.com,查看对应的彩页,获取设备详细技术规格。
Supplier’s Declaration of Conformity (SDoC)
Unique Identier: trade name: HUAWEI; product name: Network Camera; model number: X2331-CPI
Responsible Party- U.S. Contact Information
Huawei Technologies USA Inc.
5700 Tennyson Parkway, Suite 500
Plano, Texas 75024
Main: 214-919-6000 / TAC Hotline: 877-448-2934
FCC Compliance Statement ( for products subject to Part 15)
This device complies with part 15 of the FCC Rules. Operation is subject to the following two conditions: (1)
This device may not cause harmful interference, and (2) this device must accept any interference received,
including interference that may cause undesired operation.

Appendix/ 附录
Troubleshooting/ 常见问题处理
Q : After you enter the camera IP address in the address box and press Enter, the Internet Explorer displays
"There is a problem with this website's security certificate."
A : Click Continue to this web (not recommended) to continue browsing this website. Then, install the root
certificate or upload your own certificate. For details, see the
Configuration Guide
.
问:在 IE 浏览器中输入设备 IP 地址后,网页显示“此网站的安全证书有问题”?
答:单击“继续浏览此网站(不推荐)”,继续访问设备 Web 页面 , 然后安装根证书或上传用户自己的证书文件,具体操
作请参见《配置指南》。
Q : After the root certificate is installed, the Internet Explorer still displays "There is a problem with this
website's security certificate." After you click Continue to this web (not recommended) to access the
login page, the "Certificate Error" message is displayed in the address box.
A : Choose Settings > System > Configuration Management > Certificate Management, and upload a
valid certificate. After the certificate is uploaded, restart the browser.
问:根证书下载安装完成后,IE 仍提示“此网站的安全证书有问题”,单击“继续浏览此网站(不推荐)”进入登录页面后,
地址栏中出现“证书错误”提示。
答:选择“高级配置 > 系统配置 > 配置管理 > 证书管理 ”,上传用户自己的合法证书,完成后重新启动浏览器。
Q: What can I do when the message "Your request for URL has a security risk. You can access this URL by
clicking the Continue, I accept this risk. button. If you make this choice, it means that you accept this
risk.”is displayed during a login attempt?
A:Choose Tools > Internet Options, click the Connections tab, click LAN Setting, and deselect Use a proxy
for your LAN.
问:通过 web 页面登录摄像机时显示“您访问的链接存在安全风险。若您接收此风险,请点击“继续,我接受此风险”按
钮继续访问”,应如何处理?
答:选择“工具 > Internet 选项”,选择“连接”页签,点击“局域网设置”,“为 LAN 使用代理服务器”选择框去掉勾选。
Q : The message "Heating..." is displayed while the live video can be properly viewed.
A : If the camera is started in low-temperature environment, the camera may enter the low-temperature
protection mode. In this case, the message "Heating..." will be displayed on the live video. When the
temperature of the camera rises, the message will disappear.
问:Web 实况出现“Heating...”字样,而图像画面可以显示实况。。
答:在低温环境下启动摄像机,设备有可能会进入低温保护模式,实况页面带有“Heating...”字样,等设备温度上升后,
Heating...”字样会消失。
Q : What can I do if files or the SDC Web Control cannot be downloaded?
A : In Internet Explorer, choose Tools > Internet Options > Advanced and click Reset to restore the default
browser settings. Then restart the computer and log in to the web client again.
问:下载文件或者 SDC Web Control 实况控件失败,应如何处理?
答:在 Internet Exporer 中选择“工具 > Internet 选项 > 高级”,单击“重置”,恢复默认配置后,重启电脑,再次登
录设备的 Web 客户端。

Appendix/ 附录
Security Precautions/ 安全注意事项
Carefully read and strictly comply with the following instructions. Pay special attention to the alarm details in this
manual:
请仔细阅读本说明并严格遵守,留意本手册中的所有警告信息。
• After the camera is unpacked, please install and power it on within 24 hours. Do not install the camera in rainy
or windy and dusty days to prevent water or sand from getting into the device.
设备打开包装后,请在 24小时内完成安装上电;避开在雨天和风沙天操作,避免内部进水和进沙而导致的设备故障。
• The power adapter to be used by the device must meet the input voltage and current requirements described
on the device label.
设备所使用的电源适配器必须满足设备标签上注明的电源输入电压和输入电流要求。
• In areas prone to lightning strikes, the surge protector must be installed and grounded.
在易受雷击的区域,必须安装避雷器,避雷器必须接地。
• CAUTION If a battery is replaced by an incorrect type, the batter may explode. Dispose of used batteries
according to the instructions.
注意 如果更换不正确的电池规格会有爆炸的风险,请按制造商说明书处理使用过的电池。
• This is a class A product. In a domestic environment, this product may cause radio interference. Users may be
required to take compensatory measures.
此为 A级产品,在生活环境中,该产品可能会造成无线电干扰。在这种情况下,可能需要用户对其干扰采取切实可行的措施。
• Use a soft dry cloth when cleaning the camera body. Do not use strong and abrasive alkaline cleaner or volatile
solvent such as alcohol, benzene, or thinner.
清洁机身可用柔软的干布擦拭,请勿使用如酒精、苯或稀释剂等挥发性溶剂或者强烈的、带有研磨性的碱性清洁剂。
• Keep the device away from water or any other liquids. Take proper waterproofing measures.
禁止让任何液体流入设备中。做好防水措施。
• Keep the device away from heat sources, fire sources (such as heating apparatus or candles), and strong
magnetic fields (for example, high-voltage power distribution cabinet).
安放设备时请远离热源、裸露的火源(例如电暖器、蜡烛等)和强磁场环境(例如高压变电箱)。
• Avoid any unauthorized modifications on the design of the structure, security, or performance.
未经授权,任何单位和个人不得对设备进行结构、安全和性能方面的改动。
• Installation and maintenance must be performed by professional technical engineers or system installation
engineers.
有关本装置的所有安装维修工作均应由专业的维修技术人员或系统安装人员来完成。
• If the installation environment ever exceeds 50℃ , install the product in an area accessible only to professional
personnel.
当该产品安装区域的最高温度超过 50℃时,该产品需要安装在仅能由专业人士接触到的受限制区域。
• Use product-attached auxiliaries and recommended fittings.
请使用产品配套的附件以及厂商推荐的配件。
• Do not lift the pigtails when moving the device.
搬运设备时,禁止通过提拉尾线搬运。
• Comply with related laws and regulations, and respect legal rights of others when using this device. If a camera
is installed in a public place, post a clearly visible notice stating, "You have entered an electronic surveillance
area."
使用本设备时应遵循相关的法律法规,尊重他人的合法权利。如果您在公共场所安装摄像机,请在醒目的位置给予提示:您
已进入电子监控范围。
Other Huawei Digital Camera manuals

Huawei
Huawei HoloSens User manual

Huawei
Huawei HoloSens User manual

Huawei
Huawei HoloSens Eco-Cube User manual

Huawei
Huawei RP200 User manual

Huawei
Huawei C6620-Z23 User manual

Huawei
Huawei MATE 9 PRO User manual

Huawei
Huawei VPT300 User manual

Huawei
Huawei ViewPoint 8053 User manual

Huawei
Huawei X2382-HL User manual

Huawei
Huawei X3221-C User manual

Huawei
Huawei HoloSens User manual

Huawei
Huawei CV60 User manual

Huawei
Huawei IPC6225-VRZ User manual

Huawei
Huawei X2221-VI User manual

Huawei
Huawei X6721-GZ37 User manual

Huawei
Huawei X2221-VL User manual

Huawei
Huawei M2221-QL-MG User manual

Huawei
Huawei M8544-EL-Z37 User manual

Huawei
Huawei ITS User manual

Huawei
Huawei X6781-Z37 User manual