Hudora 84201-03 Mounting instructions

Art.-Nr. 84201-03
Art.-Nr. 84207-09
Stand 08/11
Seite 1/8
HUDORA I Jägerwald 13 I 42897 Remscheid I Germany
www.hudora.de
EC TYPE EXAMINATION CERTIFICATE ISSUED BY:
TÜV Rheinland LGA Products GmbH
Tillystraße 2
90431 Nürnberg
NOTIFIED BODY REFERENCE No. 0197
EN 1077
DE
EN
IT
ES
FR
NL
AUFBAU- UND GEBRAUCHSANLEITUNG
INSTRUCTIONS ON ASSEMBLY AND USE
ISTRUZIONI PER IL MONTAGGIO E PER L’USO
INSTRUCCIONES DE MONTAJE Y DE USO
INSTRUCTIONS DE MONTAGE ET MODE D’EMPLOI
MONTAGE- EN GEBRUIKSHANDLEIDING

Art.-Nr. 84201-03
Art.-Nr. 84207-09
Stand 08/11
Seite 2/8
HUDORA I Jägerwald 13 I 42897 Remscheid I Germany
www.hudora.de
EC TYPE EXAMINATION CERTIFICATE ISSUED BY:
TÜV Rheinland LGA Products GmbH
Tillystraße 2
90431 Nürnberg
NOTIFIED BODY REFERENCE No. 0197
EN 1077

HERZLICHEN GLÜCKWUNSCH ZUM ERWERB DIESES PRODUKTES!
Bitte lesen Sie diese Bedienungsanleitung sorgfältig durch. Die Bedienungsanleitung ist
fester Bestandteil des Produktes. Bewahren Sie sie deshalb genauso wie die Verpackung
für spätere Fragen sorgfältig auf. Wenn Sie das Produkt an Dritte weitergeben, geben Sie
bitte immer diese Bedienungsanleitung mit. Dieses Produkt muss von einem Erwach-
senen aufgebaut werden. Dieses Produkt ist nicht für den gewerblichen Gebrauch kon-
struiert. Die Benutzung des Produktes erfordert bestimmte Fähigkeiten und Kenntnisse.
Setzen Sie es nur altersgerecht ein, und benutzen Sie das Produkt ausschließlich für
seinen vorgesehenen Zweck.
TECHNISCHE SPEZIFIKATIONEN
Artikel: Skihelm IDX 11 / IHX 11
Artikelnummer: 84201-03, 84207-09
Verstellbar von: 56-58 cm (Größe M)
58-60 cm (Größe L)
60-61 cm (Größe XL)
Gewicht: 440g (Größe M), 465 g (Größe L), 465 g (Größe XL)
Material: EPS, Polycarbonat, Polyester
INHALT
1 x Helm
1 x Tasche
1 x Gebrauchshinweise
Andere beiliegende Teile dienen dem Transportschutz und werden für den Aufbau und den
Gebrauch des Artikels nicht benötigt.
SICHERHEITSHINWEISE
• Helm für alpine Skiläufer und Snowboarder - Klasse B. (Klasse A und Klasse B sind für
alpine Skiläufer, Snowboarder und ähnliche Gruppen. Klasse A Helme bieten ver-
gleichsweise mehr Schutz. Klasse B Helme bieten mehr Belüftung und besseres
Hören, aber sie haben eine kleinere Schutzzone und bieten einen geringeren Schutz
vor Durchdringung.)
• Beschränkter Aufprallschutz: Der Skihelm reduziert eventuelle Folgen von Unfällen
und schützt vor verschiedenen Verletzungen. Die Aufprallkraft kann selbst bei harm-
losen Unfällen oder bei geringer Geschwindigkeit schwere oder tödliche Verletzungen
verursachen. Die Energie absorbierenden Materialien, die in dem Skihelm eingesetzt
wurden, können bei einem Aufprall zerbrechen. In manchen Fällen können die
Materialien vollständig zerstört werden. In solch einem Fall wird ein Teil der Aufprall-
kraft auf den Kopf übertragen. Ist die Aufprallkraft hoch, kann es zu einer schweren
oder tödlichen Verletzung kommen. Da die einzelnen Unfälle sich voneinander unter-
scheiden, lässt sich nicht voraussehen, wann es dazu kommen wird. Skihelme
können also keinen 100 %igen Schutz geben! Jeder Skihelm, der einem kräftigen
Aufprall ausgesetzt war, kann sich lösen, oder es kann zu einer Beschädigung des
Skihelms kommen. Bleiben Sie in Ihrem Sport vorsichtig! Beschädigte Helme müssen
ausgetauscht werden!
• Der Helm wurde für alpine Skiläufer und Snowboarder entwickelt. Er darf nicht für die
Fahrt mit Kraftfahrzeugen oder bei anderen Aktivitäten benutzt werden.
• Der Skihelm schützt nur dann, wenn er richtig getragen wird. Man soll verschiedene
Größen anprobieren und die Ausführung wählen, die Sicherheit bietet und gut am
Kopf sitzt.
• Den Skihelm immer so tragen, dass der Stirnbereich bedeckt ist.
• Den Kinn-Verschluss schließen und den Gurt unter das Kinn legen.
• Vor jedem Gebrauch die Einstellung des Skihelms prüfen.
• Den Skihelm regelmäßig auf Verschleiß oder Beschädigung prüfen und nach einem
starken Stoß unverzüglich auswechseln, auch wenn keine Beschädigungen sichtbar
sind. In keinem Fall dürfen bauliche Änderungen vorgenommen werden. Es sind
weiterhin nur Original-Ersatzteile zu verwenden.
• Den Skihelm nur mit Wasser und sanfter Seife reinigen. Reinigung der Außenschale
nur mit einem feuchten Lappen. Lösungsmittel und erdölbasierte Reinigungsmittel
können die Schutzeigenschaften des Helmes beschädigen.
• Den Skihelm an einem trockenen und kühlen Ort aufbewahren.
• Den Skihelm bei jeder Skifahrt tragen.
• Der Skihelm ist kein Spielzeug.
• Es wird empfohlen, den Skihelm nach 3 Jahren auszutauschen.
AUFBAUANLEITUNG
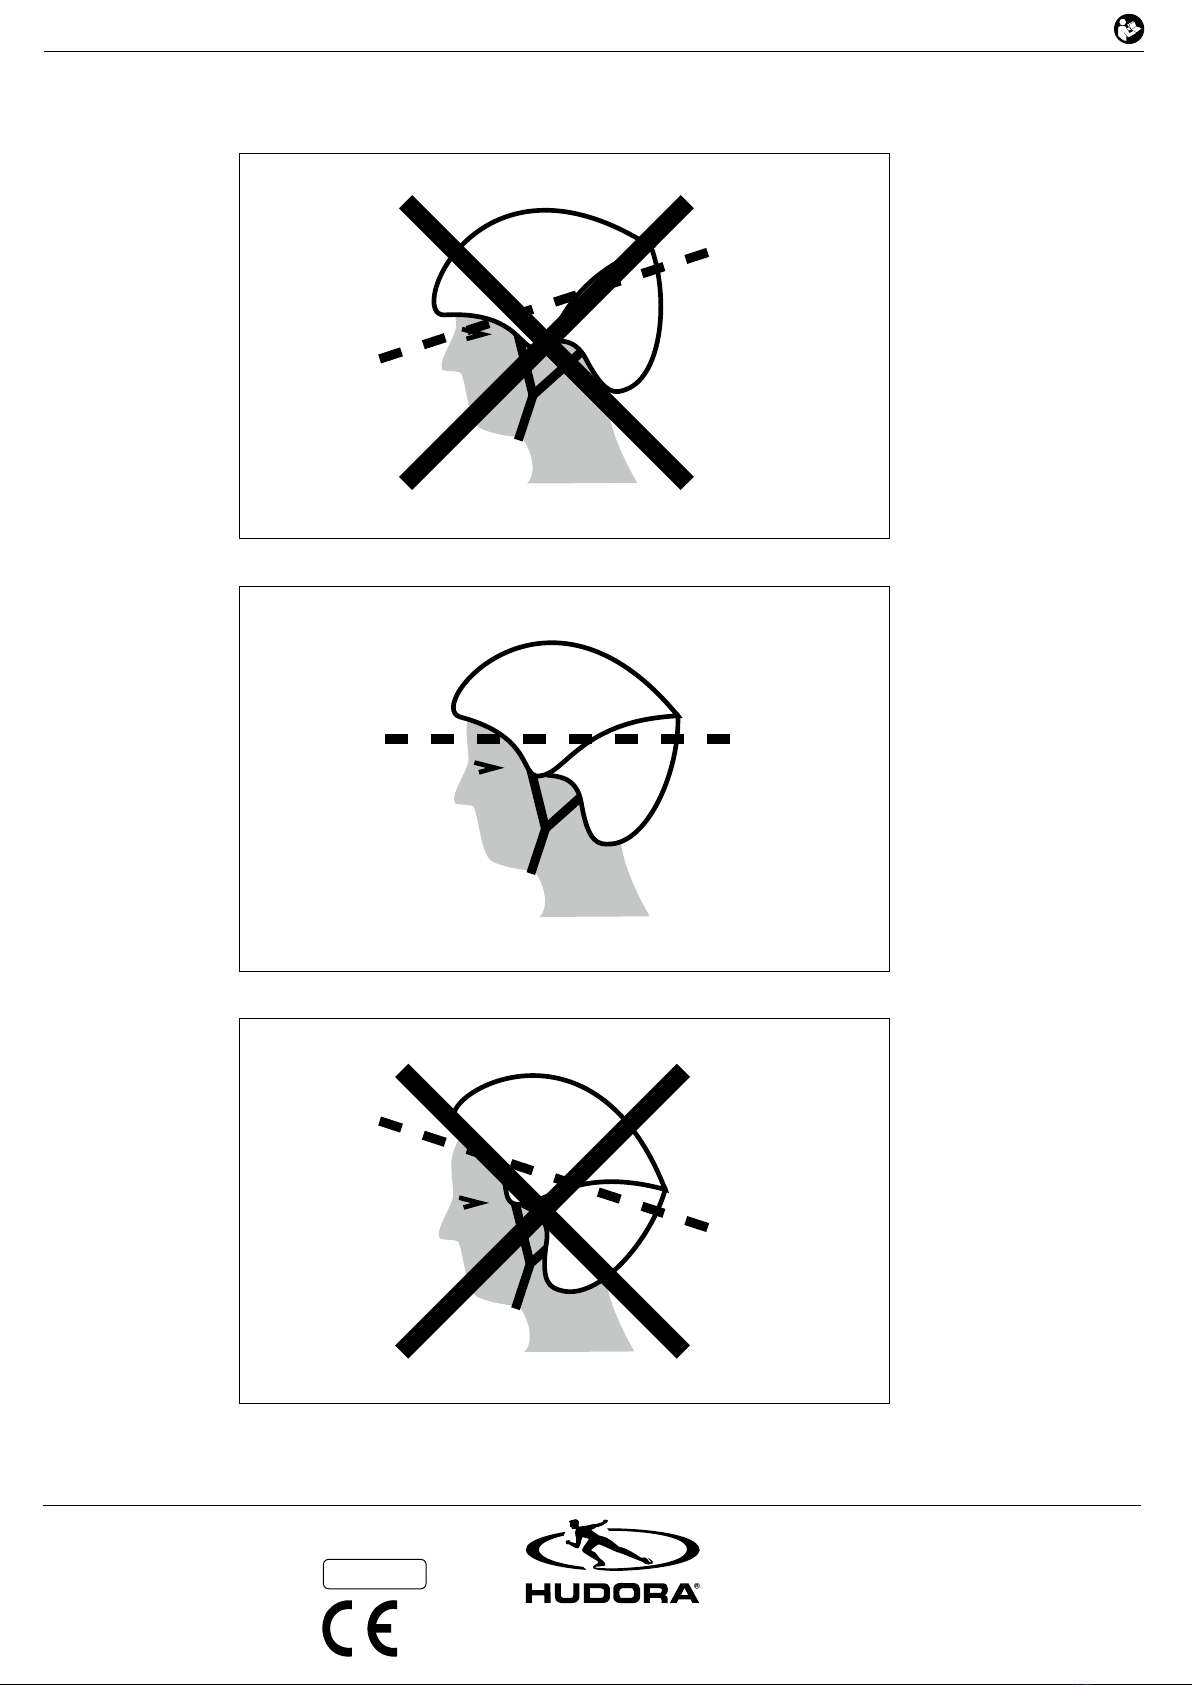
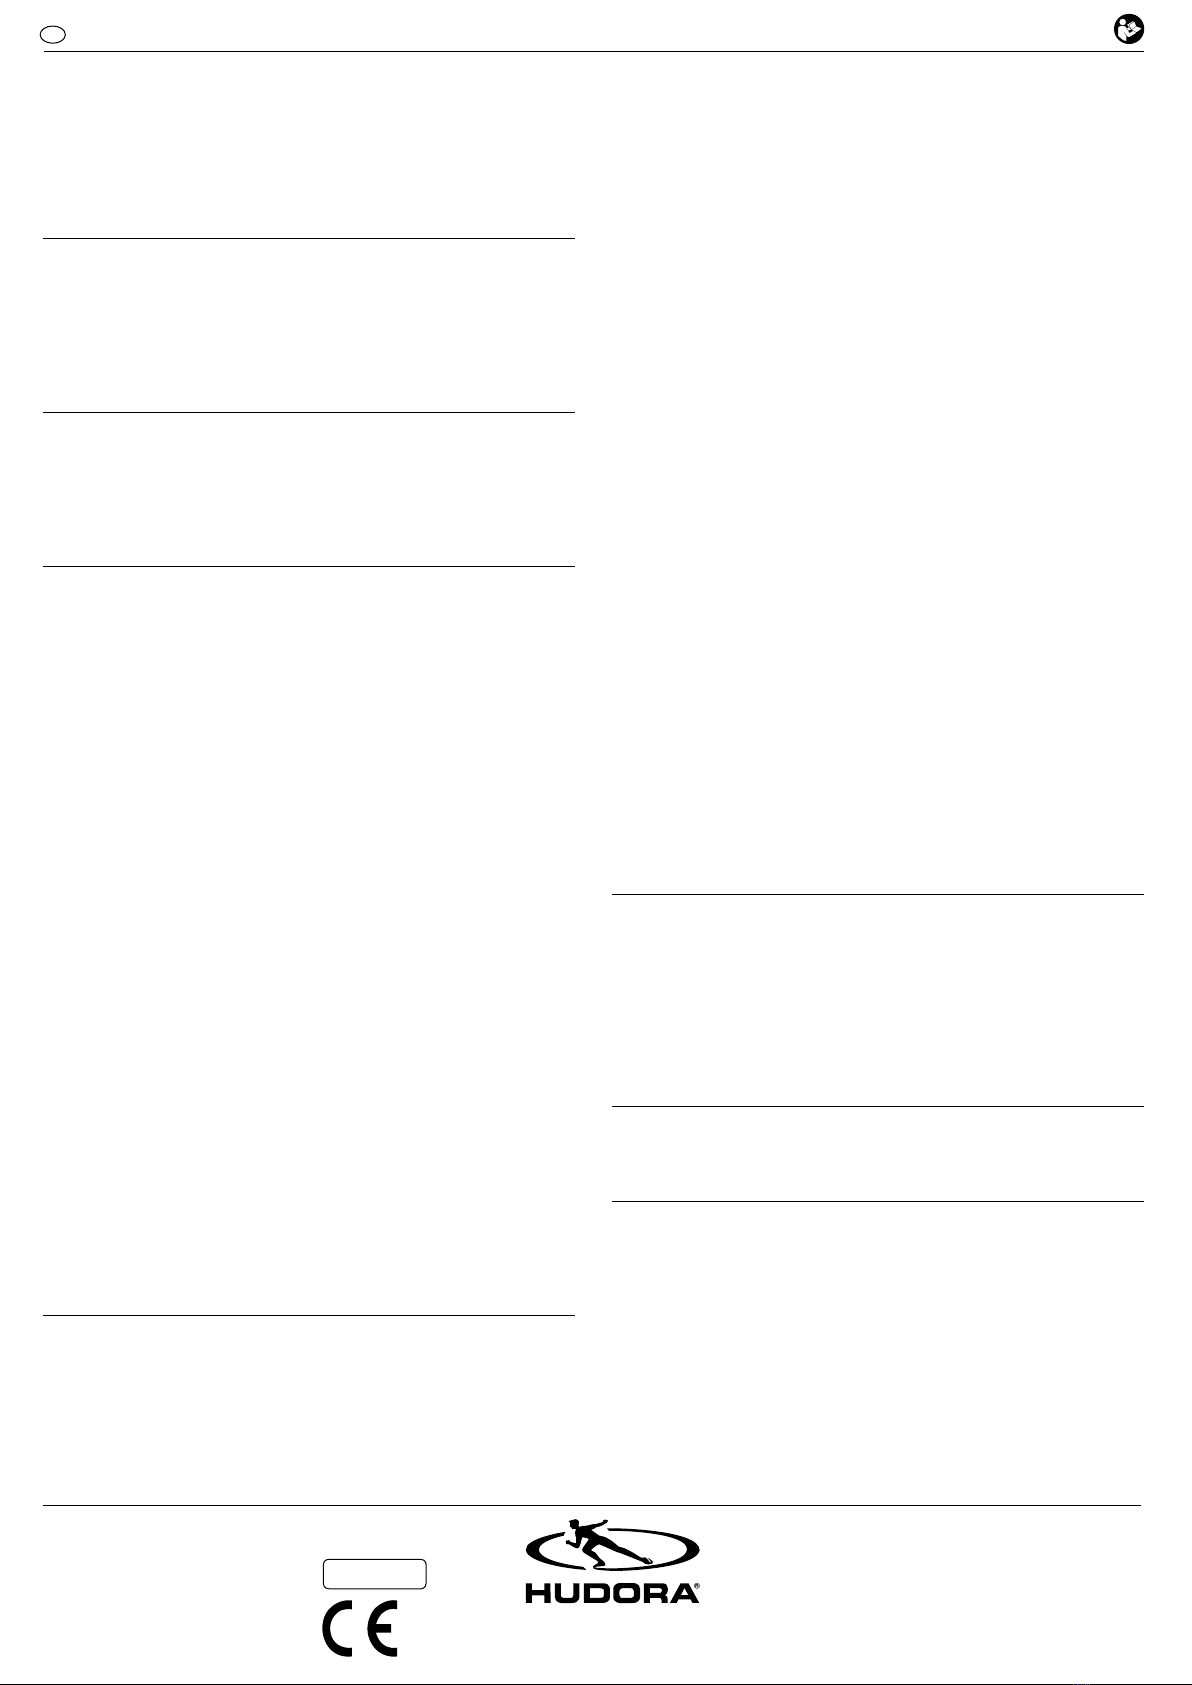
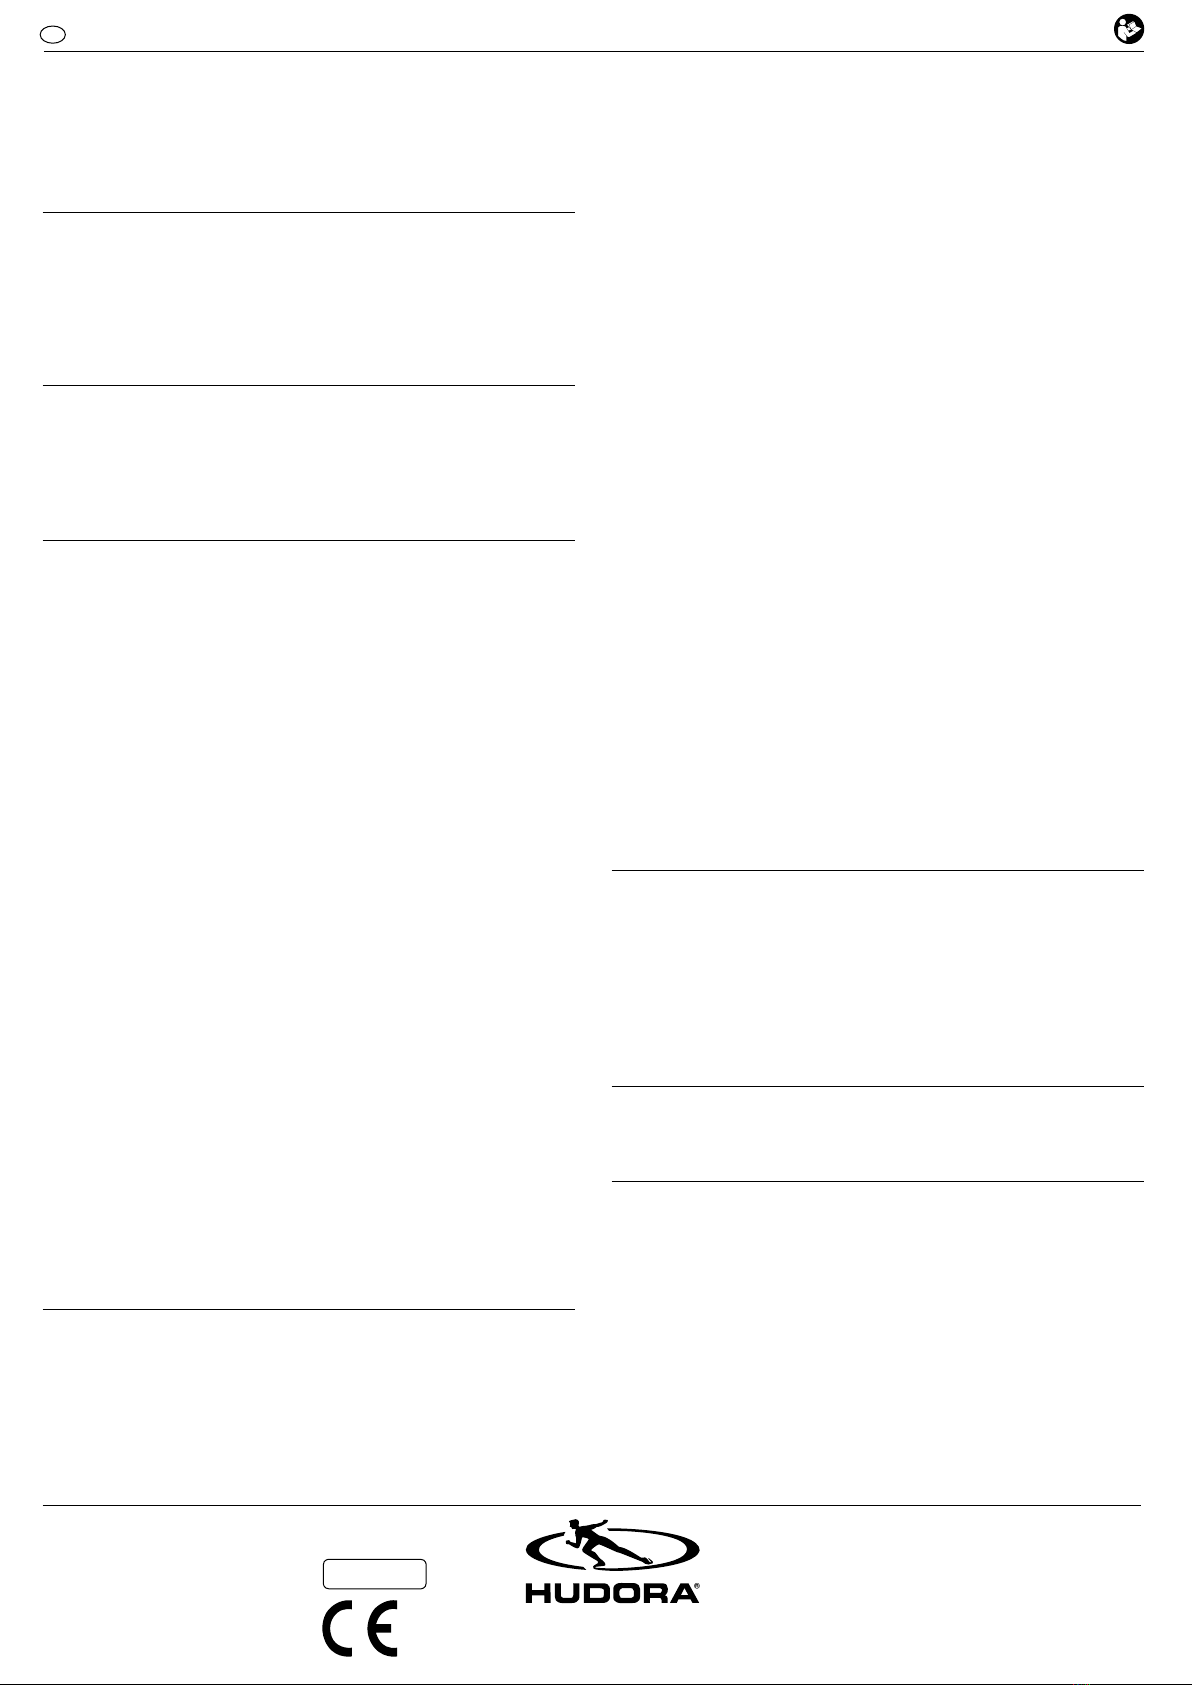
WIE WIRD DER SKIHELM RICHTIG ANGEZOGEN UND GETRAGEN?
(Siehe auch Abbildungen auf Seite 2.)
1. Erweitern Sie den Verstellring soweit, dass der Helm locker auf Ihrem Kopf sitzt.
2. Der Helm sollte den Kopf gut umschließen und waagerecht getragen werden.
Der vordere Helmrand sollte 1–2 Fingerbreit oberhalb der Nasenwurzel liegen.
WARTUNG UND LAGERUNG
Reinigen Sie das Produkt nur mit einem Tuch oder feuchten Lappen und nicht mit speziellen
Reinigungsmitteln! Überprüfen Sie das Produkt vor und nach Gebrauch auf Schäden und
Verschleissspuren. Nehmen Sie keine baulichen Veränderungen vor! Verwenden Sie zu
Ihrer eigenen Sicherheit nur Original-Ersatzteile. Diese können Sie bei HUDORA beziehen.
Sollten Teile beschädigt sein oder scharfe Ecken und Kanten entstanden sein, darf das
Produkt nicht mehr verwendet werden! Nehmen Sie im Zweifel mit unserem Service
Kontakt auf (http://www.hudora.de/service/). Lagern Sie das Produkt an einem sicheren,
witterungsgeschützten Ort, so dass es nicht beschädigt werden kann oder Personen
verletzen kann.
ENTSORGUNGSHINWEIS
Bitte führen Sie das Produkt am Ende seiner Lebensdauer den zur Verfügung stehenden
Rückgabe- und Sammelsystemen zu. Fragen beantworten die Entsorgungsunternehmen
vor Ort.
SERVICE
Wir sind bemüht einwandfreie Produkte auszuliefern. Sollten trotzdem Fehler auftreten,
sind wir genauso bemüht, diese zu beheben. Deswegen erhalten Sie zahlreiche Informa-
tionen zum Produkt, zu Ersatzteilen, Problemlösungen und verloren gegangene Aufbau-
anleitungen unter http://www.hudora.de/a/Z33.
DE AUFBAU- UND GEBRAUCHSANWEISUNG
Art.-Nr. 84201-03
Art.-Nr. 84207-09
Stand 08/11
Seite 3/8
HUDORA I Jägerwald 13 I 42897 Remscheid I Germany
www.hudora.de
3. Verengen Sie den Verstellring so weit, bis der Helm fest auf Ihrem Kopf sitzt.
Prüfen Sie den Helm auf festen Sitz, indem Sie mit geöffnetem Kinnriemen leicht Ihren
Kopf schütteln. Verschiebt sich der Helm, dann ziehen Sie den Verstellring etwas mehr
an.
4. Falls der Helm nicht zu Ihrer Kopfgröße passt, sollten Sie sich einen anderen Helm
bzw. eine passende Größe auswählen.
SCHRITT 1:
Helm in richtiger Position tragen. Helm immer so tragen, dass der Stirnbereich bedeckt
ist. Wichtig: Damit der Helm korrekt an den Kopf angepasst werden kann, müssen alle
Einstellungen vorgenommen werden.
SCHRITT 2:
Der Ohrenschutz kann montiert und demontiert werden. Montage: Stecken Sie den Oh-
renschutz passend zwischen Helm und Polster und schieben sie ihn so tief ein bis die
Kunststoffnase einrastet. Lösen: Ziehen Sie das Ohrteil vorsichtig zwischen Schale und
Futter heraus.
SCHRITT 3:
Einstellung des Gurtes: Die vorderen und hinteren Gurte müssen sich leicht unter und vor
den Ohren verbinden.
SCHRITT 4:
Einstellung des Gurtes unter dem Kinn: Helm immer mit geschlossenem Verschluss und
mit gut gespanntem Gurt tragen. Dafür sorgen, dass der Gurt nicht am Kinn, sondern
am Hals angebracht wird. Die Anbringung des Gurtes am Kinn kann dazu führen, dass
der Helm bei einem Unfall abrutscht. Der Verschluss darf sich nicht am Kiefer befinden.
SCHRITT 5:
Die richtige Position: Der Helm hat die richtige Position, wenn er gut und gleichzeitig
bequem am Kopf sitzt. Die Position wird durch die Spannung der Gurtes eingestellt.
SCHRITT 6:
Kontrolle der Position und der Einstellung: vor dem Gebrauch soll geprüft werden, ob der
Helm richtig am Kopf sitzt. Ziehen Sie den Helm in richtiger Position an. Legen Sie den
Gurt unter das Kinn und ziehen ihn fest an. Stellen Sie sich am besten vor einen Spiegel.
Packen Sie den Helm mit beiden Händen und versuchen Sie, ihn durch kräftiges Hin- und
Herbewegen auszuziehen. Wenn der Helm sich ausziehen lässt, sich nach vorne bewegt,
so dass die Sicht beschränkt ist, oder sich nach hinten bewegt, so dass der Stirnbereich
nicht bedeckt ist, sitzt der Helm nicht korrekt.
Sollte sich der Helm nicht auf Ihren Kopf anpassen lassen, gebrauchen Sie diesen bitte
nicht. Eine andere Helmgröße oder ein anderes Modell sollten gewählt werden.
Alle Abbildungen sind Designbeispiele.
EC TYPE EXAMINATION CERTIFICATE ISSUED BY:
TÜV Rheinland LGA Products GmbH
Tillystraße 2
90431 Nürnberg
NOTIFIED BODY REFERENCE No. 0197
EN 1077

EN INSTRUCTIONS ON ASSEMBLY AND USE
Item no. 84201-03
Item no. 84207-09
As of 08/11
Page 4/8
HUDORA I Jägerwald 13 I 42897 Remscheid I Germany
www.hudora.de
All images are examples of the design.
EC TYPE EXAMINATION CERTIFICATE ISSUED BY:
TÜV Rheinland LGA Products GmbH
Tillystraße 2
90431 Nürnberg
NOTIFIED BODY REFERENCE No. 0197
EN 1077
CONGRATULATIONS ON PURCHASING THIS PRODUCT!
Please read these instructions carefully. The instructions are an integral component of the
product. Therefore, please store them and the packaging carefully in case questions arise
in the future. Please always include these instructions when handing on the product to a
third party. This product must be assembled by an adult. This product is not designed
for industrial use. The use of the product requires certain capabilities and skills. Always
adjust according to the age of the user and use for the purpose it has been designed for.
TECHNICAL SPECIFICATIONS
Item: Ski helmet IDX 11 / IHX 11
Item number: 84201-03, 84207-09
Adjustable from: 56-58 cm (size M)
58-60 cm (size L)
60-61 cm (size XL)
Weight: 440g (size M), 465 g (size L), 465 g (size XL)
Material: EPS, polycarbonate, polyester
CONTENT
1 x helmet
1 x bag
1 x instructions manual
Other items included are meant to facilitate safe transportation and are not
required for the installation and use of the product.
SAFETY INSTRUCTIONS
• Helmet for alpine skiers and snowboarders – class B (class A and class B are for
alpine skiers, snowboarders and similar groups. Class A helmets provide compara-
tively greater protection. Class B helmets provide more ventilation and better hearing
but they have smaller protection zones and provide less protection against
penetration.)
• Limited crash protection: The ski helmet reduces the possible consequences of
accidents and protects from various injuries. The strength of impact in even
innocuous accidents or at low speed can cause serious or fatal injuries. The energy
absorbent materials used in the ski helmet rupture on impact. In some cases the
materials may be completely destroyed. In such a case, some of the strength of
impact is transferred to the head. If the strength of impact is high it can lead to
serious or fatal injuries. As each individual accident is different it is not possible to
predict when this may happen. Ski helmets cannot guarantee 100% protection. Every
ski helmet subjected to a powerful impact may loosen or be damaged. Always carry
out your sport carefully! Replace damaged helmets!
• The helmet has been developed for alpine skiers and snowboarders. It may not be
used on motorbikes or for other activities.
• The ski helmet only provides protection when it is worn correctly. Different sizes
should be tried on and a model that offers security and sits well on the head should
be chosen.
• Always make sure when you wear the ski helmet that the forehead area is well
covered.
• Close the chin buckle and put the strap under your chin.
• Check the setup of the ski helmet before each use.
• Inspect the ski helmet regularly for wear and tear and damage and change it immedi-
ately after a strong impact, even if there is no visible damage. Structural changes are
not allowed for any reason. Only original spare parts should be used.
• Clean the ski helmet only with water and mild soap, and the outer shell only with a
moist cloth. Solvents and petroleum-based cleaning agents may damage the
protective characteristics of the helmet.
• Store the ski helmet in a dry and cool place.
• Wear the ski helmet every time you go skiing.
• The ski helmet is not a toy.
• Replacing the ski helmet after 3 years is recommended.
INSTRUCTIONS ON ASSEMBLY
HOW IS THE SKI HELMET CORRECTLY PUT ON AND WORN?
(Also see illustrations on Page 2.)
1. Extend the adjusting ring so that the helmet sits loosely on your head.
2. The helmet should fit around the head snugly and be worn levelly. The front edge of
the helmet should lie 1-2 finger widths above the bridge of the nose.
3. Narrow the adjusting ring until the helmet is positioned firmly on your head. Check
that the helmet is held firmly by shaking your head lightly while the chin strap is open.
If the helmet moves then tighten the adjusting ring a bit more.
4. If the helmet doesn’t fit your head you should choose a different helmet or a more
suitable size.
MAINTENANCE AND STORAGE
Use a dry or damp cloth only to clean the product; do not use special cleaning agents!
Check the product for damage or traces of wear and tear before and after each use. Do
not make any structural changes. For your own safety, please use original spare parts
only. These can be sourced from HUDORA. If parts become damaged or if sharp edges or
corners should develop, the product may not be used any more. If in any doubt, please
contact our service team (http://www.hudora.de/). Store the product in a safe place
where it is protected from the elements, cannot be damaged, and cannot injure anyone.
DISPOSAL ADVICE
At the end of the product’s life, please dispose of it at an appropriate collection point
provided in your area. Local waste management companies will be able to answer your
questions on this.
SERVICE
We make every effort to deliver faultless products. If faults do arise however, we put
just as much effort into rectifying them. Therefore, you can find numerous information
on the product, replacement parts, solutions to problems and lost assembly manuals at
http://www.hudora.de/a/Z33.
STEP 1:
Wear the helmet in the correct position. Always wear the helmet in such a way that the
forehead is covered. Important: for the helmet to fit correctly on the head all setups must
be undertaken.
STEP 2:
The ear pads can be fitted and removed. Assembly: Place the ear guard correctly bet-
ween the helmet and padding and push it until the plastic stud clicks into place. Removal:
Pull out the ear section carefully from between the frame and lining.
STEP 3:
Strap setup: The front and rear straps must loosely join below and in front of the ears.
STEP 4:
Strap setup under the chin: Always wear the helmet with the buckle closed and a well-
tightened strap. Ensure that the strap is not fitted at the chin but back against the throat.
Fitting the strap at the chin can lead to the helmet slipping off if there is an accident. The
buckle should not be located along the jawbone.
STEP 5:
The correct position: The helmet is correctly positioned when it is held firmly but comfor-
tably on the head. The position is set through the tension in the strap.
STEP 6:
Checking the position and the setup: Before use, the helmet should be inspected to see
if it is sitting correctly on the head. Tighten the helmet into its correct position. Place the
strap under your chin and tighten it firmly. It is best to put it on in front of a mirror. Grasp
the helmet with both hands and try to remove it by using strong backward and forward
movements. If the helmet comes off, moves forward so that your view is impaired or
moves backward so that the forehead is no longer covered, the helmet is not positioned
correctly.
If the helmet cannot be made to fit your head then do not use it. Another size of helmet or
another model should be chosen.

IT ISTRUZIONI PER IL MONTAGGIO E PER L’USO
Art. n° 84201-03
Art. n° 84207-09
Stato 08/11
Pagina 5/8
HUDORA I Jägerwald 13 I 42897 Remscheid I Germany
www.hudora.de
Tutte le illustrazioni sono esempi di progetti.
EC TYPE EXAMINATION CERTIFICATE ISSUED BY:
TÜV Rheinland LGA Products GmbH
Tillystraße 2
90431 Nürnberg
NOTIFIED BODY REFERENCE No. 0197
EN 1077
CONGRATULAZIONI PER AVER ACQUISTATO QUESTO PRODOTTO!
La preghiamo di leggere molto attentamente questo manuale. Il manuale fa parte del
prodotto. Quindi va conservato come tutto l‘imballaggio per eventuali domande in futuro.
Dando il prodotto a terzi per cortesia allegare sempre il manuale. Il prodotto deve esse-
re montato da un adulto. Questo prodotto non è adatto per uso commerciale. L‘utilizzo
del prodotto richiede determinate abilità e conoscenze. Usare solo in maniera adeguata
all‘età, e utilizzare il prodotto esclusivamente per gli scopi previsti.
SPECIFICHE TECNICHE
Articolo: Casco da sci IDX 11 / IHX 11
Articolo numero: 84201-03, 84207-09
Regolabile da: 56-58 cm (misura M)
58-60 cm (misura L)
60-61 cm (misura XL)
Peso: 440g (misura M), 465 g (misura L), 465 g (misura XL)
Material: EPS, policarbonato, poliestere
CONTENUTO
1 x Casco
1 x Borsa
1 x Istruzioni
Sono incluse altre parti che servono alla protezione durante il trasporto e non sono neces-
sarie per il montaggio e l‘utilizzo dell‘articolo.
NOTE DI SICUREZZA
• Casco per sciatori alpini e snowboardisti – classe B (La classe A e la classe B sono per
sciatori alpini e snowboardisti e gruppi simili. I caschi della classe A offrono a
confronto una maggiore protezione. I caschi della classe B offrono invece una
maggiore ventilazione ed una maggiore capacità uditiva, anche se tuttavia presen-
tano una zona di protezione più piccola ed una protezione minore alla penetranza
sonora.)
• Protezione dall‘impatto limitata: il casco da sci riduce eventuali conseguenze di
incidenti e protegge da infortuni vari. L’intensità dell’impatto potrebbe causare, in
caso di lieve infortunio o a velocità ridotta, delle gravi ferite che a volte risultano fatali.
I materiali, che assorbono energia, impiegati nel casco da sci si infrangono al
momento dell’impatto. In alcuni casi vengono possono essere completamente
distrutti. In tale evenienza una parte trasmetterà la forza d’impatto alla testa. Le
ferite gravi riportate al capo potrebbero risultare mortali qualora la forza d’impatto
fosse elevata. Non è possibile prevedere quando accadrà, giacché i singoli incidenti
si differenziano tra loro. I caschi da sci non possono fornire una protezione del 100 %!
Ogni casco da sci, sottoposto ad una notevole forza d’impatto, potrebbe sfilarsi
oppure semplicemente danneggiarsi. Per questo é sempre necessario praticare gli
sport con prudenza! I caschi danneggiati devono essere sostituiti!
• Il casco è stato sviluppato per lo sci alpino e lo snowboard. Non può essere utilizzato
alla guida di autoveicoli o per altre attività.
• Il casco da sci protegge solo se indossato correttamente. Si dovrebbe provare la
misura e scegliere il modello che garantisca sicurezza e calzi bene in testa.
• Indossare sempre il casco da sci in modo che la zona della fronte sia coperta.
• Chiudete la chiusura sottogola e passare la cinghia sotto al mento.
• Controllate la regolazione del casco da sci ogni volta che si usa.
• Verificate periodicamente il livello di usura del casco da sci oppure che non sia stato
danneggiato, sostituire immediatamente dopo aver subito un grosso impatto, anche
se non compaiono segni evidenti di danneggiamento. Non apportate mai alcuna
variazione strutturale al casco da sci. Usare soltanto pezzi di ricambio originali.
• Pulire il casco da sci solo con acqua e sapone delicato. Pulire la calotta esterna solo
con un panno umido. I solventi ed i detergenti a base di possono danneggiare il casco
compromettendone le proprietà di protezione.
• Conservate il casco da sci in un luogo asciutto e fresco.
• Indossate il casco da sci ogni volta che sciate.
• Il casco da sci non è un giocattolo.
• E’ consigliabile sostituire il casco da sci dopo 3 anni.
ISTRUZIONI PER IL MONTAGGIO
COME SI CALZA E SI INDOSSA CORRETTAMENTE IL CASCO DA SCI?
(Vedere anche illustrazioni a pagina 2.)
1. Allargate l’anello di regolazione finché il casco è lasco e può calzare comodamente
sulla vostra testa.
2. Il casco dovrebbe cingere bene il capo ed essere indossato in posizione orizzontale.
Il bordo anteriore del casco dovrebbe trovarsi ad 1–2 dita al di sopra della radice del
naso.
MANUTENZIONE E CONSERVAZIONE
Pulire il prodotto solo con un panno oppure con un panno inumidito senza usare speciali
detergenti. Verificate che il prodotto non abbia subito danno e non presenti tracce di usura
prima e dopo l’uso. Non apportate alcuna modifica al prodotto. Utilizzate per la vostra
sicurezza solo ricambi originali. Essi si possono acquistare presso la ditta HUDORA. Se
le parti dovessero essere danneggiate oppure dovessero evidenziare angoli e spigoli, il
prodotto non potrà essere più utilizzato. Nel dubbio contattate il nostro centro di assistenza
tecnica (http://www.hudora.de/). Stoccate il prodotto in un luogo sicuro, protetto dalle
intemperie, in modo che non possa essere danneggiato o ferire delle persone.
INSTRUZIONI PER LO SMALTIMENTO
Siete pregati di portare l’apparecchio, al termine della propria durata utile, presso un
apposito punto di raccolta e di restituzione disponibile. L’impresa di smaltimento locale
sarà a vostra disposizione per rispondere ad eventuali domande.
ASSISTENZA TECNICA
Ci sforziamo a fornire dei prodotti perfettamente funzionali. Se comunque doveste
riconoscere eventuali difetti, ci impegneremo subito a rimuoverli. A tale proposito
riceverete tante informazioni sul prodotto, sui pezzi di ricambio, sulle soluzioni ai
problemi e sulle istruzioni per il montaggio andate perse sul sito web all’indirizzo
http://www.hudora.de/a/Z33.
3. Stringete l’anello di regolazione finché il casco possa calzare saldamente sulla testa.
Verificare la sede fissa del casco scuotendo leggermente la testa con la cinghi
asottogola aperto. Se il casco si sposta, occorre stringere leggermente di più l’anello
di regolazione.
4. Se il casco è troppo grande per la vostra testa è consigliabile passare ad un altro
casco e/o scegliere la misura adatta.
FASE 1:
Indossare il casco nella posizione corretta. Indossare il casco facendo attenzione che la
parte frontale sia coperta. IMPORTANTE: Per adattare correttamente il casco alla testa è
necessario eseguire tutte le impostazioni.
FASE 2:
Il paraorecchie può essere montato e smontato. Montaggio: inserire il paraorecchie ade-
guatamente fra il casco e l‘imbottitura e spingerlo in fondo finché la linguetta di plastica
non scatta in posizione. Togliere: tirare fuori attentamente la parte dell‘orecchio fra il
guscio e il rivestimento.
FASE 3:
Regolazione della cinghia: le cinghie anteriori e posteriori devono allacciarsi leggermente
sotto e tra le orecchie.
FASE 4:
Regolazione della cinghia sottogola: indossare il casco sempre con la chiusura chiusa e
con la cinghia ben tesa. In questo modo si garantirà che la cinghia non venga applicata
al mento, bensì al collo. L’applicazione della cinghia sottogola potrebbe impedire che
il casco si sfili via in caso di incidente. La chiusura non deve trovarsi sulla mandibola.
FASE 5:
La posizione giusta: il casco è indossato correttamente se calza in testa bene oltre che in
maniera comoda. La posizione viene regolata dalla tensione della cinghia.
FASE 6:
Controllo della posizione e della regolazione: prima dell’uso verificare che il casco calzi
correttamente in testa. Stringere il casco una volta assunta la posizione corretta. Pas-
sate la cinghia sotto la gola e stringete saldamente. Posizionatevi preferibilmente davanti
ad uno specchio. Afferrate il casco con entrambi le mani e tentate di estrarlo con un mo-
vimento energico avanti ed indietro. Il casco non è indossato correttamente se si riesce a
sfilare, se si sposta in avanti in modo da limitare la visibilità oppure se si sposta indietro
in modo che la parte frontale resti scoperta.
Vi preghiamo di non usare il casco qualora non dovesse essere della vostra misura o non
calzasse bene in testa. E’ consigliabile in questo caso scegliere un’altra misura o passare
ad un altro modello.
This manual suits for next models
1
Table of contents
Languages:
Other Hudora Motorcycle Accessories manuals