Hupfer EBR/70-120 User manual

91285809_A0
Operating Instructions
Cup Dispenser
EBR/70-120 | EBR/100-150 | EBRH/70-120 | EBRH/100-150

Chapter 1Introduction
Page 2 Appliance Information
Cup Dispenser
EBR/70-120 | EBR/100-150 | EBRH/70-120 | EBRH/100-150 91285809_A0
1 Introduction
1.1 Appliance Information
Appliance designation Cup Dispenser
Appliance type/ -s EBR/70-120 | EBR/100-150 | EBRH/70-120 | EBRH/100-150
Manufacturer HUPFER® Metallwerke GmbH & Co. KG
Dieselstraße 20
48653 Coesfeld
PO 1463
D-48634 Coesfeld
+49 2541 805-0
+49 2541 805-111
www.hupfer.de
info@hupfer.de
Cup Dispenser
EBR/70-120 | EBR/100-150 | EBRH/70-120 | EBRH/100-150
Read these operating instructions carefully before the first operation of the appliance.
Ensure that sources of danger and possible faulty operations have been pointed out to the operating staff.
Subject to modifications
The products covered by these operating instructions have been developed taking into consideration the re-
quirements of the market and the latest technology. HUPFER®reserves the right to modify the products and
appertaining technical documentation in so far as the modifications are in the name of technological pro-
gress. The data and weights as well as the description of performance and functions assured in the order
confirmation as binding are always decisive.
Manual edition
91285809_A0

Introduction Chapter 1
Table of Contents Page 3
Cup Dispenser
91285809_A0 EBR/70-120 | EBR/100-150 | EBRH/70-120 | EBRH/100-150
1.2 Table of Contents
1Introduction 2
1.1 Appliance Information 2
1.2 Table of Contents 3
1.3 List of Abbreviations 5
1.4 Definitions of Terms 6
1.5 Orientation Guide 6
1.6 Notes on Use of Manual 7
1.6.1 Notes on the manual structure 7
1.6.2 Notes and their illustrations used in the chapters 7
2Safety Instructions 8
2.1 Introduction 8
2.2 Warning Symbols Used 8
2.3 Safety Instructions for Appliance Safety 8
2.3.1 Safety instructions for all appliances 8
2.3.2 Additional safety instructions for heated appliances 9
2.4 Safety Instructions for Cleaning and Care 9
2.5 Safety Instructions for Troubleshooting 9
2.6 Notes on Specific Hazards 9
3Description and Technical Data 10
3.1 Performance Description 10
3.2 Intended Use 10
3.3 Improper Use 10
3.4 Appliance Description 10
3.4.1 View of the appliance 10
3.4.2 Appliance Description 11
3.5 Technical Data 11
3.6 Rating Plate 12
4Transport, Assembly, Putting into Operation and Decommissioning 13
4.1 Transport 13
4.2 Assembly 13
4.2.1 Unheated appliances (EBR/70-120 | EBR/100-150) 13
4.2.2 Heated appliances (EBRH/70-120 and EBRH/100-150) 14
4.3 Putting into Operation 16
4.4 Storage and Recycling 17
5Operation 18
5.1 Arrangement and Function of the Operating Elements 18
5.2 Adjustment of the Cup Dispenser 18
5.2.1 Spring adjustment 18
5.2.2 Calculating the capacity for cup dispensers 20
5.3 Operation 21

Chapter 1Introduction
Page 4 Table of Contents
Cup Dispenser
EBR/70-120 | EBR/100-150 | EBRH/70-120 | EBRH/100-150 91285809_A0
5.3.1 Switching on the appliance 21
5.3.2 Loading the appliance 22
5.4 Measures at the End of Operation 22
6Fault Detection and Troubleshooting 23
6.1 Safety Measures 23
6.2 Notes on Troubleshooting 23
6.3 Fault and Action Table 23
7Cleaning and Care 24
7.1 Safety Measures 24
7.2 Hygiene Measures 24
7.3 Cleaning and Care 24
7.4 Special Care Instructions 25
8Spare Parts and Accessories 26
8.1 Introduction 26
8.2 Spare Parts and Accessories List 26

Introduction Chapter 1
List of Abbreviations Page 5
Cup Dispenser
91285809_A0 EBR/70-120 | EBR/100-150 | EBRH/70-120 | EBRH/100-150
1.3 List of Abbreviations
Abbreviation Definition
BGR Rule of the Professional Association
BGV Regulation of the Professional Association
CE Communauté Européenee
European Community
DIN Deutsches Institut für Normung
German Institute for Standardisation, technical regulations and technical specifications
EC European Community
European Union
EN European Standard
Harmonised standard for the EU market
E/V Spare and wearing part
IP International Protection. The abbreviation IP and a further two-digit index specify the pro-
tection class of a housing.
The first digit:: Protection against ingress of solid foreign objects The second digit: Protection against ingress of water
0 No protection against contact, no protec-
tion against ingress of solid foreign
objects
0 No protection against ingress of water
1 Protection against contact with any large
surface of the body such as the hand,
protection against ingress of foreign
objects > 1.97'' (50 mm)
1 Protection against vertically falling water
drops
2 Protection against contact with the
fingers, protection against ingress of
foreign objects
> 0.5'' (12 mm)
2 Protection against dripping water (at any
angle up to 15°from the vertical)
3 Protection against contact with tools,
thick wires or similar objects of > 0.1''
(2.5 mm) protection against foreign
objects > 0.1'' (2.5 mm)
3 Protection against water drips at any
angle up to 60°from the vertical
4 Protection against contact with tools,
thick wires or similar objects of >
0.04'' (1 mm), protection against
foreign objects > 0.04'' (1 mm)
4 Protection against water splashing from
any direction
5 Protection against contact, protection
against dust deposits inside 5 Protection against water jets (projected
by a nozzle) at any angle
6 Complete protection against contact,
protection against ingress of dust 6 Protection against temporary flooding
7 Protection against ingress of water
during temporary immersion
8 Protection against pressurised water
during continuous immersion
LED Light Emitting Diode
Light diode

Chapter 1Introduction
Page 6 Definitions of Terms
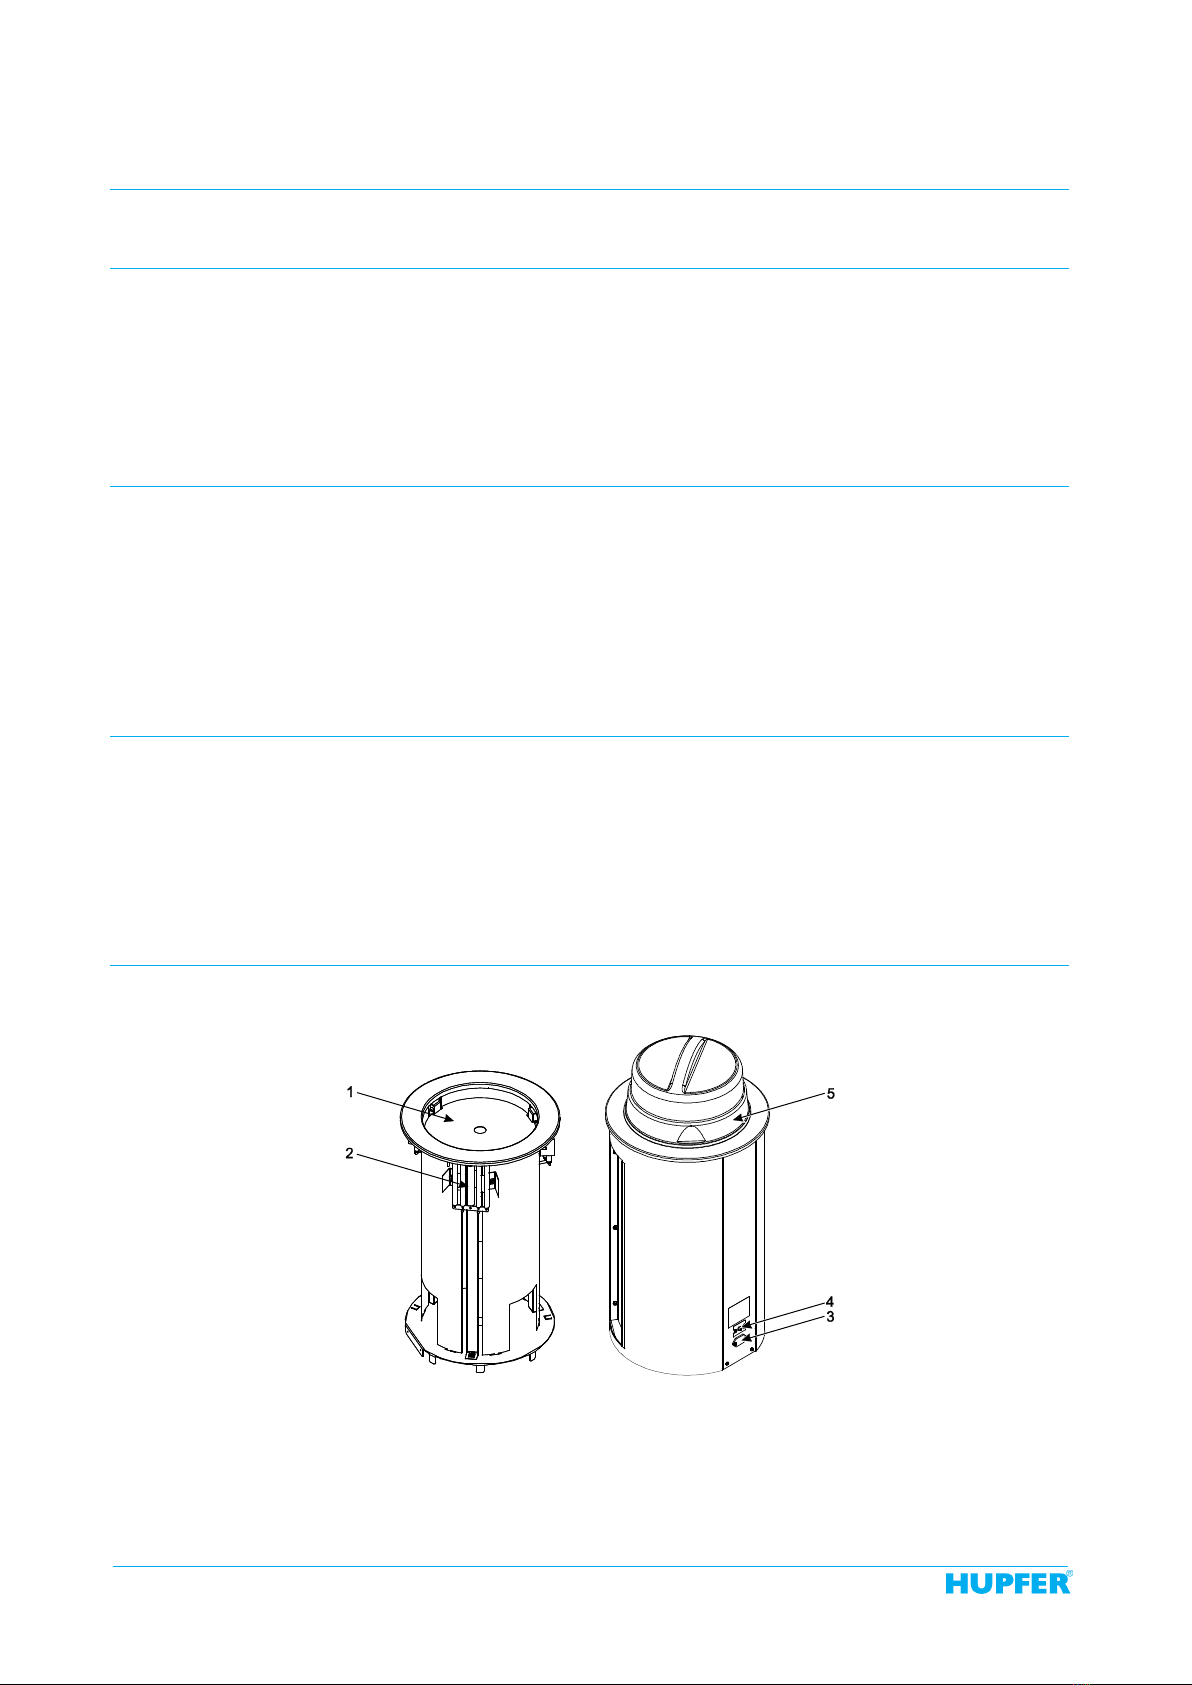
Cup Dispenser
EBR/70-120 | EBR/100-150 | EBRH/70-120 | EBRH/100-150 91285809_A0
1.4 Definitions of Terms
Term Definition
Authorised specialist An authorised specialist is a specialist that has been trained by the manufacturer, an
authorised service dealer or a company assigned by the manufacturer.
Cover A bell-shaped cover for keeping food warm on plates and dishes.
Cook&Chill Kitchens "Cook and Chill": Kitchens where warm food after being cooked is chilled as quickly as
possible.
Cook&Serve Kitchens "Cook and Serve": Kitchens where warm food is served immediately after being
cooked or kept warm until it is consumed.
Element formation Also: contact corrosion. Occurs when different noble metals are in close contact with
each other. This happens when a corrosive medium is between both metals, as for
example water or even air humidity.
Specialist A specialist is a person who can evaluate work assigned and can individually recog-
nise any possible dangers due to professional training, specialist knowledge and
experience as well as knowledge of the respective guidelines.
Lift A movement, for example a vertical movement of the stacking platform from bottom to
top.
Control Compare with certain conditions and/or characteristics such as damage, leaks, filling
levels, heat.
Convection Physical properties or mass transfer (e.g. heat or cold) through currents in gases and
liquids.
Corrosion The chemical reaction of a metallic material with its surroundings, e.g. rust.
Machine safety The term of machine safety means all the measures used to avert injury to persons.
The basis for this are national as well as EC-wide valid directives and laws for protect-
ing users of technical devices and systems.
Passive layer A non-metallic protective layer on a metallic material that prevents or slows down
material corrosion.
Check Compare with certain values such as weight, torque, content, temperature.
Qualified person,
qualified staff Qualified personnel are persons who due to their professional training, experience and
instruction as well as their knowledge of the respective standards, guidelines, accident
prevention regulations and operating conditions have been authorised by a person
responsible for system safety to carry out required activities and can recognise and
prevent any possible danger (definition of specialists according to IEC 364).
Schuko® The abbreviation of the German term "Protective contact" that indicates a system of
domestic plugs and sockets equipped with protective earthed contacts used in most of
Europe.
Instructed persons An instructed person is a person who has been instructed on the possible risks result-
ing from improper behaviour when carrying out the assigned task as well as on the
necessary protective equipment and protective measures and trained for this task if
necessary.
1.5 Orientation Guide
The front
"The front" means the side of the appliance where it is loaded.
The rear
The side named "the rear" means the opposite side of the front side (the front).
The right
The side named "the right" means the side at the right hand side of the front side (the front).
The left
The side named "the left" means the side at the left hand side of the front side (the front).

Introduction Chapter 1
Notes on Use of Manual Page 7
Cup Dispenser
91285809_A0 EBR/70-120 | EBR/100-150 | EBRH/70-120 | EBRH/100-150
1.6 Notes on Use of Manual
1.6.1 Notes on the manual structure
This manual is structured in functional and task orientated chapters.
1.6.2 Notes and their illustrations used in the chapters
DANGER Brief description of danger
There is an imminent danger to life and limb of the user and / or third parties
when the instructions are not followed precisely or the circumstances de-
scribed are not taken into account.
The type of danger is indicated by a symbol and explained in the accompany-
ing text in more detail. In this example the general sign of danger is used.
WARNING Brief description of danger
There is an indirect danger to life and limb of the user and / or third parties
when the instructions are not followed precisely or the circumstances de-
scribed are not taken into account.
The type of danger is indicated by a symbol and explained in the accompany-
ing text in more detail. In this example the general sign of danger is used.
ATTENTION Brief description of danger
There is a potential risk of injury or damage to property when the instructions
are not followed precisely or the circumstances described are not taken into
account.
The type of danger is indicated by a general sign and explained in the accom-
panying text in more detail. In this example the general sign of danger is used.
NOTE Brief description of additional information
Attention is pointed to special conditions or additional important information on
the respective subject.
INFO Short title
Contains additional information on work assisting features or recommenda-
tions on the respective subject.

Chapter 2Safety Instructions
Page 8 Introduction
Cup Dispenser
EBR/70-120 | EBR/100-150 | EBRH/70-120 | EBRH/100-150 91285809_A0
2 Safety Instructions
2.1 Introduction
The chapter on safety instructions describes the risks associated with the appliance in terms of product liabil-
ity (according to the EU Directive).
2.2 Warning Symbols Used
Symbols are used in these operating instructions to point out the dangers that can occur while operating or
cleaning the appliance. In both cases, the symbol provides information on the type and circumstances of
danger.
The following symbols can be used:
General hazardous area
Hazardous electrical voltage
Risk of hand injuries
Risk of crushing
Risk of hot surfaces
Wear hand protection
2.3 Safety Instructions for Appliance Safety
Safe operation of the appliance depends on appropriate and thorough use. Negligent handling of the appli-
ance can lead to danger to life and limb of the user and / or third parties as well as hazards to the appliance
itself and the other operator's property.
2.3.1 Safety instructions for all appliances
The following points are to be observed to ensure the appliance safety:
The appliance may only be operated when it is in perfect condition with regards to technical stan-
dards.
All the operating and actuating elements must be in a perfect and functionally reliable condition with
regards to technical standards.
Modifications or retrofits of the equipment are only permitted in consultation with the manufacturer
and on receipt of his written agreement.
In no case may people sit or stand on the appliance.
Before loading, the crockery dispensing height must be adjusted to the kind of crockery used.
To avoid injuries to the hands, care should always be taken to ensure that the crockery dispensing
height does not fall below the upper rim of the housing.
Never push the stacking platform down manually into the stacking compartment (e.g. for cleaning).
There is a risk of injury, if the stacking platform is released.
If a crockery stack is too high, do not push it down forcibly using the covers. There is a risk of injury,
if the locking is released.

Safety Instructions Chapter 2
Safety Instructions for Cleaning and Care Page 9
Cup Dispenser
91285809_A0 EBR/70-120 | EBR/100-150 | EBRH/70-120 | EBRH/100-150
2.3.2 Additional safety instructions for heated appliances
The heated appliances can only be operated by instructed specialists and kitchen staff and under
continuous supervision.
Heated cup dispensers are intended for dispensing heated crockery. Their use for cooking food and
keeping it warm or for room heating is not permitted.
The crockery temperatures can exceed the permitted maximum temperatures of 149°F (65°C) for
touchable appliance surfaces. Always wear protective gloves when dispensing hot crockery. Risk of
burning.
During operation of the appliance, never reach into it and touch the heating element with the fingers.
Risk of burning.
Plastic crockery, top and bottom parts of plastic insulated sets and plastic-coated items for keeping
food warm should not be stored nor warmed up in heated cup dispensers. Owing to the high tempera-
tures of the heating elements, the plastics can melt and catch fire.
2.4 Safety Instructions for Cleaning and Care
The following points must be observed when carrying out any cleaning and maintenance operations:
For reasons of hygiene the cleaning instructions must be strictly observed.
For cleaning, the appliance must be out of operation and cooled down sufficiently.
Do not clean the appliance with steam-jet or high-pressure washers. The appliance must be taken out
of operation and switched off at the mains beforehand in any area where steam-jet or high-pressure
washers are to be used.
Even appliances without an electrical connection should not be cleaned with running water or pres-
surised water.
2.5 Safety Instructions for Troubleshooting
The following points shall be observed when carrying out any maintenance and troubleshooting operations:
All troubleshooting work should only be carried out by authorised specialists.
When carrying out troubleshooting work, it must be ensured that the appliance is switched off. When
operating on the electrical installation, the appliance is to be switched off at the mains and secured
against reactivation.
The local applicable Accident Prevention Regulations must be observed.
Defective components should only be replaced with original parts.
2.6 Notes on Specific Hazards
Electrical energy
All work on the electrical installations should only be carried out by a certified electrician or by author-
ised specialists under supervision and monitoring of a certified electrician according to the applicable
electro-technical regulations.
The appliances on which inspection, maintenance and troubleshooting work is performed must be
disconnected from the power supply and secured against reactivation when the voltage is not re-
quired for this kind of work. This must only be carried out by a certified electrician.

Chapter 3Description and Technical Data
Page 10 Performance Description
Cup Dispenser
EBR/70-120 | EBR/100-150 | EBRH/70-120 | EBRH/100-150 91285809_A0
3 Description and Technical Data
3.1 Performance Description
Cup dispensers are intended for installation in worktops and are used in the field of catering establishments
and the food service industry.
They are used mainly for storage of round crockery items (cups, glasses and mugs) ready for use on food
distribution belts or on self-service counters in bistros or cafeterias.
Depending on the purpose, the built-in appliances are available in different sizes, heated or unheated.
3.2 Intended Use
Cup dispensers are only intended for dispensing clean and round crockery items made of porcelain or
toughened glass.
Depending on the model, the loaded crockery items can be heated up.
The intended use means the predetermined procedures, compliance with the indicated specifications and
use of the delivered or additionally available original accessories.
Any other use of the appliance is considered as unintended use.
3.3 Improper Use
It is not permitted to load the cup dispenser with other loads as given.
In no case may people sit or stand on the appliance.
Moreover, it is not permitted to use the cup dispensers for cooking food or keeping it warm and for room
heating.
No liability is assumed and no warranty claims can be submitted for damages caused by improper use.
3.4 Appliance Description
3.4.1 View of the appliance
Figure 1 View of the appliance EBR and EBRH
1 Stacking platform 3 Connecting socket for appliance plug*
2 Attachment bar with adjustable springs 4 Temperature regulation
*heated appliances only 5 Cover*

Description and Technical Data Chapter 3
Technical Data Page 11
Cup Dispenser
91285809_A0 EBR/70-120 | EBR/100-150 | EBRH/70-120 | EBRH/100-150
3.4.2 Appliance Description
Cup dispensers accommodate clean crockery items made of porcelain or toughened glass on an adjustable,
spring-loaded stacking platform. Owing to the use of special springs, crockery items are moved automatically
and constantly over the entire lift upwards to a uniform dispensing height.
All cup dispensers are universally adjustable appliances with the diameters, stack heights and weights given
below.
Appliances with electric heating preheat the crockery items or heat them up to a preset temperature.
The operating temperature can be continuously set on the heated cup dispensers. The controller can be ad-
justed as required when using built-in appliances.
The covers made of plastic protect the crockery against dust and condensed water even during relatively
long periods of temporary storage. Using a cover in the heated appliances lowers the heat loss upwards and
reduces the heating time of the inserted crockery or delays the cooling of pre-warmed crockery. The cover is
included in the scope of delivery of the heated models.
3.5 Technical Data
Dim. EBR/70-120 EBR/100-150 EBRH/70-120 EBRH/100-150
View of the appliance
Own weight lbs
(kg) 18.7 (8.5) 22 (10) 37.5 (17) 41.9 (19)
Payload lbs
(kg) 88.2 (40) 101.4 (46) 101.4 (46) 101.4 (46)
Permitted total weight lbs
(kg) 106.9 (48.5) 123.5 (56) 138.9 (63) 143.3 (65)
Overall dimensions
Ø x h without cover in
(mm) 15.7 x 25.6''
(400 x 650) 18.5 x 25.6''
(470 x 650) 15.7 x 25.6''
(400 x 650) 18.5 x 25.6''
(470 x 650)
Overall dimensions
Ø x h with cover in
(mm) - - 15.7 x 32.3''
(400 x 820) 18.5 x 32.3''
(470 x 820)
Installation from the top by
means of support
frames
from the top by
means of support
frames
from the top by
means of support
frames
from the top by
means of support
frames
Worktop cutout in
(mm) Ø 15.2'' (385) Ø 17.9'' (455) Ø 15.2'' (385) Ø 17.9'' (455)
Stacking platform in
(mm) Stainless steel,
Ø 11'' (280) Stainless steel,
Ø 13.8'' (350) Stainless steel,
Ø 11'' (280) Stainless steel,
Ø 13.8'' (350)
Crockery guide self-guiding
crockery stacks self-guiding
crockery stacks
Cup size in
(mm) Ø 2.8-4.7''
(70-120) Ø 3.9-5.9''
(100-150) Ø 2.8-4.7''
(70-120) Ø 3.9-5.9''
(100-150)
Stack height without cover in
(mm) 19.3''
(490) 19.3''
(490) 19.3''
(490) 19.3''
(490)
Stack height with cover in
(mm) 24.4''
(620) 24.4''
(620) 24.4''
(620) 24.4''
(620)
Capacity
(depending on stack
height of crockery)
up to 64 (without
cover)
up to 72 (with
cover)
up to 98 (without
cover)
up to 104 (with
cover)
up to 64 (without
cover)
up to 72 (with
cover)
up to 98 (without
cover)
up to 104 (with
cover)
Number of crockery stacks 3-8 3-8 3-8 3-8

Chapter 3Description and Technical Data
Page 12 Rating Plate
Cup Dispenser
EBR/70-120 | EBR/100-150 | EBRH/70-120 | EBRH/100-150 91285809_A0
Dim. EBR/70-120 EBR/100-150 EBRH/70-120 EBRH/100-150
Heating - - Stainless steel
tubular heating
element
Stainless steel
tubular heating
element
Thermostat setting °F
(°C) - - 68-185
(20-85) 68-185
(20-85)
Maximum crockery tem-
perature °F
(°C) - - 158
(70) 158
(70)
Temperature setting - - continuous continuous
Heat insulation - - special insulation special insulation
Electrical connection - - 230 V 1N AC 50
Hz 230 V 1N AC 50
Hz
Power requirement kW - - 0.6 0.6
Protection class - - IPX4 IPX4
The corresponding test marks can be found on our homepage at www.hupfer.de.
3.6 Rating Plate
Figure 2 Rating plate
1 Disposal of old appliances 9 Nominal current
2 Certificates/label 10 Frequency
3 Protection class 11 Nominal voltage
4 Chilling capacity 12 Payload
5 Coolant 13 Own weight
6 Induction frequency 14 Serial number/Order number
7 Current serial number 15 Item and brief description
8 Electric power 16 Manufacturer

Transport, Assembly, Putting into Operation and Decommissioning Chapter 4
Transport Page 13
Cup Dispenser
91285809_A0 EBR/70-120 | EBR/100-150 | EBRH/70-120 | EBRH/100-150
4 Transport, Assembly, Putting into Operation and Decommis-
sioning
4.1 Transport
ATTENTION Appliance damages caused by improper transport
In the case of off-site transport in a vehicle such as a lorry, the appliances
should be secured properly.
If the appliances are not secured properly, there is a risk of damage to prop-
erty and persons caused by squashing.
During transport, secure all the individually standing appliances using corre-
sponding transport securing devices.
4.2 Assembly
The following section describes the assembly of the cup dispenser.
Primarily, the unheated appliances EBR/70-120 and EBR100-150 are described that do not require any elec-
trical installations after the assembly.
Subsequently, there follows the assembly description of the heated appliances EBRH/70-120 and
EBRH/100-150, that must be connected to the power supply after the assembly.
4.2.1 Unheated appliances (EBR/70-120 | EBR/100-150)
NOTE Appliance location
Built-in appliances may only be used after being retrofitted or built-in (e.g. in a
cabinet).
Figure 3 Worktop cut-out
Step 1: Preparation
Prepare the worktop cut-out.
The cut-out dimension for the EBR/70-120 is 15.2" (385 mm) (diameter).
The cut-out dimension for the EBR/100-150 is 17.9" (455 mm) (diameter).
Remove the protective plastic film from the metal plates.

Chapter 4Transport, Assembly, Putting into Operation and Decommissioning
Page 14 Assembly
Cup Dispenser
EBR/70-120 | EBR/100-150 | EBRH/70-120 | EBRH/100-150 91285809_A0
INFO Disposal of packing material
The packing consists of recyclable materials and can be disposed of appro-
priately. Thereby, the different materials are to be separated and disposed in
an environmentally compatible manner. In any case, the local bodies respon-
sible for disposal are to be involved for this purpose.
Step 2: Installation
EBR/70-120
Insert the appliance into the worktop cut-out from above and fasten it.
Figure 4 Assembly instructions
4.2.2 Heated appliances (EBRH/70-120 and EBRH/100-150)
DANGER Hazardous electrical voltage
The electrical voltage may be considerably dangerous to limb and life of per-
sons and lead to injuries.
All work on the electrical installations should only be carried out by a certified
electrician or by authorised specialists under supervision and monitoring of a
certified electrician according to the applicable electro-technical regulations.
ATTENTION Risk of hot surfaces
The internal surfaces and base plates of the heated appliances can become
hot during and/or after the operation. The heated appliances should not come
into contact with light inflammable materials.
Ensure that there is enough space between the housing and cladding re-
quired for air circulation.

Transport, Assembly, Putting into Operation and Decommissioning Chapter 4
Assembly Page 15
Cup Dispenser
91285809_A0 EBR/70-120 | EBR/100-150 | EBRH/70-120 | EBRH/100-150
NOTE Appliance location
The built-in appliances may only be put into operation after being retrofitted or
built-in (e.g. in a cabinet).
There is a connecting cable set with a wiring diagram attached to the built-in heated appliances.
The set consists of a connecting lead with a Schuko® plug and a connecting lead with a mains plug fitted on
the appliance. The connecting leads are wired up via the on/off switch with an integrated indicator light.
Figure 5 Worktop cut-out
Step 1: Preparation
Prepare the worktop cut-out.
The cut-out dimension for the EBR/70-120 is 15.2" (385 mm) (diameter).
The cut-out dimension for the EBR/100-150 is 17.9" (455 mm) (diameter).
Step 1: Preparation
Prepare cut-outs in the worktop and the front cladding corresponding to the indicated dimensions.
The worktop cut-out dimensions are given in inch (mm) as shown in the corresponding drawing of the
built-in appliance.
The cut-out dimension for the switch is 1.2'' x 0.9'' (30x22 mm).
Remove the protective plastic film from the metal plates.
INFO Disposal of packing material
The packing consists of recyclable materials and can be disposed of appro-
priately. Thereby, the different materials are to be separated and disposed in
an environmentally compatible manner. In any case, the local bodies respon-
sible for disposal are to be involved for this purpose.
Step 2: Installation
NOTE Presetting the operating temperature
In contrast to the mobile appliances with the switch and controller arranged
next to each other, the switch of the built-in appliance can be placed any-
where on the front side.
Under these circumstances, the controller is no longer accessible for operat-
ing after the installation. Ensure that the desired temperature is set on the
thermostat before the installation.
Insert the appliance into the worktop cut-out and fasten it.

Chapter 4Transport, Assembly, Putting into Operation and Decommissioning
Page 16 Putting into Operation
Cup Dispenser
EBR/70-120 | EBR/100-150 | EBRH/70-120 | EBRH/100-150 91285809_A0
Figure 6 Assembly instructions
Step 3: Connect
Connect the appliance according to the wiring diagram: Insert the appliance plug of the connecting
lead set into the socket of the cup dispenser and the mains plug of the connecting lead set into the
on-site power supply socket.
Put thermally insulating plates around the appliance.
The appliance is ready to be put into operation.
4.3 Putting into Operation
Before the appliance is put into operation it must be clean and dry.
The function of the operating elements and heating in the heated appliances must be checked before putting
them into operation.

Transport, Assembly, Putting into Operation and Decommissioning Chapter 4
Storage and Recycling Page 17
Cup Dispenser
91285809_A0 EBR/70-120 | EBR/100-150 | EBRH/70-120 | EBRH/100-150
4.4 Storage and Recycling
Temporary storage must take place in a dry and frost-free environment. The cup dispenser must be kept
covered with a suitable covering material to be protected against dust ingress.
The cup dispenser kept in the storage location must be checked for damages and corrosion every 6 months.
NOTE Condensed water formation
Ensure that there is sufficient ventilation and no large temperature fluctuations
in the storage location to avoid condensed water formation.
Before the appliance is taken back into operation it must be clean and dry.
If the cup dispenser is required to be recycled, all the heating devices (if available) must be removed safely
and completely, the recyclable materials must be separated properly and disposed in an environmentally
compatible manner according to the Waste Disposal Regulations.
In any case, the local bodies responsible for disposal are to be involved for this purpose.

Chapter 5Operation
Page 18 Arrangement and Function of the Operating Elements
Cup Dispenser
EBR/70-120 | EBR/100-150 | EBRH/70-120 | EBRH/100-150 91285809_A0
5 Operation
5.1 Arrangement and Function of the Operating Elements
NOTE Presetting the operating temperature
In contrast to the mobile appliances with the switch and controller arranged
next to each other, the switch of the built-in appliance can be placed any-
where on the front side.
Under these circumstances, the controller is no longer accessible for operat-
ing after the installation. Ensure that the desired temperature is set on the
thermostat before the installation.
The On/Off switch of the appliance is located on the front of the cover of the heated cup dispensers. An indi-
cator light integrated into the switch shows, whether the appliance is ready to be operated.
5.2 Adjustment of the Cup Dispenser
WARNING Risk of hot surfaces
The internal surfaces of the heated appliances and the base plates can be-
come hot during operation and only cool down slowly in the air.
To adjust the stacking platform, allow the appliance to cool down sufficiently
with the cover removed.
The adjustments should only be carried out on the appliances which are switched off, disconnected from the
power supply and cooled down (room temperature).
Before work starts, it is always necessary to check whether the cup dispenser to be operated is correctly set
for the crockery to be used.
The following functions are to be checked separately:
The dispensing height, so that the staff cannot suffer injury or become trapped and no breakage of
crockery can occur.
Basically, the appliance must be adjusted if at least one of the following crockery parameters alters:
Diameter
Height
Stack height
Weight.
5.2.1 Spring adjustment
ATTENTION Damage to persons and property due to improper adjustment
When the dispensing height is exceeded, there is a risk of accident or injury
due to tipping of the crockery stack and breakage of dishes. If the level falls
below the dispensing height, injuries to the fingers due to squashing can oc-
cur when removing dishes.
Adjust appropriately the dispensing height by hooking or unhooking the
springs. When adjusting springs on sharp edges, pay particular attention to
the ends of the tension springs. Act carefully.
Before loading the appliance, the dispensing height must be adjusted to the kind of crockery used. The dis-
pensing height is adjusted by hooking or unhooking tension springs. So long as the same kind of crockery is
always used, the dispensing height only needs to be set once.

Operation Chapter 5
Adjustment of the Cup Dispenser Page 19
Cup Dispenser
91285809_A0 EBR/70-120 | EBR/100-150 | EBRH/70-120 | EBRH/100-150
The dispensing height must be adjusted so that over the entire lift the uppermost item of crockery is con-
stantly moved upwards to a uniform dispensing height between 1.6'' (4 cm) and 2.4'' (6 cm) above the upper
rim of the housing.
Step 1 -Checking the spring adjustment
Load a stack of 15 to 20 items on to the stacking platform to test the dispensing height.
Wait for a reaction.
If the dispensing height of the crockery stack is about 1.97'' (5 cm) above the upper edge of the appliance,
the spring system is adjusted correctly.
If the crockery stack drops down only a little or not at all, the dispensing height must be altered by adjusting
the springs.
Step 2 -Altering the spring adjustment
The dispensing height is adjusted by hooking or unhooking tension springs on two attachment bars. The
springs are arranged in groups of 5, where 1 is a base spring (2) and 4 are adjustable springs (1) with lower
tension.
Figure 7 Attachment bar with tension springs
If the dispensing height is too high, adjustable springs must be unhooked.
If the dispensing height is too low, adjustable springs must be added.
Procedure for setting the springs:
Take the inserted crockery items out of the cup dispenser (if available).
Hook or unhook adjustable springs uniformly in all groups of springs.
Preferably unhook the adjustable springs. Always leave the base springs inserted, if possible. Always
unhook the springs on the lower attachment bar.
Both steps must be repeated as often as possible, until the dispensing height is in the range from 1.57'' (4
cm) to 2.36'' (6 cm). So long as the same kind of crockery is always used, the dispensing height only needs
to be set once.
NOTE Arrangement of the springs
A symmetrical arrangement of springs between the attachment bars is neces-
sary for guiding the stacking platform uniformly and without friction.
A slightly asymmetrical arrangement of springs within an attachment bar does
not pose any problem.
NOTE Spring system
Since all the cup dispensers are designed for a maximum crockery load, the
available spring system of the appliances is entirely sufficient for all usual
crockery items.
Owing to the base springs with higher tension, the unheated cup dispensers
are also unsuitable for plastic items.

Chapter 5Operation
Page 20 Adjustment of the Cup Dispenser
Cup Dispenser
EBR/70-120 | EBR/100-150 | EBRH/70-120 | EBRH/100-150 91285809_A0
5.2.2 Calculating the capacity for cup dispensers
The total capacity of a cup dispenser depends on the kind of crockery loaded.
All the leading manufacturers give the necessary data for calculating the intermediate stack height in the fol-
lowing manner:
T
h
e
c
apacity per crockery stack can be calculated together with the stack height HSof the cup dispenser:
K: Items per crockery stack
HS: Stack height of the cup dispenser
Figure 8 Intermediate stack height Hzof 11 crockery items
Example:
So 54 crockery items can be stacked into the stacking compartment.
HZ: Intermediate stack height
H1: Height of the first crockery item
Hn: Height of n crockery items
n: Number of crockery items
H1= 1.1'' (28 mm): Height of the first crockery item
H11= 5.5'' (140 mm): Height of 11 crockery items
t= 11: Number of crockery items
HS= 24.6'' (625 mm): Stack height
This manual suits for next models
3
Table of contents
Other Hupfer Dispenser manuals
Popular Dispenser manuals by other brands

Go Jo
Go Jo Purell ES4 Maintenance Guide

Go Jo
Go Jo Dispenser FMX-12 installation instructions

Syncom technology
Syncom technology CRT-541 Product specification

SureShot
SureShot IntelliShot Operation manual

Amanngirrbach
Amanngirrbach Smartbox X2 operating instructions

astrawalker
astrawalker A69.54.V2 Installation

Carnival King
Carnival King 382RBD3G1 user manual

JohnDow Industries
JohnDow Industries JDI-5DP owner's manual

Tork
Tork Essity Image Design 466000 manual

Alpine
Alpine 425-GRY quick start guide

Dover
Dover Wayne Select S1 Installation & operation

T&S
T&S B-1200 Series Installation and maintenance instructions