manuals.online logo
Brands
  1. Home
  2. •
  3. Brands
  4. •
  5. Hurricane
  6. •
  7. Fan
  8. •
  9. Hurricane Supreme 736507 User manual

Hurricane Supreme 736507 User manual

READ AND SAVE THESE INSTRUCTIONS
Supreme 16" Stand Fan
Exclusively distributed by: Part #736507
1
1. Do not leave the fan running unattended.
2. Keep electrical appliances out of reach from children.
Do not let them use the appliances without supervision.
3. If the power cord is damaged, it must be replaced
by manufacturer.
1. Never insert any object through the grille when fan is running.
2. Disconnect fan when moving from one location to another.
3. Be sure the fan is on a stable surface when operating.
4. Indoor use only.
WARNING
RULES FOR SAFE OPERATION
CLEANING
1. Be sure to unplug from the power source before cleaning.
2. Plastic parts should be cleaned with a soft cloth
Correct Disposal of this product
This marking indicates that this product should not be disposed with other
household wastes throughout the EU. To prevent possible harm to the
environment or human health from uncontrolled waste disposal,
recycle it responsibly to promote the sustainable reuse
of material resources. To return your used device, please
use the return and collection systems or contact the retailer
where the product was purchased. They can take this
product for environmental safe recycling.
4
PART FIGURE
Blades
Circlip
Piano Switch
Extension column
Height adjuster
Column
Chassis
Time Switch
Tilting knob
Front grille
Spinner
Plastic rim
Motor shaft
Rear grille
Oscillation knob
“7” finger screw
1. Unscrew the “7” finger screw from the Extension Pole. (Fig.1)
2. Insert the extension pole in the chassis and tighten the “7” Finger screw. (Fig.2)
3. From the extension pole loosen the height adjustment ring and adjust the
internal pipe to the desired height. (Note: If you can’t find the internal pole, it
slides inside the extension pole. You can pull it out from the extension pole.)
(Fig.3)
4. To attach the head unit to the extension pole, loosen the thumb screw on the
bottom of the head unit. Place the head unit on the extension pole and tighten
the thumb screw in alignment with the groove on the internal pole. (Fig.4)
CAUTION: Height adjustment ring must be fully fastened before the assembly of
the motor section to the extension pole.
Annular groove
Mountinghole
Thumb screw
Fig.4Fig.3Fig.2Fig.1
ASSEMBLY OF CROSS STAND & COLUMN UNIT
Loosen
2
OPERATING INSTRUCTION
1. SPEED CONTROL
Fan speed is controlled by the piano switch :
0-1-2-3 (Off-Low-Medium-High)
2. TIME CONTROL(Fig.8)
Turn the knob of time switch (8) to the right and set the
time. The time switch is cut at the time within 120 minutes.
In case the switch is not used, set the time switch (8) to “ON”.
3.OSCILLATION CONTROL (Fig.9)
To make the fan oscillate, press the clutch knob located on the
top of the motor housing. To get the directional airflow, pull the
clutch knob up to its initial position.
4.TILT ADJUSTMENT (Fig.10)
To adjust the air flow upward or downward, push the guards
lightly to the desired direction.
5.HEIGHT ADJUSTMENT
The height of the fan can be adjusted by loosening the locknut carefully raising or
lowering the fan and firmly re-tightening the locknut.
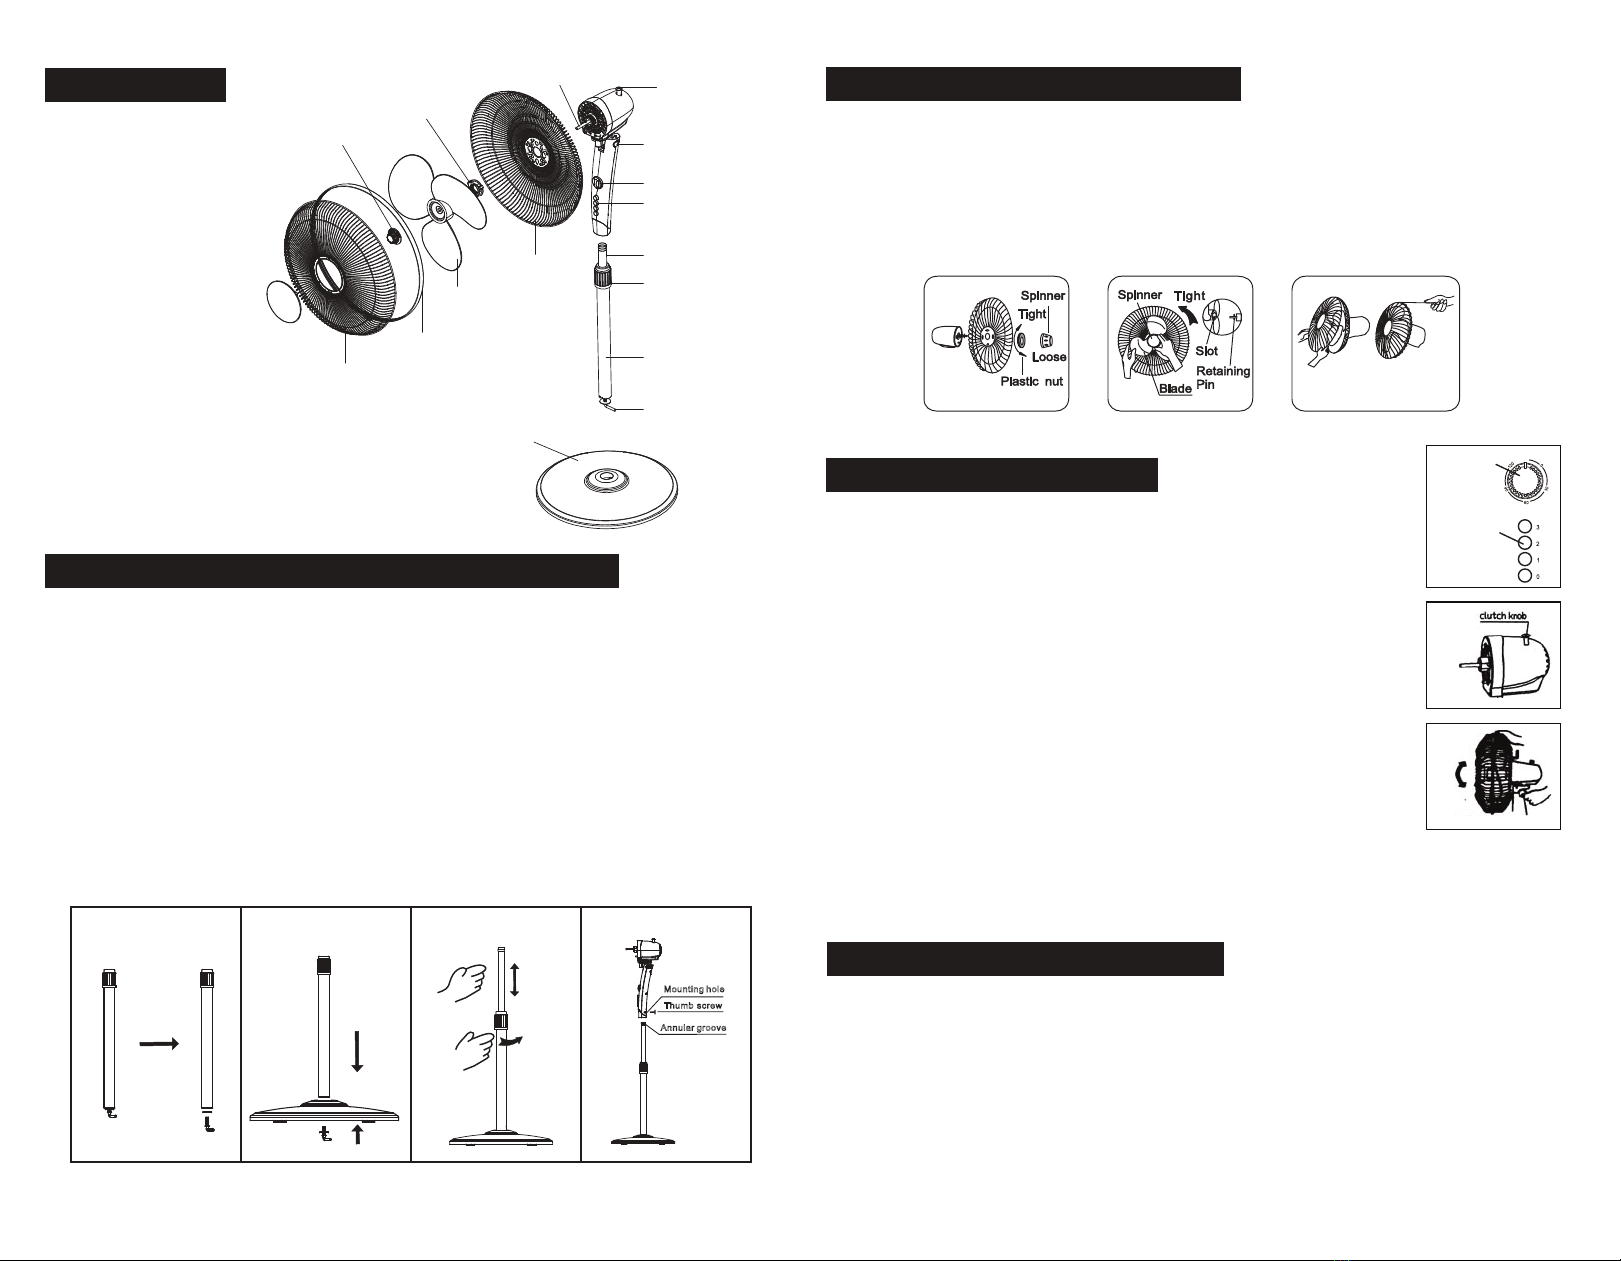
GUARD & FAN BLADE ASSEMBLY
1. Unscrew the spinner clockwise (or take the spinner out from the bag) and the
plastic nut counter clockwise to remove both of them. Fix the rear guard to the
motor then tighten the plastic nut again. (Fig. 5)
2. Insert the blade into shaft, and make sure the rotor shaft pin is fitted into groove
of the blade. Turn the spinner counter clockwise to tighten the blade. (Fig. 6)
3. Fasten the front guard and the rear guard by the guard clip and then tighten the
fan guard locking screw and nut. (Fig. 7)
7.giF6.giF5.giF
Fig.8
Fig.9
Fig.10
Piano Switch
Time Switch
MAINTENANCE INSTRUCTION
The fan requires little maintenance. Do not try to fix it by yourself.
Refer it to qualified service personnel if service is needed.
1. Before cleaning and assembling, fan must be unplugged.
2. To ensure adequate air circulation to the motor, keep vents at the rear of the
motor free of dust. Do not disassemble the fan to remove dust.
3. To Clean the exterior parts with a soft cloth.
4. Do not use any abrasive detergent or solvents.
5. Do not allow water or any other liquid into the motor housing or interior parts.
3
ON

Other Hurricane Fan manuals

Hurricane Afterburner Manual

Hurricane

Hurricane Afterburner Manual

Hurricane W Manual

Hurricane

Hurricane W Manual

Hurricane 736530 Manual

Hurricane

Hurricane 736530 Manual

Hurricane 736491 User manual

Hurricane

Hurricane 736491 User manual

Hurricane 736503 User manual

Hurricane

Hurricane 736503 User manual

Hurricane 736479 User manual

Hurricane

Hurricane 736479 User manual

Hurricane PRO HGC736489 User manual

Hurricane

Hurricane PRO HGC736489 User manual

Hurricane Super 8 Manual

Hurricane

Hurricane Super 8 Manual

Hurricane INLINE Series User manual

Hurricane

Hurricane INLINE Series User manual

Hurricane PRO 736474 User manual

Hurricane

Hurricane PRO 736474 User manual

Hurricane Supreme Series User manual

Hurricane

Hurricane Supreme Series User manual

Hurricane 850 DMX User manual

Hurricane

Hurricane 850 DMX User manual

Hurricane Supreme series User manual

Hurricane

Hurricane Supreme series User manual

Hurricane Super 8 Manual

Hurricane

Hurricane Super 8 Manual

Hurricane 736565 Manual

Hurricane

Hurricane 736565 Manual

Hurricane Supreme Series User manual

Hurricane

Hurricane Supreme Series User manual

Hurricane 736505 User manual

Hurricane

Hurricane 736505 User manual

Hurricane CLASSIC 16" OSCILLATING WALL MOUNT FAN User manual

Hurricane

Hurricane CLASSIC 16" OSCILLATING WALL MOUNT FAN User manual

Popular Fan manuals by other brands

Bard CRV-F5 installation instructions

Bard

Bard CRV-F5 installation instructions

Lunos Skalar Series Installation directions

Lunos

Lunos Skalar Series Installation directions

Emerson CF705AB04 owner's manual

Emerson

Emerson CF705AB04 owner's manual

Beacon Lighting Lucci Connect 299041 instructions

Beacon Lighting

Beacon Lighting Lucci Connect 299041 instructions

Kalorik TKG VT 1021 manual

Kalorik

Kalorik TKG VT 1021 manual

Ferroli JOLLY Plus 2 VERSIONE VM-F installation manual

Ferroli

Ferroli JOLLY Plus 2 VERSIONE VM-F installation manual

enervent eWind Pelican installation instructions

enervent

enervent eWind Pelican installation instructions

Minka-Aire SUPRA 44 instruction manual

Minka-Aire

Minka-Aire SUPRA 44 instruction manual

Pifco P40005C manual

Pifco

Pifco P40005C manual

Zoo Fans IC20 Drop-In Installation guides

Zoo Fans

Zoo Fans IC20 Drop-In Installation guides

Modern Fan Co DC Slim installation instructions

Modern Fan Co

Modern Fan Co DC Slim installation instructions

Vortice VORT PROMETEO HR 400 Instruction booklet

Vortice

Vortice VORT PROMETEO HR 400 Instruction booklet

Teral AESIV instruction manual

Teral

Teral AESIV instruction manual

Lasko B20725 Important instructions & operating manual

Lasko

Lasko B20725 Important instructions & operating manual

Brink Renovent Sky 150 installation instructions

Brink

Brink Renovent Sky 150 installation instructions

Harman ML SONO EC Series Assembly instruction

Harman

Harman ML SONO EC Series Assembly instruction

Keysight Technologies E4470AZ installation guide

Keysight Technologies

Keysight Technologies E4470AZ installation guide

Helios ultraSilence SlimVent SVV 80 Installation and operating instructions

Helios

Helios ultraSilence SlimVent SVV 80 Installation and operating instructions

manuals.online logo
manuals.online logoBrands
  • About & Mission
  • Contact us
  • Privacy Policy
  • Terms and Conditions

Copyright 2025 Manuals.Online. All Rights Reserved.