manuals.online logo
Brands
  1. Home
  2. •
  3. Brands
  4. •
  5. Hydrel
  6. •
  7. Lighting Equipment
  8. •
  9. Hydrel M9000 Series User manual

Hydrel M9000 Series User manual

Other Hydrel Lighting Equipment manuals

Hydrel Alder User manual

Hydrel

Hydrel Alder User manual

Hydrel Paradox Series User manual

Hydrel

Hydrel Paradox Series User manual

Hydrel 4400 Series User manual

Hydrel

Hydrel 4400 Series User manual

Hydrel Placer User manual

Hydrel

Hydrel Placer User manual

Popular Lighting Equipment manuals by other brands

Life 39.9F70020C quick start guide

Life

Life 39.9F70020C quick start guide

EuroLite LED ML-20 user manual

EuroLite

EuroLite LED ML-20 user manual

LIGMAN OD-50141 installation manual

LIGMAN

LIGMAN OD-50141 installation manual

Home Accents Holiday 1002461144 instructions

Home Accents Holiday

Home Accents Holiday 1002461144 instructions

Experia IRiS Ripple Light instruction manual

Experia

Experia IRiS Ripple Light instruction manual

Erco Gecko Mounting instructions

Erco

Erco Gecko Mounting instructions

Inter-lux ZTA.100.Surface Installation and maintenance instructions

Inter-lux

Inter-lux ZTA.100.Surface Installation and maintenance instructions

Whelen Engineering Company TN Series installation guide

Whelen Engineering Company

Whelen Engineering Company TN Series installation guide

IKEA BJÖRKSPIREA manual

IKEA

IKEA BJÖRKSPIREA manual

Toolland PM 6640 instruction manual

Toolland

Toolland PM 6640 instruction manual

GTD GTD-LP200 user manual

GTD

GTD GTD-LP200 user manual

LIVARNO home 1105-W-UK manual

LIVARNO home

LIVARNO home 1105-W-UK manual

ProLights EclPar IPMFC user manual

ProLights

ProLights EclPar IPMFC user manual

Velvet EVO Series user manual

Velvet

Velvet EVO Series user manual

IDTOLIGHT GENT installation instructions

IDTOLIGHT

IDTOLIGHT GENT installation instructions

MAYTONI S35 installation manual

MAYTONI

MAYTONI S35 installation manual

MaxLite MLFP14DP4535 user manual

MaxLite

MaxLite MLFP14DP4535 user manual

SLV Elektronik 550621 instruction manual

SLV Elektronik

SLV Elektronik 550621 instruction manual

manuals.online logo
manuals.online logoBrands
  • About & Mission
  • Contact us
  • Privacy Policy
  • Terms and Conditions

Copyright 2025 Manuals.Online. All Rights Reserved.

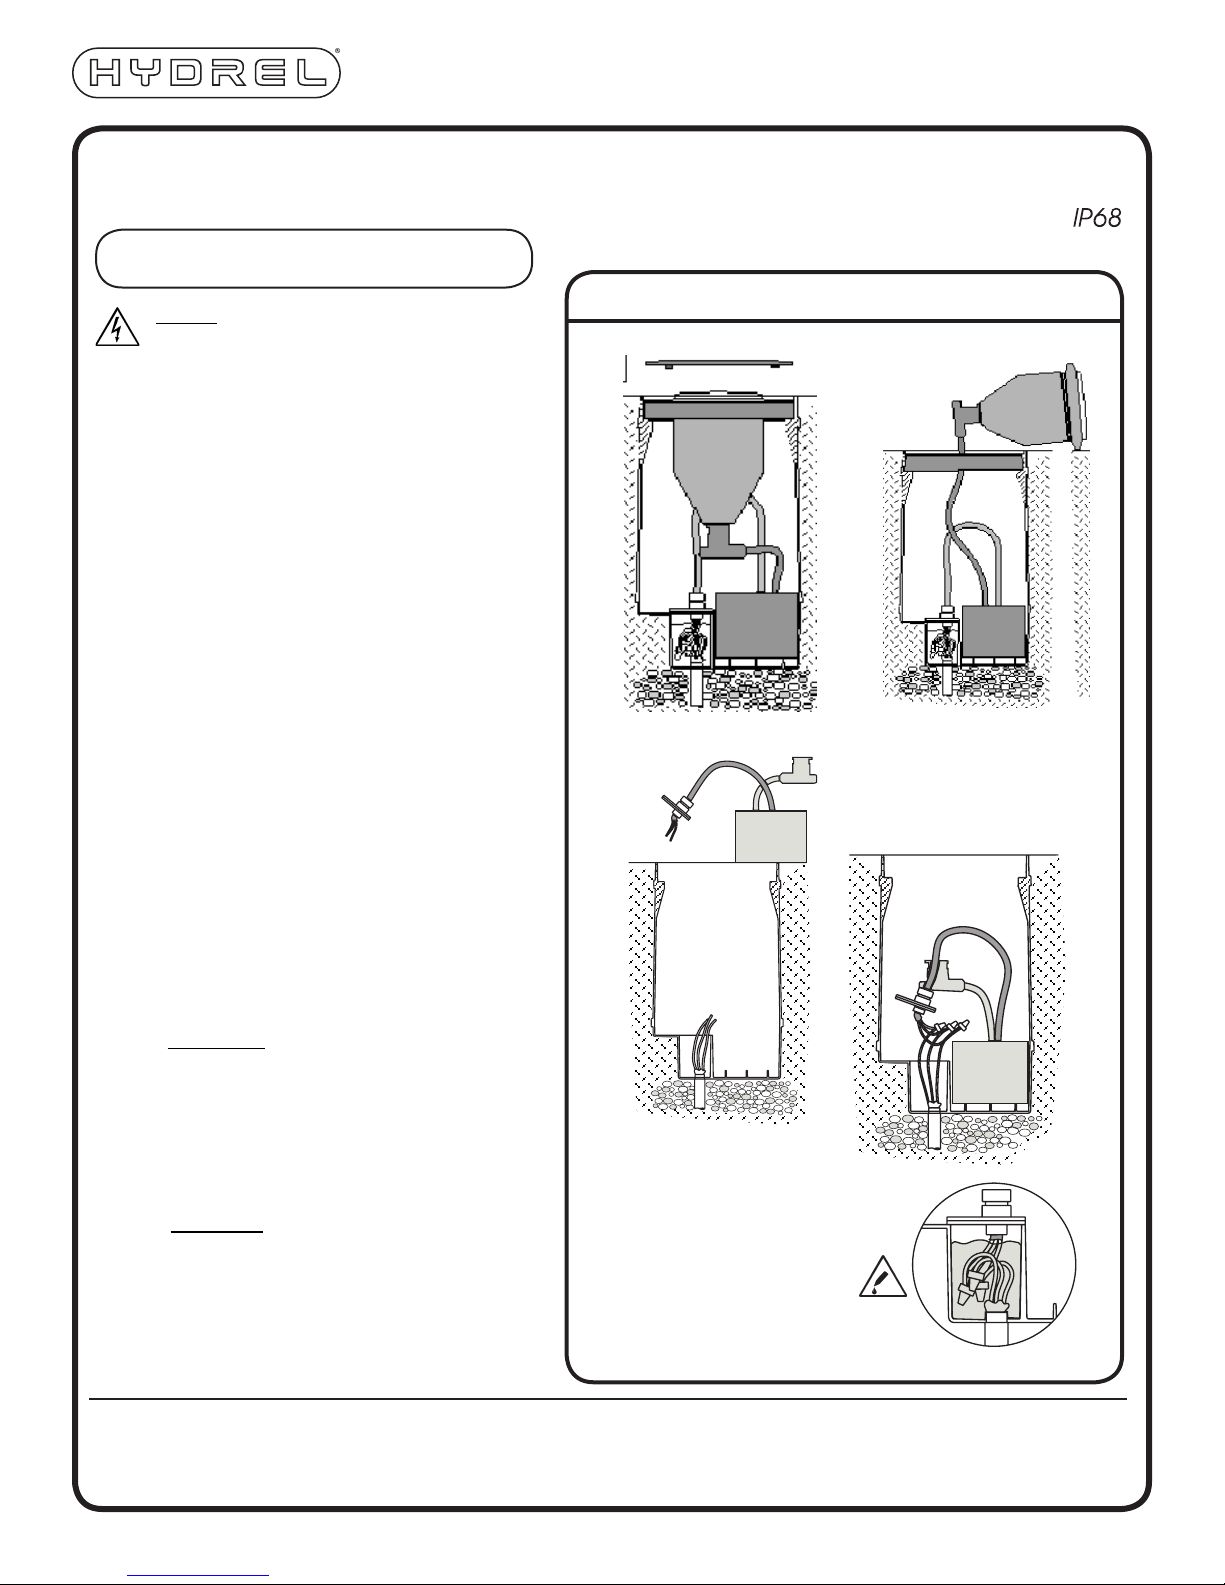
INSTALLATION DIAGRAM
1.
2.
Remove existing power module or power
cord by removing the junction box cover &
gasket and undoing the wire nuts (3). Then
loosen the cord seal so you can pull the cord
all the way through. Do not discard the
junction box cover, screws and gasket, you
will need to re-use those.
3.
Install the new LED driver module by running
pig tailed supply cord from power module
through cord seal and junction box cover
(provide enough cord for proper splicing
within junction box).
4.
Tighten junction box seal nut around power
cord. Make electrical connection using
silicone-filled wire nuts or fill junction box
with re-enterable potting compound (PC21,
ordered separately) prior to replacing lid and
gasket.
5.
6.
7.
Re-install junction box cover and gasket.
Tighten to ensure proper sealing.
CAUTION: DO NOT OVER TIGHTEN
(20 in-lbs or 2 N-m).
M9000 Series LED Retrofit
INSTALLATION INSTRUCTIONS
Installation should be performed by a qualified electrician
in accordance with the National Electrical Code
and relevant local codes.
SUITABLE FOR WET LOCATIONS
©2014 Acuity Brands Lighting, Inc.
7/30/15
M9000 LED retro
NOTE: Hydrel Reserves The Right To Modify Specification Without Notice.
Any dimension on this sheet is to be assumed as a reference dimension:
“Used for information purposes only. It does not govern manufacturing or
inspection requirements.” (ANSI Y14.5-1973)
9144 Deering Avenue | Chatsworth, CA 91311
Phone: 866.533.9901 | Fax: 866.533.5291
www.hydrel.com
Remove door assembly.
1.
NOTICE:
DO NOT INSTALL RETROFIT WHILE SYSTEM
IS ENERGIZED. TURN OFF POWER BEFORE
INSTALLATION.
Remove existing lamp module by
unplugging it from the power cord.
2.
3. 4.
Install the new LED lamp module by plugging
it into the driver and positioning it in the
housing to key into the existing mounting
ring to maintain original aiming.
Close the fixture by replacing the metal door.
CAUTION: DO NOT OVER TIGHTEN
(20 in-lbs or 2 N-m).
©2014 Acuity Brands Lighting, Inc.
7/30/15
M9000 LED retro
NOTE: Hydrel Reserves The Right To Modify Specification Without Notice.
Any dimension on this sheet is to be assumed as a reference dimension:
“Used for information purposes only. It does not govern manufacturing or
inspection requirements.” (ANSI Y14.5-1973)
SPLICE
SUPPLY POWERPOWER FROM FIXTURE
SUPPLY POWER - LINE VOLTAGE
0-10 LOW VOLTAGE DIMMING LINE
-
+
POWER FROM FIXTURE
2. LDIM 5 WIRE - SINGLE CORD TO DOUBLE CORD
1. STANDARD 3 WIRE ELECTRICAL - SINGLE CORD TO SINGLE CORD
9144 Deering Avenue | Chatsworth, CA 91311
Phone: 866.533.9901 | Fax: 866.533.5291
www.hydrel.com
WIRING DIAGRAMS
M9000 Series LED Retrofit