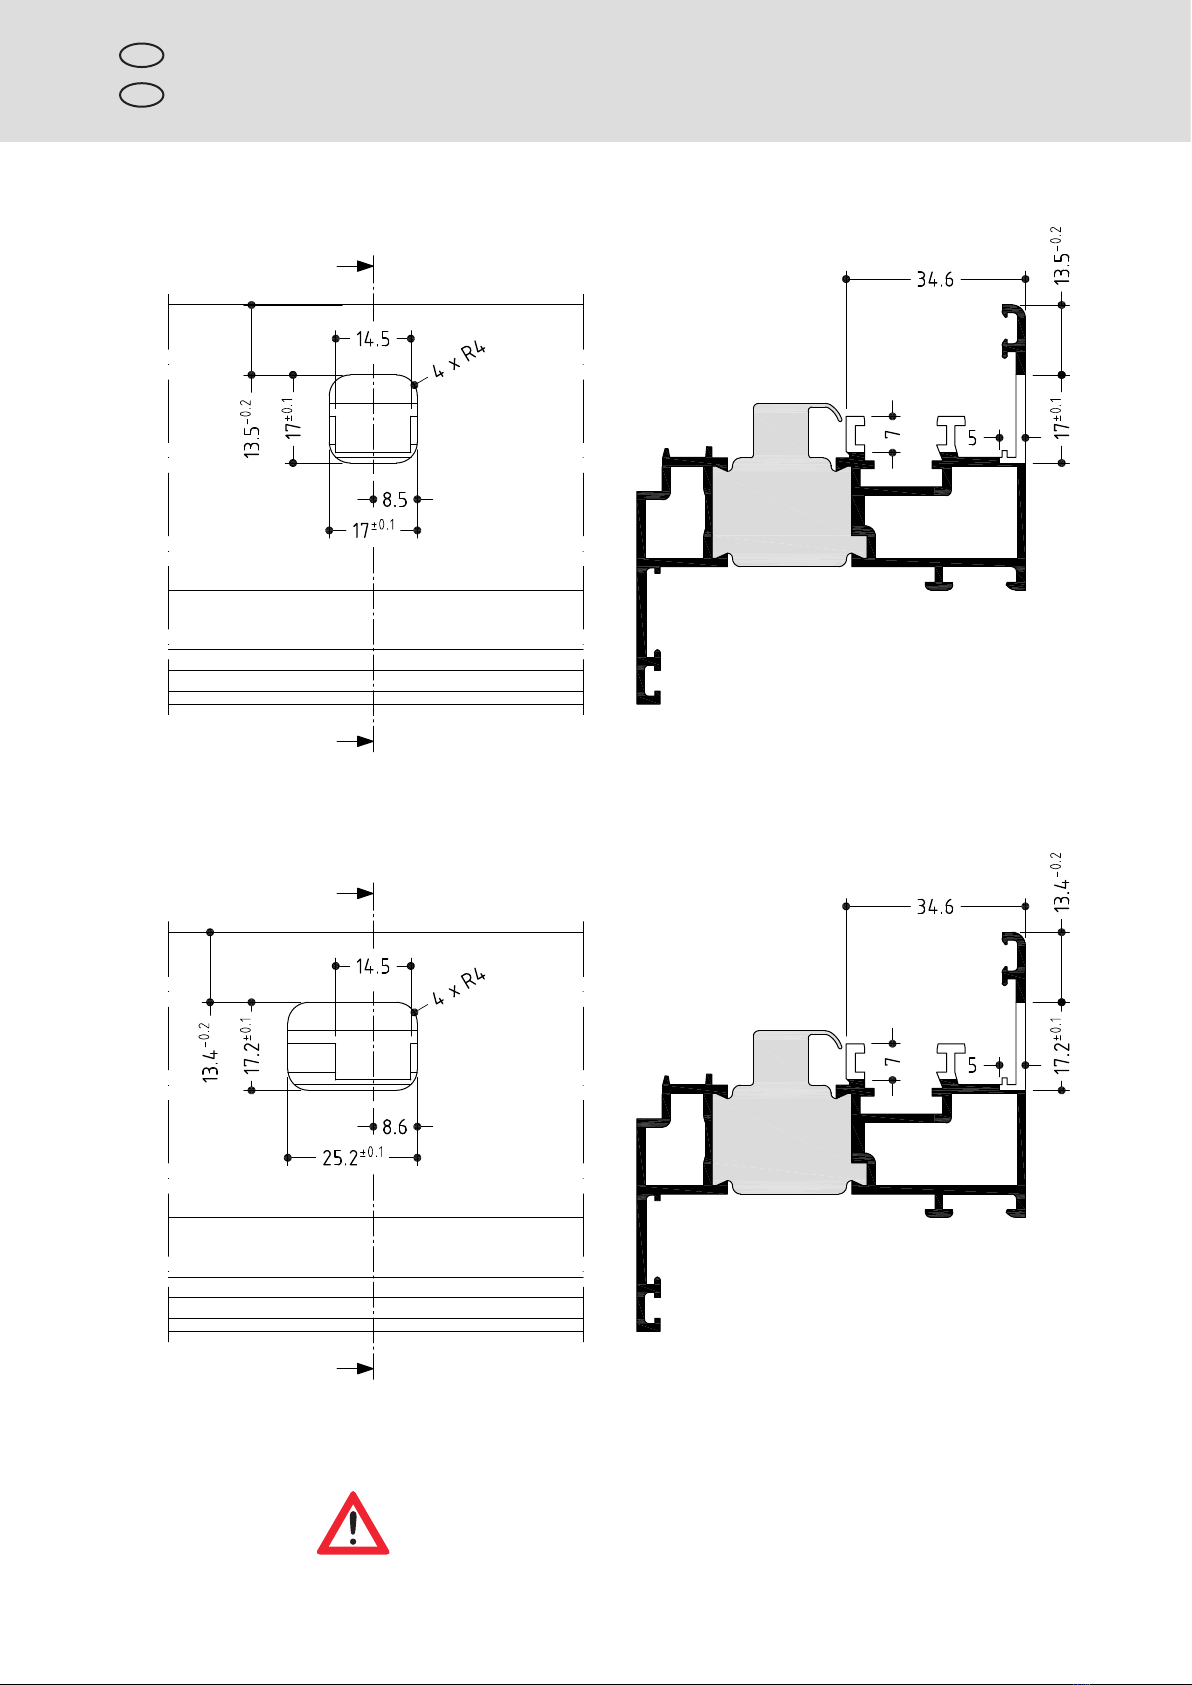
Hydro WICONA WICLINE evo Manual

01.2022
57501
www.wicona.com
WICLINE evo
DK-V 160
TF-V 160
D-V 160
K-V 130
K-V 130
(40001)
(40101)
(40201)
(40301)
(40401)
Hardware installation plan
for rebate gear 6020370 window hardware inwards up to 160 kg
Additional plan for:
Beschlag-Einbauplan
für Falzgetriebe 6020370 Fenster-Beschlag einwärts bis 160 kg
Zusatzplan für:
quer / landscape
hoch / portrait

Übersicht Griffe 4
Overview handles
Montagereihenfolge 5
Mounting sequence
Wichtige Hinweise 6
Important notes
Bearbeitung Flügel mit 10 mm Überschlag 7
Machining sash with 10 mm overlap
Bearbeitung Flügel mit 20 mm Überschlag 8
Machining sash with 20 mm overlap
Einbaulage der Fehlbediensperre 6040436 9
Mounting position anti-mishandling device 6040436
Montage Fehlbediensperre 6040436 11
Assembly anti-mishandling device 6040436
Contents
GB
Änderungen vorbehalten. Subject to alterations. 57501 01.2022 3
Inhalt
D

2
13
45
6
7
2a
2
1345
6
7
2a
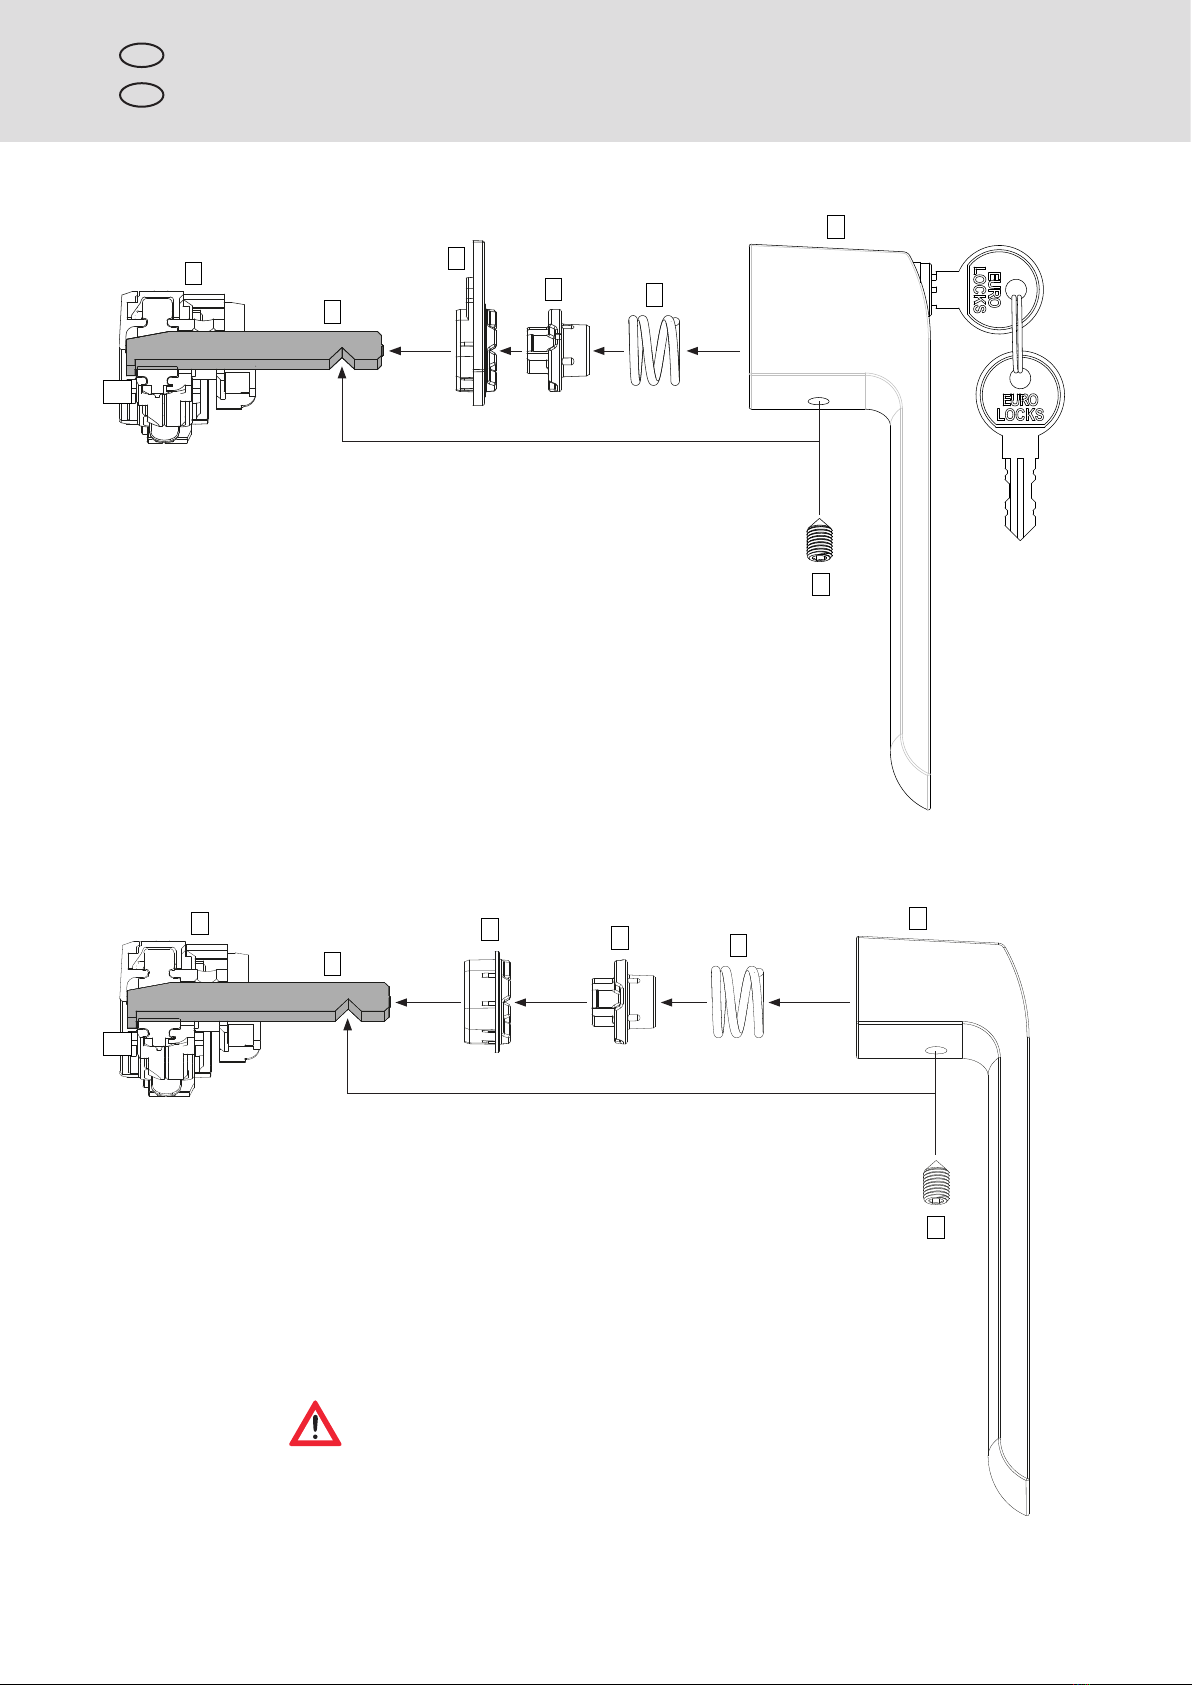
GB Mounting sequence
1. Insert the gear into the profile (pos.1)
2. Slide the square pin (pos.2) at an angle into the gear taking care that the retaining nose
(pos.2a) fits correctly
3. Press the rosette (pos.3) into the profile opening
4. Insert the fixing sleeve (pos.4) into the rosette (pos.3)
5. Slide the coil spring (pos.5) onto the fixing sleeve (pos.4)
6. Push the handle (pos.6) over the previously assembled parts (pos. 2,3,4 and 5) until it
rests against the rosette and hold it there
7. Screw in the threaded pin (pos.7) making sure that the pointed end sits tightly in the notch
of the square pin.
8. Fix the gear (pos.1) into the profile
Representations in closed position
Änderungen vorbehalten. Subject to alterations. 57501 01.2022 5
Montagereihenfolge
D
1. Getriebe ins Profil (Pos. 1) legen.
2. Vierkantstift (Pos. 2) schräg in das Getriebe schieben und darauf achten, dass die
Hinterhackung (Pos. 2a) korrekt sitzt.
3. Rosette (Pos. 3) in die Profilaussparung eindrücken.
4. Fixierhülse (Pos. 4) in die Rosette (Pos. 3) einsetzen.
5. Spiralfeder (Pos. 5) auf die Fixierhülse (Pos. 4) aufschieben.
6. Griff (Pos. 6) in die vorher montierten Teile (Pos. 2, 3, 4 + 5) bis zum Anliegen des Griffes
an der Rosette drücken und halten.
7. Den Gewindestift (Pos. 7) einschrauben und darauf achten, dass die Spitze in der
Einkerbung des Vierkantstiftes formschlüssig sitzt.
8. Getriebe (Pos. 1) im Profil fixieren.
Darstellungen in Geschlossenstellung

6060053
6020370
6040436
GB Important notes
Installation of roseless handles 6060051 and 6060052 requires the use of
gearbox 6020370 and anti-mishandling device 6040436.
Roseless handles 6060051 and 6060052 are supplied with a square pin suitable for sash profiles
with 10 mm overlap. For sash profiles with 20 mm overlap, square pin 6060053 (to be ordered
separately) replaces the original pin supplied with the handles!
601.2022 57501 Änderungen vorbehalten. Subject to alterations.
Wichtige Hinweise
D
Einbau der rosettenlosen Griffe 6060051 und 6060052 erfordert die Verwendung
von Getriebe 6020370 und Fehlbediensperre 6040436.
Die rosettenlosen Griffe 6060051 und 6060052 werden mit einem Vierkantstift für Flügelprofile mit
10 mm Flügelüberschlag ausgeliefert. Für Flügelprofile mit 20 mm Flügelüberschlag muss der den
Griffen beiliegende Vierkantstift durch den Stift 6060053 (separat zu bestellen) ersetzt werden!

Fräsbild Griff 6060051
Fräsbild Griff 6060052 (abschließbar)
A
A
B
B
A - A
B - B
Machining sash with 10 mm overlap
GB
Milling pattern handle 6060051
Milling pattern handle 6060052 (lockable)
Machining of the sash profile requires a profile machining
centre (PMC)!
Änderungen vorbehalten. Subject to alterations. 57501 01.2022 7
Bearbeitung Flügel mit 10 mm Überschlag
D
Fräsbild Griff 6060051
Fräsbild Griff 6060052 (abschließbar)
Für die Flügelprofilbearbeitung ist ein PBZ erforderlich!

Fräsbild Griff 6060051
B
B
A
A
A - A
B - B
Fräsbild Griff 6060052 (abschließbar)
Machining sash with 20 mm overlap
GB
Machining of the sash profile requires a profile machining
centre (PMC)!
801.2022 57501 Änderungen vorbehalten. Subject to alterations.
Bearbeitung Flügel mit 20 mm Überschlag
D
Milling pattern handle 6060051
Fräsbild Griff 6060051
Milling pattern handle 6060052 (lockable)
Fräsbild Griff 6060052 (abschließbar)
Für die Flügelprofilbearbeitung ist ein PBZ erforderlich!

106
10 4050
40 83 10
TF
40 83 10
TF
FAH > 703 (HG min. 416)
FAH > 690 (HG min. 400)
FAB > 792 (HG min. 396)
FAH = 600 - 703
FAB > 600
FAH = 600 - 703 with corner transmission
GB Mounting position anti-mishandling device 6040436
without corner transmission
top
lateral
top
When using a gap ventilation or a
second retainer arm etc. please
check the installation of the anti-
mishandling device on top and
correct it if necessary.
Änderungen vorbehalten. Subject to alterations. 57501 01.2022 9
DEinbaulage der Fehlbediensperre 6040436
ohne Eckumlenkung
oben
seitlich
oben
FAH = 600 - 703 mit Eckumlenkung
Bei Einsatz eines Spaltlüfters, ei-
ner Zweitschere usw. ist die
Einbausituation der Fehlbedien-
sperre oben zu überprüfen und
gegebenenfalls zu korrigieren.

10 4050
40 83 10
167
FAH > 1300 - 2250
FAH = 840 - 1300
FAB > 450
top
GB Mounting position anti-mishandling device 6040436
lateral
With deviating handle heights check that the hardware
moves freely and without collision between components.
10 01.2022 57501 Änderungen vorbehalten. Subject to alterations.
oben
Einbaulage der Fehlbediensperre 6040436
D
seitlich
Bei abweichenden Griffhöhen ist die Freigängigkeit
und Kollisionsfreiheit des Beschlags zu prüfen!

T10 (2x)
2.0 - 2.5 Nm
6040436
GB Assembly anti-mishandling device 6040436
Put handle exactly on turn position,
then tighten punching screw.
Änderungen vorbehalten. Subject to alterations. 57501 01.2022 11
Montage Fehlbediensperre 6040436
D
Griff exakt auf Drehstellung bringen,
danach Stanzschraube eindrehen.
Other manuals for WICONA WICLINE evo
1
This manual suits for next models
1
Table of contents
Other Hydro Door Lock manuals
Popular Door Lock manuals by other brands

Esco
Esco systeQ-M-SL-KIGA-ESC Installation, operation and maintenance instructions

Yale
Yale YDM4109 user guide

Simplex
Simplex 3000 Series Assembly instructions

LapSafe
LapSafe ClassBuddy Locker 32 user manual

Lippert Components
Lippert Components Bauer NE owner's manual

Philips
Philips DDL173LCGBB/97 user manual