Hyper Tough HT19-401-003-15 User manual

Operator’s Manual
Model No. HT19-401-003-15
WARNING: Read, understand and follow all safety Rules and Operating
Instructions in this Manual before using this product.
Wal-Mart Stores, Inc., Bentonville, AR 72716
For questions / comments, technical assistance or repair parts.
Please Call Toll Free at: 1-888-997-8875 (M-F 8am-6pm)
2 in 1: Portable Power Cleaner/Water Sprayer
TM
3026035

2
TABLE OF CONTENTS
Important Safety Instructions...........................................................................................................................................Pages 3-4
Symbols..........................................................................................................................................................................................Page 5
Component List...........................................................................................................................................................................Page 6
Technical Data..............................................................................................................................................................................Page 7
Accessories....................................................................................................................................................................................Page 7
Operating instructions........................................................................................................................................................Pages 8-9
Troubleshooting........................................................................................................................................................................Page 10
Maintenance...............................................................................................................................................................................Page 15
SAVE THESE INSTRUCTIONS!
READ ALL INSTRUCTIONS!
WARNING: This product can expose you to chemicals including lead, phthalate or bisphenol A which
are known to the State of California to cause cancer, birth defects or other reproductive harm. Wash
your hands after use. For more information go to www.P65Warnings.ca.gov.

3
WARNING: Read all safety warnings and all instructions. Failure to follow the warnings and
instructions may result in electric shock, re and/or serious injury.
Save all warnings and instructions for future reference.
WARNING: This product can expose you to chemicals including lead, phthalate or bisphenol A which
are known to the State of California to cause cancer, birth defects or other reproductive harm. Wash
your hands after use. For more information go to www.P65Warnings.ca.gov.
IMPORTANT SAFETY INSTRUCTIONS
WARNING – When using this product basic precautions should always be followed, including the following:
1. Read all the instructions before using the product.
2. To reduce the risk of injury, close supervision is necessary when a product is used near children.
3. Know how to stop the product and bleed pressures quickly. Be thoroughly familiar with the controls.
4. Stay alert – watch what you are doing.
5. Do not operate the product when fatigued or under the inuence of alcohol or drugs.
6. Keep operating area clear of all persons
7. Do not overreach or stand on unstable support. Keep good footing and balance at all times.
8. Follow the maintenance instructions specied in the manual.
9. WARNING – Risk of injection or injury– do not direct discharge stream at persons.
10. Do not spray electrical apparatus and wiring.
SAVE THESE INSTRUCTIONS
Safety Warnings for battery pack
a) Do not dismantle, open or shred battery pack.
b) Do not expose battery pack to heat or re. Avoid storage in direct sunlight.
c) Do not short-circuit a battery pack. Do not store battery packs haphazardly in a box or drawer where
they may short-circuit each other or be short-circuited by other metal objects. When battery pack is
not in use, keep it away from other metal objects, like paper clips, coins, keys, nails, screws or other small
metal objects, that can make a connection from one terminal to another. Shorting the battery terminals
together may cause burns or re.
d) Do not remove battery pack from its original packaging until required for use.
e) Do not subject battery pack to mechanical shock.
f) In the event of battery leaking, do not allow the liquid to come in contact with the skin or eyes. If
contact has been made, wash the aected area with copious amounts of water and seek medical
advice.
g) Observe the plus (+) and minus (–) marks on the battery back and equipment and ensure correct use.
h) Do not use any battery pack which is not designed for use with the equipment.
i) Keep battery pack out of the reach of children.
j) Seek medical advice immediately if a cell or battery has been swallowed.
k) Always purchase the battery pack recommended by the device manufacturer for the equipment.
l) Keep battery pack clean and dry.
m) Wipe the battery pack terminals with a clean dry cloth if they become dirty.
n) Battery pack needs to be charged before use. Always use the correct charger and refer to the
manufacturer’s instructions or equipment manual for proper charging instructions.
o) Do not leave battery pack on prolonged charge when not in use.
p) After extended periods of storage, it may be necessary to charge and discharge the battery pack
several times to obtain maximum performance.
q) Battery pack gives its best performance when it is operated at normal room temperature (20 °C ± 5
°C).
r) When disposing of battery packs, keep battery packs of dierent electrochemical systems separate
IMPORTANT SAFETY INSTRUCTIONS

4
from each other.
s) Recharge only with the charger specied by manufacturer. Do not use any charger other than that
specically provided for use with the equipment. A charger that is suitable for one type of battery pack
may create a risk of re when used with another battery pack.
t) Retain the original product literature for future reference.
u) Use only the battery pack in the application for which it was intended.
v) Remove the battery pack from the equipment when not in use.
w) Dispose of properly.
Information for radiated emission
This device complies with Canadian ICES-001.
This device complies with Part 15 of the FCC Rules.
Operation is subject to the following two conditions:
(1) This device may not cause harmful interference, and
(2) This device must accept any interference received, including interference that may cause undesired
operation.
WARNING: Changes or modications to this unit not expressly approved by the party responsible for
compliance could void the user’s authority to operate the equipment.
NOTE: This equipment has been tested and found to comply with the limits for a Class B digital device,
pursuant to Part 15 of the FCC Rules.
These limits are designed to provide reasonable protection against harmful interference in a residential
installation. This equipment generates, uses and can radiate radio frequency energy and, if not installed and
used in accordance with the instructions, may cause harmful interference to radio communications.
However, there is no guarantee that interference will not occur in a particular installation. If this equipment
does cause harmful interference to radio or television reception, which can be determined by turning the
equipment o and on, the user is encouraged to try to correct the interference by one or more of the following
measures:
• Reorient or relocate the receiving antenna.
• Increase the separation between the equipment and receiver.
• Connect the equipment into an outlet on a circuit dierent from that to which the receiver is connected.
• Consult the dealer or an experienced radio/TV technician for help.

5
SYMBOLS
To reduce the risk of injury, user must read instruction manual.
Warning
Li-I on
Li-Ion battery, battery must be recycled.
Do not burn
Do not expose to rain or water
POSITEC Inc. has established a partnership with the RBRC Corporation to
recycle any Positec batteries with the RBRC-call2recycle seal. For environmental
protection, please do not discard batteries in the trash. After the batteries’
life cycle is ended, then please call 1-800-822-8837 for a free service that will
properly dispose of the battery.
Remove battery from the socket before carrying out any adjustment, servicing
or maintenance.

6
COMPONENT LIST
1. Lock-o switch
2. On/o switch lever
3. Hose adapter
4. Battery protection cover
5. Power nozzle
6. Extension lance
7. Nozzle adapter
8. Multi-spray nozzle
9. Fixing nail
10. Hose connector
11. Hose lter
12. Floater
13. Hose
14. Hose clip
15. Carry bag
16. Hose lter (See Fig. E2)
Not all the accessories illustrated or described are included in standard delivery.
8
9
7 6
10 11 12 13 14
15
5
4
3
2
1

7
TECHNICAL DATA
Charger Voltage 120V~60Hz
Voltage 20V Max.**
Battery capacity
ABP118T 2.5Ah
ABP118T7 2.0Ah
HT19-401-003-17 2.5Ah
Charger rating
HT19-401-003-14 120V~60Hz, 50W
20V , 2.0A
HT19-401-003-13 120V~60Hz, 75W
20V , 3.0A
ACG318W1U 120V~60Hz, 18W
20V , 0.7A
Charging time 3hrs
Pressure Max. 320psi
Max water ow rate 0.53GPM
Weight (with lance) 2.8 lbs
The accessories of battery charger ( HT19-401-003-14 / HT19-401-003-13 ) and battery pack
(ABP118T / HT19-401-003-17 ) illustrated or described are not included in HT19-401-003-15
delivery.
20ft (6m) hose 1
Extension lance 1
Multi-Spray nozzle 1
Carry bag 1
Battery pack (ABP118T7) 1
Charger (ACG318W1U) 1
We recommend that you purchase your accessories listed in the above list from the same store that sold you
the tool. Refer to the accessory packaging for further details. Store personnel can assist you and oer advice.
ACCESSORIES

8
NOTE: Before using the tool, read the instruction book carefully.
Intended Use
This tool is intended for cleaning and watering.
ASSEMBLY & OPERATION
ACTION FIGURE
BEFORE OPERATION
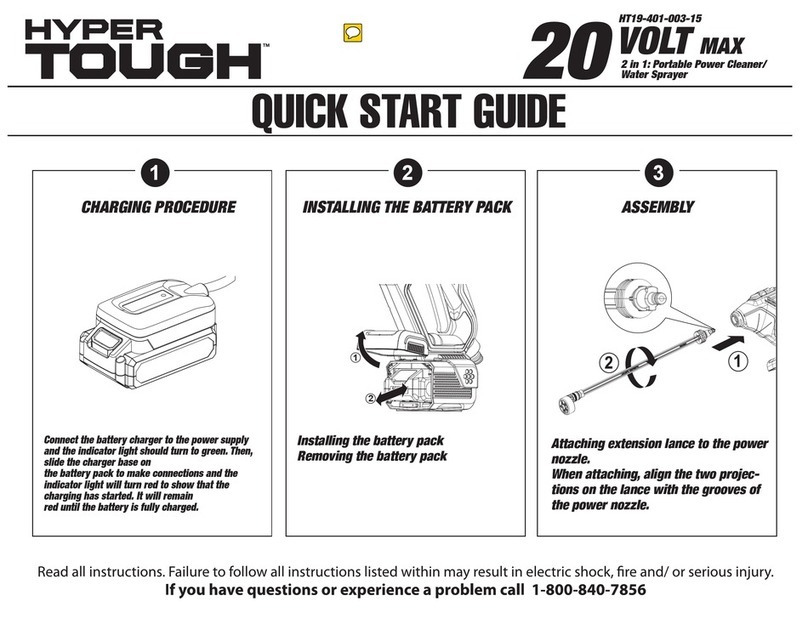
Installing the battery pack
NOTE: Before operation, make sure the battery is locked into position securely and the battery
protection cover is fully closed.
See Fig. A1
Removing the battery pack
Open the battery protection cover and press and battery pack release button repeatedly to get out the battery.
See Fig. A2
Charging the battery pack
More details can be found in the section“For battery charger”. See Fig. A3, A4, A5
ASSEMBLY
Attaching extension lance to the power nozzle
NOTE: When attaching, align the two projections on the lance with the grooves of the power nozzle as
shown in Fig. B.
See Fig. B
Attaching the multi-spray nozzle
NOTE: When attaching, gently pulling the nozzle to make sure it is locked into position securely. See Fig. C
Attaching the hose to the power nozzle
NOTE: After the draw hose is attached, check the connection by gently pulling upon the draw hose. It
should not be pulled o.
See Fig. D1, D2
Attaching your own water hose (optional)
1. Attach the quick connect adapter
2. Attach your household garden hose with suitable connectors
NOTE: Except for the draw hose supplied, you can also connect the power nozzle to your own water
hose with suitable connectors.
NOTE: Check whether the lter screen is missing before retightening the hose adapter. (Fig. E1, E2)
When retightening the hose adapter, please tighten securely. Otherwise, it may not draw any water for
proper operation.
WARNING: It is not recommended to connect the draw hose to your garden hose or your
home tap.
See Fig. E1, E2, E3
OPERATION
Selecting the nozzle pattern
NOTE: Choose a suitable nozzle pattern according to your work. Spray
patterns 0o, 15o, 25oand 40oare applicable for cleaning, and the spray
pattern with the symbol is best suitable for showering.
WARNING: Do not shift the nozzle pattern when the tool is powered on due to potential water
leakage.
Make sure the nozzle pattern symbol aligns with the indicator mark on tool, otherwise the nozzle will
leak and there will be no sucient pressure.
See Fig. F1, F2
Start
NOTE: At the rst use, you need to empty the air in hose, place the
power nozzle below waist level (<5ft/1.5m), then attach the pressure cleaning lance and set it at high
pressure. It does not start working until the water goes up along the hose and sprays out. This could
take up to 30 seconds or more depending on the fresh water source.
See Fig. G
Watering
NOTE: It is recommended to use the low pressure mode for watering. See Fig. H
Cleaning
WARNING:Do not connect the machine to water supplies that are dirty, rusty, muddy, or
corrosive. (Including window cleaning liquids, plant foods, or fertilizers etc.)
NOTE: Not recommended for use with salt water, immediately rinse with fresh water for proper maintenance.
See Fig. I, J
OPERATING INSTRUCTIONS

9
For battery charger
NOTE: The accessories of battery charger ( HT19-401-003-14 / HT19-401-003-13 ) and battery pack (ABP118T / HT19-401-003-
17 ) illustrated or described are not included in HT19-401-003-15 delivery.
(1) For charger ACG318W1U
CHARGING PROCEDURES (SEE FIG. A3)
Connect the battery charger to the power supply and the indicator light should turn to green. Then, slide the charger base on
the battery pack to make connections and the indicator light will turn red to show that the charging has started. It will remain
red until the battery is fully charged. A discharged battery at normal ambient temperature will take approximately 1.5 hours to
reach a full charge. When charging is completed, unplug the charger and remove the battery pack.
NOTE: green = power on;
red = charging.
(2) For charger HT19-401-003-14
IMPORTANT NOTES FOR CHARGING BATTERY
The battery in your new tool is not charged when it leaves the plant. Therefore it must be full charged before using the rst
time.
NOTE: If the battery pack is very hot you must remove your battery pack from the charger and allow your battery pack to cool
rst to ambient temperature and then recharging can be started.
To prevent damage to the Battery Pack, when charge runs out, please charge the battery to reach full or no less than half
charge before storage.
If the tool will not be used for long periods of time, charge the battery every 3-6 months.
CHARGING PROCEDURE (SEE FIG. A4)
1) Plug the charger into an appropriate outlet. The light will be green.
2) Slide the battery pack into the charger, the light will turn to red to indicate the charging process has started.
3) When charging is completed, the light will turn to green. The pack is now fully charged, unplug the charger and remove the
battery pack.
WARNING: When battery charge runs out after continuously use or exposure to direct sunlight or heat, allow time
for the tool to cool down before re-charging to achieve the full charge.
CHARGING INDICATOR
Light Status
Red on Charging
Green on Fully Charged
(3) For charger HT19-401-003-13
IMPORTANT NOTES FOR CHARGING BATTERY
The battery charger supplied is matched to the Li-ion battery installed in the machine. Do not use another battery charger.
The Li-ion battery is protected against deep discharging. When the battery is empty, the machine is switched o by means of a
protective circuit: The tool holder no longer rotates.
In a warm environment or after heavy use, the battery pack may become too hot to permit charging. Allow time for the battery
to cool down before recharging.
When the battery pack is charged for the rst time and after prolonged storage, the battery pack will accept a 100% charge
after several charge and discharge cycles.
CHARGING PROCEDURE (SEE FIG. A5)
1) Plug the charger into an appropriate outlet. The light will be green.
2) Slide the battery pack into the charger, the light will turn to red to indicate the charging process has started.
3) When charging is completed, the light will turn to green. The pack is now fully charged, unplug the charger and remove the
battery pack.
WARNING: When battery charge runs out after continuously use or exposure to direct sunlight or heat, allow time for the
tool to cool down before re-charging to achieve the full charge.
CHARGING INDICATOR
Light ON/OFF ash Status
Red on Charging
Green on Fully Charged

10
Symptom Possible causes Solution
Machine turns on but it
does not draw any water
or there is not sucient
pressure.
Power nozzle is too high from the
water source surface. Lower the machine below 5ft/1.5m.
Hose lter is blocked. Take out the hose lter and rinse the parts with clean
water. (See Fig. K1, K2)
The users garden hose is not well
connected to the machine.
Check and reattach the garden hose tightly. (See Fig.
E3)
Hose adapter looses. Tighten the hose adapter securely with a spanner.
The lter screen is missing. (See
Fig. E2)
Contact service agent to get a lter screen.
Pump, hose, or other parts are
frozen due to outside temperatures. Wait for the pump, hose or other parts to thaw.
Hose kinks. Straighten out the hose.
Additional air could be sucked into
the machine.
Remove the pressure cleaning lance to eliminate the
air or remove the multi-spray nozzle to drain all the
water completely. Then reattach the pressure cleaning
lance or the multi-spray nozzle.
Multi-spray nozzle leaks.
The nozzle pattern does not spray
correctly.
Make sure the nozzle pattern symbol aligns with the
indicator mark on tool.
Fixing nail of the multi-spray nozzle
loosens. Tighten it with a hex key.
Outlet pressure increases
suddenly. Multi-spray nozzle is blocked. Replace with a new multi-spray nozzle.
Machine drains out water
after stopping.
There is water remaining in the
lance and pump after stopping. Drain all the water completely before storage.
Machine does not start.
The battery pack is not attached
well. Reinstall the battery pack.
Battery pack is empty. Replace with a new battery pack or recharge the
battery pack.
Defective battery. Replace with a new battery pack.
Machine pressure is not
consistent.
Additional air could be sucked into
the machine.
Check connection between the hose adapter and the
draw hose.
It is at low pressure setting. No action need.
Machine stops
automatically.
Battery pack is empty. Replace with a new battery pack or recharge the
battery pack.
The multi-spray nozzle is blocked.
The current protection is activated.
Remove the multi-spray nozzle and turn on the
machine. If the machine works normally, replace with a
new multi-spray nozzle.
The inlet hose emerges
from the water.
There is water remaining in the
machine.
Drain all the water completely and then put the inlet
hose in the water.
TROUBLESHOOTING

11
1
2
1
2
1
2
1
2
16
1
2
D2 E1
E2 E3
F1 F2
G H
I J
K1 K2
A5 B
C D1
A1 A2
A3 A4

12
1
2
1
2
1
2
1
2
16
1
2
D2 E1
E2 E3
F1 F2
G H
I J
K1 K2
A5 B
C D1
A1 A2
A3 A4

13
1
2
1
2
1
2
1
2
16
1
2
D2 E1
E2 E3
F1 F2
GH
I J
K1 K2
A5 B
C D1
A1 A2
A3 A4

14
1
2
1
2
1
2
1
2
16
1
2
D2 E1
E2 E3
F1 F2
G H
I J
K1 K2
A5 B
C D1
A1 A2
A3 A4

15
Remove the battery pack from the tool before carrying out any adjustment, servicing or maintenance.
Inspect the product for damaged or worn parts before each use. Do not operate it if you nd damaged or worn parts. Contact
your supplier or the manufacturer for replacement parts.
Hose lter maintenance
Remove the hose lter from the hose and get out the strainer. Rinse the parts with clean water before reassembling. (See Fig.
K1, K2)
CLEANING/STORAGE
Before Storage, completely drain all the water from the machine and hose.
Clean the moulded plastic housing of the machine using a soft brush and clean cloth. Do not use water, solvents or polishes.
Store in a secure and dry place out of the reach of children. Do not place other objects on the product.
Store the machine and the accessories in a frost free place.
MAINTENANCE


Manual del operador
ADVERTENCIA: Lea, entienda y siga todas las Reglas de seguridad y las
Instrucciones de operación en este Manual antes de usar el producto.
Wal-Mart Stores, Inc., Bentonville, AR 72716
Para preguntas / comentarios, asistencia técnica o partes de reparación.
Por favor llámenos de forma gratuita al: 1-888-997-8875 (M-F 8am-6pm)
TM
Model No. HT19-401-003-15
2 en 1: Limpiador a presión/Rociador de agua portátil
3026035

18
TABLA DE CONTENIDOS
Instrucciones de Seguridad.......................................................................................................................................Páginas 19-20
Símbolos...................................................................................................................................................................................Página 21
Lista de partes........................................................................................................................................................................Página 22
Datos técnicos........................................................................................................................................................................Página 23
Accesorios................................................................................................................................................................................Página 23
Instrucciones de uso....................................................................................................................................................Páginas 24-25
Solución de problemas.......................................................................................................................................................Página 26
Mantenimiento......................................................................................................................................................................Página 31
CONSERVE ESTAS INSTRUCCIONES!
LEA Y COMPRENDA TODAS LAS INSTRUCCIONES!
ADVERTENCIA: Este producto puede exponerlo a químicos que incluyen plomo, ftalato, o bisfenol
A que se sabe en el Estado de California que causan cáncer, defectos de nacimiento u otros daños
reproductivos. Lave sus manos después de usarlo. Para más información visite www.P65Warnings.ca.gov.

19
¡ADVERTENCIA! Lea y comprenda todas las instrucciones. El no seguir todas las instrucciones a
continuación puede ocasionar descargas eléctricas, incendios y/o heridas graves.
Conserve todas las advertencias e instrucciones para consulta futura.
ADVERTENCIA: Este producto puede exponerlo a químicos que incluyen plomo, ftalato, o
bisfenol A que se sabe en el Estado de California que causan cáncer, defectos de nacimiento
u otros daños reproductivos. Lave sus manos después de usarlo. Para más información visite www.
P65Warnings.ca.gov.
INSTRUCCIONES IMPORTANTES DE SEGURIDAD
ADVERTENCIA –Al utilizar este producto, tome siempre las precauciones básicas, incluidas las siguientes:
1. Lea todas las instrucciones antes de usar el producto.
2. Para reducir el riesgo de lesiones, es preciso vigilar atentamente si se usa el producto cerca de niños.
3. Es necesario saber cómo parar rápidamente el producto y parar hemorragias. Estar familiarizado con los
mandos.
4. Estar atento, prestar atención a lo que se está haciendo.
5. No ponga en funcionamiento el producto si está cansado o está bajo la inuencia de alcohol o drogas.
6. Mantenga la zona de trabajo libre de personas.
7. No sobrecargar o colocar sobre un soporte inestable. Mantener el equilibrio en todo momento.
8. Seguir las instrucciones de mantenimiento especicadas en el manual.
9. ADVERTENCIA - Riesgo de inyección o lesiones – no dirigir el chorro directamente sobre personas.
10. No rocíe el aparato y cableado eléctrico.
CONSERVE ESTAS INSTRUCCIONES.
Advertencias generales de seguridad para la batería
a) No desensamble, abra o triture el paquete de batería.
b) No exponga el paquete de batería a calor o fuego. Evite guardar a la luz directa del sol.
c) No ponga en corto circuito el paquete de batería. No guarde el paquete de batería de forma
aleatoria en una caja o cajón donde puedan ponerse en corto circuito entre sí o ponerse en corto
circuito por otros objetos metálicos. Cuando el paquete de batería no esté en uso, manténgalo alejado
de otros objetos metálicos, como sujetadores de papel, monedas, llaves, clavos, tornillos u otros objetos
metálicos pequeños que puedan establecer una conexión de una terminal a otra. El corto circuito de las
terminales de la batería puede causar quemaduras o incendios.
d) No retire el paquete de la batería de su empaque original hasta que se requiera para el uso.
e) No someta el paquete de batería a impacto mecánico.
f) En el caso de fuga de la batería, no permita que el líquido entre en contacto con la piel o los ojos. Si
hay contacto, lave el área afectada con bastante agua y busque atención médica.
g) Observe las marcas positiva (+) y negativa (–) en la parte posterior de la batería y el equipo para
asegurar su uso correcto.
h) No use ningún paquete de batería que no esté diseñado para uso con el equipo.
i) Mantenga el paquete de batería fuera del alcance de los niños.
j) Busque atención médica de inmediato si se ingiere una celda o una batería.
k) Siempre adquiera el paquete de batería recomendado por el fabricante del dispositivo para el
equipo.
l) Mantenga el paquete de batería limpio y seco.
m) Limpie las terminales del paquete de batería con una tela seca limpia su se ensucian.
n) El paquete de batería se necesita cargar antes del uso. Siempre use el cargador correcto y consulte
las instrucciones del fabricante o el manual del equipo para saber las instrucciones correctas de
carga.
o) No deje el paquete de batería en carga prolongada cuando no esté en uso.
SEGURIDAD DEL PRODUCTO

20
p) Después de periodos prolongados de almacenamiento, puede ser necesario cargar y descargar el
paquete de batería varias veces para obtener el desempeño máximo.
q) El paquete de batería proporciona su mejor desempeño cuando se opera en temperatura ambiente
normal (68°F ± 9°F).
r) Cuando deseche los paquetes de batería, mantenga los paquetes de batería de diferentes sistemas
electromecánicos separados entre sí.
s) Recargue únicamente con el cargador especicado. No use cargadores que no sean los
especícamente suministrados para uso con el equipo. Un cargador que es adecuado para un tipo de
paquete de batería puede crear un riesgo de incendio cuando se usa con otro paquete de batería.
t) Conserve la literatura el producto original para referencia futura.
u) Sólo use el paquete de batería en la aplicación para la que está diseñado.
v) Retire el paquete de batería del equipo cuando no esté en uso.
w) Deséchelo adecuadamente.
Información para emisiones radiadas
Este dispositivo cumple con la Canadiense de las normas de la ICES-001.
Este dispositivo cumple con la sección 15 de las normas de la FCC.
Su operación está sujeta a las siguientes dos condiciones:
1) Este dispositivo no puede causar interferencia dañina y
2) Este dispositivo debe aceptar cualquier interferencia que reciba, incluyendo aquella interferencia que podría
producir una operación no deseada.
Advertencia: Los cambios o las modicaciones que se le realicen a esta unidad sin aprobación expresa del
tercero responsable del cumplimiento pueden anular la autorización del usuario para operar el equipo.
- NOTA: Este equipo ha sido probado y se ha encontrado que cumple con los límites establecidos para
dispositivos digitales Clase B, en conformidad con la Parte 15 del Reglamento de la FCC.
Estos límites están diseñados para ofrecer un nivel razonable de protección contra la interferencia dañina en
instalaciones residenciales. Este equipo genera, utiliza y puede emitir energía de radiofrecuencia y, si no se
instala y utiliza de acuerdo a las instrucciones proporcionadas, puede producir una interferencia dañina a la
comunicación radial.
Sin embargo, no existen garantías de que no ocurra interferencia alguna en una instalación en particular. Si
este equipo produce interferencia dañina a su recepción radial y de televisión, lo que puede ser determinado al
apagar y volver a encender el equipo, se pide al usuario que corrija la interferencia implementando una o más
de las siguientes medidas:
• Cambie la orientación o el lugar donde está ubicada la antena receptora.
• Aumente el espacio que separa al equipo del receptor.
• Conecte el equipo a una toma de corriente que esté en un circuito diferente al circuito al que está
conectado el receptor.
• Consulte con el concesionario o con un técnico de radio y televisión con experiencia que pueda ayudarle.
Table of contents
Languages:
Other Hyper Tough Paint Sprayer manuals