manuals.online logo
Brands
  1. Home
  2. •
  3. Brands
  4. •
  5. HYSEN
  6. •
  7. Thermostat
  8. •
  9. HYSEN HY01RF User manual

HYSEN HY01RF User manual

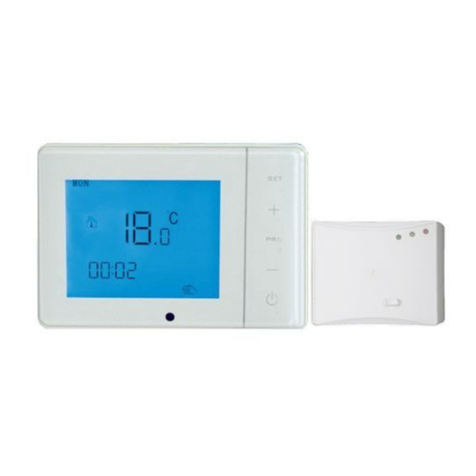
HY01RF Wireless Thermostat User Manual
Many thanks for your selection of our products and services, and also for your trust and support to us
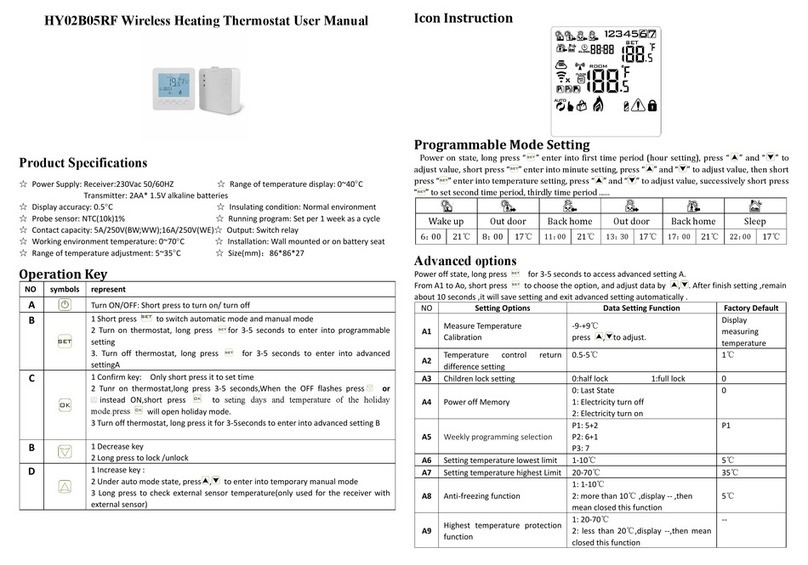
Product Specification
☆Power: two AA* 1.5V alkaline batteries ☆Display accuracy: 0.5°C or 1°F
☆Range of temperature display: 0~40°C/32~104°F☆Output: Switch relay
☆Insulating condition: Normal environment ☆Probe sensor: NTC(10k)1%
☆Running program: Set per 1 week as a cycle ☆Size(mm): 130*90*27 And 107*78*28
☆Installation: Wall mounted or on battery seat ☆Contact capacity: 16A/220V(RF electric heating)
☆Working environment temperature: 0~70°C/32~122°F 5A/220V(RF gas boiler heating)
☆Range of temperature adjustment: 5~35°C/41~95°F 3A/220V(RF water heating)
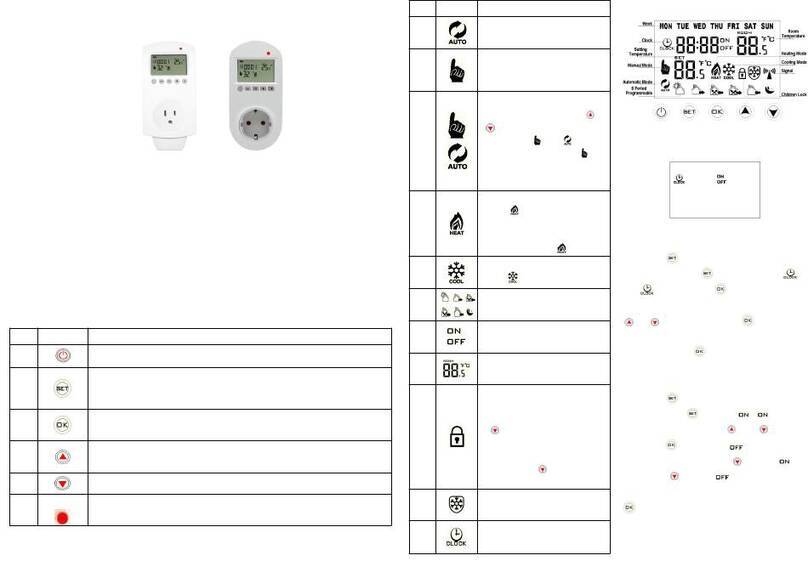
Displays & Buttons
Operation Key
NO:
symbols
represent
A
set key: short press it to switch programme mode to manual mode. At programme mode,
press “ ”or” ” to adjust the value, it will automatic enter into temporary manual mode
B
Increasing key
C
clock key: short pressing is setting clock, long pressing is setting programme
Keys locked/unlocked:press “ ”and“ ”at the same time for 3 seconds
D
Decreasing key
E
Power on/off key
Run Mode
Factory Preset Mode
Interval
Monday to
Friday
the default
value
Saturday and
Sunday
the default
value
1st
06:00-08:00
20°C
06:00-08:00
20°C
2nd
08:00-11:30
15°C
08:00-11:30
15°C
3rd
11:30-13:30
15°C
11:30-13:30
15°C
4th
13:30-17:00
15°C
13:30-17:00
15°C
5th
17:00-22:00
22°C
17:00-22:00
22°C
6th
22:00-06:00
15°C
22:00-06:00
15°C
Sending condition of Thermostat
Send once for 20 minutes
Press on/off key
Switch over output state
Communication instruction,be long bright display in normal communication and blinking display in abnormal
communication
Transceiver tips
Transceiver LED display instruction:
Power light (green light):it’s bright when power on
Signal light(orange light):it’s long bright within 10s after power on (match IP),signal light off when it receive
match,signal light is blinking within 10s when power off.
Load light/fault light (red light):
A、When no fault:light on when load output,light off when no load output
B、When fault: light is blinking and indication when fault
Mode
explain
printscreen
Programming
mode
Press“ ”to switch into programme mode (As shown in
picture one)
Programme illustration
5+2 programme function(advanced options contain of 6+1
and 7 days programme function, you can also cancel this
programme function), that is Monday to Friday is the same
setting value, and Saturday to Sunday is the same setting
value。Every day can be divided into 6 time interval
Setting the programme value:long press“ ” to enter into
programme setting mode, then short press“ ”to switch,
press“ ”or“ ”to adjust value.
Manual Mode
Press “ ” to enter into manual mode (As shown in picture
two), press“ ”or“ ”to adjust value.
Temporary
manual mode
at programme mode,press “ ” or “ ” to adjust the value,
it will automatic enter into temporary manual mode
Signal light blink 1 time when it does not receive 485 signal for 1 hour (light on 0.25 seconds light off 0.25
seconds), spacing out the light for 2 seconds
IP is fault(IP:FFFF),light blink 2 times (light on 0.25 seconds light off 0.25 seconds), spacing out the light for 2
seconds
Light blink 3 times when it does not receive wireless signal for 1 hour (light on 0.25 seconds light off 0.25
seconds),spacing out the light for 2 seconds
Light blink 4 times when built-out sensor is fault (light on 0.25 seconds light off 0.25 seconds), spacing out the
light for 2 seconds
Advanced Options
Advanced options can be classified to two sets
MODE 1:
Turn off thermostat,long press for 3 seconds,it will display A01-A09,then press to switch between these options
Display
symbol
Option content
Press“ ”or“ ”to adjust value
temperature
compensation
(A01)
Press “ ”or“ ” key to adjust setting value (—9~9 ) increment:0.5°C.
Start
differential
temperature
(A02)
Range:1°C~5°C:
1.When the setting temperature is higher than or equal to the sum of indoor
temperature and the start differential temperature, the heating equipment will turn
on.
2.When the indoor temperature is higher than or equal to the sum of the setting
temperature and the start differential temperature, the heating equipment will turn
off.
Keypad (A03)
0 half locked:all keys are locked except for the on-off key;
1 full locked,all keys are locked including the on-off key.
high
temperature
protection
(A04)
Range:35~70 When the lowest setting temperature is 35°C,press “ ”,it will display
“ ”, high temperature protection function is canceled; if the indoor
temperature is higher than the high temperature protection value,the heating
equipment will be cut off.
low
temperature
protection
(A05)
Range:5°C~10°C ;When the highest setting temperature is 10°C,press “ ”,it will
display “ ”, low temperature protection function is canceled; if the indoor
temperature is lower than the low temperature protection value,the heating
equipment will turn on.
setting
temperature
lowest limiting
value(A06)
Range:1°C~10°C:
setting
temperature
highest
limiting value
(A07)
Range:30°C~70°C
Week
programme
choice(A08)
: represent 7days programme
:represent6+1 programme
:represent5+2 programme
“ ”represent programme is canceled
Transceiver I P
check ( A 0 9 ):
Within 10 seconds after transceiver power on,press “ ”key shortly,check
transceiver .Check successfully as shown
MODE 2:
Turn off thermostat, long press “ ” for 3 seconds it will display B01-B08,then press “ ” to switch between these
options
Display
symbol
Option content
Press“ ”or“ ”to adjust value
version number
(b01)
version number 1.0
IP high Setting
(b02)
Press “ ”or“ ” key to adjust setting value ( 0 ~ F F )
IP low setting
(b03)
Press “ ”or“ ” key to adjust setting value ( 1 ~ F F )
Write
transceiver IP
address
(b04)
Within 10 seconds after transceiver power on, press“ ”key to send address
valve
controlling
selection
(b05)
Press “ ”or“ ” key to adjust setting value, 0 valve is controlled by thermostat, 1
valve is not controlled by thermostat, Keep valve in closed state
Descaling
function
(b06)
Press“ ”or“ ”key to adjust setting value, 0 turn off, 1 turn on
Descaling function:continue to close valve for 100 hours and force to open valve for 3
minutes
Degrees Celsius
and
Fahrenheit
selection
(b07)
0= °C
1= °F
Factory reset
(b08)
Display Ao, long press PRG key,show all setting key and factory reset
Wiring Diagram
Gas wall hung boiler Electric Heating Water Heating
NO: Normally-Open point
NC: Normally-Closed point

Other HYSEN Thermostat manuals

HYSEN HY02TP WIFI User manual

HYSEN

HYSEN HY02TP WIFI User manual

HYSEN HY04BW User manual

HYSEN

HYSEN HY04BW User manual

HYSEN HY02TPR User manual

HYSEN

HYSEN HY02TPR User manual

HYSEN HY08AC User manual

HYSEN

HYSEN HY08AC User manual

HYSEN HY03WE-4 User manual

HYSEN

HYSEN HY03WE-4 User manual

HYSEN HY01RF User manual

HYSEN

HYSEN HY01RF User manual

HYSEN HY06RF-BW User manual

HYSEN

HYSEN HY06RF-BW User manual

HYSEN HY607 User manual

HYSEN

HYSEN HY607 User manual

HYSEN HY312WE User manual

HYSEN

HYSEN HY312WE User manual

HYSEN HY02B05RF User manual

HYSEN

HYSEN HY02B05RF User manual

HYSEN HY01WW User manual

HYSEN

HYSEN HY01WW User manual

HYSEN HY08AC User manual

HYSEN

HYSEN HY08AC User manual

Popular Thermostat manuals by other brands

Lava ET-6AW instructions

Lava

Lava ET-6AW instructions

thermotouch 5245W Installation & user guide

thermotouch

thermotouch 5245W Installation & user guide

Kenmore TSTAT0713K installation manual

Kenmore

Kenmore TSTAT0713K installation manual

Nibe RG 10 installation instructions

Nibe

Nibe RG 10 installation instructions

NuTone RFTH-95 quick start guide

NuTone

NuTone RFTH-95 quick start guide

Robertshaw 8400 user manual

Robertshaw

Robertshaw 8400 user manual

Radio Thermostat CT80 install guide

Radio Thermostat

Radio Thermostat CT80 install guide

Danfoss ECL Comfort 310, A376 installation guide

Danfoss

Danfoss ECL Comfort 310, A376 installation guide

Honeywell Home T3 Pro installation instructions

Honeywell Home

Honeywell Home T3 Pro installation instructions

Worcester Wave Installation and operating manual

Worcester

Worcester Wave Installation and operating manual

Elko TEV-2 manual

Elko

Elko TEV-2 manual

Immergas SMARTECH PLUS Instructions and warnings

Immergas

Immergas SMARTECH PLUS Instructions and warnings

Miller Optima Wifi Basic manual

Miller

Miller Optima Wifi Basic manual

HighLine CCU1 Installation and user manual

HighLine

HighLine CCU1 Installation and user manual

KING ECP Series General information

KING

KING ECP Series General information

Giacomini K470H Instruction

Giacomini

Giacomini K470H Instruction

ensto ECO10R Installation and operating instructions

ensto

ensto ECO10R Installation and operating instructions

White Rodgers 1F86-0244 Installation and operating instructions

White Rodgers

White Rodgers 1F86-0244 Installation and operating instructions

manuals.online logo
manuals.online logoBrands
  • About & Mission
  • Contact us
  • Privacy Policy
  • Terms and Conditions

Copyright 2025 Manuals.Online. All Rights Reserved.