HYSEN HY04BW User manual

1
Wall-hung Boiler Thermostat User Manual
Many thanks for your selection of our products and services, and also for your trust and support to us
HY04BW HY06BW
Product Specifications
Power: two AA* 1.5V alkaline batteries
Display accuracy:0.5℃or 1°F
Probe sensor:NTC(10k)1%
Contact capacity:
5A/30VDC(HF relay)
2A/30VDC(NEC relay);
Working environment temperature:
0~50°C/32~122°F
Range of temperature adjustment:
5~35°C/41~95°F
Range of temperature display:0~40°C/32~99°F
Output: Switch relay
Insulating condition: Normal environment
Running program: Set per 1 week as a cycle
Installation: Wall mounted or on battery seat
Size(mm):140*91*27 and 86*86*29
Function Description:
Thermostat HY04BW,HY06BW supplies single heating contact output or single cooling output contact,to get
room temperature via sensor and compare with thermostat setting temperature,achieve close and open of output
contact,switching temperature difference is 0.5℃
Display And Button
Operation Key
NO.
symbols
represent
A
Rotary Press Button
Increasing key,clockwise rotation
B
Rotary Press Button
1.Under turn on state,short press rotary key,switch automatic mode
and manual mode
2.Under turn on state,press rotary key for 3 seconds then move your finger
to enter into setting screen
3.Match with other keys,confirm key
B
Rotary Press Button
Decreasing key,anticlockwise rotation
C
Power on/off key and children lock key(long press power key for 3
seconds then move finger,lock or unlock children lock)
Main Setting Screen
Mode
Explain
Printscreen
Automatic
Mode
Short press rotary button,display icon,it will work as
automatic mode,show main screen as right picture.
Main Screen As Below
Manual
Mode
Short press rotary button,display icon,show main screen
as right picture.The setting default temperature of main
screen shows 23℃,
Temporary
manual
mode
under automatic mode and unlock state,rotary button to
adjust temperature,it will enter into temporary manual

2
mode,you can set required temperature.If you want to return
to automatic mode or manual mode,enter into setting screen
to reset it.It work to next interval,then will return to
automatic mode automatically,such as it works as temporary
mode at 8 o’clock,adjust temperature to 23℃,when it works
to 9 o’clock,it will return to automatic mode automatically.
Long press rotary ENTERY key for 3 seconds,enter into setting screen,choose the icon you need to set,rotates
the rotary press button to choose the icon you need to set,then press enter key enter into setting,skip the icon
that need not set directory.
Mode
Explain
Printscreen
Frost
Protection
Mode
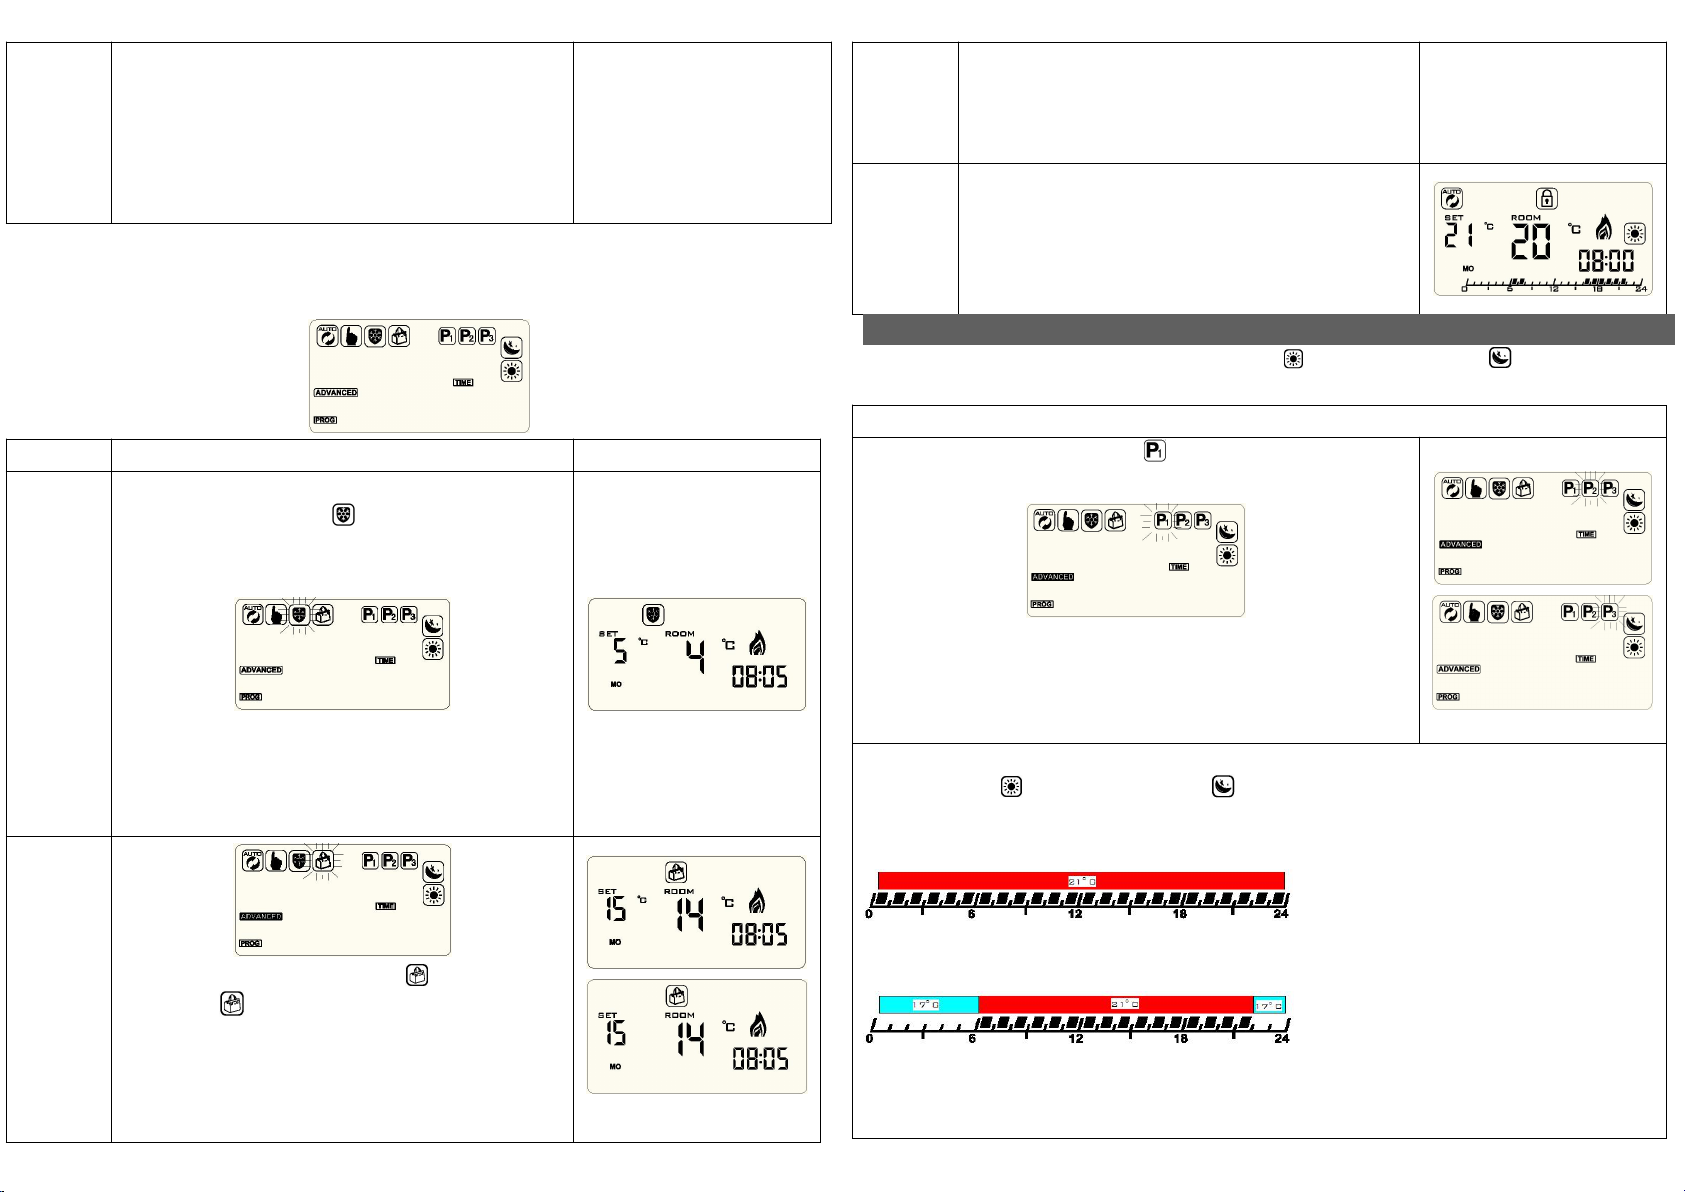
After enter into setting screen,rotates rotary press button to
choose frost protection mode icon,press rotary button to
work at frost protection mode,main screen display as right
picture.
Frost protection mode,default setting temperature is 5℃.
If you want to quit frost protection mode,please long press
rotary key to back to setting screen,rotate rotary press button
to choose another setting icon required to quit this mode.
Holiday
Mode
Rotates rotary press button to choose holiday mode,you
can see icon flashing,press rotary button to enter into
holiday mode,see right picture,setting temperature
flashing,you can rotate rotary press button to set
temperature,such as 15 ℃.Default temperature is 15℃,then
after press rotary button to set holiday days,rotates rotary
press button to adjust days(countdown from holiday
starting,back to work at automatic mode after holiday
ends),then press rotary button to confirm and exit mode
setting,back to main screen as right picture.
Children
Lock
Long press power on/off key for 3 seconds then move your
finger,when lock icon display on screen,rotary press button
can’t be used,if it need unlock,press power on/off key for 3
seconds again then move your finger,lock icon
disappears,rotary press button can be used again.
Programmable Mode Setting
HY04BW,HY06BW wall-hung boiler thermostat can set (comfortable mode) and (energy- saving mode)
two kinds of different temperature;it offers P1、P2、P3 three kinds of program to choose
Mode Setting
Rotate rotary press button to choose programmable mode,press rotary
button for one time.
Rote rotary press button to choose one program of P1、P2、P3,press rotary
button to confirm the program you choose,press it again exit and back to
last screen;it automatically exit setting after 5 seconds and back to display
main screen.
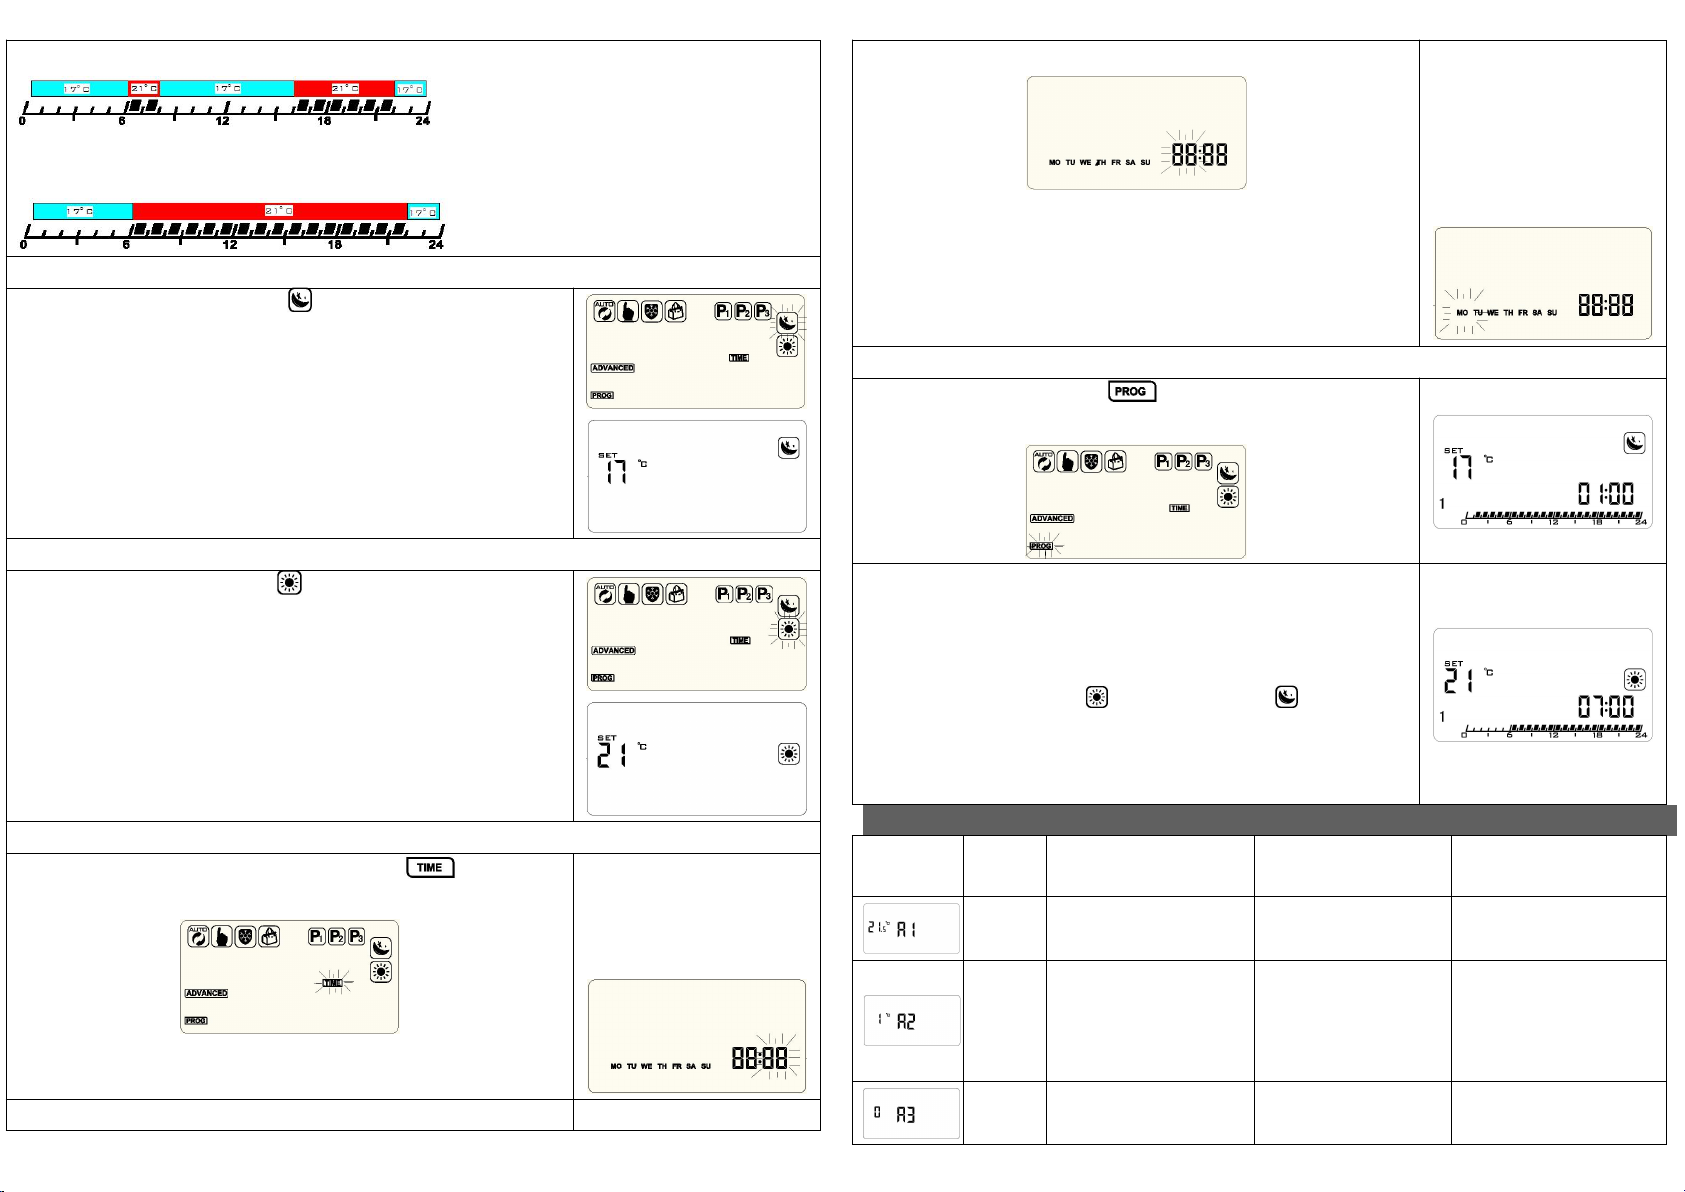
P1:work in manual program:7 days one week,24 hours,different time different temperature,it can be set as
comfortable mode or energy-saving mode ,low temperature rhombus is energy-saving rhombus,the
small black rhombus do not display,high temperature rhombus is comfortable rhombus,the small black
rhombus display.(programmable mode refer to manual program mode.
P2:7 days one week,from 22:00-6:00,temperature is energy-saving mode temperature,from 6 :00-22 :
00,temperature is 21℃comfortable mode temperature,time and temperature is default,they can’t be modified.
P3:from 22:00-6:00,temperature is 17℃energy-saving mode temperature,from 6 :00-8:00,temperature is
21℃comfortable mode temperature, from 8:
00-16:
00,temperature is 17℃energy-saving mode temperature,
from 16:00-20:
00,temperature is 21℃comfortable mode temperature.time and temperature is default,they

3
can’t be modified. From Monday to Friday is working day.
Weekend:from 22:00-6:00,temperature is 17℃energy-saving mode temperature,from 6 :00-22 :
00,temperature is 21℃comfortable mode temperature,time and temperature is default,they can’t be modified.
Energy-saving Mode Temperature Setting
Rotate rotary press button to choose energy-saving mode,press rotary
button to enter into energy-saving mode temperature setting,you can rotate
rotary press button to set temperature,such as 15℃,default is 17℃.press
rotary button again to confirm and back to last screen;it automatically exit
setting after 5 seconds and back to display main screen.
Comfortable Mode Temperature Setting
Rotate rotary press button to choose comfortable mode,press rotary
button to enter into comfortable mode temperature setting,you can rotate
rotary press button to set temperature,such as 21℃,default is 21℃.press
rotary button again to confirm and back to last screen;it automatically exit
setting after 5 seconds and back to display main screen.
Timer Setting
At setting screen,rotate rotary press button to choose ,press rotary
button.
Minute flashing,you can rotate
rotary press button to adjust
value,press rotary button to
confirm.
Hour flashing,you can rotate rotary press button to adjust value,press rotary
Week Flashing,you can rotate
button to confirm.
rotary press button to choose
week day,press rotary button
to confirm and back to last
setting screen;it exits setting
automatically,back to display
screen.
Manual Program
Enter into setting screen,choose ,press rotary button to enter into
manual program.
From 0-23,the choosing rhombus flashing,rotate rotary press button to
choose comfortable mode or energy-saving mode,then press rotary button
to confirm,jump to next rhombus,by this analogy,following is the setting of
from Monday to Friday;
Notes:set as comfortable mode or energy-saving mode low
temperature rhombus is energy-saving rhombus,the small black rhombus
do not display,high temperature rhombus is comfortable rhombus,the small
black rhombus display.
Advanced Options
No.
Symbol
Setting Item
Parameter Setting
Function
Factory Default
A1
Measuring temperature
calibration
-9-+9℃
0.5℃accuracy calibration
A2
External sensor limit
temperature control
hystersis
1-5℃:
(SET±0.5℃—SET±2.5
℃),default is 2℃
(SET±1℃)
2℃
A3
Children lock setting
0:half lock
1:full lock
0

4
A4
Programmable and
non-programmable
option
n0:programmable
n1:non-programmable
n0:programmable
A5
External sensor high
temperature limit value
35℃-50℃
45℃
A6
External sensor low
temperature limit
value(frost protection)
5℃-10℃
5℃
A7
Setting temperature
lowest limit value
1-10℃
5℃
A8
Setting temperature
highest limit value
30-50℃
35℃
A9
Descaling function
0:descaling function
close;
1:descaling function
open
Descaling
function:when valve is
continuously closed
over 100 hours,it will
be opened for 3 minutes
automatically.
0:descaling function close
AC
Temperature unit
switch: °C Or °F
Celsius degree or
Fahrenheit degree
0=°C
1=°F
0=°C
AE
Restore to factory default
setting
Display A o, press wind
rotary button whole
show
Cautions On Installation And Use
1. To prevent the thermostat display from a high fluctuation, special treatment has been made to the
program. Therefore, it is
normal that the thermostat cannot immediately display the sudden change of temperature.
2. The thermostat installed on 1.5m above the ground.
3. For the thermostat installed,please take care not to install it to the wall corner, door / window side or
behind the door or in such
unheated area as exterior wall. Avoid hot / cold air duct, radiator, flue or thermal pipe.
4. If you have any problem for the installed ,please contact our company Hysen, we will make a
demonstration for you
5. Only the professional technicians are permitted to open the transmitting and receiving box of the
thermostat for installation. When install the power supply, make sure that the power cable is well
insulated.
6. The thermostat is unrepairable product. The user shall not open the internal circuit board.
7. Before installing the thermostat, make sure that the system is disconnected. The maximum voltage of the
system shall meet the requirements specified in the Instruction Manual (Max. AC Voltage: 250V).
Wiring Illustration
Wiring Terminals
Wiring Terminal
Remarks
1
COM (Public terminal of relay)
2
NO (Normally-Open point)
3
NC (Normally-Closed point)
Warranty:
We offer the warranty of 12 months, from the sales day. The products of our company can have lifetime
warranty ,if it is not the quality problems, or beyond the warranty period, we will charge for the
after-sale service.
Installation

5
HY04BW Installation:
HY06BW Installation:
This manual suits for next models
1
Table of contents
Other HYSEN Thermostat manuals

HYSEN
HYSEN HY01RF User manual

HYSEN
HYSEN HY02TP WIFI User manual

HYSEN
HYSEN HY08AC User manual

HYSEN
HYSEN HY06RF-BW User manual

HYSEN
HYSEN HY312WE User manual

HYSEN
HYSEN HY607 User manual

HYSEN
HYSEN HY02B05RF User manual

HYSEN
HYSEN HY01WW User manual

HYSEN
HYSEN HY02TPR User manual

HYSEN
HYSEN HY08AC User manual