Hytera PD56X R5.6 User manual

数字手持终端
DIGITAL PORTABLE RADIO
使用说明书
OWNER’S MANUAL


DIGITAL PORTABLE RADIO
Preface
Thanks for your favor in our product. This manual is helpful for you to quickly know how to
use the product. Please refer to the corresponding Feature Book for detailed features and
operations.
This manual is applicable to the following product:
PD56X Digital Portable Radio (X may represent 2, 5, 6 or 8)

Instructional Icons
Indicates functions that are available on digital channel only.
Indicates functions that are available on analog channel only.
Functions marked with neither the above icons are available on both analog and digital channels.
Disclaimer
Hytera Communications Corporation Limited (the Company) endeavors to achieve the accuracy and completeness of this manual, but no warranty of
accuracy or reliability is given. All the specications and designs are subject to change without notice due to continuous technology development. No part
of this manual may be copied, modied, translated, or distributed in any manner without the express written permission of us.
We do not guarantee, for any particular purpose, the accuracy, validity, timeliness, legitimacy or completeness of the Third Party products and contents
involved in this manual.
If you have any suggestions or would like to learn more details, please visit our website at: http://www.hytera.com.
RF Radiation Information
This product must be restricted to operations in an occupational/controlled RF exposure environment. Users must be fully aware of the hazards of the
exposure and able to exercise control over their RF exposure to qualify for the higher exposure limits.
RF Radiation Prole
Radio Frequency (RF) is a frequency of electromagnetic radiation in the range at which radio signals are transmitted. RF technology is widely used in
communication, medicine, food processing and other elds. It may generate radiation during use.
RF Radiation Safety
In order to ensure user health, experts from relevant industries including science, engineering, medicine and health work with international organizations to
develop standards for safe exposure to RF radiation. These standards consist of:

●United States Federal Communications Commission, Code of Federal Regulations; 47CFR part 2 sub-part J;
●American National Standards Institute (ANSI)/Institute of Electrical and Electronic Engineers (IEEE) C95. 1-1992;
●Institute of Electrical and Electronic Engineers (IEEE) C95.1-1999;
●International Commission on Non-Ionizing Radiation Protection (ICNIRP) 1998.
FCC Regulations
Federal Communication Commission (FCC) requires that all radio communication products should meet the requirements set forth in the above standards
before they can be marketed in the U.S, and the manufacturer shall post a RF label on the product to inform users of operational instructions, so as to
enhance their occupational health against exposure to RF energy.
Operational Instructions and Training Guidelines
To ensure optimal performance and compliance with the occupational/controlled environment RF energy exposure limits in the above standards and
guidelines, users should transmit not more than 50% of the time and always adhere to the following procedures:
●RF energy will be generated only when the radio is transmitting.
●The radio must be 2.5 centimeters away from human body when transmitting.
EU Regulatory Conformance
As certied by the qualied laboratory, the product is in compliance with the essential requirements and other relevant provisions of the Directive 1999/5/
EC.
Please note that the above information is applicable to EU countries only.

Contents
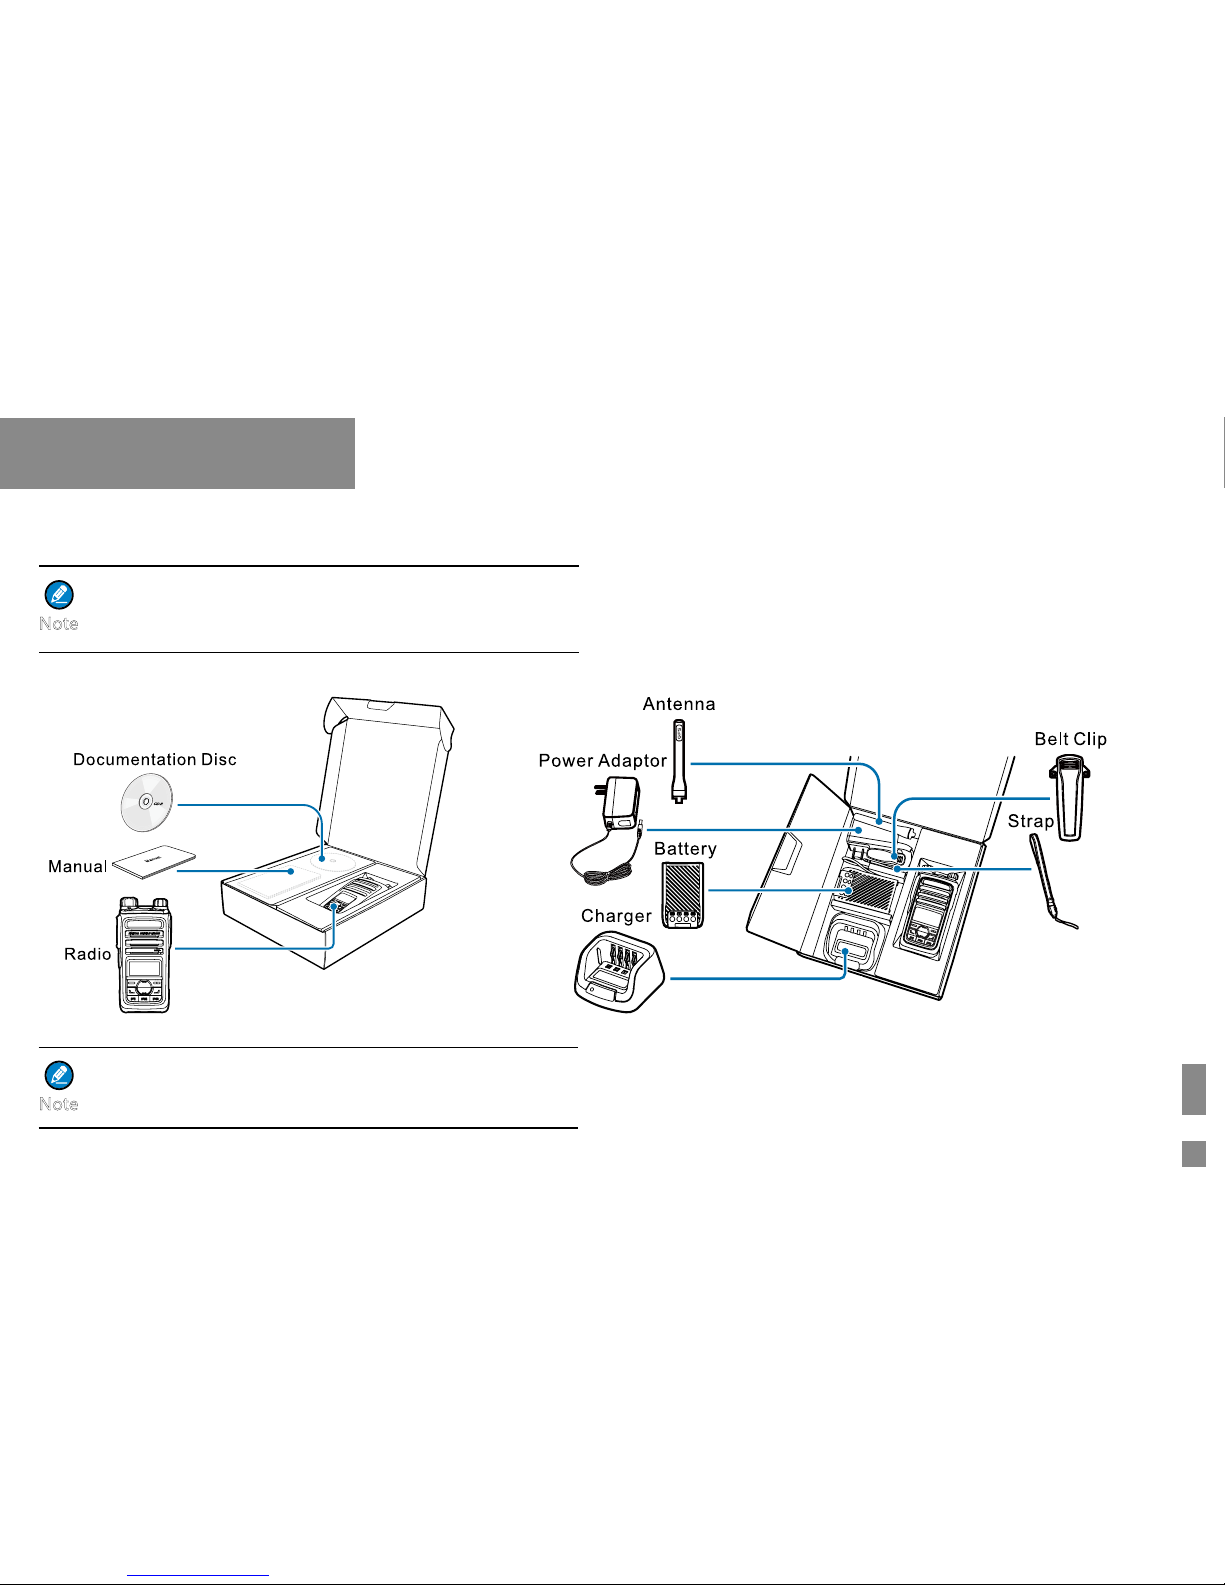
Items in the Package----------------------------------------1
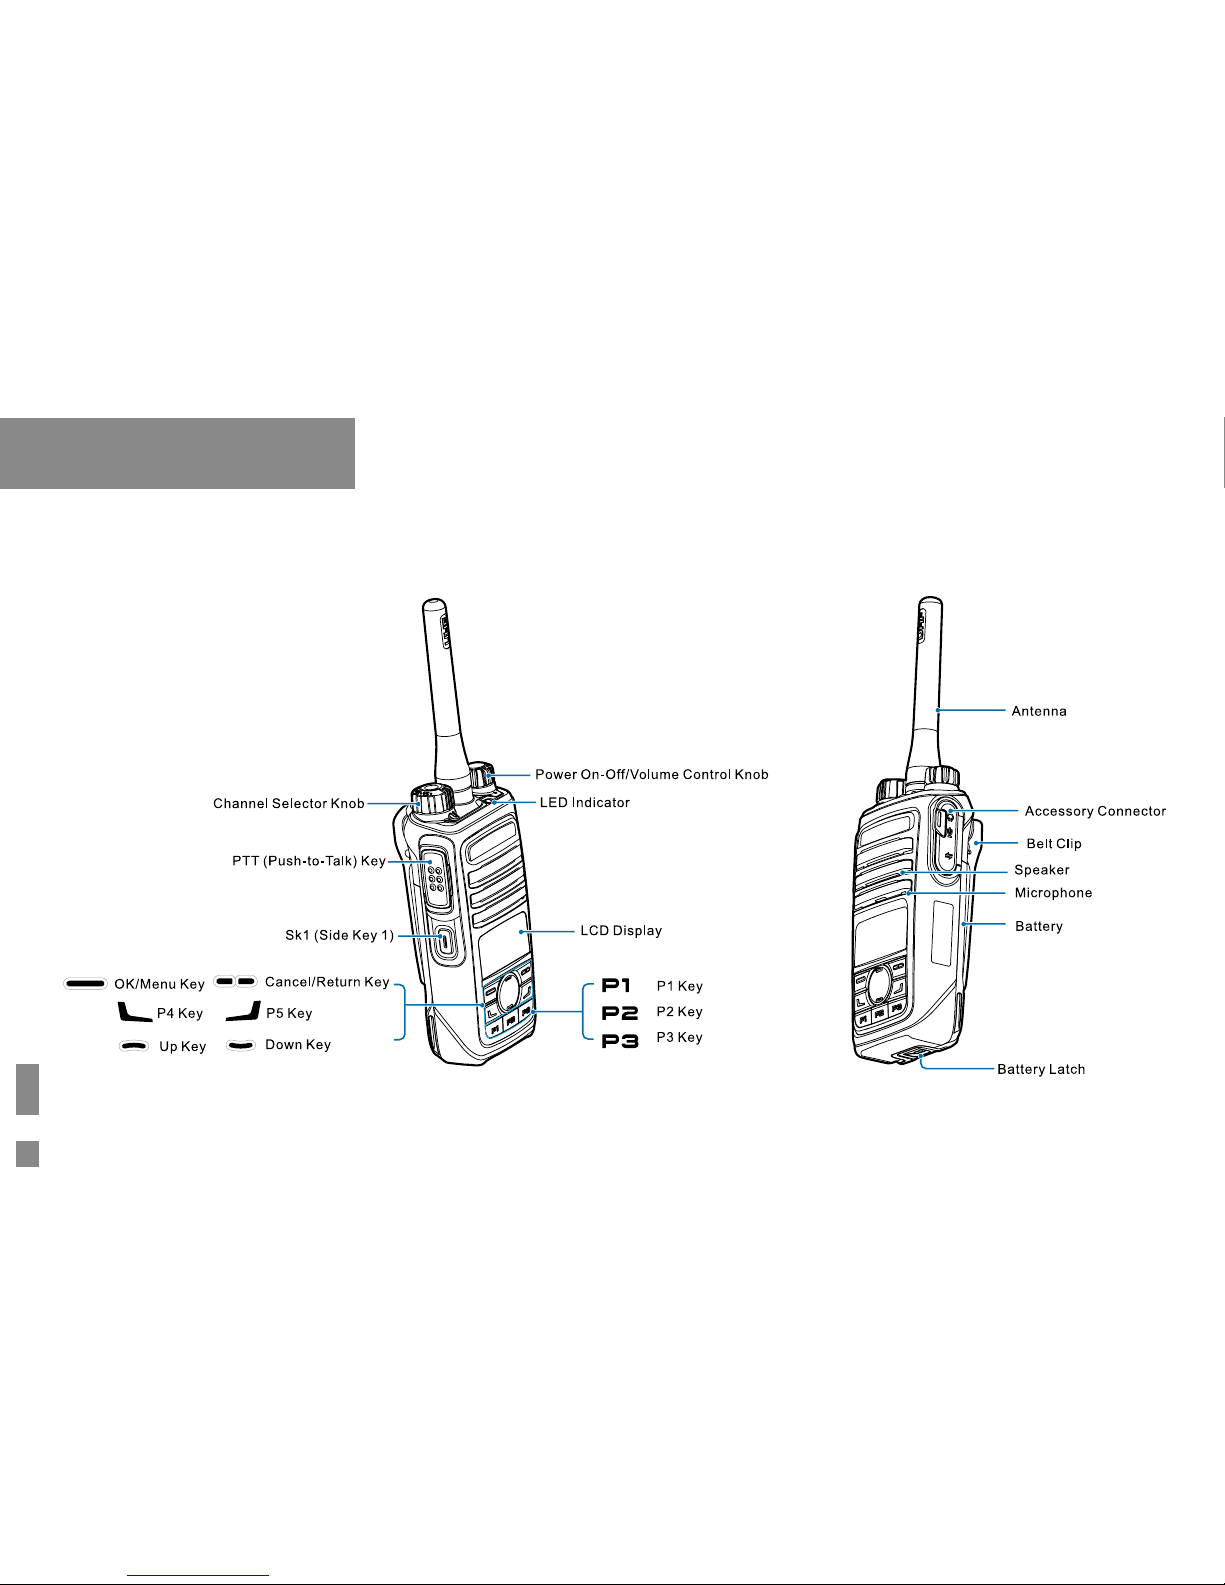
Product Overview --------------------------------------------2
Product Controls ---------------------------------------------------2
Programmable Keys ----------------------------------------------3
Before Use------------------------------------------------------3
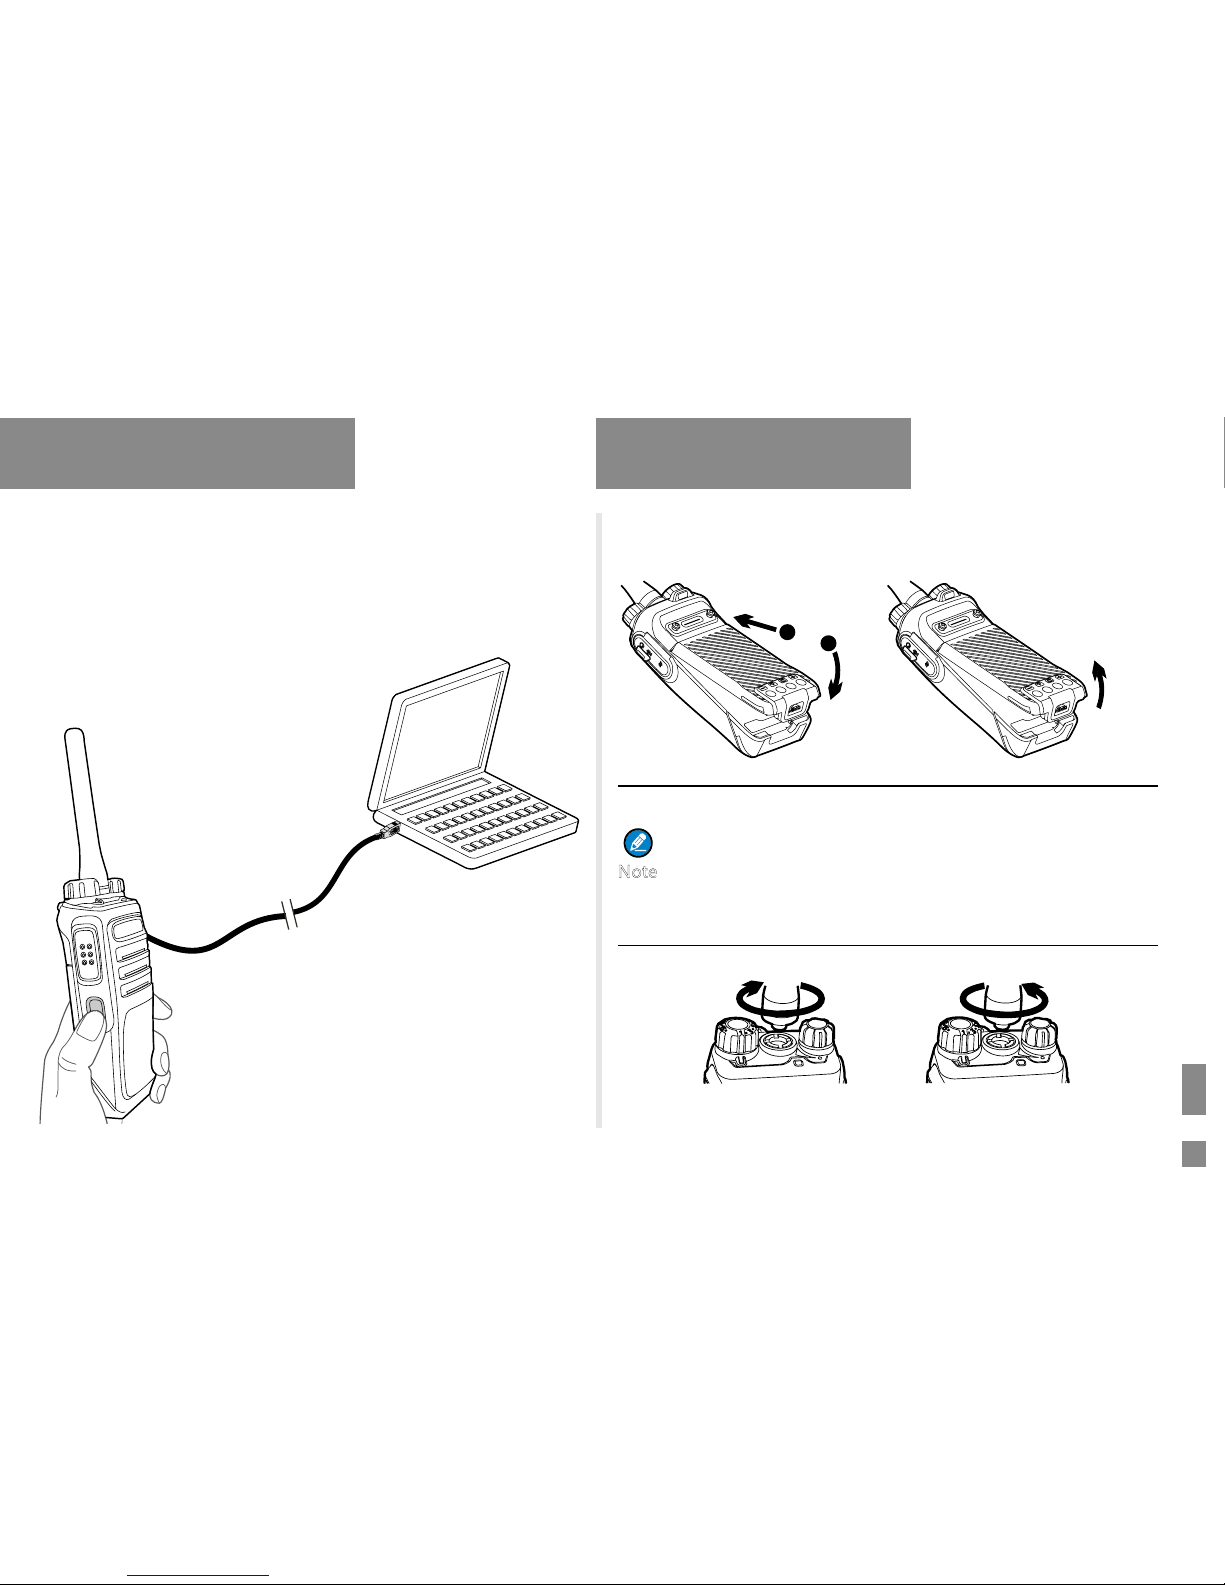
Attaching the Battery ----------------------------------------------3
Attaching the Antenna --------------------------------------------3
Attaching the Belt Clip --------------------------------------------4
Attaching the Accessories ---------------------------------------4
Charging the Battery ----------------------------------------------4
Status Indication ---------------------------------------------5
LCD Icon -------------------------------------------------------------5
LED Indicator -------------------------------------------------------6
Menu Navigation----------------------------------------------6
Basic Operations---------------------------------------------7
Powering On/Off ---------------------------------------------------7
Adjusting the Volume ---------------------------------------------7
Selecting a Zone ---------------------------------------------------7
Selecting a Channel -----------------------------------------------7
Locking and Unlocking the Keypad --------------------------8
Managing the Contacts -------------------------------------8
Call Services---------------------------------------------------9
Call on Digital Channel -------------------------------------------- 9
Call on Analog Channel ------------------------------------------ 10
Message Service -----------------------------------------11
Feature Description -----------------------------------------11
Troubleshooting ----------------------------------------------13
Care and Cleaning -------------------------------------------14
Optional Accessories ---------------------------------------15

1
Items in the Package
Note
All pictures in this manual are for reference only.
Note
Please unpack carefully and check that all items listed below are
received. If any item is missing or damaged, please contact your dealer.
The frequency band is marked on the label of antenna; if
not, please refer to the label on the radio for frequency
band information.

2
Product Overview
Product Controls

3
Product Overview Before Use
Assemble Disassemble
“click ”
12
“click ”
Assemble Disassemble
Note
Programmable Keys
For enhanced convenience, you may request your dealer to program the
SK1, P1, P2, P3, P4 and P5 as shortcuts to certain functions. Please
refer to the corresponding Feature Book for more details.
Attaching the Battery
●To remove the battery, turn off the radio first.
●If not attached with battery specified by Hytera, the radio
will give an alarm tone to remind you when powering on.
Afterwards, the radio will operate properly but the icons
of battery power and RSSI will remain unchanged during
operation.
Attaching the Antenna

4
Charging the Battery
Charging Status Indication (on charger):
●Make sure the radio is powered off before charging.
Read the Safety Information Booklet in advance to get
necessary safety information.
●To achieve optimal battery performance, please charge
the battery for at least 5 hours before initial use.
123
12
Remove the screws Assemble the Belt Clip
Before Use
LED Indication Current Status
The LED Indicator ashes orange slowly Low current charging
The LED Indicator ashes red slowly Standby (no load)
The LED Indicator glows red Charging
The LED Indicator glows orange 90 % 90% charged
The LED Indicator glows green 100 %Fully charged
The LED Indicator ashes red rapidly Charging error
Charging the Radio Charging the Battery
Caution
Caution
Do not hold the radio by its antenna, otherwise the
performance and lifespan of the antenna will be reduced.
Attaching the Belt Clip
Attaching the Accessories

5
Status Indication
LCD Icon
Icon Name Icon Radio Status
Battery Power
Icon
More bars indicate more battery
power.
TX Power Icon Low power for the current channel.
High power for the current channel.
Accessory Icon An accessory is connected.
Operation
Mode Icon
DM
Direct Mode Operation: Under this
mode, radios can communicate
with each other directly.
RM
Repeater Mode Operation: Under
this mode, radios communicate
with each other via a repeater.
Monitor Icon The Monitor feature is enabled.
Roam Icon The radio is roaming.
Scrambler/
Encrypt
The Scrambler/Encrypt feature is
enabled.
Scan Icon
The radio is scanning.
The radio stays on a non-priority
channel.
The radio stays on Priority Channel
1.
The radio stays on Priority Channel
2.
Icon Name Icon Radio Status
VOX Icon The VOX feature is enabled.
Missed Call
Icon Missed call(s).
Message Icon
Unread message(s).
Inbox is full.
RSSI Icon
No signal.
More bars indicate better signal
strength.
Speaker Icon The speaker is unmuted.
LQO Icon The LQO feature is enabled.
Call/Contact
Icon
●Indicates Private Call during a
call.
●Indicates Private Contact in the
contact list.
●Indicates Group Call during a
call.
●Indicates Group Contact in the
contact list.
●Indicates All Call during a call.
●Indicates All Call Contact in the
contact list.

6
Status Indication
LED Indicator
LED Indication Product Status
The LED indicator ashes green Powering on
The LED indicator glows green Receiving
The LED indicator glows red Transmitting
The LED indicator ashes orange slowly Scanning or roaming
The LED indicator ashes orange rapidly Emergency
The LED indicator glows orange
Call hung. During a call,
you can hold down the
PTT key to talk to the
other party before the call
hang time expires.
LED
Menu Navigation
The following menu structure shows all the customizable menu
items, which can be programmed by your dealer as per your actual
requirements.
To select and confirm the options shown in the menu, press the OK/
Menu key and then press the Up or Down key to select your needed
option, finally press the OK/Menu key. This manual only provides a
menu path when instructing menu operations, for example, to access the
contact list, go to “Contact -> Contact List”.
The radio supports menu reset function. When you do not operate the
menu for a preset time period congured by the dealer, the radio will
automatically return to the home screen. You may request the dealer to
change the auto reset time or disable the feature.
Menu
Contact
Message
Call Log Settings
Zone
Contact
List
Favorite
Contact
Quick
Text
Outbox
Inbox
Outgoing
Incoming
Missed
Digital Mic AGC
Audio
Settings
Device
Information
Always Treble Boost
Scan
List
Scan
Scan
On/Off
LQO
Roam
Radio
Settings
Power
Level
Language
Backlight
Lightness
Keypad Lock
LED
Tones
Select Button
Lock
VOX
Covert Mode
Analog Mic AGC
Scrambler Squelch Level
Encrypt Rent
Battery
Roam
On/Off
Roam
List

7
Basic Operations
Selecting a Zone Selecting a Channel
“click ”
ON
- +
“click ”
OFF
Powering On/Off
Adjusting the Volume
Selecting a Zone
A zone is a group of channels exhibiting the same property, which is
programmed by your dealer and can facilitate convenient management
over the channel. The radio support 32 zones, and each zone consists of
up to 16 channels.
●Via the menu: Go to “Menu -> Zone”, press the Upor Down key
to select an appropriate zone, and then press the OK/Menu key to
conrm it.
●Via Programmable Keys: You can toggle to the appropriate zone by
pressing the programmed Zone Upor Zone Down key preset by your
dealer.
Selecting a Channel
After the radio is powered on, you can rotate the Channel Selector Knob
to select an appropriate channel. You can also switch to the designated
channel directly by pressing the programmed Preset Channel key preset
by your dealer.
If the Channel Notify feature is enabled by your dealer or by you via the
menu “Settings -> Radio Settings -> Tones”, the radio will announce the
channel number upon channel switching.

8
Basic Operations
Locking and Unlocking the Keypad
When the keypad is not in use, you can lock the keypad to avoid
mishandling. You can lock or unlock the keypad through any of the
following methods:
●Default: Long press P3 key to lock/unlock the keypad.
●Programmable Key: Press the programmed Keypad Lock key preset
by your dealer.
●Menu Navigation: Go to “Settings -> Radio Settings -> Keypad Lock”
to enable or disable the feature.
»Enable: The keypad will be locked automatically if there is no
radio operation within the preset time.
»Disable: The keypad will not be locked automatically. However,
you can lock or unlock the keypad via the default way or Keypad
Lock key mentioned above.
You can go to “Settings -> Radio Settings -> Select
Button Lock” to configure the lockable keys or knobs.
Managing the Contacts
You can manage the contacts via the “Contact” menu.
Contact List
The Contact List is used to save Private Call/Group Call/All Call contacts
information which is preset by the dealer. You can access the “Contact
List” menu by going to “Contact -> Contact List” or by pressing the
Note
programmed Contact List key.
In the “Contact List” menu, you can check the detailed contact information
(such as Call ID). You can send to a private call contact the following
commands: Alert Call, Radio Check, Remote Monitor (Optional), Radio
Enable (Optional) or Radio Disable (Optional). Please refer to Feature
Book for details.
Favorite Contact
The Favorite Contact is used to save regular Private Call/Group Call/All
Call contacts information which is congured by you. You can access the
“Favorite Contact” menu by going to “Contact -> Favorite Contact” or by
pressing the programmed Favorite Contact key.
You can add, view or delete the Favorite Contact information in the
“Favorite Contact” menu. You can send to a private call contact the
following commands: Alert Call, Radio Check, Remote Monitor (Optional),
Radio Enable (Optional) or Radio Disable (Optional). Please refer to
Feature Book for details.

9
2.5~5.0CM
Call Services
After the radio is powered on, you can make and receive calls. To ensure
optimal volume of the receiving radio, keep the microphone about 2.5 to
5 centimeters away from your mouth when transmitting.
The types of calls you may initiate are listed below:
●Private call: A call made to a private contact.
●Group call: A call made to the group contacts.
●All call: A call made to all the contacts on the current channel.
Call on Digital Channel
You can initiate a private call, group call or all call (programmed by your
dealer) through the same operations on digital channel. When calling
back, the radio will make a call to the calling party in private call and all
call (your radio must be programmed to allow you to call back in an all
call); but in group call, the radio will make a call to all parties involved
when calling back.
Here takes the private call between Radio A and Radio B as example:
●Preset contact
1. Radio A and Radio B select the same digital channel.
You may ask your dealer to preset a regular private call/group call/all
call contact for each digital channel.
2. Radio A holds down the PTT key to initiate a call.
By holding down the PTT key, Radio A can talk to the microphone
when the LED indicator glows red and the radio displays the icon
.
3. Radio B can receive the call without any operation. When receiving,
the LED indicator glows green and the radio displays the icon
.Radio B can hold down the PTT key to talk when the LED indicator
glows orange and the radio displays the icon .
If Radio B does not respond it, the radio will display appropriate
indications.
4. Radio A can receive the call without any operation. When receiving,
the LED indicator glows green and the radio displays the icon .
Radio A can hold down the PTT key to talk when the LED indicator
glows orange and the radio displays the icon .
If Radio A does not respond it, the call will end.

10
Call Services
●Contact List or Call Log
1. Radio A and Radio B select the same digital channel.
2. Radio A accesses the contact list via menu “Contact -> Contact List”,
“Contact -> Favorite Contact” or “Call Log -> Outgoing/Incoming/
Missed”.
3. Radio A presses the Upor Down key to select Radio B.
4. Radio A holds down the PTT key to initiate a call.
By holding down the PTT key, Radio A can talk to the microphone
when the LED indicator glows red and the radio displays the icon
.
5. Radio B can receive the call without any operation. When receiving,
the LED indicator glows green and the radio displays the icon
Radio B can hold down the PTT key to talk when the LED indicator
glows orange and the radio displays the icon .
If Radio B does not respond it, the radio will display appropriate
indications.
6. Radio A can receive the call without any operation. When receiving,
the LED indicator glows green and the radio displays the icon
Radio A can hold down the PTT key to talk when the LED indicator
glows orange and the radio displays the icon .
If Radio A does not respond it, the call will end.
The Call Hang Time (the duration of LED indicator glowing
orange) is preset by your dealer.
Note
Call on Analog Channel
●On the analog channel without signaling, the calling operations are
the same as that on the digital channel. The difference is that the
called parties are all the users on the channel, rather than the preset
contact for the channel.
●Please refer to the corresponding Feature Book for operation
description on how to make and receive calls on the analog channel
with signaling.

11
Message Service
You can send the Quick Text message directly. In the inbox, you can
reply, forward or delete the text message, and in the outbox you can also
resend, forward or delete the message.
Operation: Press the OK/Menu key and select the “Message” menu.
Quick Text
Quick Text are frequently used messages preset by your dealer. You can
select a Quick Text message and send it directly.
Inbox
The radio saves the received messages into the Inbox and gives every
message a corresponding icon to indicate its status.
●: Read message
●: Unread message
The inbox can save up to 20 received messages. When the Inbox is
full, the radio will display the icon , and the earliest message will be
overwritten by the latest one automatically.
Outbox
The radio saves the sent messages into the Outbox and gives every
message a corresponding icon to indicate its status.
●: The message is sent successfully.
●: The message is not sent successfully. In this case, you can
resend it.
The Outbox can save up to 20 sent messages. When the Outbox is full,
the earliest message will be overwritten by the latest one automatically.
Feature Description
Available features of this radio are listed below. Please refer to the
corresponding Feature Book for details.
Feature Type Detailed Feature
Radio Features
●Checking the Device Information
●Radio settings: Power Level, Language,
Backlight, Lightness, LED Indicator, Alert Tone
and Covert Mode
●Audio setting: Mic AGC, Always Treble Boost,
LQO, Audio Feedback Suppression
●Convenient functionality: Shortcuts, Call Log,
One Touch Call and VOX
●Rent
Conventional
Features
●Scan
●Talk Around
Digital Features
●Access management: Time-out-Timer (TOT)
and Transmission Management
●Basic voice services: Private Call and Group
Call
●Auxiliary voice service: All Call
●Message
●Security: Encryption
●Supplementary Services: Alert Call, Radio
Check, Remote Monitor (Optional), Radio
Enable (Optional) or Radio Disable (Optional)
●Patented features: Pseudo Trunking and Priority
Interrupt (Optional)
●Mobility management: Roam (Optional)

12
Feature Type Detailed Feature
Analog Features
●Access management: Time-out-Timer (TOT),
Transmission Management, Monitor, Squelch
Off and Adjust Squelch Level
●Call on Analog Channel (No Signaling)
●Security: Scrambler
●Signaling: HDC1200, 5-Tone and 2-Tone
Follow the instructions below when using the VOX
feature:
●You can only enable or disable the VOX feature for one
channel instead of all of the channels at a time.
●When using the VOX feature, holding down the internal
or external PTT key will disable the VOX feature for
the current channel. In such case, you can enable the
VOX feature by switching the channel, pressing the
programmed VOX key or restarting the radio.
●The VOX feature settings will remain the unchanged
when the radio is powering on and off.
●The VOX Gain Level includes Internal MIC VOX Gain
Level and External MIC VOX Gain Level, which can be
configured by your dealer or via the menu.
●The VOX MIC Selection can be set to Only External and
External First, which is set to Only External by default
Feature Description
and can be configured by your dealer.
●To use the VOX feature with an external microphone, make
sure the PTT/VOX switch is switched to “VOX” before
the radio is powered on and the VOX feature is enabled.
●No matter the VOX feature is enabled or disabled after
the radio is powered on, if the PTT/VOX switch is switched
to “PTT”, you can talk by holding down the internal or
external PTT key. In such case, switching the PTT/VOX
switch to “VOX” will keep the radio transmitting. To
make the radio function properly, switch the PTT/VOX
switch to “PTT” or restart the radio.
Caution

13
Troubleshooting
If the solutions below cannot x the problems for you, or you may have some other queries, please contact us or your local dealer for more technical
support.
Phenomena Analysis Solution
The radio fails to power
on.
The battery may be improperly installed. Remove the battery and then reattach it.
The battery power may be used up. Recharge or replace the battery.
The battery may be poorly connected due to dirtied or
damaged battery contacts.
Clean the battery contacts. If the problem cannot be solved, contact your
dealer or authorized service center for inspection and repair.
During receiving,
the voice is weak,
discontinuous or totally
inactive.
The battery voltage may be low. Recharge or replace the battery.
The volume level may be low. Increase the volume by rotating the Volume Control Knob.
The antenna may be loosened or improperly installed. Reattach the antenna after turning off the radio.
The speaker may be blocked or damaged. Clean the surface of the speaker. If the problem cannot be solved, contact
your dealer or authorized service center for inspection and repair.
You cannot communicate
with other members.
The frequency or signaling may not match that of other
members.
Set your TX/RX frequency and signaling to the same as that of other
members.
The channel type (digital/analog) may be set inconsistently. Make sure all members are on the same digital/analog channel.
You may be too far away from the group members. Move towards other members.
Irrelevant communication
or noise is heard on the
channel.
You may be interrupted by radios using the same
frequency. Change the frequency, or adjust the squelch level.
The radio may be set with no signaling. Set signaling for all member radios to avoid interference at the same
frequency.
The noise is too loud.
You may be too far away from other members. Move towards other members.
You may locate in an unfavorable position. For example,
your communication may be blocked by high buildings or
frustrated in the underground areas.
Move to an open and at area, and restart the radio to try again.
You may suffer from external disturbance (such as
electromagnetic interference). Stay away from equipment that may cause interference.
You cannot use the keys. The keypad may fail to function temporarily. Restart the radio.
The LCD does not display
any information. The LCD may fail to function temporarily. Restart the radio.

14
Care and Cleaning
To guarantee optimal performance as well as a long service life of the
product, please follow the tips below.
Product Care
Do not pierce or scrape the product.
Keep the product far away from substances that can
corrode the circuit.
Do not hold the product by its antenna directly.
Do not hold the product by its earpiece cable directly.
Attach the accessory connector cover when the
accessory is not in use.
Product Cleaning
Turn off the product and remove the battery before
cleaning.
●Clean up the dust and fine particles on the product surface and
charging piece with a clean and dry lint-free cloth or a brush regularly.
●Use neutral cleanser and a non-woven fabric to clean the keys,
control knobs and front case after long-time use. Do not use
chemical preparations such as stain removers, alcohol, sprays or oil
preparations, so as to avoid surface case damage.
●Make sure the product is completely dry before use.
HNO 2
HNO 3
H2FeO4
HMNO4
HMNO 4
HNO3
H2FeO4
H2TIO3
Caution
Table of contents
Other Hytera Portable Radio manuals

Hytera
Hytera PD562i User manual

Hytera
Hytera PD785 User manual

Hytera
Hytera BD61 Series User manual

Hytera
Hytera PD702 User manual

Hytera
Hytera HM78XVHF User manual

Hytera
Hytera PD412i User manual

Hytera
Hytera PD782iG User manual

Hytera
Hytera PD78X Series User manual

Hytera
Hytera HP70X User manual

Hytera
Hytera TETRA PT580H User manual

Hytera
Hytera BD30 Series User manual

Hytera
Hytera Sepura STP9100 User manual

Hytera
Hytera HP68X User manual

Hytera
Hytera PD482i User manual

Hytera
Hytera PD56Xi User manual

Hytera
Hytera PD795 Ex User manual

Hytera
Hytera PD75X User manual

Hytera
Hytera TC-780 User manual

Hytera
Hytera PD982 User manual

Hytera
Hytera MD62X User manual