Hyundai GR8 Reference manual

Circulate To: General Manager, Service Manager, Parts Manager, Warranty Manager, Service
Advisors, Technicians, Body Shop Manager, Fleet Repair
Technical Service Bulletin
GROUP
NUMBER
ENGINE
ELECTRICAL
18-EE-003
DATE
MODEL(S)
AUGUST 2018
ALL MODELS
SUBJECT:
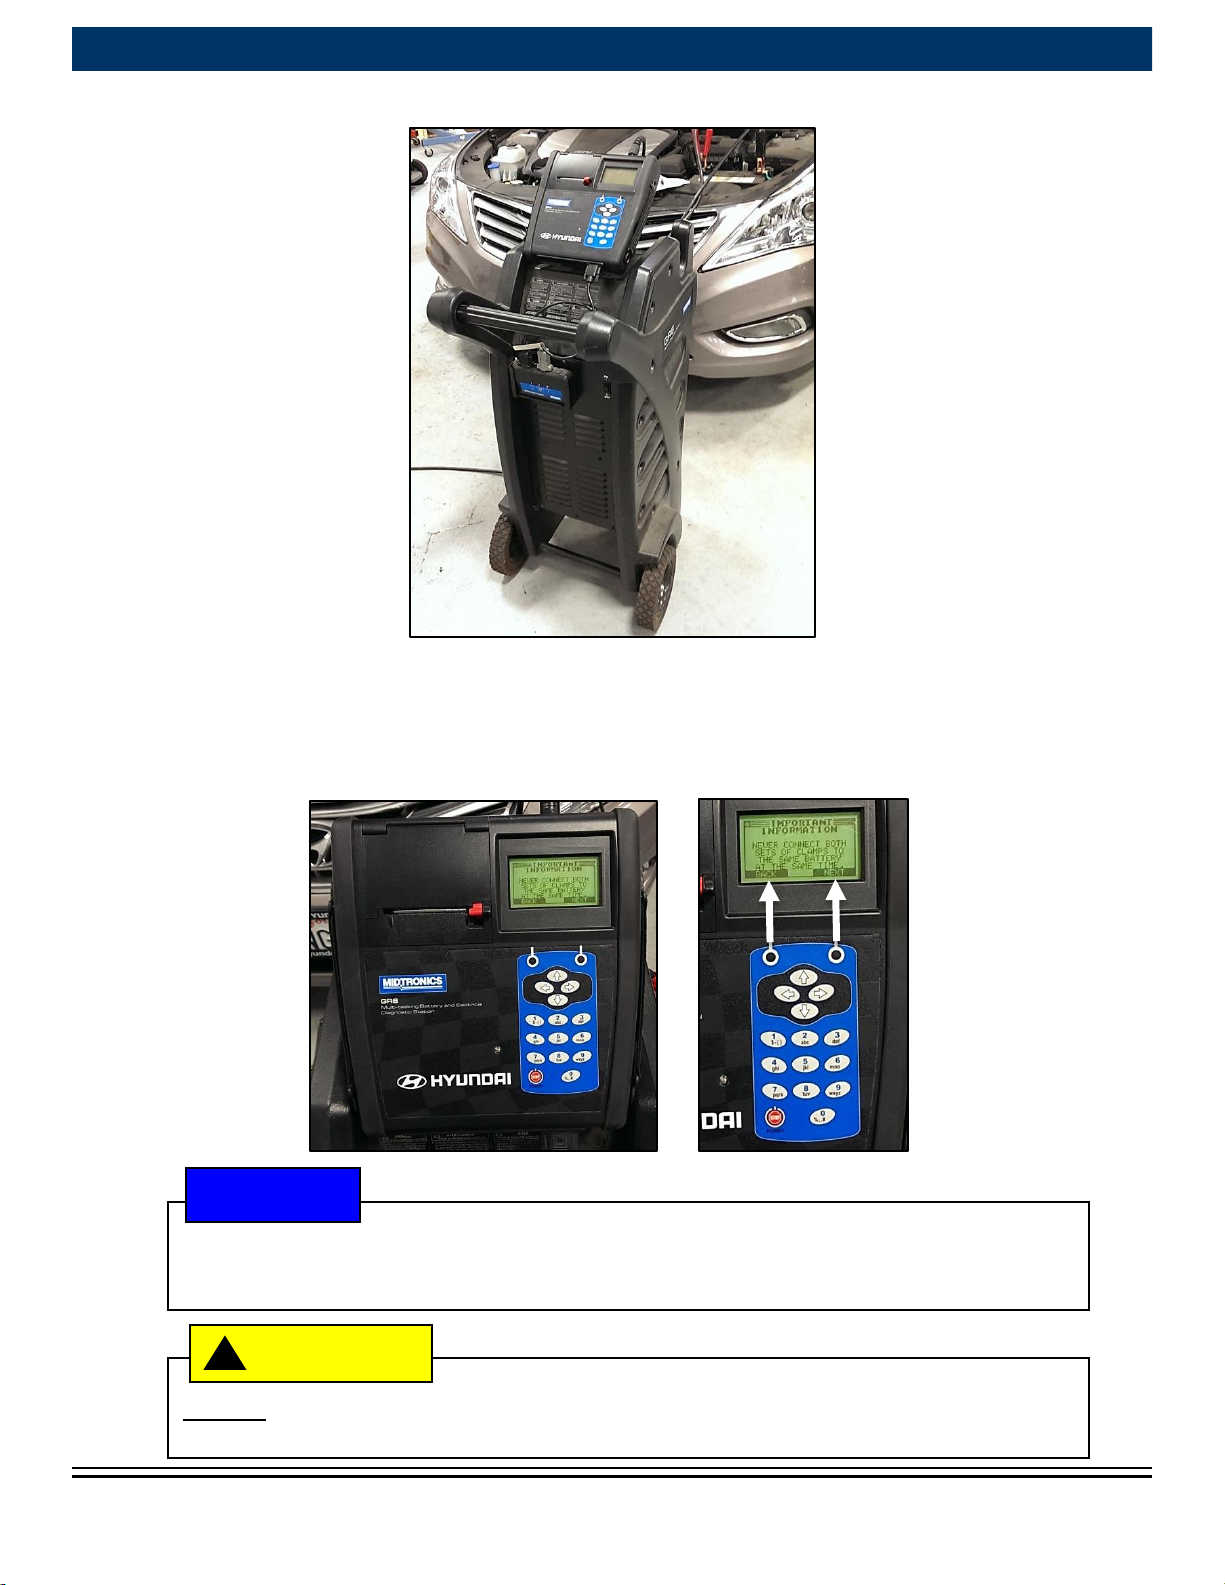
GR8 BATTERY TESTER/DIAGNOSTIC CHARGER
TOOL AND BATTERY WARRANTY POLICY
This TSB supersedes TSB 14-EE-002 to include additional information in the “Important
section”and “Service Procedure section”.
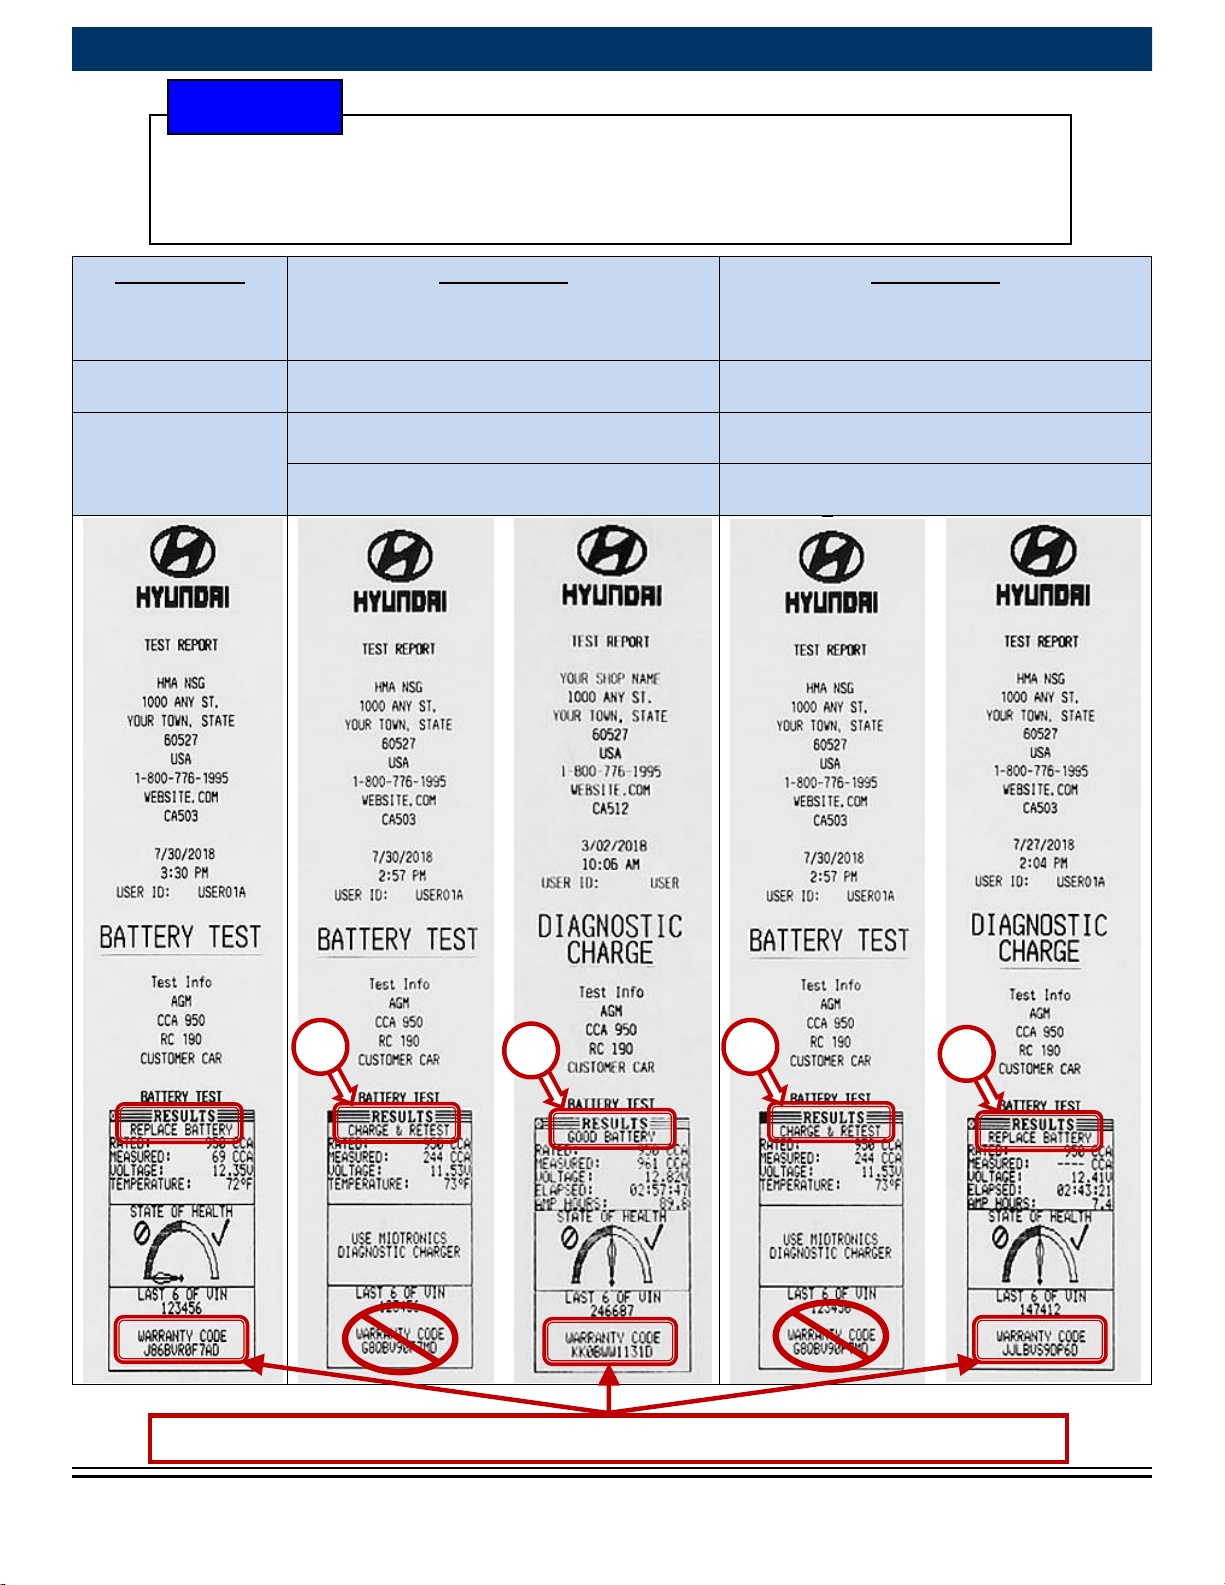
Description: This bulletin describes operation of the GR8 for battery related repair work. The GR8 is
a state of the art tool that checks battery health and then performs a reliable intelligent safe charge,
which can quickly restore some batteries to good condition. For example, a battery may be fully
revived within 1.5 hours if it has not been in a discharged state for an extended period of time.
Hyundai Factory Installed and Replacement Battery Information can be found at:
Hyundai Flash Drive - P/N Reference Materials
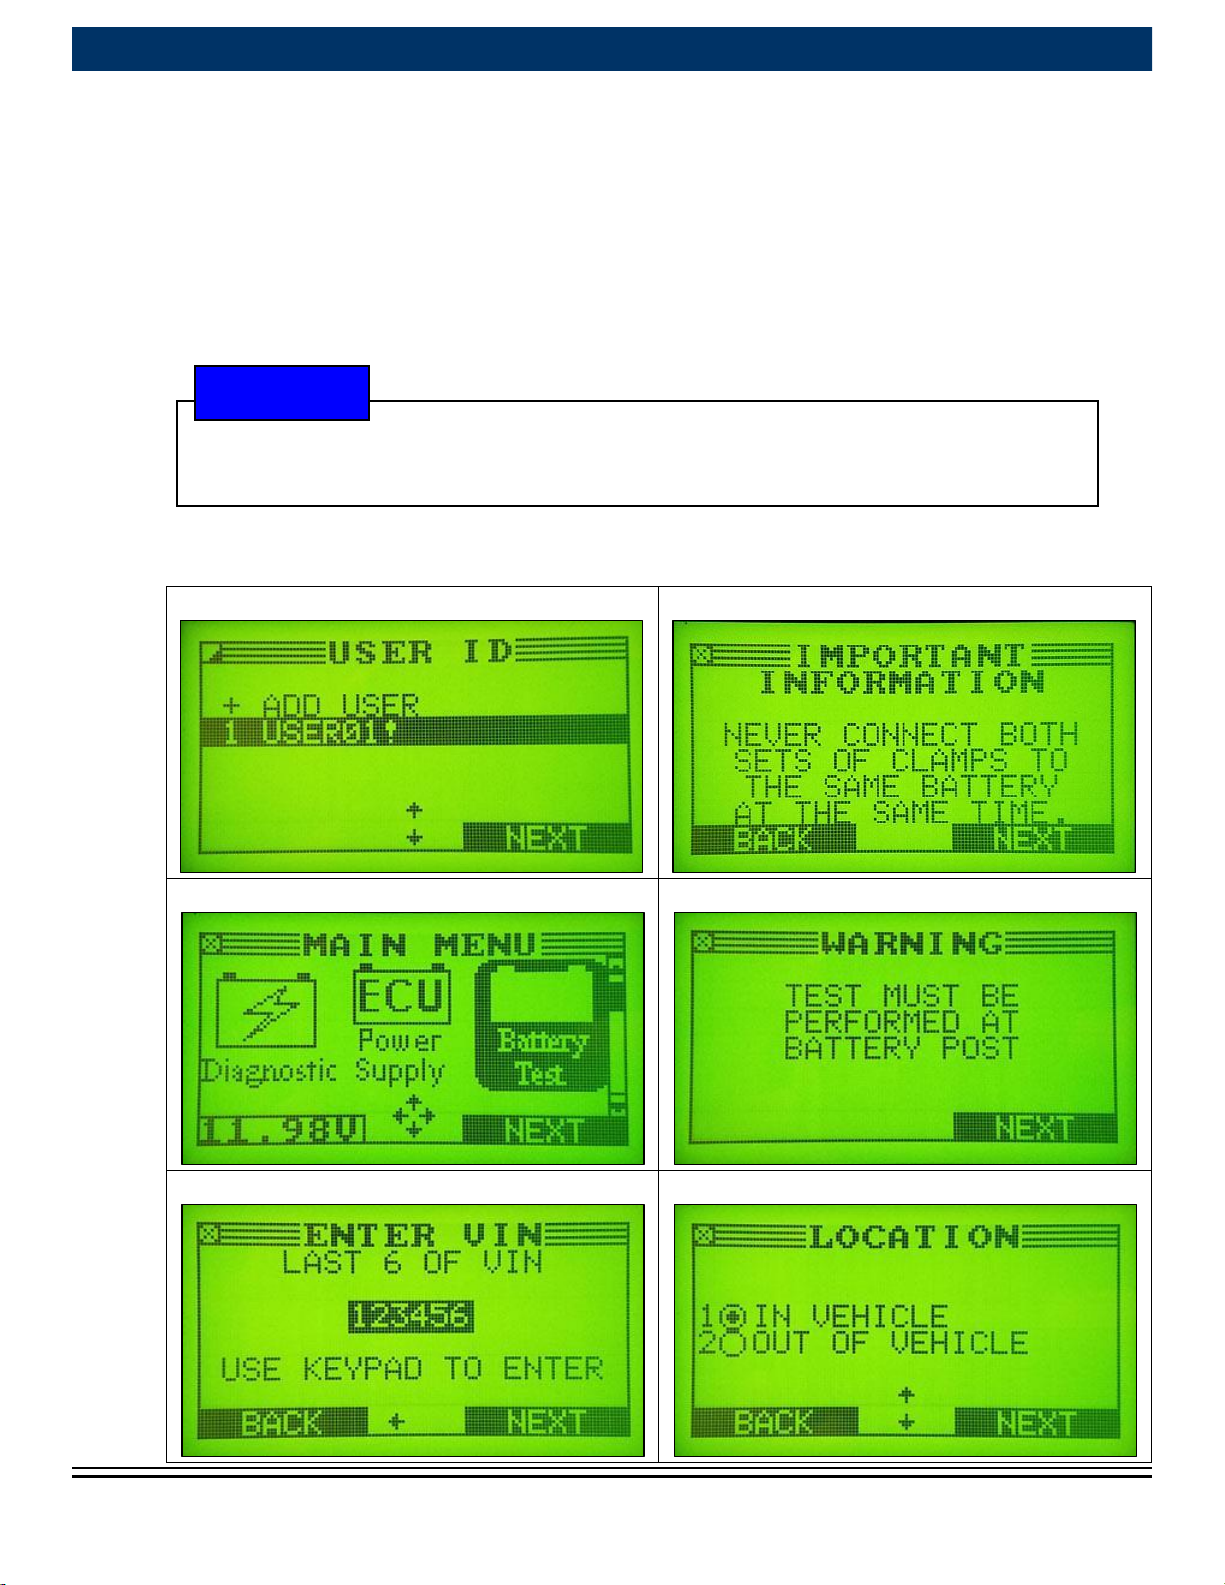
GR8 Battery Test clamps or Charger clamps must be connected directly onto the
battery posts. Do not connect to the jumper terminals in the engine compartment.
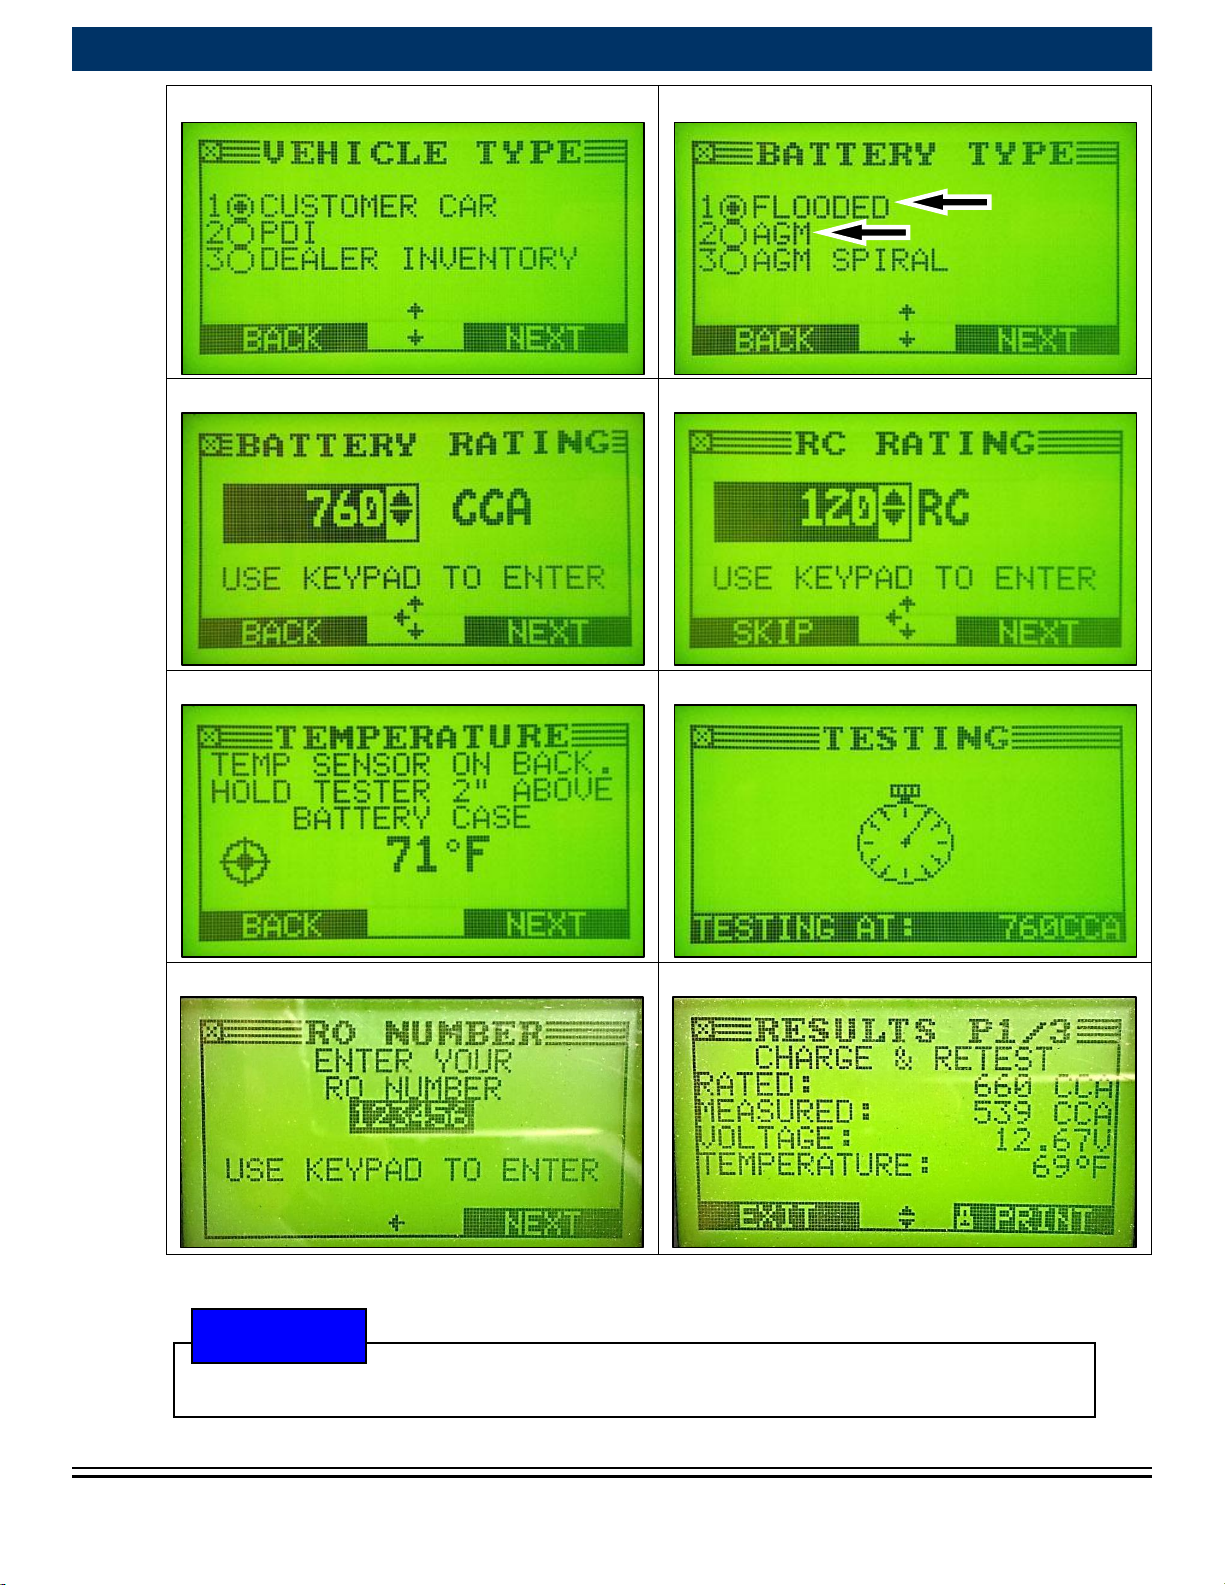
The correct battery type selection, either “Flooded” or “AGM”, must be selected
during GR8 Battery Testing and Charging to ensure correct results.
Charging with an incorrect battery type selection may damage and shorten the life
of the battery.
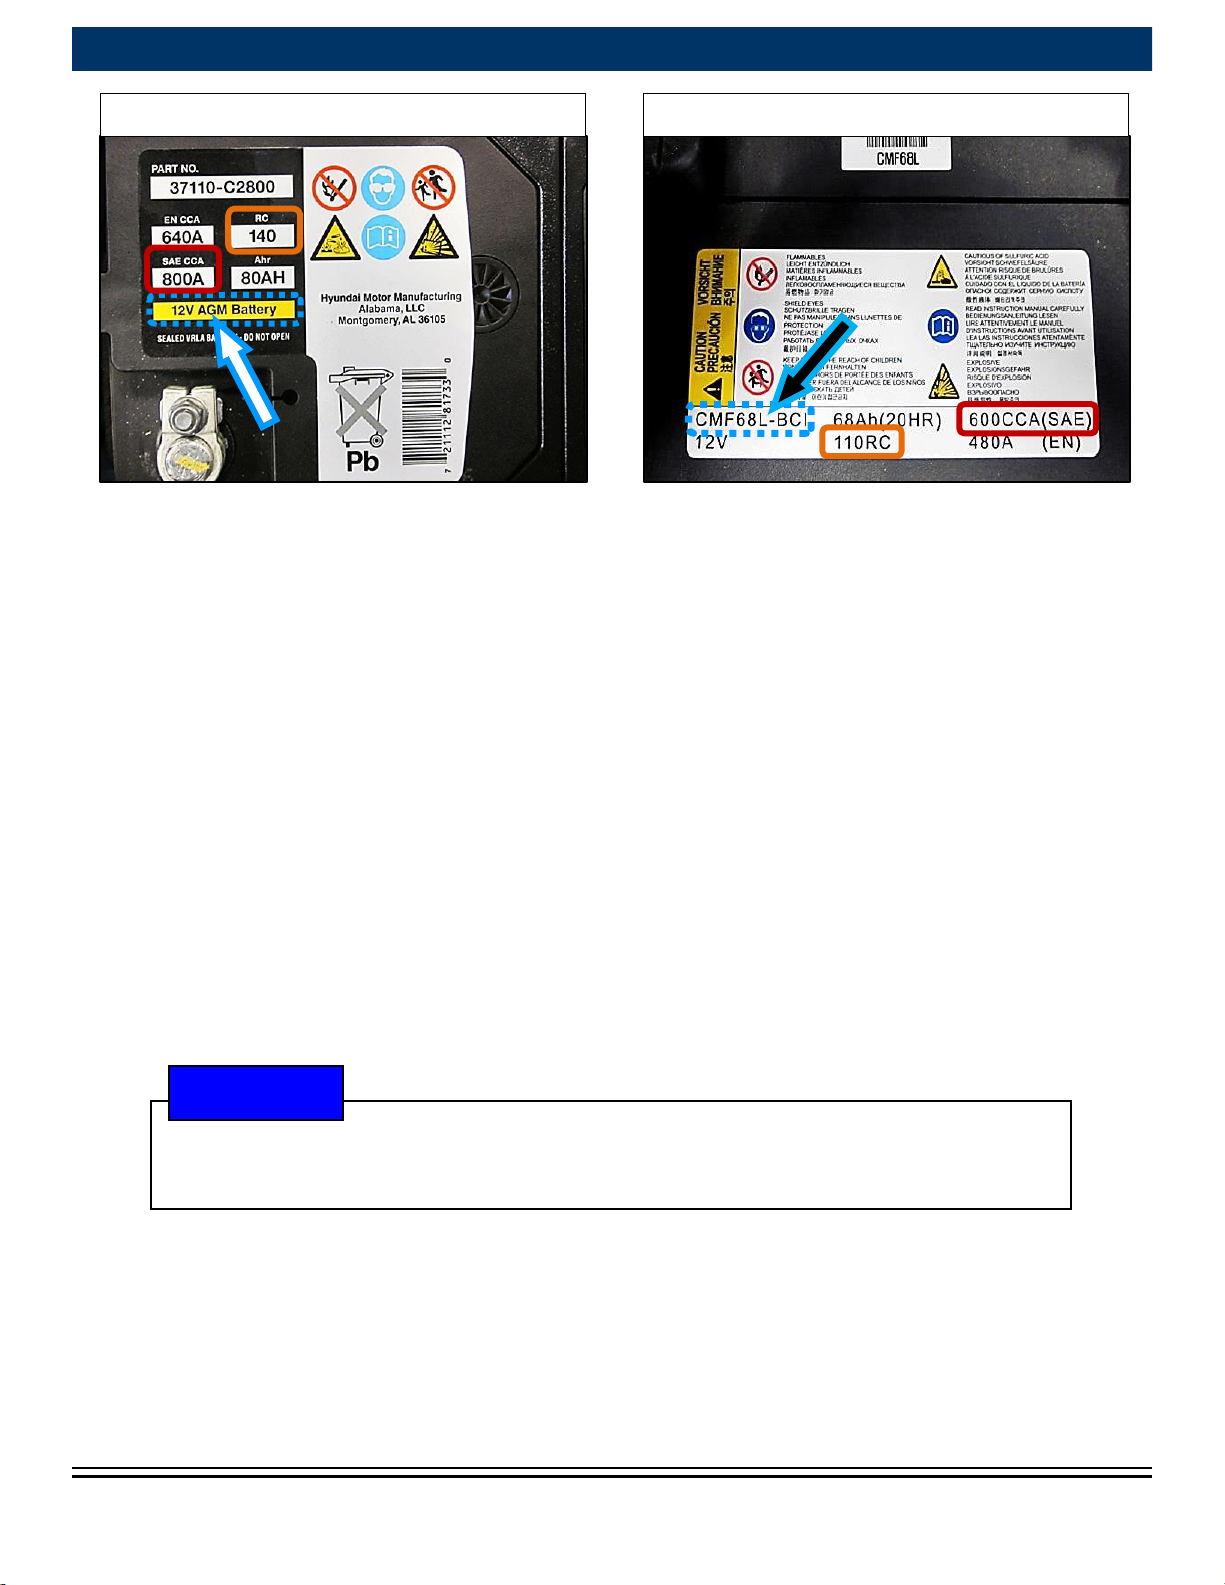
Always check the battery specification label affixed on top of the battery before
working on the battery and be sure to select the appropriate battery type.
Always enter the “SAE CCA” and RC value printed on the battery specification label
for the GR8 battery CCA and RC rating.
The replacement battery must be the same type of battery originally installed from
the factory.
IMPORTANT

GR8 DIAGNOSTIC TESTER/CHARGER TOOL AND BATTERY WARRANTY POLICY
TSB #: 18-EE-003
Page 2 of 10
SUBJECT:
Basic Operation and Battery Warranty Policy using the GR8:
1. Perform a quick test in the Battery Test mode. If the Battery Test mode provides a “Replace
Battery” result, the battery can be replaced without further steps.
2. If the Battery Test Mode produces a “Charge and Retest” result, you are then required to
conduct a Diagnostic Charge that will determine whether the battery is able to be brought to a
“Good Battery” condition by a full GR8 charge. If the initial diagnostic charge test finds that the
charge will not revive the battery, it will usually indicate “Replace Battery” within 20 minutes on
average.
3. Should the battery pass the “Diagnostic Charge” test, it will continue charging until the battery
reaches a full charge condition (which can take up to 1.5 hours) and indicate “Good Battery” by
automatically printing out a printout when completed successfully.
4. The GR8 produces printouts of the results in both the Battery Test and Diagnostic Charge
modes. Both printouts must be attached to the warranty repair order with proper VIN and RO
numbers entered via the GR8’s keyboard.
Flooded Battery
AGM Battery
A “Diagnostic Charge” must be performed if the battery test resulted in
“Charge & Retest”.
NOTICE

GR8 DIAGNOSTIC TESTER/CHARGER TOOL AND BATTERY WARRANTY POLICY
TSB #: 18-EE-003
Page 3 of 10
SUBJECT:
GR8 Battery Tester/Charger Assembly:
GR8 Battery Tester Unit: Performs battery testing and initial control of the diagnostic charger. Tester
can be used independent of the charger unit after a battery charge is in process. The cable from the
base may be disconnected and wireless communication exists to the Charger unit. The cable should
be reconnected when docked on the charger.
Either the small battery tester clamps or large charger clamps can be
connected to a battery at a time.
NOTICE
NEVER connect both sets of small and large clamps to a battery as it can
cause internal damage to the GR8 assembly.
CAUTION
!

GR8 DIAGNOSTIC TESTER/CHARGER TOOL AND BATTERY WARRANTY POLICY
TSB #: 18-EE-003
Page 4 of 10
SUBJECT:
Service Procedure:
First step –Battery Test (always the initial test):
1.
Press the power button on the GR8 if the Battery Tester unit is docked on the Charger unit.
You should hear the Charger unit’s fan come on and the Tester unit’s display will light up.
2.
Connect only the Battery Tester unit’s small clamps to the vehicle’s battery making sure
that the black clamp is connected to the battery negative “-” terminal and the red cable’s
clamp is connected to the battery positive “+” terminal. GR8 display will warn if you
connected in backwards.
3.
Follow these screen by screen instructions from left to right for each row. This example
shows screens that will occur for the battery condition of “Charge & Retest”:
Select or add yourself as a user
Connect small clamps only
Select Battery Test
Connect Test Leads at Battery Post
Enter last 6 digits of the VIN
Select battery location IN/OUT of vehicle
Battery Test or Charger clamps must be connected directly onto the battery
posts. Do not connect to the jumper terminals in the engine compartment.
NOTICE

GR8 DIAGNOSTIC TESTER/CHARGER TOOL AND BATTERY WARRANTY POLICY
TSB #: 18-EE-003
Page 5 of 10
SUBJECT:
Select vehicle type
Select either FLOODED or AGM type
Enter SAE CCA rating of battery
Enter RC rating of battery
Follow instruction and select NEXT
Testing is in progress
Enter Repair Order number
Test Result. Print for the R.O.
Always print out the Battery Test result to attach to the Repair Order.
NOTICE

GR8 DIAGNOSTIC TESTER/CHARGER TOOL AND BATTERY WARRANTY POLICY
TSB #: 18-EE-003
Page 6 of 10
SUBJECT:
4.
Follow the directions in this table based on the result of the Battery Test (first column).
PRINT results of Battery Test and then after Diagnostic Charge:
GR8 Battery Test/Charge Repair Procedure and Warranty Policy
1st Step
2nd Step
3rd Step
Claim
Always begin with
the Battery Test first:
Perform Diagnostic
Charge as applicable:
Press YES or select
Diagnostic at Main Menu:
Repair Action
Warranty Claim Type
Battery Test Result:
Diag. Charge Result:
None
None
GOOD BATTERY
Charge is not
applicable
GOOD –RECHARGE
Dealer optional
charge method as
per
Charge by GR8 or
idle engine for 30
minutes
None
REPLACE BATTERY/BAD CELL
Charge is not
applicable
Replace Battery
Replace 37110R00
only
(Add Printout #A to
R.O.)
CHARGE & RETEST
COMPLETE –GOOD BATTERY
GR8 Charge Only
Replace 37110A00
only
(Add Printout #B to
R.O.)
CHARGE & RETEST
REPLACE BATTERY/BAD CELL
GR8 Charge Attempt
No Good Replace
Battery
Charge 37110A00
+
Replace 37110R00
(Add Printout #C to
R.O)

GR8 DIAGNOSTIC TESTER/CHARGER TOOL AND BATTERY WARRANTY POLICY
TSB #: 18-EE-003
Page 7 of 10
SUBJECT:
5.
Connect only the Charger unit’s large clamp set to the vehicle’s battery making sure that the
black clamp is connected to the battery negative “-“ terminal and the red clamp is connected
to the battery positive “+” terminal. GR8 display will warn if you have connected it
backwards.
6.
Perform the following instructions showing the GR8 screens (as shown from left to right of
each row) that will occur when a “Good Battery” result is reached after charging:
Press YES to start charging
Connect large clamps
Diagnostic charge is in progress
Charge status being displayed
Good Battery condition reached
Full Charge Complete
If the Diagnostic Charge results in “Good Battery”, attach both Battery Test
printout of the “Charge & Retest” result and the Diagnostic Charge “Good
Battery” result per example of “Printout #B” on page 9.
NOTICE

GR8 DIAGNOSTIC TESTER/CHARGER TOOL AND BATTERY WARRANTY POLICY
TSB #: 18-EE-003
Page 8 of 10
SUBJECT:
7.
The GR8 will show the following screens when “Replace Battery” results after a Diagnostic
Charge attempt:
Charge Status Screen
Enter R.O. number
Charge NG –Replace Battery
If the Diagnostic Charge resulted in “Replace Battery”, claim the Op Code
37110A00 for the battery charge attempt and Op Code 37110R00 for “Replace
Battery”. The Battery Test printout for “Charge & Retest” result and the
“Diagnostic Charge” result must be attached as per example “Printout #C” of
the page 9.
NOTICE

GR8 DIAGNOSTIC TESTER/CHARGER TOOL AND BATTERY WARRANTY POLICY
TSB #: 18-EE-003
Page 9 of 10
SUBJECT:
Printout #A
Printout #B
(Both tickets as shown must be
attached with matching VIN, close in date,
and with correct RO#)
Printout #C
(Both tickets as shown must be
attached with matching VIN, close in date,
and with correct RO#)
REPLACE
37110R00 only
CHARGE
37110A00 only
CHARGE 37110A00
+ REPLACE 37110R00
BATTERY TEST=
REPLACE
BATTERY
1. BATTERY TEST = CHARGE &
RETEST
1. BATTERY TEST = CHARGE &
RETEST
2. DIAGNOSTIC CHARGE =
GOOD BATTERY
2. DIAGNOSTIC CHARGE =
REPLACE BATTERY
Hhha h sha H HH ihDIUH
Enter this 11-digit warranty code into the claim based on results as indicated.
Printout(s) that must be attached to the Repair Order based on the Battery
Test result and Diagnostic Charge result are shown below. Also listed are the
warranty claim types.
NOTICE
1
1
2
2

GR8 DIAGNOSTIC TESTER/CHARGER TOOL AND BATTERY WARRANTY POLICY
TSB #: 18-EE-003
Page 10 of 10
SUBJECT:
Warranty Claim Information:
GR8 RESULTS
OP CODE
OPERATION
OP TIME
CAUSAL P/N
NATURE/
CAUSE
Battery Test =
“REPLACE BATTERY”
(Ex: Printout #A)
37110R00
REPLACE
BATTERY
(Per LTS)
Use applicable
Part Number
(00275-XXXXX)
shown in
Replacement
Battery Chart for
each models
Select
appropriate
NATURE
and
CAUSE
codes
Battery Test =
“CHARGE & RETEST”
and
Diagnostic Charge =
“GOOD BATTERY”
(Ex: Printout #B)
37110A00
CHARGE
BATTERY
0.3 M/H
Battery Test =
“CHARGE & RETEST”
and
Diagnostic Charge =
“REPLACE BATTERY”
(Ex: Printout #C)
Must be entered in order as below:
37110R00
+
37110A00
REPLACE
BATTERY
+
CHARGE
BATTERY
(Per LTS)
+
0.3 M/H
Initial Step:
BATTERY TEST
Printout Result
2nd Step:
DIAGNOSTIC CHARGE
Printout Result
Warranty Code is entered from:
BATTERY TEST
Printout
DIAGNOSTIC
CHARGE Printout
REPLACE BATTERY
Not applicable
(Do not attach to R.O.)
X
-
BAD CELL-REPLACE
X
-
CHARGE & RETEST
GOOD BATTERY
-
X
REPLACE BATTERY or
BAD CELL - REPLACE
-
X
Attach the Printout(s) to the Repair Order as per examples shown on the page
10 based on the GR8 results.
NOTICE
Enter the 11-digit warranty code into the claim submission as per below:
NOTICE
Other Hyundai Test Equipment manuals