icklebubba Galaxy User manual

Galaxy Car Seat
User Guide

Keep this instruction manual for future
CONTENTS
Dear Parents
Congratulations on the purchase of your Galaxy car seat.
Studies have shown that a large percentage of car seats are not
installed correctly. Your child’s safety can only be guaranteed if
this product is used according to these instructions.
Therefore, please take time to read through this instruction
manual carefully.
Contents 1
Restraint Features 2
Important Information 3
Instructions for use in the car 5
General 6
Seatbelt Installation 9
Isofix Installation 12
Disassembly 15
Maintenance 16
Warranty 17
Waste Separation 18
1.Shell
2.Support Pillow
3.Shoulder Pad
4.Carrying Handle
5.Push Button for Adjusting
Carrying Handle
6.Sun Canopy
7.Belt Hook for Lap Section of
Safety Belt
8.Control Button
9.Belt Strap
10.Safety Buckle
11.Belt Slots
12.Adapter Slot
13.Headrest Adjuster
1

RESTRAINT FEATURES
1.Shell
2.Support Pillow
3.Shoulder Pad
4.Carrying Handle
5.Push Button for Adjusting
Carrying Handle
6.Sun Canopy
7.Belt Hook for Lap Section of
Safety Belt
8.Control Button
9.Belt Strap
10.Safety Buckle
11.Belt Slots
12.Adapter Slot
13.Headrest Adjuster
14.Rear Belt Hook for Shoulder
Section of Safety Belt
15.Button for Releasing Car Seat from
the Stroller
16.Lever for Releasing Car Seat from
Isofix Base
17.Isofix Connector Button.
18.Indicator to show Support Leg is
Properly Installed
19.Button to Release Isofix Leg
Adjustment
20.Indicator to Show Seat is Properly
Installed
21.Release Button for Isofix Adjustment
22.Hook that Attaches to Car Seat
2

3
IMPORTANT
WARNING: Read this instruction manual carefully. Study the
illustrations in this manual closely before and during installation.
Our product is a safety product that is only safe when used
according to the instructions given in this manual.
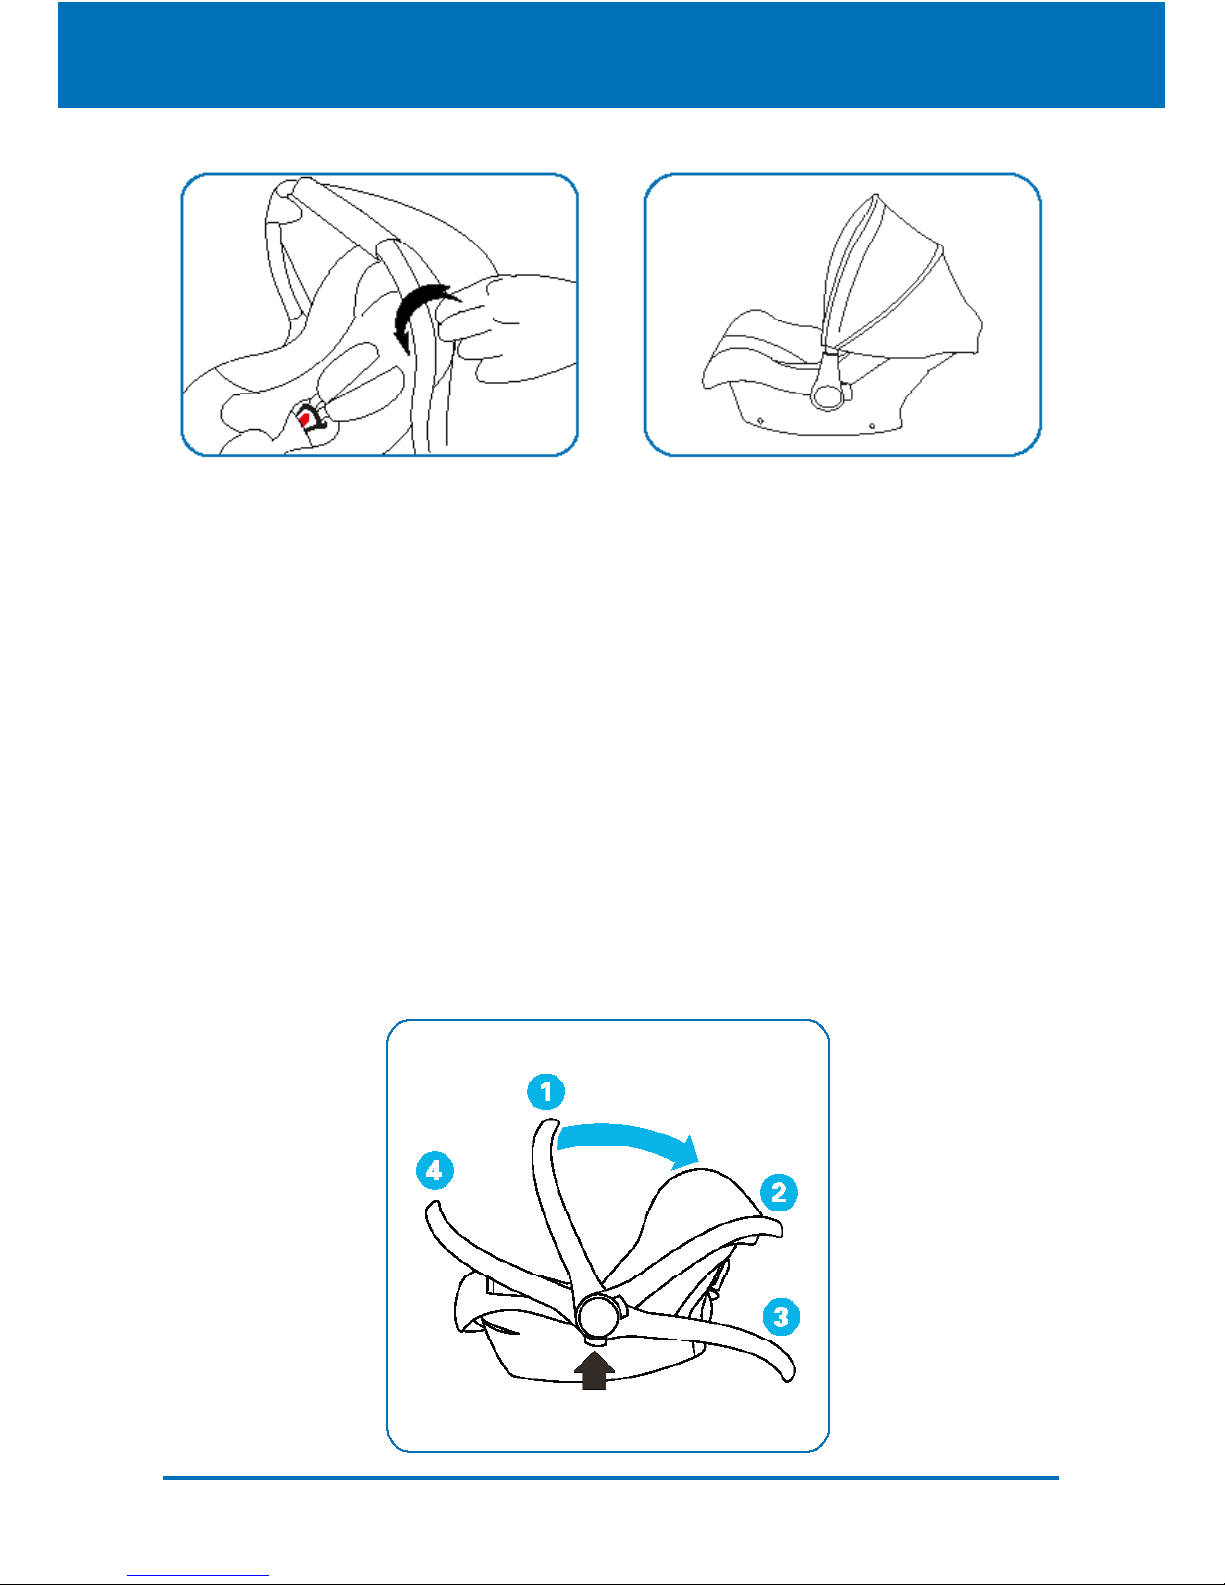
To prevent your child from falling out of the seat, always check
to make sure the carrying handle is clicked into the carrying
position before lifting the seat. Also make sure your child is
always strapped in securely with the harness belt.
WARNING: For the future use of the car seat, it is important
that you store this instruction manual.
WARNING: Never leave a child unattended in the car seat while
in the car or elsewhere.
WARNING: The correct rooting of the seat belt, along the blue
markings on the baby car seat, is essential for your child’s safety.
Please see the Installation section and/or the sticker on the side
of the product. Never thread the belt in any other way.
When installing with the seat belt only, use the baby car seat
on a front-facing seat that has been approved according to the
ECE R16 standard or similar.
The Galaxy car seat may be used in the front seat and in the rear
seat. Always place the baby car seat rearward facing. Lock rear
seats that fold down.
Never use the baby car seat on a seat equipped with a front
airbag, as this can result in the death or injury of the baby.
This does not apply to the so called side airbags.
WARNING: Do not leave your baby in the car seat on a raised
surface, such as a table, work top, bed, or shopping trolley, due
to the risk of falling.
Always secure your child with the harness belt, even when the
seat is not fitted in the car.
Do not leave your baby in the car seat for a long period of time.
It is important for proper motor and muscle development that
you place your baby on his stomach or back regularly.

4
IMPORTANT
The seat may become unsafe after an accident due to
damage that is not immediately noticeable. It should therefore
be replaced.
The manufacturer can only guarantee the safety of the seat if it
is used by the original owner.
We strongly advise against using a second-hand product, as
you can never be sure of its history.
We recommend that car seats are not used for longer than 5
years after the date of purchase. The properties of the product
may deteriorate, for example, ageing of the plastic (as a result
of direct sunlight) and this may not be visible.
The moving parts of the baby car seat should not be lubricated
in any way.
No alterations may be made to the baby car seat, as this could
aect part or the overall safety of the seat.
The baby car seat must not be used without its cover. Always
use an original cover, as the cover contributes to the safety of
the seat.
In order to prevent damage to the cover, do not remove the
logos or airbag sticker.
Our baby car seat has been approved according to the most
recent guidelines of the ECE R 44/04: the European standard
for safety seats. It is suitable for children from birth to approxi-
mately 12 months (group 0+: 0 to 13kg).

5
INSTRUCTIONS FOR USE IN THE CAR
Always check to make sure the seat fits in your car properly
before purchasing it.
The seat must always be secured, even when not in use.
An unsecured seat can injure other passengers in the car in the
event of an emergency stop.
If the seat belt height is adjustable, adjust it to the lowest
position.
When installing the baby car seat on the passenger seat, posi-
tion the car seat in the rearmost position. The backrest must
be in a fully upright position and the headrest down. When not
using the baby car seat, the passenger seat (and headrest) may
be adjusted as required.
Prevent damage to the seat by not wedging it between or
underneath heavy luggage, adjustable seats or slamming the
car door etc.
Make sure that you properly secure all luggage and all other
objects likely to cause injury in the event of an accident.
Always cover the seat when the car is parked in the sun as
plastic and, metal parts can become very hot and the cover may
become discoloured.
Always use a car seat, even for short trips, as this is when most
accidents occur.
NEVER hold a baby on your lap while driving. Due to the
enormous forces released in an accident, it will be impossible to
hold onto the baby.
Never use the same seat belt to secure yourself and the child.

6
GENERAL
Carrying Handle
The carrying handle can be adjusted into 4 positions (L).
Press the red buttons on both sides of the carrying handle at the
same time and then adjust the carrying handle to the desired
position. The buttons will pop up again once the handle is in
place.
Fitting the canopy on to the car seat
1. Attach the adapters.
2. Hook the elastic loops of the canopy on to the adapters
(both sides).
3. Pull the back of the canopy over the back of the car seat.
4. Pull the front of the canopy over the carrying handle.
Sun Canopy

7
PLACING YOUR CHILD IN THE GALAXY CAR SEAT
Loosen the shoulder belts by pressing the quick adjuster button,
(A1) and pulling the shoulder belts towards you (A2).
Release the belt buckle and drape the belts with the tongue
sections over the two sides of the seat (B). Pull the buckle for-
ward, attach the loop of the belt pad over the edge of the quick
adjuster button.
Make sure there are no toys or other hard objects in the shell.
Position your baby comfortably in the baby car seat.
Join the buckle tongue sections together and insert them into
the buckle until it clicks (C).
Pull the shoulder belts tight using the quick adjuster belt strap
at the front.
The loop can be secured under the shell rim (D).
Adjusting the height of the shoulder belts
The shoulder belts should run through the slots located directly
above the baby’s shoulders.
•Pull the shoulder belts through the slots in the shell and cover.
•Place the shoulder belts back, at the required height.
•Use the same slots in both the shell and the cover.
•Check to make sure the belts can be used properly and that
they are not twisted.
Important
The more tightly the belts are fastened around the child, the bet-
ter the protection. You should be able to fit no more than one
finger between the belts and your child.
The belts should never be twisted or damaged.
When positioning the baby make sure that he/she does not sit
on the belts by hanging them to the side behind the belt hooks.
Hook the belt pad of the belt that goes between the legs behind
the edge of the quick adjuster.
E Removable seat insert
The baby car seat has a removable seat insert (E) to create a
flatter lying position for newborn babies and support the head
in a sideways direction. When the baby is approx. 4 or 5 months
old, remove the filling block (F) to make the seat deeper, then
you can still use the head support.

8
PLACING YOUR CHILD IN THE GALAXY CAR SEAT
G Headrest Adjustment Method
Push the button to release the buckle and pull the headrest
adjuster (G2) to move it up and down before choosing a
suitable position for the headrest (3).

9
SEATBELT INSTALLATION
Our product can be fitted safely on almost all forward-facing
seats in the car using the existing seat belts. However, the belts
are fitted so far forward on some seats that proper installation is
not possible. If this is the case, try another seat.
In some cases, the buckle of the safety belt may be too long and
therefore sits too high against the base of our product, making
it dicult to install the baby car seat securely. If this is the case,
choose another position in the car. Contact your supplier with
any questions.
Installation with 3-point safety belt Yes
Installation with 2-point safety belt No
On passenger seat Yes
On left/right side of back seat Yes
In middle position of back seat Yes*
Belt routing marking Blue
Frontal airbag No
Side airbag Yes
*If there is a seatbelt present in the middle position of the back seat.
1
2
3
4

10
SEATBELT INSTALLATION

Important!
Do not mix up point (H-1) and shoulder strap (H-1) .
Place the baby car seat in a rearward-facing position on
the seat. The carrying handle must be locked in an upright
position (H-2).
Thread the lap section of the seat belt across the front (foot
end) between the shell and the two blue belt hooks (H-3).
Place the shoulder section of the seat belt around the baby
car seat and slide it into the blue belt hook on the back (H-
4).
Please make sure the seat belt is located between the
adapter and seat base (H-5).
The retaining hook holds the seat belt in place (H-6).
After fixing the baby car seat onto the seat of the car, push
down the red button on both sides of the carrying handle so
that it touches the back rest of the car seat (H-7).
Insert the tongue section into the buckle (H-8) . Make sure
the seat belt is not twisted. Tighten it as much as possible.
Check again to make sure the seat belt is threaded through
all three blue belt hooks.
NOTE: Your vehicle must be parked on a horizontal surface
during this installation.
11
SEATBELT INSTALLATION
1
3
2

12
ISOFIX INSTALLATION
Fold out the support leg fully
and place the car seat base
onto the vehicle seat.
Squeeze together the isofix
adjustment buttons located
on either side of the sup-
port leg at the front of the
car seat base and pull the
support leg towards the seat
base to extend the isofix
attachment points.
Line the isofix attachment
points with the isofix
latches in the vehicle seat
and push the isofix points
into the isofix latches until
you hear a “click”.

13
ISOFIX INSTALLATION
When the isofix points are
correctly attached the isofix
connection indicators will
turn green.
If the indicators remain red
you must release and re-
connect the isofix points. To
do this see section “Disas-
sembly” on page 15 (J-11).
Please pick up the seat and
fix it on the three slots of the
base.
Once you hear a “click” this
has been done properly.

14
ISOFIX INSTALLATION
Push the baby seat firmly
against the backrest to lock
it into the isofix fittings.
Check the indicator light to
confirm your baby seat is
correctly installed.
Adjust the leg to the right
height by pressing this
button. Make sure the leg is
stable against the floor and
lock it firmly into position
and check the indicator light
(it will be green).
The rearward-facing baby
seat is fitted correctly on
your car seat.

15
DISASSEMBLY
Press the release button and
pull the handle upwards to
remove the car seat from the
base.
Unlock the isofix points by
pulling the latches towards
the front of the vehicle seat.
Pull the car seat base away
from the back seat to release
from the vehicle.

General
Remove the car seat from the car before carrying out any
maintenance work.
The seat can be cleaned with soap and lukewarm water. Do
not use any abrasive detergents.
The belt buckle can be cleaned using warm water.
Do not lubricate.
The cover must be washed by hand (maximum 30° C). Do
not use a tumble dryer.
Removing the cover
1. Remove the shoulder harness.
2. Separate the fabric from the car seat shell by gently pulling
on the fabric cover.
Re-fitting the cover
1. To refit the cover, carry out the above instructions in
reverse order.
2. Make sure that the lower section of the cover flaps are over
the upper section.
3. Fasten the shoulder harness adjustment strap under the
shell again.
IMPORTANT!
Never remove the energy absorbing foam.
Never remove the pull strap from the control button.
The fabric can be removed without removal of the pull strap.
16
MAINTENANCE

17
WARRANTY
We guarantee that this product was manufactured in accordance
with the current European safety requirements and quality standards
applicable to this product, and is free from defects in workmanship
and material at the time of purchase. During the production process
the product was subjected to various quality checks.
If this product, despite our best eorts, shows a material/manufac-
turing fault within the warranty period, (with normal use as described
in the user instructions) we will comply with the warranty terms and
conditions. In this case please contact your reseller.
Warranty Term:
The warranty applies for a period of 24 consecutive months from the
date the product was purchased. The warranty only applies for the
first owner and is not transferrable.
Free 4 Year Extended Warranty
To activate your 4 year warranty, register online and keep your proof
of purchase for any future claim. If you register within 28 days of pur-
chase we will extend your standard warranty to 4 years from the date
of purchase at no extra cost.
THE WARRANTY IS NOT VALID IN THE FOLLOWING CASES:
1. In the case of a use or purpose other than described in the manual.
2. If the product is submitted for repair through a dealer that is not
authorised by us.
3. If the product is not supplied to the manufacturer with the original
purchase receipt (via the retailer).
4. If repairs were carried out by third parties or a dealer that is not
authorised by us.
5. If the defect is the result of improper or careless use or main-
tenance, negligence or impact damage to the fabric cover and/or
frame.
6. If the parts show normal wear and tear that may be expected from
daily use of a product (wheels, rotating and moving parts etc.)
If in Doubt
Not all car seats fit all cars. For advice as to the suitability of this
restraint for your car, please contact your vehicle manufacturer.
We cannot accept responsibility for damage occurring to vehicle
seats or seat belts through normal use of this product.

18
WASTE SEPARATION
To ensure optimum and safe use of car safety seats, they should not
be used for longer than 5 years after the date of purchase.
Once your child has outgrown the baby car seat, we therefore advise
you to no longer use the the car seat and dispose of it in the proper
way.
As we care for the environment we request the user to separate the
waste produced at the start (packaging) and end (product parts) of
the life of the baby car seat.

Table of contents
Other icklebubba Car Seat manuals

icklebubba
icklebubba Astral User manual

icklebubba
icklebubba Mercury User manual

icklebubba
icklebubba ROTATOR I-SIZE User manual

icklebubba
icklebubba Astral User manual

icklebubba
icklebubba Stomp User manual

icklebubba
icklebubba ROTATOR User manual

icklebubba
icklebubba Mercury User manual

icklebubba
icklebubba Solar User manual

icklebubba
icklebubba Astral User manual

icklebubba
icklebubba RADIAL I-SIZE PLUS User manual