icklebubba RADIUS User manual

THE
RADIUS
360 spin isofix car seat
INSTRUCTIONS FOR USE • MANUEL D´INSTRUCTIONS
INSTRUCCIONES DE USO • GEBRAUCHSANWEISUNG
ISTRUZIONI PER L’USO • GEBRUIKSAANWIJZING
BRUKSANVISNING • INSTRUÇÕES DE USO
INSTRUKCJA UŻYCIA • BRUGSANVISNING
ECE R44/04 GROUP: 0+ / 1 / 2 (0-25kgs)

9-25kg
English: P. 01-28
THE
RADIUS
360 spin isofix car seat
EN
Français: P. 29-56
Español: P. 57-84
Deutsch: P. 85-112
Italiano: P. 113-140
Nederlands: P. 141-168
Português: P. 197-224
Svenska: P. 169-196
FR
ES
DE
IT
NL
SV
PT
PL Polskie: P. 225-252
Dansk: P. 253-280
DK

Item: Radius Car Seat (newborn to 25kg)
Group 0+ (newborn to 13kg / birth to approximatively 12-15 months)
Group 1 (9kg to 18kg / approximatively 9months - 4 years)
Group 2 (15kg to 25kg / approximatively 3 years - 7 years)
Thank you for purchasing this Group 0+, 1, 2 car seat. If you are not
completely satisfied with the car seat or you would like to change any
accessory or obtain any help about the car seat, please contact our
customer services department.
Please Note: Only suitable for use in vehicles fitted with a 3 point
retractable safety belt or lsofix attachments.
Read the instructions carefully before use and keep for future reference.
CONTENTS
• Warnings 03
• Car Seat Features and Components 07
• Rearward Facing Installation for Group 0+ (Newborn to 13kg) 09
• Forward Facing Installation for Group 1 (9kg to 18kg) 12
• Adjusting the Harness 15
• Forward Facing Installation for Group 2 (15kg to 25kgs) 19
• Care and Maintenance 24
• Warranty and Product Guarantee 27
1 2
EN

IMPORTANT!
IMPORTANT! Read the instructions carefully before use and keep for future
reference. Install and use the child safety seat as described in the instruction
manual. Failure to do this could result in serious injury or death. Keep the
instructions together with the child restraint for future reference. This seat already
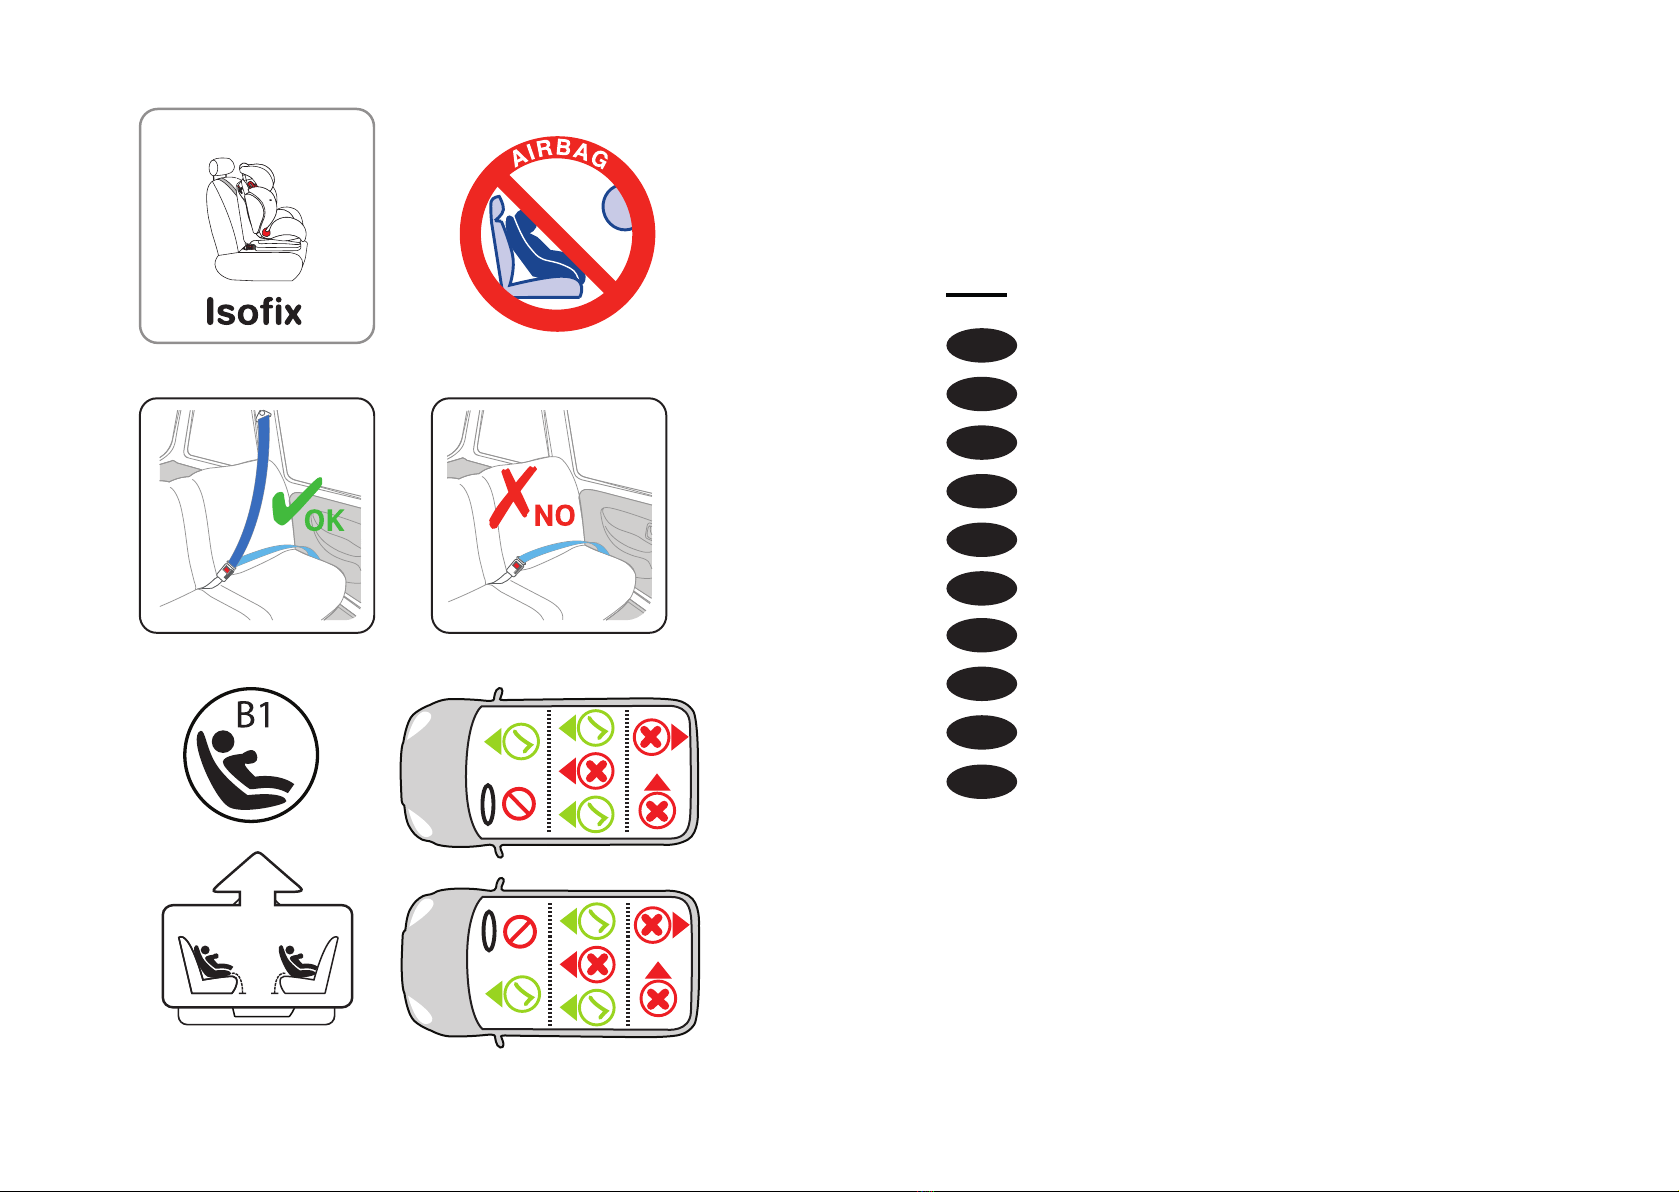
conforms to ECE R44/04 and it is classified as Group 0+ (birth-13kgs) rear-facing,
Group I (9-18kgs) which should be fastened by Isofix + base support leg. Group
II (15-25kg) which should be installed by Isofix + base support leg. This seat
should only be used in the vehicle which is equiped with Isofix + base support leg.
IMPORTANT! Because of potential medical issues inherent to low birth weight
and premature infants, always have a trained professional doctor or hospital staff
member assess the suitability of the child restraint prior to leaving the hospital or
using the child restraint. The seat cushion must be used in Group 0+ (birth-13kg).
WARNINGS!
WARNING: The correct routing of the seat belt is essential for your child’s safety.
Please see the Installation section. Never thread the belt in any other way.
A correctly adjusted harness is essential for your child's protection.
NEVER leave a child unattended in the car seat while in the car.
NEVER use the car seat on a seat equipped with a front airbag unless the airbag is
deactivated as this can result in the death or injury of the baby. This does not apply
to side airbags.
NEVER use the car seat without the backrest as it will not protect your child in the
event of an accident.
NEVER use this child restraint with any other base, except ones that the
manufacturer permits.
DO NOT leave your child in this restraint for extended periods of time.
DO NOT use a child safety seat with damaged or missing parts.
DO NOT use damaged or frayed harness straps or vehicle belt.
DO NOT use a child safety seat that has been in a crash. A crash can cause unseen
damage to the child safety seat.
DO NOT use a second-hand child seat or child seat whose history you do not know.
DO NOT use this child seat in the home. It has not been designed for home use and
should only be used in your car.
The seat must always be secured, even when not in use.
The rigid items and plastic parts of a child restraint must be located and installed
so that they are not liable, during everyday use of the vehicle, to become trapped
by a movable seat or in a door of the vehicle. Any straps holding the restraint to the
vehicle should be tight. Any straps restraining the child should be adjusted to the
child's body, and the straps should not be twisted.
It is important to ensure that any lap strap is worn low down, so that the pelvis is
firmly engaged.
It is dangerous to make any alterations or additions to the device without the
approval of a competent authority, and to not closely follow the installation
instructions provided by the child restraint manufacturer.
The chair should be kept away from sunlight, otherwise it may be too hot for the
child's skin.
Any luggage or other objects liable to cause injuries in the event of a collision should
be properly secured.
The child restraint must not be used without the cover. The seat cover should not
be replaced with any other than the one recommended by the manufacturer, as the
cover constitutes an integral part of the restraint performance.
If the position of the vehicle safety-belt buckle relative to the main load bearing
contact points on the child safety seat is unsatisfactory, please contact the
manufacturer.
Do not use any load bearing contact points other than those described in the
instructions and marked in the child restraint.
If the seat belt height is adjustable, adjust it to the lowest position.
3 4

WARNINGS!
When securing your child using the vehicle belt for Group II, you MUST ONLY use a
lap sash (3 point seat belt) that crosses the waist and shoulder. NEVER use a lap
only belt as this could result in serious injury or death to the occupant.
Refer to the table and diagram below.
Here is the positions of installation for your reference.
WARNINGS!
NEVER fasten the child restraint on the front passenger seat as air bag deployment
will interfere with the safety of the restraint and may cause serious injury or death.
ALWAYS secure the child restraint to the rear vehicle passenger seats.
NEVER fasten the child restraint to rear facing or lateral facing vehicle seats.
Refer to the graphic below when selecting a vehicle seat to install your child
restraint to.
Forward Facing √
Rear facing √
Two points seat belts X
Three points seat belts √
Front passenger seat X
The rear vehicle seats √
5 6

Car Seat Features
1. Belt Hooks (left and right side)
2. Seat Shell
3. Seat Reinforcement Cover
4. Rear Seat Cover
5. RHS Lap Belt Guide (LHS in mirrored location)
6. ISO-FIX Connection Indicator
7. ISO-FIX Adjuster Button
8. ISO-FIX Sleeve
9. ISO-FIX Latch
10. ISO-FIX Assembly
11. Headrest Height Adjustment Handle
12. Headrest
13. Infant Head Insert
14. Shoulder Strap Slots
15. Shoulder Straps
16. Infant Body Insert
17. Crotch Buckle Pad
18. Harness Adjustment Lever (underneath seat cover slot)
19. Harness Adjustment Strap
20. Recline Adjustment Handle
21. Base
22. Seat Rotation Adjustment Handle
23. Support Leg Hinge
24. Support Leg
25. Support Leg Height Adjustment Button
26. Support Leg Installation Indicator
27. Shoulder Pads
28. Shoulder Straps
29. Buckle Tongue (RHS & LHS)
30. Buckle Release Button
31. Buckle
32. Foot Rest
11
12
13
15 14
16
17 18
19
20
21
22
23
24
25
26
27
28
29
30
31
PRESS
32
7 8

Rearward Facing Installation
Group 0+ (birth to 13kgs)
NOTE: It is best to fit your child into the seat prior to installation to ensure the
position of the headrest and the configuration of soft inserts is correct. Refer to the
Harness Adjustment section for detailed instruction. CAUTION: The foam wedge
(fitted behind the body insert) is suitable for newborns and toddlers up until 13kg.
1. Locate the ISO-FIX anchorage points in your vehicle, in the seat bite between the
vehicle back rest and seat surface as shown in image A-1.
2. Adjust the seat to be rearward facing by squeezing the red rotation adjustment
handle with one hand and simultaneously rotating the seat with the other as shown
in image A-2. Once the seat is facing in the opposite direction, release the red
handle to lock the position.
NOTE: The red rotation adjustment handle is located at the front of the base, just
slightly behind the support leg. Refer to the Car Seat Features page for further
instruction, the handle is listed as item 22.
3. Adjust the seat recline into position three as shown in image A-3. This can be
achieved by squeezing the black recline adjustment handle and simultaneously,
pulling the seat into the maximum recline position. Once this position is reached,
release the handle to lock the position.
NOTE: The black recline adjustment handle is located underneath the front of the
seat. Refer to the Car Seat Features section of your manual for further instruction,
the handle is listed as item 20.
4. Place the restraint into the vehicle and align it to be central with the ISO-FIX
vehicle anchorages as shown in image A-4. When central, extend the ISO-FIX
latches on the restraint by squeezing the red adjuster buttons and simultaneously,
sliding them to the maximum adjustment positions as shown in image A-5.
NOTE: The ISO-FIX buttons are located either side of the base and are directly
behind the ISO-FIX latch slots. Refer to the Car Seat Features section of your
manual for further instruction, the button is listed as item 7.
5. With the ISO-FIX latches extended, push the child restraint into the vehicle seat,
connecting each latch onto each vehicle anchor. Ensure each latch is connected
correctly, by checking that the ISO-FIX adjuster button’s indicator has turned green
as shown in image A-6. To tighten the installation, once the latch indicator is green,
continue pushing the restraint’s base into the vehicle seat until the base is as firm as
possible against the seat as shown in image A-6.
6. Adjust the support leg down so that the foot is contacting the vehicle floor
and the indicator is green as shown in images A-7 and A-8. Ensure the base isn’t
unnaturally pitched by the position of the support leg, it should only be in the first
position that allows contact.
9 10
.
A-1 A-2

A-8
Forward Facing Installation
Group 1 (9kg to 18kgs)
NOTE: It is best to fit your child into the seat prior to installation to ensure the
position of the headrest and the configuration of soft inserts is correct. Refer to the
Harness Adjustment section for detailed instruction.
CAUTION: The foam wedge (fitted behind the body insert) is suitable for newborns
and toddlers up until 13kg. It is at the user’s discretion to decide when to remove the
wedge based on the independant growth of the child. It must however, be removed
once the child reaches 13kg.
1. Locate the ISO-FIX anchorage points in your vehicle, in the seat bite between the
vehicle back rest and seat surface as shown in image A-1.
2. Adjust the seat to be forward facing by squeezing the red rotation adjustment
handle with one hand and simultaneously rotating the seat with the other as shown
in image B-1. Once the seat is facing in the correct direction, release the red handle
to lock the position.
NOTE: The red rotation adjustment handle is located at the front of the base, just
slightly behind the support leg. Refer to the Car Seat Features section of your
manual for further instruction, the handle is listed as item 22.
3. Place the restraint into the vehicle and align it to be central with the ISO-FIX
vehicle anchorages as shown in image B-4. When central, extend the ISO-FIX
latches on the restraint by squeezing the red adjuster buttons and simultaneously,
sliding them to the maximum adjustment positions as shown in images B-2 and B-3.
NOTE: The buttons are located either side of the base and are directly behind
the ISO-FIX latch slots. Refer to the Car Seat Features section of your manual for
further instruction, the button is listed as item 7.
11 12
-
33
A-3 A-4
A-5 A-6
BB--11
CC--33

4. With the ISO-FIX latches extended, push the child restraint into the vehicle seat,
connecting each latch onto each vehicle anchor. Ensure each latch is connected
correctly, by checking that the ISO-FIX adjuster button’s indicator has turned green
as shown in image B-4. To tighten the installation, once the latch indicator is green,
continue pushing the restraint’s base into the vehicle seat until the base is as firm as
possible against the seat as shown in image B-4.
5. Adjust the support leg down so that the foot is contacting the vehicle floor and
the indicator is green as shown in image B-5. Ensure the base isn’t unnaturally
pitched by the position of the support leg, it should only be in the first position that
allows contact.
6. Once installed, the seat’s recline can be adjusted independently by squeezing the
black recline adjustment handle and sliding the seat into the preferred position as
shown in image C. Once the desired recline is achieved, release the handle to lock
the position.
B-5
B-3
B-2
BB--11
CC--33
B-4
C
11
22
33
13 14
B-1
A-1

Adjusting the Harness
Group 0+ and 1
Loosening and Tightening the Harness
1. To release the harness, press the central red button located on the buckle and
pull the buckle tongues out as shown in image C-1. Refer to the Car Seat Features
page, item 30.
2. To loosen the harness, push on the vertical adjuster lever (located in the adjuster
slot found at the front of the seat, indicated by a white arrow) whilst simultaneously
pulling on the shoulder straps as shown in image C-2 and C-3. Refer to the Car Seat
Features section of your manual, item 18.
NOTE: Do not pull on the shoulder pads as their position is fixed and this will prevent
the strap length from adjusting.
3. To secure the harness, position the RHS buckle tongue on top of the top of the
left, so they are connected as shown in image C-4 and C-5. Once connected, push
them into the top of the buckle slot until you hear a click C-5.
4. To tighten the harness, pull on the adjuster strap found at the front of the seat
(in front of the adjuster slot) until the harness is firm against the child and there is
no belt slack as shown in image C-6. Refer to the Car Seat Features section of your
manual, item 19.
CAUTION: Ensure the harness straps are never twisted as this is dangerous and
could result in injury or death.
15 16
C-1
C-2
C-3
D-8
C- 6
C-4
C-5

Adjusting the Headrest Height
1. Completely loosen the harness to allow the headrest to adjust as shown in
images C-2 and C-3.
2. Squeeze the headrest height adjustment handle at the top of the headrest and
simultaneously, slide the headrest up or down to change positions as shown in
image C-7.
3. Once the desired height is reached, release the handle to lock the position. To
ensure position is locked, press down on the headrest to ensure it doesn’t shift. If it
does shift, it will lock into the position slightly below the original height. If this is too
low, repeat the steps and position the headrest slightly higher. There are 7 positions
to adjust between as shown in image C-8.
NOTE: Headrest height should be in a position so that in rearward facing, the
shoulder straps are level or slightly below the child’s shoulder but not above and
that in forward facing, the shoulder straps are level or slightly above the shoulder
but not below.
17 18
C-7
C-8
C-9

Forward Facing Installation
Group 2 (15kg to 25kgs)
FORWARD FACING
1515 --2525
Attention:
Please store the 5 point harness system underneath the seat fabrics when
using Group II (15-25kg)
NOTE: Only use this configuration once the child’s weight exceeds the minimum
weight range and their shoulder height is above the maximum harness height
position.
1. Remove the infant head and body inserts and pillow. First unclip and loosen the
harness and then pull out the inserts from around the harness before then removing
the pillow. This is shown in images D-1, D-2 and D-3.
2. Remove the buckle and buckle pad. To remove the crotch buckle pad, pull
and slide it off the buckle as shown in image D-3. To remove the buckle, reach
underneath the seat (it is helpful to adjust the seat into maximum recline to improve
access) and thread the retaining clip back through the slot as shown in image D-4.
The buckle should now be separated from the seat.
3. Store the shoulder straps and pads behind the seat fabric panels. First release
the 6 press studs located around the harness as shown in image D-5. Push the
headrest back panel up and over the headrest and pull the lower back panel
forward over the buckle slot. Thread the harness and buckle tongues behind the
panels, positioning them flat and then resecure the press studs.
4. The child will now be secured with the vehicle seatbelt or lap-sash belt, with
the sash portion crossing over their chest starting at their door side shoulder and
finishing on their opposing waist side – clipped into the buckle. The lap belt will cross
over the waist, beginning at their door side and finishing on the opposing as shown
in images E-1 and E-2.
5. Thread the shoulder or sash portion of the vehicle seatbelt through the red belt
hook - closest to the retractor and then through the headrest clip as shown in
image E-3.
19 20

6. Once the sash portion of the vehicle seatbelt is threaded correctly as per step 5,
thread the lap belt portion closest to the door through the waist guide.
7. Once the lap and sash belts are threaded correctly through their guides, pull the
vehicle belt across the child and thread the two belts through the opposing waist
guide before clipping the buckle tongue into the buckle to secure the child.
CAUTION: Make sure there are no twists in the belts and the vehicle belt is
threaded through the waist guides and is not just “on top” of them. Incorrect use is
dangerous and could result in serious injury or death.
Remove the crotch buckle pad
by pulling it up and off the buckle.
Remove the headrest insert by
disconnecting the press stud.
Remove the body insert by
pulling it out from the harness
and up and over the buckle.
D-1 D-2
21 22
D-3
D-4
D-5 D- 6
PULL PU LL
PULLPULL
PULL PU LL

Care and Maintenance
Removing the infant inserts
1. Remove the infant inserts by loosening the harness and pulling them out from
around the waist and shoulder straps.
2. Remove the buckle pad by sliding it off the buckle.
3. Remove the headrest padding by first releasing the press studs around the
shoulder straps and then pulling the cover up and away from the headrest
Cleaning the infant inserts
The infant inserts can be washed at 30 degrees celsius with mild detergent using
the delicate setting on your washing machine. Never tumble dry or dry-clean, only
line dry inside out.
Cleaning the Car Seat
The seat is wipe clean only.The plastic and metal components can be cleaned
using soapy water but do not use harsh cleaning agents or solvents.
E-3
1
2
E-5
E-6
E-4
23 24

Cleaning the Harness Buckle
The buckle may need periodic cleaning if the child regularly eats and drinks whilst
seated in the restraint. Ensure the buckle is checked regularly for accumulating debris
or dried liquids that could prevent operation. If the buckle’s audible click becomes
muted or is no longer latching, clean it immediately before use.
Remove the buckle by releasing the retention clip underneath the seat and threading
it back through the slot.
Once removed, rinse thoroughly under warm water to loosen any debris.
If this is ineffective, allow the buckle to soak in warm water over night.
DO NOT take apart or attempt to disassemble the buckle or any of its components.
DO NOT use solvents, detergents or and washing liquids as this
may cause irreparable damage to the buckle or buckle straps.
DO NOT lubricate or oil any part of the buckle, affiliated components or any parts
of the seat.
Replacing Damaged Components
If your seat trim becomes damaged, only replace it with one provided by Ickle
Bubba as it is dangerous to use an uncertified replacement. If you need a
replacement cover, contact our customer care team.
It is not safe to buy or sell secondhand restraints. Please dispose of your child
restraint safely once it has been involved in an accident or is damaged. Although
it may look undamaged, after an accident, a child restraint can have hidden stress
and strain that could make it ineffective if another accident was to occur.
1
25 26

Warranty:
We guarantee that this product was manufactured in accordance with the current
European safety requirements and quality standards applicable to this product,
and is free from defects in workmanship and material at the time of purchase.
During the production process the product was subjected to various quality checks.
If this product, despite our best efforts, shows a material/manufacturing fault within
the warranty period, (with normal use as described in the user instructions) we will
comply with the warranty terms and conditions.
Warranty Term
The warranty applies for a period of 24 consecutive months from the date the
product was purchased. The warranty only applies for the first owner and is not
transferable.
Free 4 Year Extended Warranty
To activate your 4 year warranty, register online and keep your proof of purchase
for any future claim. If you register within 28 days of purchase we will extend your
standard warranty to 4 years from the date of purchase at no extra cost.
THE WARRANTY IS NOT VALID IN THE FOLLOWING CASES:
1. In the case of a use or purpose other than described in the manual.
2. If the product is submitted for repair through a dealer that is not authorised by us.
3. If the product is not supplied to the manufacturer with the original purchase
receipt (via the retailer).
4. If repairs were carried out by third parties or a dealer that is not authorised by us.
5. If the defect is the result of improper or careless use or maintenance, negligence
or impact damage to the fabric cover and/or frame.
6. If the parts show normal wear and tear that may be expected from daily use of a
product (wheels, rotating and moving parts etc.)
If in Doubt
Not all car seats fit all cars. For advice as to the suitability of this product for your
car, please contact your vehicle manufacturer. We cannot accept responsibility for
damage occurring to vehicle seats or seat belts through normal use of this product.
Notice:
This car seat is a "Universal" child restraint system. It has been approved in
accordance with regulation ECE R44/04, and is suitable for general use in vehicles
which are fitted with 3 point static or retractable lap and diagonal seat belts
approved to ECE Rl6 and with lsofix anchorages approved to ECE Rl4.
This child restraint is likely to fit if the vehicle manufacturer states that the vehicle
approval specifies suitability for "Universal" child restraint systems Class A, B, Bl.
This restraint system is classified as "Universal" in accordance with the strictest
approval criteria, whereas earlier models do not correspond to these new
provisions. This restraint system is classified as "Universal" use and is suitable for
fixing into seat positions according to the vehicle fitting list provided. If in doubt,
contact the manufacturer or retailer of the car seat.
27 28

29 30
FR
Produit: Siège-auto Radius (moins de 25kg)
Groupe 0+ (moins de 13kg / de la naissance à 12-15 mois environ)
Groupe 1 (de 9kg à 18kg / de 9mois environ à 4 ans)
Groupe 2 (de 15 kg à 25kg / de 3 ans à 7 ans environ)
Merci d'avoir acheté ce siège-auto du groupe 0+, 1, 2. Si vous n’êtes
pas pleinement satisfait du siège-auto ou si vous souhaitez changer un
accessoire ou obtenir de l’aide à propos du siège-auto, veuillez contacter
notre service client.
Veuillez noter: Utilisation sur les véhicules équipés d'une ceinture de
sécurité rétractable à 3 points ou à fixations lsofix uniquement.
Veuillez lire attentivement le mode d’emploi avant utilisation et le
conserver pour référence ultérieure.
SOMMAIRE
• Avertissements 31
• Caractéristiques et composants du siège d'auto 35
• Installation dos à la route pour le groupe 0+ (moins de 13 kg) 37
• Installation face à la route pour le groupe 1 (de 9kg à 18kg) 40
• Réglage du harnais 43
• Installation face à la route pour le groupe 2 (de 15kg à 25kg) 47
• Entretien et maintenance 52
• Garantie et garantie produit 55

ATTENTION!
ATTENTION! Veuillez lire attentivement le mode d’emploi avant utilisation et le
conserver pour référence ultérieure. Installez et utilisez le siège de sécurité enfant
tel que décrit dans le mode d’emploi. Le non-respect de cette consigne peut
entraîner des blessures graves ou mortelles. Conservez le mode d’emploi avec le
dispositif de retenue pour enfants pour toute référence ultérieure. Ce siège est
conforme à la norme ECE R44/04 et est classé dans le Groupe 0+ (moins de 13kg)
dos à la route, Groupe I (9-18kg) qui doit être maintenu par le système Isofix +
jambe de force. Groupe II (15-25kg) qui doit être installé par Isofix + jambe de force.
Ce siège ne doit être utilisé que dans un véhicule équipé du système Isofix + jambe
de force. ATTENTION! En raison des problèmes médicaux potentiels inhérents aux
nourrissons très légers et aux prématurés, demandez toujours à un médecin ou à
un membre du personnel hospitalier d'évaluer l'adéquation du dispositif de retenue
pour enfants avant de quitter l'hôpital ou de l'utiliser. Le coussin de siège doit être
utilisé dans le groupe 0+ (moins de 13kg).
AVERTISSEMENTS!
AVERTISSEMENT : L’orientation appropriée de la ceinture de sécurité est essentielle
pour la sécurité de votre enfant. Veuillez consulter la section Installation. N’enfilez
jamais la ceinture d’une autre manière.
Un harnais correctement ajusté est essentiel pour la sécurité de votre enfant.
Ne laissez JAMAIS un enfant sans surveillance dans le siège-auto de la voiture.
N’utilisez JAMAIS le siège-auto sur un siège équipé d’un airbag frontal, à moins que
l'airbag ne soit désactivé, car cela peut entraîner la mort ou la blessure du bébé. Ceci
ne s'applique pas aux airbags latéraux.
N'utilisez jamais le siège auto sans le dossier, car il ne protégera pas votre enfant en
cas d'accident.
NE PAS utiliser ce dispositif de retenue pour enfants avec une autre base, sauf celles
autorisées par le fabricant.
NE PAS laisser votre enfant dans ce dispositif de retenue pendant de longues
périodes.
NE PAS utiliser un siège de sécurité enfant dont les pièces sont endommagées ou
manquantes.
NE PAS utiliser des sangles de harnais ou de ceinture de véhicule endommagées ou
effritées.
NE PAS utiliser un siège de sécurité enfant qui a subi un accident. Un accident peut
causer des dommages invisibles au siège de sécurité enfant.
NE PAS utiliser un siège enfant d'occasion ou dont vous ne connaissez pas
l'historique.
NE PAS utiliser ce siège-auto à la maison. Il n’a pas été conçu pour une utilisation
domestique et doit uniquement être utilisé dans votre voiture.
Le siège doit toujours être fixé, même lorsqu'il n'est pas utilisé.
Les éléments rigides et les pièces en plastique du dispositif de retenue pour
enfants doivent être placés et installés de manière à ce qu'ils ne risquent pas, lors
de l'utilisation quotidienne du véhicule, d'être coincés par un siège mobile ou une
portière du véhicule. Les sangles qui maintiennent le dispositif de retenue doivent
être serrées. Les sangles retenant l’enfant doivent être ajustées au corps de l’enfant,
et elle ne doivent pas être tordues.
Il est important de s'assurer que la sangle abdominale est portée au niveau le plus
bas, de manière à ce que le bassin soit fermement maintenu.
Il est dangereux d'apporter des modifications ou des ajouts au dispositif sans
l'approbation d'une autorité compétente, et de ne pas suivre attentivement les
instructions d'installation fournies par le fabricant du dispositif de retenue pour
enfants.
Le siège doit être protégé des rayons du soleil, au risque d’être à température trop
élevée pour la peau de l’enfant.
Tout bagage ou autre objet susceptible de causer des blessures en cas de collision
doit être correctement maintenu.
Le dispositif de retenue pour enfants ne doit pas être utilisé sans la housse. La
housse du siège ne doit pas être remplacée par une autre que celle recommandée
par le fabricant, car la housse fait partie intégrante de la performance du dispositif
de retenue.
Si la position de la boucle de la ceinture de sécurité du véhicule par rapport
aux principaux points de contact porteurs du siège de sécurité enfant n'est pas
satisfaisante, veuillez contacter le fabricant.
N’utilisez aucun autre point de contact porteur que ceux décrits dans les instructions
et indiqués sur le dispositif de retenue pour enfants.
Si la hauteur de la ceinture de sécurité est réglable, réglez-la sur la position la
plus basse.
31 32

33 34
NO
AVERTISSEMENTS!
Lorsque vous attachez votre enfant à l'aide de la ceinture du véhicule pour le
groupe II, vous DEVEZ UNIQUEMENT utiliser une ceinture sous-abdominale
(ceinture de sécurité à 3 points) composée d’une sangle abdominale et d’une
sangle diagonale. N'utilisez JAMAIS une ceinture à sangle abdominale uniquement
car cela pourrait entraîner des blessures graves ou mortelles pour l'occupant.
Veuillez consulter le tableau et le diagramme ci-dessous.
Voici les positions d'installation pour référence.
Face à la route √
Dos à la route √
Ceintures de sécurité à deux points X
Ceintures de sécurité à trois points √
Siège passager avant X
Sièges arrières du véhicule √
AVERTISSEMENTS!
N'attachez JAMAIS le dispositif de retenue pour enfants sur le siège passager
avant car le déploiement de l’airbag interférerait avec la sécurité du dispositif et
pourrait causer des blessures graves ou mortelles.
Attachez TOUJOURS le dispositif de retenue pour enfants aux sièges arrières du
véhicule.
N’attachez JAMAIS le dispositif de retenue pour enfants aux sièges du véhicule
tournés vers l'arrière ou le côté.
Reportez-vous au graphique ci-dessous pour choisir le siège du véhicule sur lequel
installer votre dispositif de retenue pour enfants.

11
12
13
15 14
16
17 18
19
20
21
22
23
24
25
26
27
28
29
30
31
PRESS
32
35 36
Caractéristiques du siège-auto
1. Crochets de ceinture (côté gauche et droit)
2. Coque du siège
3. Housse de rembourrage du siège
4. Housse arrière du siège
5. Guide de ceinture de sécurité RHS (LHS dans un véhicule inversé)
6. Indicateur de connexion ISO-FIX
7. Bouton de réglage ISO-FIX
8. Manchon ISO-FIX
9. Loquet ISO-FIX
10. Ensemble ISO-FIX
11. Poignée de réglage de la hauteur de l'appui-tête
12. Appui-tête
13. Coussinet de tête
14. Fentes des sangles d’épaules
15. Sangles d'épaules
16. Coussinet de corps
17. Coussinet de boucle d'entrejambe
18. Levier de réglage du harnais (sous la fente de la housse du siège)
19. Sangle de réglage du harnais
20. Poignée de réglage de l’inclinaison
21. Base
22. Poignée de réglage de la rotation du siège
23. Charnière de la jambe de force
24. Jambe de force
25. Bouton de réglage de la hauteur de la jambe de force
26. Indicateur d’installation de la jambe de force
27. Coussinets d’épaules
28. Ceintures d’épaules
29. Languette de la boucle (RHS & LHS)
30. Bouton de libération de la boucle
31. Boucle
32. Repose-pieds
Other manuals for RADIUS
1
Table of contents
Languages:
Other icklebubba Car Seat manuals

icklebubba
icklebubba ROTATOR User manual

icklebubba
icklebubba RADIUS User manual

icklebubba
icklebubba Astral User manual

icklebubba
icklebubba RADIAL I-SIZE PLUS User manual

icklebubba
icklebubba ROTATOR I-SIZE User manual

icklebubba
icklebubba Mercury User manual

icklebubba
icklebubba Astral User manual

icklebubba
icklebubba Mercury User manual

icklebubba
icklebubba Astral User manual

icklebubba
icklebubba STRATUS User manual