Icom IC-7200 Setup guide

Icom, Icom Inc. and the Icom logo are registered trademarks of Icom Incorporated (Japan) in Japan, the United States, the
United Kingdom, Germany, France, Spain, Russia and/or other countries.
Adobe and Adobe Reader are registered trademark of Adobe Systems Incorporated.
All other products or brands are registered trademarks or trademarks of their respective holders.
About these Advanced Instructions (PDF format)
These Advanced Instructions describe the details of the IC-7200 features.This PDF formatted manual provides you
with convenient functions, as follows.
INTRODUCTION
Previous view
3-7
3BASIC OPERATION
Frequency setting (Continued)�
DQuick tuning function
The operating frequency can be changed in steps of
0.1, 1, 5, 9 or 10 kHz selectable for quick tuning.
PushqTS to turn ON the Quick tuning function.
“Z•
•
•
•
” appears.
Rotatew[DIAL] to change the frequency in pro-
grammed kHz steps.
PusheTS again to turn OFF the Quick tuning func-
tion.
“Z” disappears.
Rotater[DIAL] for normal tuning, if desired.
DSelecting ‘kHz’ step
When the Quick tuning function is selected, the fre-
quency can be changed in the selected ‘kHz’ steps.
• 0.1, 1, 5, 9 or 10 kHz are selectable.
PushqTS to turn ON the Quick tuning function.
“Z” appears.
Hold downwTS for 1 second to enter the tuning
step Set mode.
Rotatee[DIAL] to select the desired tuning step of
0.1, 1, 5, 9 or 10 kHz.
PushrTS to exit the tuning step Set mode.
Rotatet[DIAL] to change the frequency according
to the set tuning step.
PushyTS to turn OFF the Quick tuning function.
“Z” disappears.
[DIAL]
Appears
[DIAL]
Appears
T u ning step Set mode
Hold down TS
Move to the previously read page.
Click [Previous view] at the left top on an each page, to
move back to the previously read page.
Shows a term description
When the mouse cursor is moved over a term which
is highlighted in yellow, the description of the term is
displayed.
Shows the location of keys
When the cursor is moved over a term with a red un-
derline, a red circle appears around the appropriate
key(s) on the figure of the transceiver.
The screen shots at the right column, correspond to
the operating instructions and procedures shows both
setting and operating example.
Example: When the cursor is moved over TS in the
description, a red circle appears around the
appropriate key(s).
Previous view

1
INTRODUCTION
2
3
4
5
6
7
8
9
10
11
12
13
14
15
16
17
18
19
20
21
INTRODUCTION
Functions and features of Adobe®Reader®
The following functions and features can be used with Adobe®Reader®.
• Keyword search
Click “Find (Ctrl+F)” or “Advanced
Search (Shift+Ctrl+F)” in the Edit
menu to open the search screen.
This is convenient when search-
ing for a particular word or phrase
in this manual.
*The menu screen may differ, depend-
ing on the Adobe®Reader®version.
• Find screen
• Advanced search screen
Click to open the find or search
screen or advanced search screen.
• Printing out the desired pages.
Click “Print (P)” in File menu, and then select the pa-
per size and page numbers you want to print.
*The printing setup may differ, depending on the
printer. Refer to your printer’s instruction manual
for details.
*Select "A4" size to print out the page in the equal-
ized size.
• Read Out Loud feature.
The Read Out Loud feature reads aloud the text in
this Instruction Manual.
Refer to the Adobe®Reader®Help for the details.
(This feature may not be usable, depending on your
PC environment including the operating system.)
*The screen may differ, depending on the Adobe®Reader®version.
Previous view

ADVANCED INSTRUCTIONS
Iç-7200
HF/50 MHz TRANSCEIVER
12 INFORMATION
INDEX
11 CONTROL COMMAND
INDEX
10 SET MODE
9 ANTENNA TUNER OPERATION
8 SCAN OPERATION
7 MEMORY OPERATION
6 FUNCTIONS FOR TRANSMIT
5 FUNCTIONS FOR RECEIVE
4 RECEIVE AND TRANSMIT
3 BASIC OPERATION
2 INSTALLATION AND CONNECTIONS
1 PANEL DESCRIPTION
INTRODUCTION

1
2
3
4
5
6
7
8
9
10
11
12
13
14
15
16
17
18
19
20
21
1-1
Section 1
PANEL DESCRIPTION
Front panel■.................................................................... 1-2
KeypadD....................................................................... 1-9
Function display■........................................................... 1-12
Rear panel■................................................................... 1-14
ACC socket informationD........................................... 1-16
Microphones■................................................................ 1-17
SM-50 (Option)D........................................................ 1-17
SM-30 (Option)D........................................................ 1-17
HM-36D...................................................................... 1-17

1-2
1PANEL DESCRIPTION
q PASSBAND TUNING CONTROLS [TWIN PBT]
Adjust the receiver’s DSP filter passband width.
(p. 5-4)
• The limit of the variable range depends on the passband
width and operating mode.The limit of the variable range
is half of the passband width, and PBT is adjustable in
200 Hz (AM) or 50 Hz (other modes) steps.
• Rotating both [TWIN PBT] controls (PBT1 and PBT2) to
the same position shifts the IF higher or lower.
What is the PBT control?✓
Generally, the PBT electronically narrows the IF pass-
band width to reject interference. This transceiver uses
the DSP circuit for the PBT function.
PBT2
PBT1
Low cutHigh cut Center
TWIN PBT TWIN PBT TWIN PBT
–+
w NOISE BLANKER KEY NB (p. 5-7)
Push to turn the noise blanker function ON or➥
OFF.
• “ ” appears when the noise blanker function is
ON.
Hold down for 1 second to enter the noise blanker➥
Set mode to set the noise blanker level and blank
width; push again to return to normal operation.
• When entering the noise blanker Set mode, the noise
blanker function is automatically turned ON.
• In the noise blanker Set mode, rotate [M-CH] (u) to
select the item, then rotate [DIAL] to set.
What is the noise blanker?✓
The noise blanker reduces pulse-type noise such as
that generated by automobile ignition systems. This
function is not effective against non pulse-type noise.
e NR KEY NR (p. 5-8)
Push to turn the noise reduction function ON or➥
OFF.
• “ ” appears when the noise reduction function is
ON.
Hold down for 1 second to enter the noise re-➥
duction level Set mode
; push again to return to
normal operation.
• When entering the noise reduction Set mode, the
noise reduction function is automatically turned ON.
•
In the noise reduction Set mode, rotate [DIAL] to set.
What is the Noise Reduction function?✓
The Noise Reduction (NR) function removes random
noise from the receiver passband. The level is adjust-
able to allow maximum clarity without harming the
intelligibility of the desired signal. Noise Reduction
should generally not be used in the digital modes.
i7200
MODE
TUNER
TS
FILTER
SPCH
V/M
A/B
SPLIT
M-CL
SCAN
SET
ATT
P
.
AMP
COMP
VOX
MNF
RIT
123
456
78
0
50
28
1814
10
21 24
=
7
3.51.8
F-INP
M-CH/RIT
ENT
BAND
GENE
9
.
AGC
MW
ANF
METER
NRNB
Speaker ew
Function
Display (p. 1-12)
q
■Front panel
Previous view

1-3
1PANEL DESCRIPTION
rANF/METER KEY ANF
METER (p. 5-9)
➥
Push to turn the Automatic Notch Filter function
ON or OFF in the SSB and AM modes.
•“ ” appears when the automatic notch filter func-
tion is ON.
Hold down for 1 second to toggle the meter func-➥
tion. (pp. 3-13, 6-11)
PO ➟SWR ➟ALC
•PO : Displays the relative RF output power.
•SWR : Displays the SWR of the antenna.
•ALC : Displays the ALC level.
What is the Automatic Notch Filter?✓
The Automatic Notch Filter is a narrow DSP filter that
automatically identifies and attenuates beat tones,
tuning signals, CW, and so on, even if they are mov-
ing. It removes them from the receiver passband while
preserving the desired signal’s audio frequency re-
sponse.
tKEYPAD
Push the keys to select various functions. Details➥
on each function are listed on page 1-9.
After holding down➥F-INP ENT
BAND for 1 second, push
a key on the keypad to select the operating band.
(p. 3-4)
•Afterthebandhasbeenusedonce,thelastusedfre-
quency is recalled when the band is selected again.
• •
GENE selects the general coverage receive band.
After pushing➥F-INP ENT
BAND , push a key on the key-
pad to enter a frequency. After entering, push
F-INP ENT
BAND again. (p. 3-6)
•ForexampleToenter14.195MHz;
Push F-INP ENT
BAND , 1
1.8 , 4
10 , •
GENE , 1
1.8 , 9
28 , 5
14
and F-INP ENT
BAND .
Front panel (Continued)■
i7200
MODE
TUNER
TS
FILTER
SPCH
V/M
A/B
SPLIT
M-CL
SCAN
SET
ATT
P
.
AMP
COMP
VOX
MNF
RIT
123
456
78
0
50
28
1814
10
21 24
=
7
3.51.8
F-INP
M-CH/RIT
ENT
BAND
GENE
9
.
AGC
MW
ANF
METER
NRNB
Speaker tr
Function
Display (p. 1-12)
Previous view

1-4
1PANEL DESCRIPTION
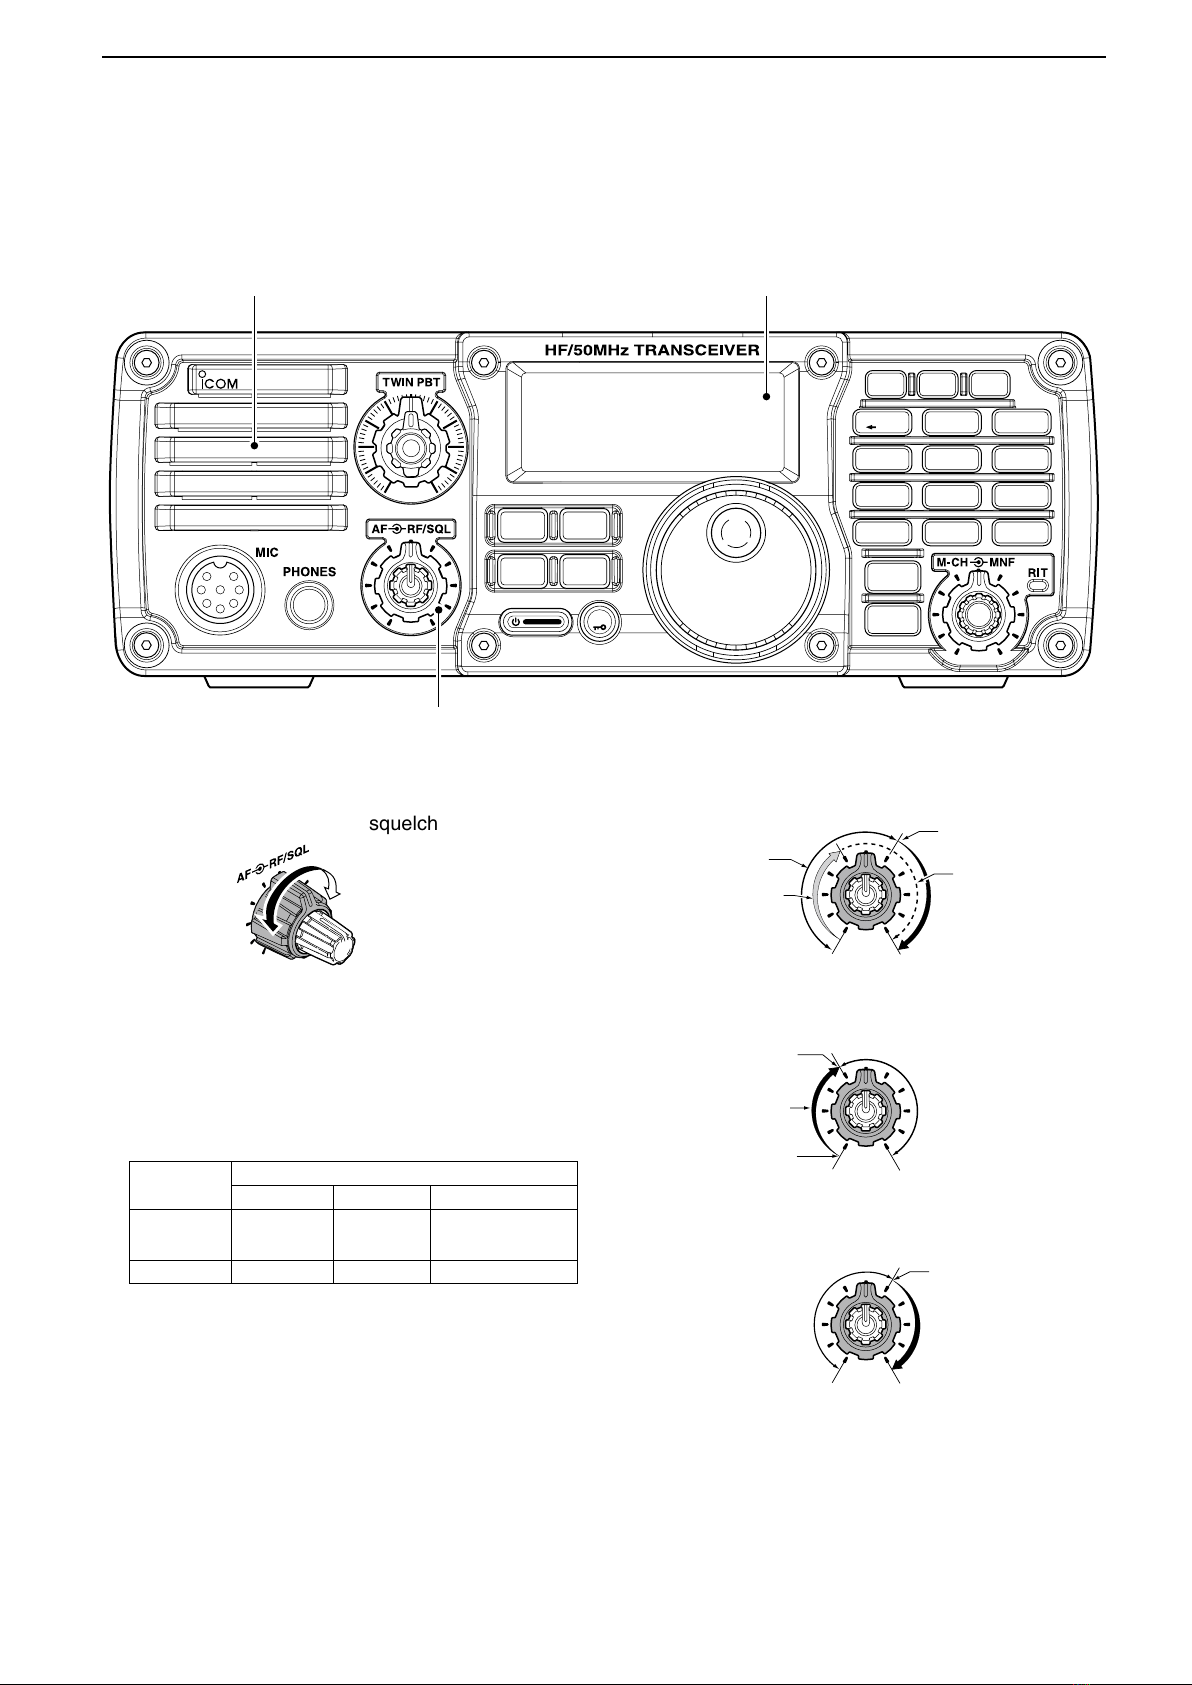
u M-CH/RIT CONTROL [M-CH] (inner control)
While in the Set mode/Quick Set mode, rotate to➥
select the Set mode item. (p. 10-2)
This control can be set as the memory channel➥
control or the RIT control.
• The RIT function should be turned ON rst to activate
this control as the RIT control. (p. 5-2)
- “ ” appears when the RIT function is ON.
• The RIT control indicator (i) lights orange when this
control is activated as the RIT control.
When [M-CH] acts as the M-CH control:
Rotate to select a memory channel. (p. 7-2)
OFF
M-CH
Channel decreases
Channel increases
When [M-CH] acts as the RIT control:
Rotate to shift the receive frequency. (p. 5-2)
• Rotate the control clockwise to incerase the frequen-
cy, or rotate the control counterclockwise to decrease
the frequency.
• The shift frequency range is ±9.999 kHz in 1 Hz steps
(or ±9.99 kHz in 10 Hz steps).
Lights orange
RIT
Frequency decreases
Frequency increases
What is the RIT function?✓
The RIT (Receiver Incremental Tuning) shifts the re-
ceive frequency without shifting the transmit frequency.
This is useful for fine tuning stations calling you off fre-
quency, or when you prefer to listen to slightly different
sounding audio characteristics.
• About the [M-CH] control activation:
RIT control indicator (ias below)
Lights OFF
icon
(!6 on page
1-13)
Appears Acts as the
RIT control Acts as the memo-
ry channel control
Disappears N/A
i RIT CONTROL INDICATOR (pp. 5-2, 7-2)
Lights orange when the [M-CH] control (u) is se-
lected as the RIT control.
o M-CH/RIT•SET KEY M-CH/RIT
SET
Push to toggle the➥[M-CH] control between the
memory channel control and the RIT control.
•
The RIT function should be turned ON first.
(p. 5-2)
• The RIT control indicator (y) lights orange when the
[M-CH] control functions as the RIT control.
Hold down for 1 second to enter the Quick Set➥
mode. (p. 10-2)
In the Quick Set mode, hold down for 1 second to➥
enter the Set mode (p. 10-3)
In the Quick Set mode or Set mode, push➥to re-
turn to normal operation.(p. 10-2, 10-3)
i7200
MODE
TUNER
TS
FILTER
SPCH
V/M
A/B
SPLIT
M-CL
SCAN
SET
ATT
P
.
AMP
COMP
VOX
MNF
RIT
123
456
78
0
50
28
1814
10
21 24
=
7
3.51.8
F-INP
M-CH/RIT
ENT
BAND
GENE
9
.
AGC
MW
ANF
METER
NRNB
Speaker
Function
Display (p. 1-12) u
io
Front panel (Continued)■
Previous view

1-5
1PANEL DESCRIPTION
o MANUAL NOTCH FILTER CONTROL [MNF]
(outer control; p. 5-9)
Rotate to adjust the notch filter frequency to reject
an interfering signal while the manual notch function
is ON.
• Select the narrow, mid or wide lter width in the manual
notch filter Set mode.
Higher frequency
Lower frequency
What is the Manual Notch Filter?✓
The Manual Notch Filter is an adjustable narrow DSP
filter that removes tones from CW, SSB, AM or RTTY
or other signals, while preserving the desired signal’s
frequency response.
!0 TUNING STEP KEY TS (pp. 3-7, 3-8)
Push to turn the Quick tuning function ON or➥
OFF.
• “√” appears above the 1 kHz indicator when the
Quick tuning function is turned ON and the frequency
is changed in the selected ‘kHz’ steps.
“➥√” appears when the Quick tuning function is
turned ON.
Hold down for 1 second to enter tun-
ing step Set mode.
After selecting a step, push again to return to nor-
mal operation.
• 0.1, 1, 5, 9 and 10 kHz tuning steps are selectable.
➥
While the
Quick
tuning function is turned OFF,
hold down for 1 second to turn the 1 Hz step ON
or OFF.
• 1 Hz indication appears, and the frequency is changed
in 1 Hz steps.
!1 MODE KEY MODE (p. 3-11)
Push to cycle through the operating modes:➥
USB/LSB➥➟CW/CW-R ➟RTTY/RTTY-R ➟AM
Hold down for 1 second to toggle the following➥
operating modes:
USB ↔ LSB (p. 4-2)
CW ↔ CW-R (Reverse) (p. 4-5)
RTTY ↔ RTTY-R (Reverse) (p. 4-10)
• “CW-R” or “RTTY-R” appears when the reverse mode
is selected.
You can temporarily disable modes you do not
want to be selectable, in the Set mode. (p. 10-16)
Front panel (Continued)■
i7200
MODE
TUNER
TS
FILTER
SPCH
V/M
A/B
SPLIT
M-CL
SCAN
SET
ATT
P
.
AMP
COMP
VOX
MNF
RIT
123
456
78
0
50
28
1814
10
21 24
=
7
3.51.8
F-INP
M-CH/RIT
ENT
BAND
GENE
9
.
AGC
MW
ANF
METER
NRNB
Speaker
Function
Display (p. 1-12)
o
!0!1
Previous view

1-6
1PANEL DESCRIPTION
Front panel (Continued)■
!2 PREAMP/ATTENUATOR KEY P.AMP
ATT (p. 5-3)
Push to turn the preamp ON or OFF.➥
• “ ” appears when the preamp is ON.
Hold down for 1 second to turn ON the 20 dB at-➥
tenuator; push to turn OFF the attenuator.
• “ ” appears when the attenuator is ON.
What is the preamp?✓
The preamp amplifies signals in the receiver front end
(input) circuit to improve the sensitivity. Turn ON the
preamp when receiving weak signals.
What is the attenuator?✓
The attenuator prevents a strong undesired signal
near the desired frequency or near your location, such
as from a broadcast station, from causing distortion or
spurious signals.
!3 MAIN DIAL [DIAL]
Changes the displayed frequency and selects val-
ues for selected Set mode/Quick Set mode items.
!4 FILTER KEY FILTER (p. 5-5)
Push to select the wide, mid or narrow IF filter➥
setting for the selected band.
Hold down for 1 second to enter the filter Set➥
mode.
• Rotate [DIAL] to adjust the lter width, then hold
down the key again to return to normal operation.
!5 SPCH•LOCK KEY
SPCH
➥
Push to announce the displayed frequency and S-
meter level by the speech synthesizer. (p. 3-13)
• The items to be announced can be selected in the
Set mode. (p. 10-12)
Hold down for 1 second to turn the Dial lock func-➥
tion ON or OFF. (p. 3-12)
• The dial lock function electronically locks the main
dial.
• “ ” appears while the dial lock function is ON.
!6 POWER KEY
Push to turn ON power.➥
• First turn ON the DC power supply.
Hold down for 1 second to turn OFF power.➥
!7 TUNER KEY TUNER (p. 9-2, 9-4)
Push to turn the automatic antenna tuner func-➥
tion ON or OFF.
• An optional antenna tuner must be connected.
• “ ” appears when the automatic antenna tuner
function is ON.
Hold down for 1 second to start the antenna tun-➥
er.
• An optional antenna tuner must be connected.
• When the tuner cannot tune the antenna within
20 seconds, the tuning circuit is automatically by-
passed.
i7200
MODE
TUNER
TS
FILTER
SPCH
V/M
A/B
SPLIT
M-CL
SCAN
SET
ATT
P
.
AMP
COMP
VOX
MNF
RIT
123
456
78
0
50
28
1814
10
21 24
=
7
3.51.8
F-INP
M-CH/RIT
ENT
BAND
GENE
9
.
AGC
MW
ANF
METER
NRNB
Speaker
Function
Display (p. 1-12)
!3!5 !4!6!7 !2
Previous view

1-7
1PANEL DESCRIPTION
!8 RF GAIN/SQUELCH CONTROL [RF/SQL]
(outer control: p. 3-12)
Adjusts the RF gain and squelch threshold level.➥
➥
The squelch removes noise output from the
speaker (closed) when no signal is received.
• The squelch is usable in all modes.
• The control can be set as the squelch plus RF gain
controls, squelch control only (RF gain is fixed at
maximum) or Auto (RF gain control in SSB, CW and
RTTY; squelch control in AM) in the Set mode.
MODE SET MODE SETTING
AUTO SQL RF + SQL
SSB, CW
RTTY RF GAIN SQL RF GAIN + SQL
AM SQL SQL RF GAIN + SQL
Minimum RF gain
Adjustable range
RF gain adjustable
range
Maximum RF gain
Maximum RF gain
Squelch is open. S-meter squelch
S-meter squelch
threshold
Lowest threshold Highest threshold
Squelch is open.
S-meter squelch
S-meter squelch
threshold
• When functioning as the RF GAIN/SQL control
• When functioning as the RF GAIN control
(Squelch is fixed open; SSB, CW, RTTY only)
• When functioning as the SQL control
(RF gain is fixed at maximum.)
Front panel (Continued)■
i7200
MODE
TUNER
TS
FILTER
SPCH
V/M
A/B
SPLIT
M-CL
SCAN
SET
ATT
P
.
AMP
COMP
VOX
MNF
RIT
123
456
78
0
50
28
1814
10
21 24
=
7
3.51.8
F-INP
M-CH/RIT
ENT
BAND
GENE
9
.
AGC
MW
ANF
METER
NRNB
Speaker
Function
Display (p. 1-12)
!8
Previous view

1-8
1PANEL DESCRIPTION
!9 AF CONTROL [AF] (inner control; p. 3-11)
Adjusts the audio output level from the speaker.
Audio output
decreases
Audio output
increases
@0 HEADPHONE JACK [PHONES]
Accepts headphones with 8–16 Ωimpedance.
• Output power: 5 mW with an 8 Ωload.
• When headphones are connected, the speaker audio is
disabled.
@1 MICROPHONE CONNECTOR [MIC]
Accepts the supplied or optional microphones.
• See page 1-17 for appropriate microphones and micro-
phone connector information.
Front panel (Continued)■
i7200
MODE
TUNER
TS
FILTER
SPCH
V/M
A/B
SPLIT
M-CL
SCAN
SET
ATT
P
.
AMP
COMP
VOX
MNF
RIT
123
456
78
0
50
28
1814
10
21 24
=
7
3.51.8
F-INP
M-CH/RIT
ENT
BAND
GENE
9
.
AGC
MW
ANF
METER
NRNB
Speaker
Function
Display (p. 1-12)
@1 !9@0
Previous view

1-9
1PANEL DESCRIPTION
i7200
MODE
TUNER
TS
FILTER
SPCH
V/M
A/B
SPLIT
M-CL
SCAN
SET
ATT
P
.
AMP
COMP
VOX
MNF
RIT
123
456
78
0
50
28
1814
10
21 24
=
7
3.51.8
F-INP
M-CH/RIT
ENT
BAND
GENE
9
.
AGC
MW
ANF
METER
NRNB
V/M
A/B
SPLIT
M-CL
SCANCOMP
VOX
MNF
RIT
123
456
78
0
50
28
1814
10
21 24
=
7
3.51.8
F-INP ENT
BAND
GENE
9
.
AGC
MW
@4@3@2
@5
DKeypad
@2 VFO/MEMORY/1/1.8 MHz BAND KEY
V/M
➔
Push to toggle the operating mode between the➥
VFO mode and the memory mode. (pp. 3-3, 7-2)
Hold down for 1 second to copy the memory con-➥
tents to the VFO. (p. 7-5)
1
1.8
Push➥F-INP ENT
BAND , then push this key to input the
number ‘1.’ (p. 3-6)
Hold down➥F-INP ENT
BAND for 1 second, then push this
key to select the 1.8 MHz band. (p. 3-4)
@3
VFO SELECT/EQUALIZATION/2/3.5 MHz BAND KEY
A/B
=
Push to toggle between VFO A and VFO B.➥
(p. 3-2)
Hold down for 1 second to equalize the frequency➥
and operating mode of the two VFOs. (p. 3-2)
• The undisplayed VFO frequency and operating mode
are set to the same frequency and operating mode
as the displayed VFO.
2
3.5
Push➥F-INP ENT
BAND , then push this key to input the
number ‘2.’ (p. 3-6)
Hold down➥F-INP ENT
BAND for 1 second, then push this
key to select the 3.5 MHz band. (p. 3-4)
@4 SPLIT/3/7 MHz BAND KEY
SPLIT
➥Push to turn the Split function ON or OFF. (p. 6-8)
• “ ” appears when the split function is ON.
➥ Hold down for 1 second to activate the Quick split func-
tion. (p. 6-10)
• VFO B’s frequency and operating mode are set to the
same frequency and operating mode as VFO A.
• The quick split function can be disabled in the Set
mode. (p. 10-10)
3
7
Push➥F-INP ENT
BAND , then push this key to input the
number ‘3.’ (p. 3-6)
Hold down➥F-INP ENT
BAND for 1 second, then push this
key to select the 7 MHz band. (p. 3-4)
@5 MEMORY WRITE/4/10 MHz BAND KEY
MW
Hold down for 1 second to store the displayed VFO
frequency and operating mode into the selected
memory channel. (p. 7-3, 7-4)
4
10
Push➥F-INP ENT
BAND , then push this key to input the
number ‘4.’ (p. 3-6)
Hold down➥F-INP ENT
BAND for 1 second, then push this
key to select the 10 MHz band. (p. 3-4)
Previous view

1-10
1PANEL DESCRIPTION
@6 MEMORY CLEAR/5/14 MHz BAND KEY
M-CL
Hold down for 1 second to clear the displayed➥
frequency and operating mode in the selected
memory channel. (p. 7-6)
• “ ” appears above the memory channel num-
ber.
Hold down for 1 second, to select a default option➥
or value when in the Set mode or the Quick Set
mode. (p. 10-2, 10-3)
5
14
Push➥F-INP ENT
BAND , then push this key to input the
number ‘5.’ (p. 3-6)
Hold down➥F-INP ENT
BAND for 1 second, then push this
key to select the 14 MHz band. (p. 3-4)
@7 AGC/6/18 MHz BAND KEY
AGC
Push to toggle the time constant for the AGC cir-➥
cuit fast or slow. (p. 5-3)
• “F.AGC” appears when fast AGC is selected; no indi-
cation appears when slow AGC is selected
Hold down for 1 second to turn OFF the AGC➥
function.
• “AGC-OFF” appears.
6
18
Push➥F-INP ENT
BAND , then push this key to input the
number ‘6.’ (p. 3-6)
Hold down➥F-INP ENT
BAND for 1 second, then push this
key to select the 18 MHz band. (p. 3-4)
@8 SPEECH COMPRESSOR/7/21 MHz BAND KEY
COMP
Push to turn the Speech compressor function➥
ON or OFF. (p. 6-6)
• “ ” appears when the speech compressor func-
tion is ON.
Hold down for 1 second to enter the speech com-➥
pression level Set mode. Rotate [DIAL] to set the
compression level, then push the key again to re-
turn to normal operation.
7
21
Push➥F-INP ENT
BAND , then push this key to input the
number ‘7.’ (p. 3-6)
Hold down➥F-INP ENT
BAND for 1 second, then push this
key to select the 21 MHz band. (p. 3-4)
@9 SCAN/8/24 MHz BAND KEY
SCAN
Push to start/stop the programmed/memory scan
in the VFO/memory mode. (p. 8-4, 8-5)
• “ ” appears during a scan.
8
24
Push➥F-INP ENT
BAND , then push this key to input the
number ‘8.’ (p. 3-6)
Hold down➥F-INP ENT
BAND for 1 second, then push this
key to select the 24 MHz band. (p. 3-4)
i7200
MODE
TUNER
TS
FILTER
SPCH
V/M
A/B
SPLIT
M-CL
SCAN
SET
ATT
P
.
AMP
COMP
VOX
MNF
RIT
123
456
78
0
50
28
1814
10
21 24
=
7
3.51.8
F-INP
M-CH/RIT
ENT
BAND
GENE
9
.
AGC
MW
ANF
METER
NRNB
V/M
A/B
SPLIT
M-CL
SCANCOMP
VOX
MNF
RIT
123
456
78
0
50
28
1814
10
21 24
=
7
3.51.8
F-INP ENT
BAND
GENE
9
.
AGC
MW
@8
@6 @7
@9
Keypad (Continued)D
Previous view

1-11
1PANEL DESCRIPTION
#0 VOX/9/28 MHz BAND KEY
VOX
Push to turn the VOX function ON or OFF.➥
(p. 6-2)
Hold down for 1 second to enter the VOX Set➥
mode; push again to return to normal operation.
9
28
Push➥F-INP ENT
BAND , then push this key to input the
number ‘9.’ (p. 3-6)
Hold down➥F-INP ENT
BAND for 1 second, then push this
key to select the 28 MHz band. (p. 3-4)
What is the VOX function?✓
The VOX function (Voice-Operated Transmission) ac-
tivates the transmitter when you speak into the micro-
phone and automatically returns to receive when you
stop speaking.
#1 MANUAL NOTCH FILTER/0/50 MHz BAND KEY
MNF
Push to turn the Manual notch filter function ON➥
or OFF. (p. 5-9)
• “ ” appears when the Manual notch filter function
is ON.
Hold down for 1 second to enter the manual➥
notch Set mode. Rotate [DIAL] to select Wide,
Mid or Narrow width. Push again to return to nor-
mal operation. (p. 5-10)
0
50
Push➥F-INP ENT
BAND , then push this key to input the
number ‘0.’ (p. 3-6)
Hold down➥F-INP ENT
BAND for 1 second, then push this
key to select the 50 MHz band. (p. 3-4)
#2 RIT/•/GENERAL BAND KEY
RIT
Push to turn the RIT (Receiver Incremental Tun-➥
ing) function ON or OFF.
(p. 5-2)
• “ ” appears when the RIT function is ON.
• The RIT frequency can be adjusted with the [M-CH]
control when the RIT mode is selected.
Hold down for 1 second to add the RIT shift fre-➥
quency to the operating frequency. (p. 5-2)
•
Selectable only when the XFC (transmit frequency
check function) is turned OFF.
(p. 10-11)
•
GENE
Push➥F-INP ENT
BAND , then push this key to input the
number ‘• (decimal point).’ (p. 3-6)
Hold down➥F-INP ENT
BAND for 1 second, then push this
key to select the general coverage receive mode.
(p. 3-4)
#3 FREQUENCY INPUT/ENTER/BAND KEY
F-INP ENT
BAND
Push to enter the direct frequency input mode.➥
(p. 3-6)
Hold down for 1 second, then push a band key on➥
the keypad to select the desired operating band.
(p. 3-4)
• •
GENE
selects the general coverage receive band.
i7200
MODE
TUNER
TS
FILTER
SPCH
V/M
A/B
SPLIT
M-CL
SCAN
SET
ATT
P
.
AMP
COMP
VOX
MNF
RIT
123
456
78
0
50
28
1814
10
21 24
=
7
3.51.8
F-INP
M-CH/RIT
ENT
BAND
GENE
9
.
AGC
MW
ANF
METER
NRNB
V/M
A/B
SPLIT
M-CL
SCANCOMP
VOX
MNF
RIT
123
456
78
0
50
28
1814
10
21 24
=
7
3.51.8
F-INP ENT
BAND
GENE
9
.
AGC
MW
#0
#3
#2 #1
Keypad (Continued)D
Previous view

1-12
1PANEL DESCRIPTION
■Function display
qw er
t
i
u
y
!1 o!0
!2
!3
!4
q TRANSMIT ICON
Appears while transmitting.
w MODE ICONS
Shows the selected operating mode.
• “ ” appears when the SSB/AM data mode is selected.
(p. 10-5)
• “-R” appears when the CW reverse or RTTY reverse
mode is selected. (pp. 3-11, 4-5, 4-10)
e IF FILTER ICONS (p. 5-5)
Shows the selected IF filter.
“➥” appears when the wide IF filter is selected.
➥“ ” appears when the mid IF filter is selected.
➥“ ” appears when the narrow IF filter is select-
ed.
r LOCK ICON (p. 3-12)
Appears when the dial lock function is ON.
t MEMORY ICON (p. 7-2)
Appears when in the memory mode is selected.
y MEMORY CHANNEL NUMBER READOUT
(p. 7-2)
Shows the selected memory channel number.
u BLANK ICON (p. 7-3)
Appears when the selected memory channel is
blank.
• This icon appears in both the VFO and memory modes.
i S/RF METER
Displays the receiving signal strength.➥
Displays either the transmit power (PO), SWR or➥
ALC while transmitting. (p. 3-13)
o NOTCH ICONS (p. 5-9, 5-10)
“➥” appears when the automatic notch func-
tion is ON.
“➥” appears when the manual notch function
is ON.
!0 NOISE REDUCTION ICON (p. 5-8)
Appears when the noise reduction function is ON.
!1 NOISE BLANKER ICON (p. 5-7)
Appears when the noise blanker is ON.
!2 TUNE ICON (p. 9-2, 9-4)
Appears when an automatic antenna tuner is ac-➥
tivated.
Blinks while tuning.➥
!3 RECEIVE ICON
Appears while receiving a signal or when the squelch
is open.
!4 FREQUENCY READOUT
Displays the operating frequency.
Previous view

1-13
1PANEL DESCRIPTION
!5 !6
!7
!8
!9
@0
!5 QUICK TUNING STEP ICON
Appears when the Quick tuning function is selected.
(p. 3-7, 3-8)
!6 RIT ICON (p. 5-2)
Appears when the RIT function is ON.
!7 VFO ICONS (p. 3-2)
“ VFO A” or “VFO B” appears when the VFO mode is
selected.
!8 FUNCTION ICONS
“➥” appears when the speech compressor
is ON in the SSB mode.
“➥” appears when the VOX function is ON.
“➥” appears when the Split function is ON.
“➥” appears when preamp is ON.
“➥” appears when the attenuator is ON.
“➥” appears during a scan.
• Blinks when the scan is paused.
!9 AGC ICONS (p. 5-3)
Displays the selected AGC time constant.
• “F.AGC” for AGC fast; “AGC-OFF” for AGC OFF; no icon
for AGC slow.
@0 BREAK-IN ICONS
“➥BK” appears when the Semi break-in function is
ON. (p. 6-4)
“➥F-BK” appears when the Full break-in function
is ON. (p. 6-5)
Function display (Continued)■
Previous view

1-14
1PANEL DESCRIPTION
■Rear panel
DC 13.8VACC KEYSENDALC ANT
REMOTEEXT SP
GNDTUNER
qwetr
q TUNER CONTROL SOCKET [TUNER] (p. 2-6)
Accepts the control cable from an optional antenna
tuner.
w GROUND TERMINAL [GND] (p. 2-2, 2-3)
Connects to a ground to prevent electrical shocks,
TVI, BCI and other problems.
e DC POWER SOCKET [DC 13.8V] (p. 2-5)
Accepts 13.8 V DC through the supplied DC power
cable.
Rear panel view
r ACCESSORY SOCKET [ACC]
Enables connection to external equipment such as
a TNC for data communications, a linear amplifier or
an automatic antenna tuner, and so on.
• See below for socket wiring information.
t ELECTRONIC KEYER JACK [KEY]
Accepts a key or paddle connector for the internal
electronic keyer.
• The keyer type selection between the internal electronic
keyer and straight key operation can be made in the Set
mode.
When connecting
a straight key
When connecting
a paddle
(dot)
(com)
(dash)
(⊕)
If you use an external electronic keyer, make sure
the output voltage of the keyer is less than 0.4 V
when keying the transmitter.
Previous view

1-15
1PANEL DESCRIPTION
DC 13.8VACC KEYSENDALC ANT
REMOTEEXT SP
GNDTUNER
!1
!0
o
i
uy
y SEND CONTROL JACK [SEND] (p. 2-7)
Goes to ground while transmitting to control exter-
nal equipment such as a linear amplifier.
• Maximum control level: 16 V DC/0.5 A
u ALC INPUT JACK [ALC] (p. 2-7)
Connects to the ALC output jack of a non-Icom lin-
ear amplifier.
i ANTENNA CONNECTOR [ANT] (p. 2-3)
Accepts a PL-259 connector and a 50 Ωcoaxial
cable from an antenna tuner or an antenna.
o CI-V REMOTE CONTROL JACK [REMOTE]
(pp. 2-4, 11-2)
Designed for use with a PC for remote control of➥
the transceiver functions.
Used for transceiver operation with another Icom➥
CI-V transceiver or receiver.
!0 EXTERNAL SPEAKER JACK [EXT SP]
(p. 2-4)
Connects a 4–8 øexternal speaker.
• When an external speaker is connected, the internal
speaker is disabled.
!1 USB JACK [ ]
Connects a USB cable for transceiver modulation
input (p. 2-9), the transceiver operation with a PC,
and the received audio sent to the PC.
CAUTION:
The USB driver must be installed. Please read
the USB driver installation guide before installing
the USB driver into your PC that is connected to
the IC-7200 with the USB cable (third party).
Rear panel (Continued)■
About the USB driver:
The USB driver and the installation guide can be
downloaded from our website.
http://www.icom.co.jp/world/➥
The following items are required:
PC
• Microsoft®Windows®7/XP*/2000 or
Microsoft®Windows Vista®installed
*The USB driver is not supported for Microsoft®
Windows®XP (64 bit).
• With USB port
Other items
• USB cable (third party’s)
• PC software
About the modulation input:
Select “U” (USB) in the Set mode item ‘Modulation
input (Data OFF)’ or ‘Modulation input (Data ON)’.
And the modulation input level from USB jack can
be set in the Set mode item ‘USB Level.’ (p. 10-11,
10-12)
Previous view

1-16
1PANEL DESCRIPTION
DACC socket information
• ACC socket
ACC
PIN No.
NAME DESCRIPTION SPECIFICATIONS
1234
8765
9
10 11 12
13
Rear panel view
Color refers to
the cable strands
of the supplied
cable.
qbrown
wred
eorange
ryellow
tgreen
yblue
upurple
i
o
!0
!1
!2
!3
gray
white
black
pink
light
blue
light
green
1NC
(8 V*)
*If the Band Voltage modification is
performed, regulated 8 V output. (p.
12-2)
—
Output voltage
Output current
: 8 V ± 0.3 V
: Less than 10 mA
2 GND Connects to ground. —
3
SEND
Input/output
pin.
Grounded
when trans-
mits.
An external equipment
controls the transceiver.
When this pin goes low,
the transceiver transmits.
Input voltage (High)
Input voltage (Low)
Current flow
: 2.0 V to 20.0 V
: –0.5 V to 0.8 V
: Max. 20 mA
The transceiver outputs
a low signal to control
external equipment.
Output voltage (Low)
Current flow
: Less than 0.1 V
: Max. 200 mA
4 START Data line for the optional AT-180. —
5NC
(BAND
*
)
*If the Band Voltage modification is per-
formed, band voltage output.
(p. 12-2)
—
Output voltage : 0 to 8.0 V
6 ALC ALC voltage input. Control voltage
Input impedance
: –4 V to 0 V
: More than 3.3 k˘
7 NC — —
8 13.8 V 13.8 V output when power is ON. Output current : Max. 1 A
9 KEY Key line for the optional AT-180. —
10 FSKK Controls RTTY keying
“High” level
“Low” level
Output current
: More than 2.4 V
: Less than 0.6 V
: Less than 2 mA
11 MOD Modulator input. Input impedance
Input level
: 10 k˘
: Approx. 100 mV rms
12 AF
AF detector output.
Fixed level, regardless of the [AF] con-
trol position
.
Output impedance
Output level
: 4.7 k˘
: 100–300 mV rms
13 SQLS Squelch output.
Grounded when squelch opens.
SQL open
SQL closed
: Less than 0.3 V/5 mA
: More than 6.0 V/100 µA
• When connecting the ACC conversion cable (OPC-599)
When the SEND terminal controls the inductive load (such as a relay), a counter-electromotive force can cause the transceiver’s
malfunction or damage. To prevent this, we recommend adding a switching diode, such as an “1SS133,” on the load side of the
circuit to the counter-electromotive force absorption. When the diode is added, a switching delay of the relay may occur. Be sure
to check its switching action before operation.
Rear panel (Continued)■
eSEND
i13.8V
ACC
socket
Relay
Switching diode To a non-Icom
linear amplifier
[Example]
ACC 1ACC 2
qFSKK tAF
wGND ySQLS
eSEND u13.8 V
rMOD iALC
qNC (8 V*) tALC
wGND yNC
eSEND u13.8 V
rNC (BAND*)
8
1
2
3
4
7
6
5
1
2
3
4
7
6
5
Connect to ACC socket
qwer
tyui
o!0!1!2
!3
* See page 12-2 for details.
Previous view

1-17
1PANEL DESCRIPTION
q PTT SWITCH
Hold down to transmit; release to receive.
w PTT LOCK SWITCH
(Only for the SM-50 and SM-30)
Push to lock the PTT switch in the transmit mode.
e UP/DOWN SWITCHES [UP]/[DN]
Change the selected readout frequency or memory
channel.
• Holding down continuously changes the frequency or
memory channel number.
• While holding down RIT *, the transmit readout frequen-
cy can be controlled while in the split frequency mode.
* Only when the XFC (transmit frequency check) func-
tion is ON. (p. 10-11)
• The [UP]/[DN] switch can simulate a key paddle. Pre-
set in the Set mode (U/D KEY; Mic Up/Down Keyer).
(p. 10-15)
r LOW CUT SWITCH
(Only for the SM-50 and SM-30)
Push (SM-50)/Slide (SM-30) to cut out the low fre-
quency components of input voice signals.
t PTT LOCK INDICATOR [LOCK]
(Only for the SM-30)
Lights red when the PTT lock switch (e) is ON.
y MIC GAIN VOLUME [MIC GAIN]
(Only for the SM-50 and SM-30)
Rotate to adjust the microphone output level.
• Use this control as an addition to the microphone gain
setting of the connected transceiver.
Rotating the control too far clockwise may result
in an output level that is too high and transmit
signal distortion.
q
r
y
w
e
e
q
■Microphones
DSM-50 (Option)
DSM-30 (Option)
qw
t
MIC GAIN
ONOFF
LOW CUT
yr
TOP VIEW
BOTTOM VIEW
DHM-36
Previous view
Other manuals for IC-7200
6
Table of contents
Other Icom Transceiver manuals