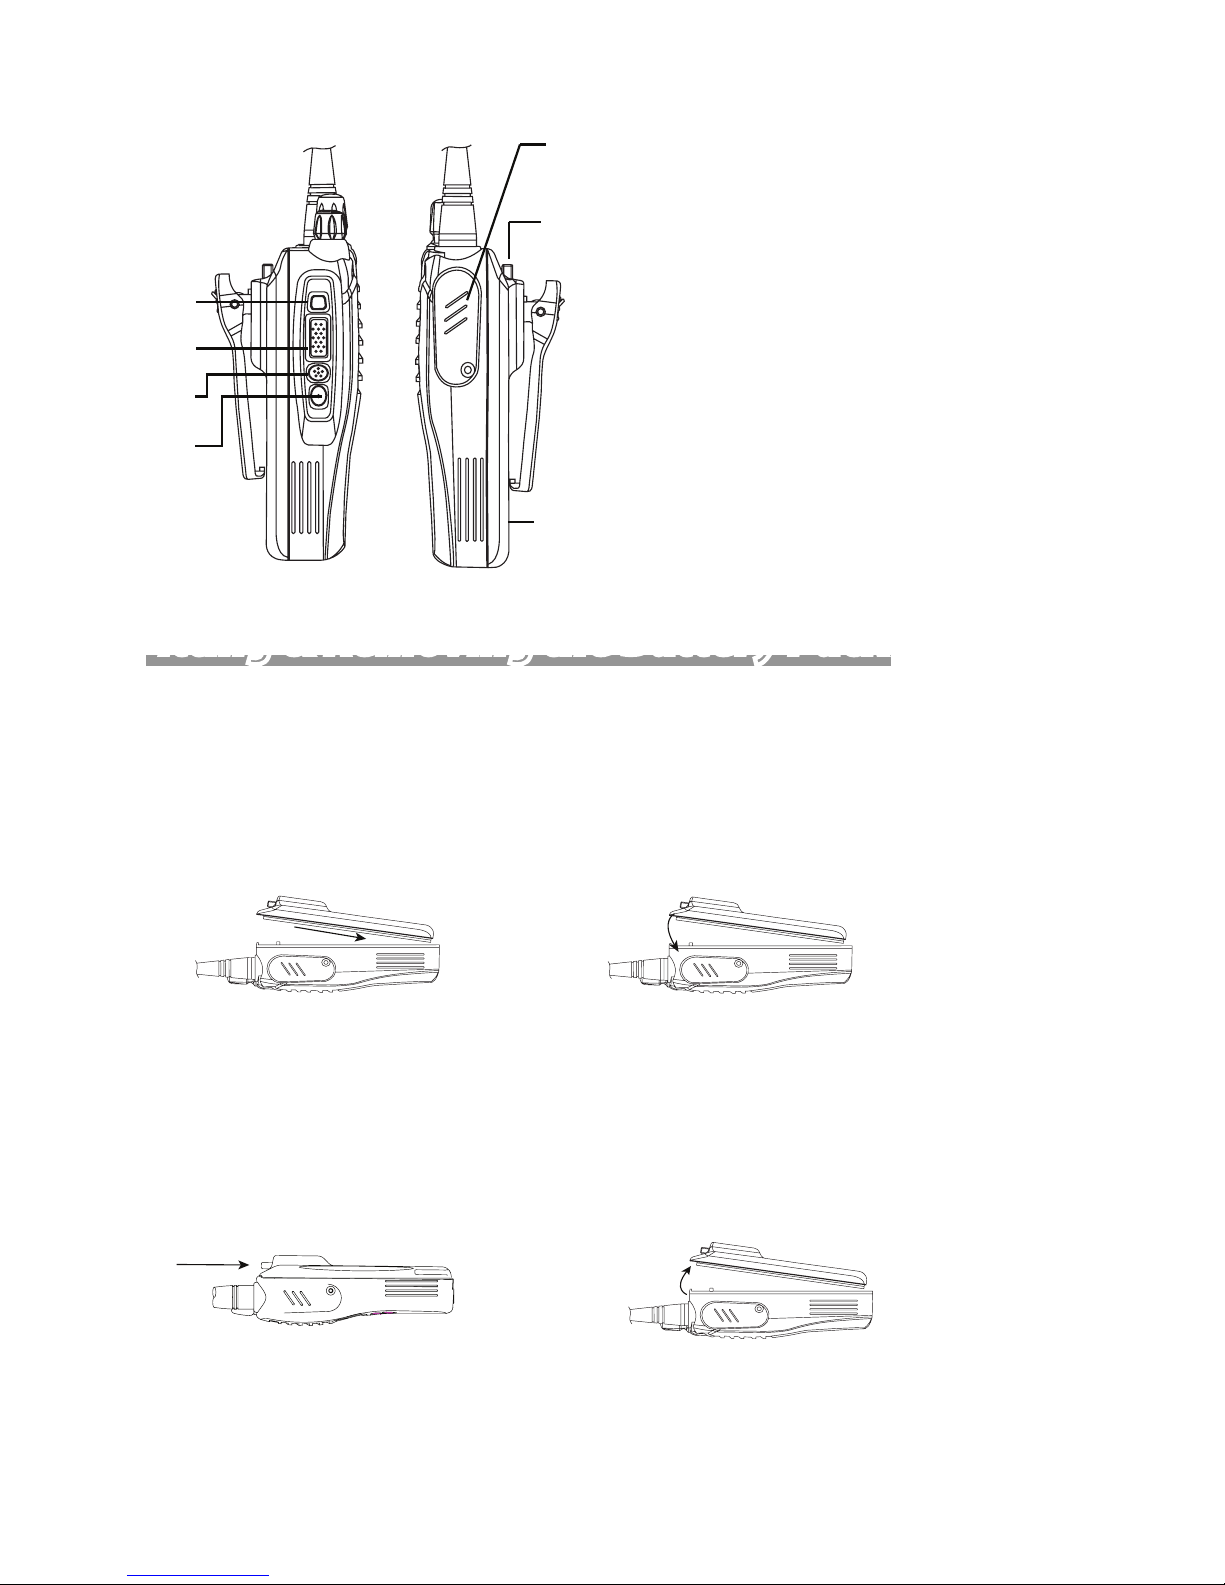
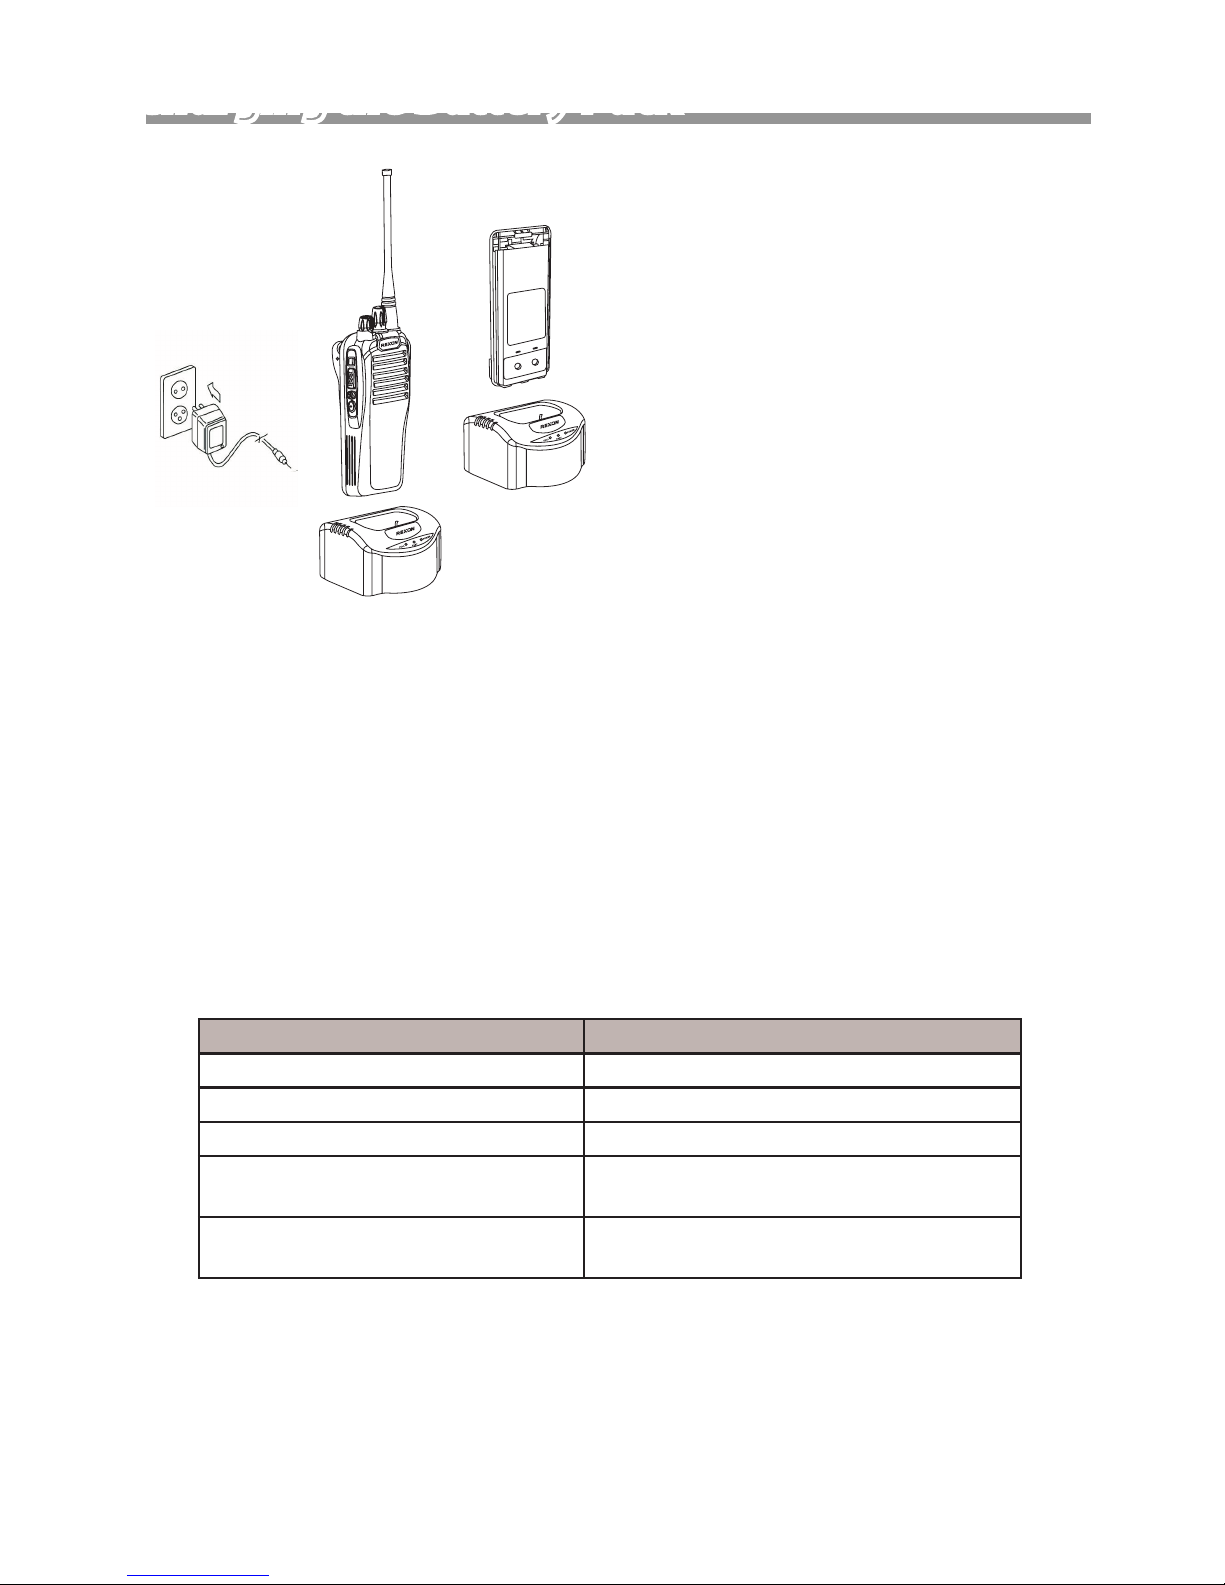
REXON RL-308 User manual

User’s Manual
VHF/UHF TRANSCEIVER
RL-308
Professional Portable Radio

Table of Contents
Parts Name & Functions��������������������������������������������������������������������������1
Fitting & Removing the Battery Pack�����������������������������������������������������2
•To Install the battery pack ������������������������������������������������������������������������������� 2
•To remove the battery pack ��������������������������������������������������������������������������� 2
Charging the Battery Pack����������������������������������������������������������������������3
Basic Operation ���������������������������������������������������������������������������������������4
•Turn the radio On/O & Adjust Volume������������������������������������������������������ 4
•Channel Selection����������������������������������������������������������������������������������������������� 4
•Receiving���������������������������������������������������������������������������������������������������������������� 4
•Monitor������������������������������������������������������������������������������������������������������������������� 4
•Transmitting���������������������������������������������������������������������������������������������������������� 4
Programmable functions������������������������������������������������������������������������5
•CTCSS table ����������������������������������������������������������������������������������������������������������� 7
•DCS code���������������������������������������������������������������������������������������������������������������� 7

Page 1
Parts Name & Functions
qPower/Volume Knob:
Rotate it to turn on the transceiver and to adjust the
volume.
wAntenna Connector:
Fit the antenna to this MX type connector.
eChannel Selection Knob:
Rotate it to select a channel or a group.
rLED Indicator:
tSpeaker
yMic
LED Color Status Indication
Continuous “RED” lighting TX / programming Read
Continuous “GREEN” lighting RX / Programming Write
Flashing “AMBER” Scanning
Continuous “AMBER” RX mode but with unmatched tone
signalling
Flashing “Red” Sending a Selective Call
Flashing “GREEN” Received matched Selcall signaling or tone
BEEP sound Status Indication
Beep every 30 seconds warning for battery low
Beep while pressing Hi/Low button one Beep for low power;
two Beeps for high power
Beep while pressing programmable button one beep for enable the function;
two beeps for disable it
FRONT
TOP
q
w
e
r
t
y

Page 2
SIDE
u External Speaker/Mic Connector
i Release Buckle
o Battery Pack
aSide button A: programmable (Priority
Call/ Emergency siren/ Turbo PTT)
sSide button B / PTT (Push To Talk)
dSide button C: programmable
fSide button D: programmable
1] Fit the bottom edge of the battery pack into the holes of the transceiver cabinet bottom.
2] Push the battery pack down to the transceiver aluminum chassis till the end click.
Fitting & Removing the Battery Pack
¯To Install the battery pack
¯To remove the battery pack
Keep pressing the release buckle of the battery pack and lift the battery pack up from the trans-
ceiver body. Note: It is normal for this buckle to be stiff.
a
u
i
o
s
d
f

Page 3
Charging the Battery Pack
1] Connect the jack of switching adaptor into the socket of the charging cradle.
2] Plug the switching adaptor into the power outlet.
3] Insert the radio into the cradle
4] Charge the radio with standard charger for 4 hours; with rapid charger for 2 hours.
Make sure the radio is turned off while charging it.
Do not forget to remove the radio from the charger when the battery is full-
charged.
LED Color Status Indication
Continuous Yellow AC power supply is well connected.
Continuous Red Fast charging mode
Continuous Green Fully charged
Flashing Red over 5 minutes Something wrong with charging circuit or
battery pack. Please check!
Flashing Red for 5 minutes Slow charging when battery voltage is too
low to be fast charged

Page 4
¯Turn the radio On/Off & Adjust Volume
1] Rotate the PWR/VOL knob clockwise till the radio is turned on. Voice announcement
for channel number will be heard after auto testing is done, if voice announcement is enabled
through PC programmer.
2] Enable Monitor function (Programmable in C or D button) to hear the background noise
as volume reference. Rotate the PWR/VOL knob clockwise to increase its volume or counter-
clockwise to reduce its volume.
3] To turn the radio off, rotate the PWR/VOL knob counterclockwise to the end.click.
¯Channel Selection
RL-308 is allowed to be programmed with 16 channels * 16 groups = 256 channels totally.
1] To select a channel: Rotate the channel selection knob to choose the channel you want.
Voice announcement for channel number indicator (programmable) will be heard.
2] To select a group: Keep holding button A and rotate the channel selection knob for choos-
ing the group. After releasing A button, you can select the channel as procedure 1.
A continuous DU sound will be heard if you switch to a channel or a group not
being programmed in advance.
¯Receiving
RL-308 can be programmed to work channel by channel in “Open trafc” or “Group Mode”
(CTCSS/DCS/Selcall). Group mode prevents other users on the same channel from being heard
on your radio. LED indicator will glow green & speaker will be unmute when the radio receives
a call.
¯Monitor
This allows you to over ride the squelch and the “CTCSS” or “DCS” tones. It is useful to moni-
tor the channel before you transmit to ensure there is no one using the channel when you have
CTCSS or DCS tones programmed. Monitor function can be programmed in button C or D with
long press or short press. Ask you dealer how it is set up through PC programmer.
¯Transmitting
Before transmitting, monitor the channel you are using to ensure it is not busy. Keep pressing
PTT button and start talking at approximately 2 inches from the MIC hole. During transmitting,
the LED on the top of the radio will glow red. Release PTT button when you nish talking.
Basic Operation

Page 5
Programmable functions
Ask your dealer for programming RL-308 with the following functions. The programmable but-
tons A/B/C/D can be tailored according to your need. In general, the radio will beep a “DU” sound
when the programmed function is enabled (by either long press or short press). Duplicate the
same procedure to disable this function, and the radio will beep a “DuDu” sound as indicator.
1] Priority Call: The radio will shift from the present working channel into pre-dened prior-
ity channel. After enable it, you will send/receive message on the priority channel, not on the
present channel.
2] Emergency Siren/Call: It will either siren at your own side or send Emergency code to
others through the present working channel.
3] Lone Worker: Once activating Lone Worker button (programmable), the radio will send
an emergency call, which has been set by programmer, when pre-set timer is reached. Before
sending the emergency call, a DUDUDU sound will be heard to remind the user of pressing
any button to re-start the timer.
4] Turbo PTT: An extra turbo PTT to have max. output power up to 6-6.5W for some critical
environment. It optimizes the best balance between battery’s working hours and max. output
power.
5] Call 1/ Call 2: To transmit pre-set selcall (5tone, 2tone, or DTMF)
6] Scan: During scanning, LED indicator will ash in green. When scanning a busy channel,
LED indicator will glow in red. Ask your dealer for different Scan modes of your choice, includ-
ing normal scan, priority scan, & dual watch.
7] Delete a Nuisance Channel: During scanning, when it resumes on a busy channel which
you don’t want to hear, you can remove this channel temporarily from the scan list. Then, it
won’t be scanned until the radio is turned on again.
8] Squelch Level: During RX mode, you can set squelch level from 0 to 9 with voice an-
nouncement. 0 means squelch cancelling; 9 means tight squelch. Setting the radio to the
tightest squelch level, you can avoid unwanted signals or noise, but you may not receive a
weak signal.
9] Reverse TX & RX: TX frequency & sub tone turns to RX frequency & sub tone, and vise
versa. Talk Around: You can directly communicate with other radios in your group in case the
repeater is not activated or you are out of the repeater range. Through PC programmer, you
can dene Talkaround to resume at either TX or RX channel.
10] Talk Around: You can directly communicate with other radios in your group in case the
repeater is not activated or you are out of the repeater range. Through PC programmer, you
can dene Talkaround to resume at either TX or RX channel.
11] Lock / Unlock: To prevent users from activating some function by accidental touch. Once
you activate lock function, buttons C&D will be locked with a beep sound when you press it.
Channel selection knob can be also locked if you enable it though PC programmer.
12] TX Power Selection: A Du sound indicates low TX power; a DuDu sound indicates high
TX power.

Page 6
13] Whisper: It will increase mic sensitivity to make weak audio at your side to be heard by
others loudly; however, background noise at your side will be increased too.
14] Battery Capacity Indicator : Du means low battery (need to be charged), DuDu means
50% left, DuDuDu means 70-80%, & DuDuDuDu means fully charged.
15] Auto TX : The radio will switch to priority channel and automatically transmit without your
pressing PTT. The time intervals for auto TX & RX modes can be set through PC programmer.
Turn off the radio to disable auto TX.
16] VOX: You can talk without pressing PTT. VOX function should be activated with optional
plugged-in speaker/mic to avoid accidental activation.
17] VOX sensitivity level: You can set VOX sensitivity level from 1 to 5 by PC programmer in
advance or by programmable button C/D according to your present environmental background
noise. 1 means most sensitive for quiet environment; while 5 for noisy environment.
18] Scrambler: This analog voice inversion scrambler can offer a more condential commu-
nication. Other radios at the same frequency will receive only disordered noise.
19] Encryption (optional): An advance scrambler/encryption board can be plugged into RL-
308 to have a much more secure communication.
20] Bluetooth (optional): Once Bluetooth module is plugged in, RL-308 can be paired with
any off-the-shelter BT headset.

Page 7
67.0 97.4 135.5 192.8 165.5
71.9 100 141.3 203.5 171.3
74.4 103.5 146.2 210.7 177.3
77.0 107.2 151.4 218.1 183.5
79.7 110.9 156.7 225.7 189.9
82.5 114.8 162.2 233.6 196.6
85.4 118.8 167.9 241.8 199.5
88.5 123.0 173.8 250.3 206.5
91.5 127.3 179.9 69.3 229.1
94.8 131.8 186.2 159.8 254.1
150 OFF
¯CTCSS table
023 025 026 031 032
043 047 051 054 065
071 072 073 074 114
115 116 125 131 132
134 143 152 155 156
162 165 172 174 205
223 226 243 244 245
251 261 263 265 271
306 311 315 331 343
346 351 364 365 371
411 412 413 423 431
432 445 464 465 466
503 506 516 532 546
565 606 612 624 627
631 632 654 662 664
703 712 723 731 732
734 743 754 OFF
¯DCS code
Table of contents
Other REXON Transceiver manuals