ICON 58003 Assembly instructions

Owner’s Manual & Safety Instructions
Save This Manual Keep this manual for the safety warnings and precautions, assembly,
operating, inspection, maintenance and cleaning procedures. Write the product’s serial number in the back
of the manual near the assembly diagram (or month and year of purchase if product has no number). Keep
this manual and the receipt in a safe and dry place for future reference. 21i
When unpacking, make sure that the product is intact
and undamaged. If any parts are missing or broken,
please call 1-888-866-5797 as soon as possible.
Copyright©2021 by Harbor Freight Tools®. All rights reserved.
No portion of this manual or any artwork contained herein may be reproduced in
any shape or form without the express written consent of Harbor Freight Tools.
Diagrams within this manual may not be drawn proportionally. Due to continuing
improvements, actual product may differ slightly from the product described herein.
Tools required for assembly and service may not be included.
Read this material before using this product.
Failure to do so can result in serious injury.
SAVE THIS MANUAL.
Visit our website at: http://www.harborfreight.com

Page 2 For technical questions, please call 1-888-866-5797. Item 58003
Specifications
Pulling Capacity
Short Jaw: 4-1/2 ton
Medium Jaw: 6-1/2 ton
Large Jaw: 8 ton
Important Safety Information
1. Assemble and use only according to
these instructions. Improper assembly
and usage can create hazards.
2. Wear ANSI-approved safety
goggles and heavy-duty work
gloves during assembly and use.
3. Keep area clean and well lit.
4. Use only according to vehicle
service instructions.
5. Inspect before every use; do not use
if parts are loose or damaged.
6. Keep children and other
bystanders out of the area.
7. Do not use when tired or when under
the influence of drugs or medication.
8. Use as intended only.
9. Maintain product labels and
nameplates. These carry
important safety information. If
unreadable or missing, contact
Harbor Freight Tools for a replacement.
Operation Instructions
Read the ENTIRE IMPORTANT SAFETY INFORMATION section at the
beginning of this document including all text under subheadings therein
before set up or use of this product.
TO PREVENT SERIOUS INJURY FROM EXPLOSION:
Carefully follow service instructions to disable airbag
before working near steering wheel or steering column.
SAVE THESE INSTRUCTIONS.

Page 3For technical questions, please call 1-888-866-5797.Item 58003
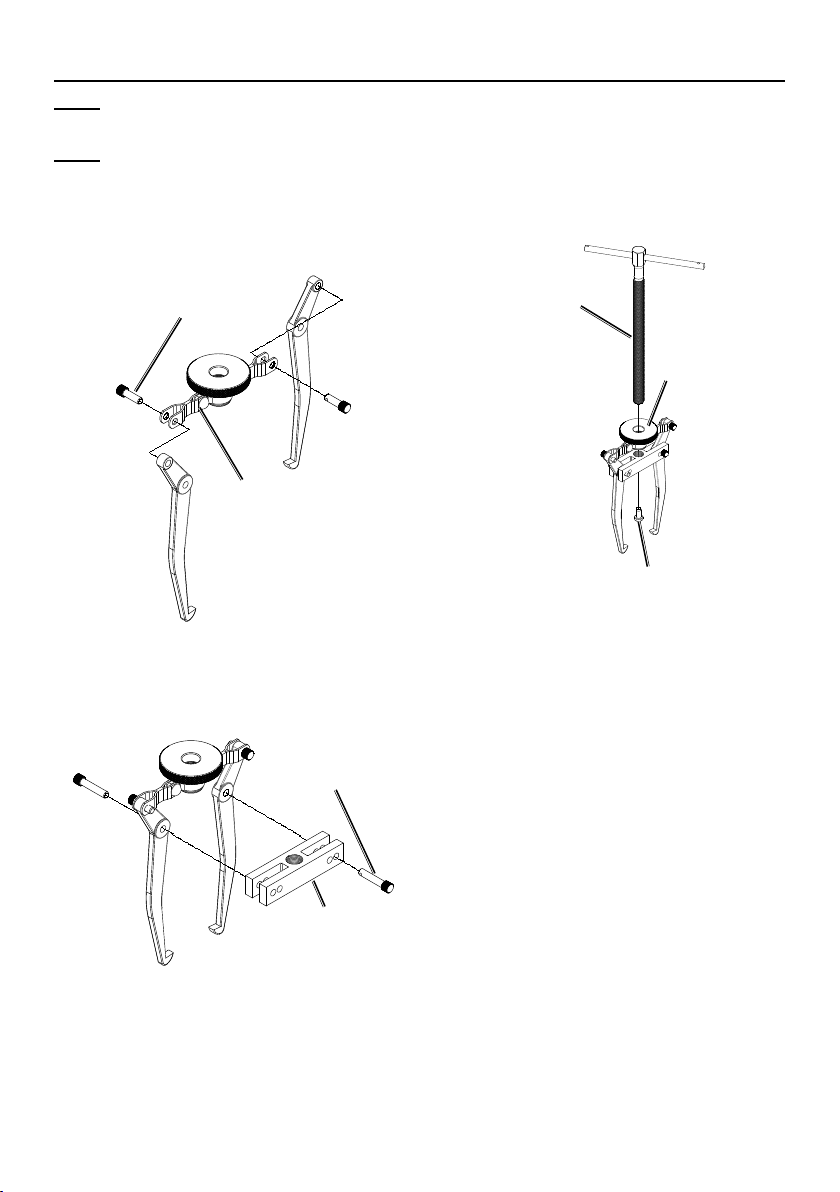
Three Jaw
Note: Use appropriate sized parts
for object being removed.
Note: Attach Jaws pointing out for internal
pulling and pointing in for external pulling.
1. Insert Small Pin (10) through 3-Way
Jaw Control (6) and desired size of
Jaw. Apply this to three Jaws total.
3-Way
Jaw
Control
(6)
Small
Pin (10)
2. Connect Three Jaw Yoke (8) to three
Jaws. Insert three Large Pins (11)
through either inner or outer holes.
Use same hole on each side.
Three Jaw
Yoke (8)
Large
Pin (11)
3. Insert Pressure Screw with T-bar
(9) through Jaw Frame Knob (4)
and Three Jaw Yoke by threading
Pressure Screw with T-bar clockwise.
4. Insert Plug Pin (12) into
Pressure Screw with T-bar.
Pressure Screw
with T-bar (9)
Jaw
Frame
Knob (4)
Plug Pin (12)
5. Place Jaws onto application.
6. Turn Jaw Frame Knob Clockwise so
that Jaws firmly grip onto application.
7. Turn Pressure Screw with T-bar
clockwise until Plug Pin is properly
seated and makes contact with
center of application mount.
8. Continue turning Pressure
Screw with T-bar clockwise until
application is removed.
Page 4 For technical questions, please call 1-888-866-5797. Item 58003
Two Jaw
Note: Use appropriate sized parts
for object being removed.
Note: Attach Jaws pointing out for internal
pulling and pointing in for external pulling.
1. Insert Small Pin (10) through 2-Way
Jaw Control (5) and desired size
of Jaw. Apply this to both Jaws.
2-Way Jaw
Control (5)
Small Pin (10)
2. Connect Two Jaw Yoke (7) to both
Jaws. Insert two Large Pins (11)
through either inner or outer holes.
Use same hole on each side.
Two Jaw
Yoke (7)
Large
Pin (11)
3. Insert Pressure Screw with T-bar (9)
through Jaw Frame Knob (4) and
Two Jaw Yoke by threading Pressure
Screw with T-bar clockwise.
4. Insert Plug Pin (12) into
Pressure Screw with T-bar.
Pressure Screw
with T-bar (9)
Jaw
Frame
Knob (4)
Plug Pin (12)
5. Place Jaws onto application.
6. Turn Jaw Frame Knob Clockwise so
that Jaws firmly grip onto application.
7. Turn Pressure Screw with T-bar
clockwise until Plug Pin is properly
seated and makes contact with
center of application mount.
8. Continue turning Pressure
Screw with T-bar clockwise until
application is removed.

Page 5For technical questions, please call 1-888-866-5797.Item 58003
Maintenance
Procedures not specifically explained in this manual must be performed
only by a qualified technician.
TO PREVENT SERIOUS INJURY FROM TOOL FAILURE: Do not use damaged
equipment. If abnormal noise or vibration occurs, have the problem corrected before
further use.
1. BEFORE EACH USE, inspect the
general condition of the tool. Check for:
• loose hardware
• cracked, worn, or damaged Adapters
• any other condition that may
affect its safe operation.
If a problem occurs, have the problem
corrected before further use.
Do not use damaged equipment.
2. AFTER EACH USE, wipe external
surfaces of the tool with clean cloth.
3. Periodically check the
threads for damage.
4. Keep clean and free from dirt,
grease and grit.
5. Store tool in its Carrying
Case when not in use.
PLEASE READ THE FOLLOWING CAREFULLY
THE MANUFACTURER AND/OR DISTRIBUTOR HAS PROVIDED THE PARTS
LIST AND ASSEMBLY DIAGRAM IN THIS DOCUMENT AS A REFERENCE
TOOL ONLY. NEITHER THE MANUFACTURER OR DISTRIBUTOR MAKES ANY
REPRESENTATION OR WARRANTY OF ANY KIND TO THE BUYER THAT HE
OR SHE IS QUALIFIED TO MAKE ANY REPAIRS TO THE PRODUCT, OR THAT
HE OR SHE IS QUALIFIED TO REPLACE ANY PARTS OF THE PRODUCT. IN
FACT, THE MANUFACTURER AND/OR DISTRIBUTOR EXPRESSLY STATES THAT
ALL REPAIRS AND PARTS REPLACEMENTS SHOULD BE UNDERTAKEN BY
CERTIFIED AND LICENSED TECHNICIANS, AND NOT BY THE BUYER. THE BUYER
ASSUMES ALL RISK AND LIABILITY ARISING OUT OF HIS OR HER REPAIRS TO
THE ORIGINAL PRODUCT OR REPLACEMENT PARTS THERETO, OR ARISING
OUT OF HIS OR HER INSTALLATION OF REPLACEMENT PARTS THERETO.

Page 6 For technical questions, please call 1-888-866-5797. Item 58003
Parts List and Diagram
Parts List
Part Description Qty
1 Large Jaw 3
2 Medium Jaw 3
3 Small Jaw 3
4 Jaw Frame Knob 2
5 2-Way Jaw Control 1
6 3-Way Jaw Control 1
Part Description Qty
7 Two Jaw Yoke 1
8 Three Jaw Yoke 1
9 Pressure Screw with T-bar 1
10 Small Pin 3
11 Large Pin 3
12 Plug Pin 1
Record Serial Number Here:
Note: If product has no serial number, record month and year of purchase instead.
Note: Some parts are listed and shown for illustration purposes only, and are not available
individually as replacement parts. Specify UPC 193175430656 when ordering parts.

Page 7For technical questions, please call 1-888-866-5797.Item 58003
Diagram
7
23
4
1
7
8
9
12
11
10
5
6

Limited Lifetime Warranty
Harbor Freight Tools warrants to the original purchaser that this ICON™ product
shall be free from defects in materials and workmanship for its useful life.
If your ICON™ product does not perform in accordance with this warranty,
Harbor Freight Tools will, at its option and expense, repair or replace (or elect to
refund the purchase price if we cannot repair or replace), your ICON™ product,
which shall be your sole and exclusive remedy. To obtain warranty service,
ICON™ products must be returned with proof of purchase to a Harbor Freight Tools
retail store or returned by mail after contacting Harbor Freight Tools Product
Support at 1-888-866-5797 and receiving a return authorization.
This warranty excludes normal wear and tear and does not apply to products subjected
to misuse, use or operation other than for the intended purpose or not in accordance
with the product manual, abuse, accident, modification or alteration, unauthorized
repair, improper storage, neglect, or lack of maintenance. This warranty is in lieu of
all other warranties. Harbor Freight Tools is not liable for incidental, indirect, special,
consequential, or punitive damages or costs arising from the use of this product. Some
states do not allow the exclusion or limitation of incidental or consequential damages,
so the above limitation may not apply to you. This warranty gives you specific
legal rights, and you may also have other rights which vary from state to state.
ICON is a trademark of Harbor Freight Tools. All other brands and trade
names are the property of their respective owners.
26677 Agoura Road • Calabasas, CA 91302 • 1-888-866-5797
Table of contents
Other ICON Power Tools manuals


