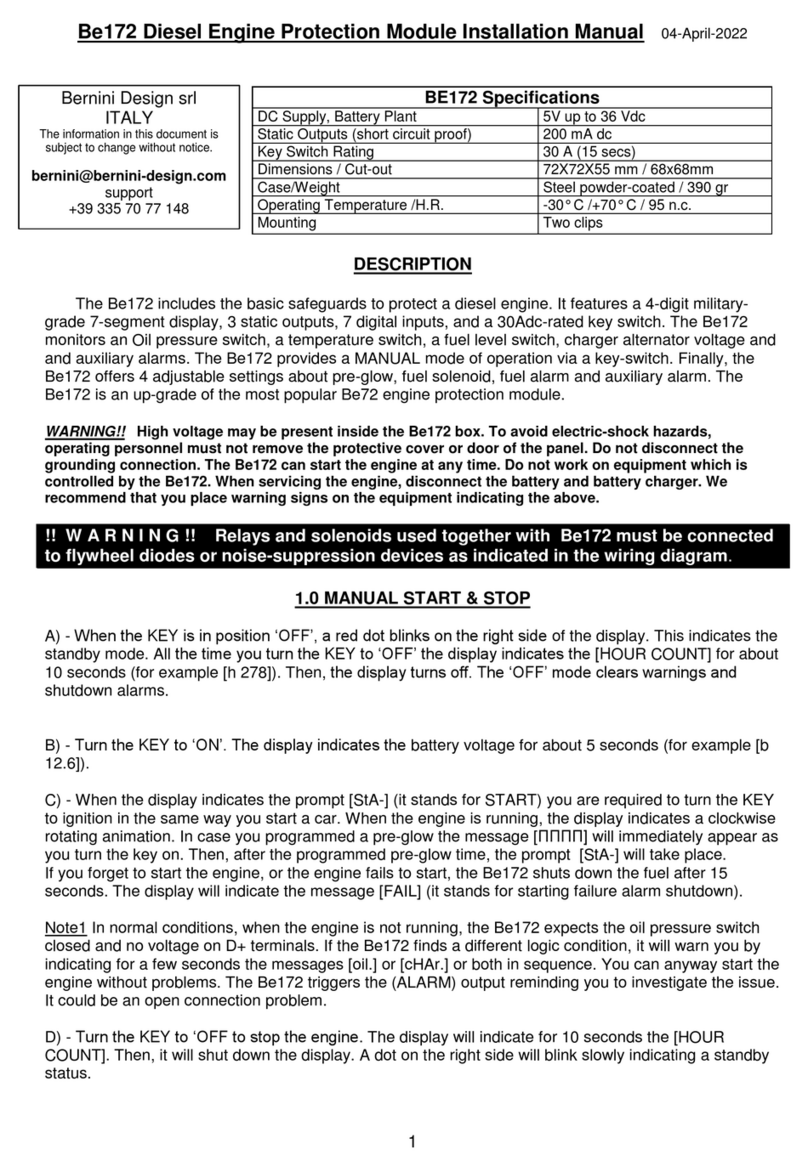
ICON TARMAC 2 BOOT User manual

i
TARMAC 2 BOOT
NOT TO BE REMOVED EXCEPT BY CONSUMER
DIRECTIVE 89/686/EEC
CATEGORY II
MOTORCYCLISTS’ BOOTS
WWW.RIDEICON.COM
PERSONAL PROTECTIVE EQUIPMENT USER MANUAL

NOT TO BE REMOVED EXCEPT BY CONSUMER
ICON®
TARMAC 2 BOOT
DIRECTIVE 89/686/EEC
CATEGORY II
MOTORCYCLISTS’ BOOTS
PERSONAL PROTECTIVE EQUIPMENT USER MANUAL

01
SAFETY WARNINGS
PPE:
The Tarmac 2 Boot by Icon® is considered Personal Protective Equipment (PPE), as defined by European Directive 89/686/EEC. The protective
footwear described in this manual is considered Category II PPE and, as such, may only display the CE Marking after having undergone an EC Type
Approval and subsequent, relevant, Certification at a Notified European Body. Placement of the CE Marking on the protective footwear indicates
conformity with the Basic Health and Safety Requirements of Directive 89/686/EEC.
The protective footwear described in this manual, has undergone EC Type Examination at Ricotest s.r.l, Notified Body number 0498, to assure
compliance with Directive 89/686/EEC.
USE RESTRICTIONS AND LIMITATIONS:
Use of Tarmac 2 Boots is strictly limited to on-road motorcycling. Tarmac 2 Boots are designed to offer, limited protection, in specific circumstances,
only. Tarmac 2 Boots are designed for use as on-road motorcycling riding boots, only. Tarmac 2 Boots are designed for use, along with certified shin
and leg protectors bearing the CE marking and the designation “L” type “A”, “L” type “B”, “K+L” type “A”, or “K+L” type “B”.The addition of
Tarmac 2 Boots to any other PPE or on-road motorcycling apparel being worn is not intended to imply that said PPE or on-road motorcycling apparel
is also CE approved. On-road motorcycling is inherently dangerous in nature and use of Tarmac 2 Boots cannot prevent injury or death. Icon® strongly
suggests that, whenever engaged in motorcycling and for improved protection, riders always use multiple forms of compatible PPE, including an
approved helmet, a jacket with, at least, approved shoulder and elbow impact protectors, an approved back protector, pants with, at least, approved
knee, leg, and hip impact protectors, gloves, and approved boots.

02
CE mark to indicate that the protective footwear complies with the requirements or Directive 89/686/EEC
Pictogram indicating that a User Manual (Information Notice) has been provided for this product
Specific symbol to indicate the protective footwear is for motorcycle use only
For details regarding the performance afforded by this protective footwear please see the section in this User Manual
titled PERFORMANCE and Chart 2, included in that section, titled “Tarmac 2 Boots Performance Test Results”.
Protective footwear name or Internal Manufacturing Code
CE MARKING SYMBOL KEY
Below is an explanation of the CE Marking and other markings on the Tarmac 2 Boot envisaged both by Directive 89/686/EEC. The CE marking is
located on a label stitched onto the Tarmac 2 Boots.
Example: Marking For The Tarmac 2 Boots
Chart 1: Label Explanation

03
Manufacturer’s name or logo
Protective footwear size according to country.
In addition to the markings described above, the year and, at least, the quarter of
manufacture will also be indicated on a separate label. Some additional coded information,
which ICON®uses to track the product may also appear. The code may also appear in other
versions of the marking.

04
Wearing Instructions and Adjustment:
Repeat for each boot: Release the ankle retention strap, on the inside of the boot, at the ankle. To do this, grasp the tab at the end of the ankle
retention strap and then pull the retention strap away from the inside of the ankle, releasing the hook and loop fastener. The tongue of the boot is held
in place with permanently fixed elastic cords that run through it. Pull the tongue forward, stretching the elastic cords far enough to allow the foot to
be inserted into the boot. Insert foot, pulling the boot on. Slide foot all the way down in the boot. Confirm boot fit. Boot should feel snug on foot but
not too tight. Foot should be the same length as the boot without being too much shorter or too much longer than the boot. The permanently fixed
elastic cords running through the tongue adjust the fit of the boot automatically. Next, reengage the ankle retention strap. Grasp the tab at the end
of the ankle retention strap and wrap the strap around the front of the boot to the inside of the ankle and then reengage the hook and loop fastener.
Be sure to confirm that no pants or sock material is caught in the hook and loop fastener. The ankle retention strap may be adjusted by releasing
the ankle retention strap as above and then repositioning the ankle retention strap tab and reengaging the hook and loop fastener, with the tab in a
different position. Be sure that the ankle retention strap is snug enough to keep the boots on the feet but not so tight that it impairs blood circulation
or the foot’s range of motion. Be sure that the hook and loop fastener is completely engaged and that the ankle retention strap tab is flat against the
boot. Check to confirm that wearing these boots does not reduce your ability to operate the motorcycle controls.
For maximum protection and safety the protective footwear should not cause any discomfort and should not reduce the rider’s freedom of movement
or restrict the reach to, or operation of, the motorcycle controls while in a normal riding position. If you are unable to find a proper fit in this protective
footwear style, please try another CE certified protective footwear style.
USE
Selecting The Correct Size:
In order to ensure you choose the correct size Tarmac 2 Boot please see the table below
PPE Position And Fit:
For PPE to offer the maximum protection possible PPE must be placed on the areas to be protected and PPE must cover the protected areas
effectively. If the protective features are already incorporated into the PPE, then to be positioned correctly, the PPE must be the correct size. In all
cases, the proper equipment has been supplied to keep this PPE firmly in contact with the body.
Footwear:
Protective footwear fit is very important. The fit of different protective footwear styles varies due to differences in design and construction. Only use
protective footwear that fits properly. Any protective footwear that does not fit properly should not be used. Be sure that the protective footwear fits
snugly but not too tightly. Confirm that heel lift is minimal. Check to confirm adequate room in the toe box.
Men’s Sizes
EU 41 42 43 43.5 44 44.5 45 45.5 46 47 48.5
US 8 8.5 9 9.5 10 10.5 11 11.5 12 13 14
UK 7.5 8 8.5 9 9.5 10 10.5 11 11.5 12.5 13.5
05
SAFETY INSPECTIONS AND OBSOLESCENCE
Before Every Use:
Check the sole to confirm that it is good condition and attached securely to the boot. Check the lining to confirm that it is not ripped or torn. Check
uppers and adjustment strap to confirm that none of the materials are cut or cracked. Check the adjustment strap to confirm that it is not broken,
that it is not filled with debris, and that nothing prevents it or the hook and loop fastener from fastening securely. Check the elastic cords that hold
the tongue in place to be sure that they are securely attached and confirm they are not worn or cut. Protective footwear that is improperly fastened
cannot protect the user. If the protective footwear or any parts of them become worn, replace the footwear immediately.
In The Event Of An Impact:
In the event of impact, the key elements of the protective footwear may become compromised and the protective footwear may no longer provide the
limited protection described above. The damage may not be visible to the naked eye. In all cases of impact, replace the boots. Replacement Tarmac
2 Boots can be purchased at Icon® retail locations.
2 Year Rule:
In general, lightweight PPE such as the Tarmac 2 Boot should be replaced at least every 2 years even if the PPE has not suffered any damage. Damage
may be present and may not always be identified by a simple visual inspection.
SAFETY WARNINGS
PERFORMANCE
Tarmac 2 Boots have undergone EC Type Examination to assure compliance with Directive 89/686/EEC. They have additionally been examined and
tested according to the technical standard EN 13634:2010, with the exception of Section 4.2.1 “Height of upper”. *Note: they have, instead, been
tested according to the “Low boot height requirement protocol” rev 1 of 11-May-2012, which has been developed by the consent of the Italian
notified bodies’ and has been proposed as a future amendment to EN 13634:2010.
European standard EN 13634:2010 includes two performance levels in terms of the protection afforded. The degree of risk or hazard that a
motorcyclist will face is closely linked to the type of riding and the nature of the accident. Within standard EN 13634:2010 ‘Level 1’ performance
is deemed as the minimum level required in order for the footwear to provide useful protection in an accident, and offers footwear with an optimum
comfort level to suit all riding types. Where riders feel that their riding style or sport exposes them to an increased accident risk ‘Level 2’ has been
provided which offers increased performance – however it is likely that this additional level of protection has an increased penalty for the weight and
comfort, so may not be acceptable to all riders.

06
Test Technical Standard Reference Unit Requirement Result
Upper
Height of
upper EN 13634:2010 Section
4.2.1 mm
Not
applied
*see
above
note
Impact
abrasion
resistance
EN 13634:2010 Section
4.4.4 seconds
Area A: (Achilles’ and instep)
Level 1: ≥ 1.5 s Level 2: ≥ 2.5 s
Area B: (Remainder of boot upper)
Level 1: ≥ 5 s Level 2: ≥ 12 s
Upper is classified based on the lowest result obtained in either area A
or B. For a definition of Area A and B see Fig. 1 and Chart 3.
Level 2
Impact cut
resistance EN 13634:2010 Section
4.4.5 mm
Area A: (Achilles’ and instep)
Level 1: ≤ 25 mm maximum knife penetration
Level 2: ≤ 25 mm maximum knife penetration
Area B: (Remainder of boot upper)
Level 1: ≤ 25 mm maximum knife penetration
Level 2: ≤ 15 mm maximum knife penetration
Upper is classified based on the lowest result obtained in either area A
or B. For a definition of Area A and B see Fig. 1 and Chart 3.
Level 2
Chart 2: Tarmac 2 Boots Type Examination Test Results
Paris Point Size UK Size Height (mm)
≤ 36 ≤ 3.5 44
37 to 38 4 to 5 46
39 to 40 5.5 to 6.5 48
41 to 42 7 to 8 50
43 to 44 8.5 to 10 52
≥ 45 ≥ 10.5 53

07
Fig. 1 Chart 3: Dimensions For Material Areas Shown In Fig.1
Size
(Paris Points) Size
(English)
“E” “F”
Minimum (mm) Maximum (mm)
38 and Below 5 and below 40 120
39-42 5.5 to 8 50 125
43 and above 8.5 and above 55 130
The lower tangent of Zone 2 is used to define the lower limits of measure-
ment E&F. Zone 2 is located by centering point X over the natural center of
the ankle as felt through the footwear when worn.
Key
1 = Zone 1 shin region
2 = Zone 2 ankle region
Area A
Area B
Test Technical Standard Reference Unit Requirement Result
Sole
Transverse rigidity of footwear EN 13634:2010 Section 6.1 kN Level 1: ≥ 1.0 kN
Level 2: ≥ 1.5 kN Level 2
Optional Requirements
Slip resistance of sole EN 13634:2010 Section 5.4 B) Surface: smooth steel - Lubricant: glycerol
heel mode (7°) ≥ .13
flat mode ≥ .18 SRB
Chart 2: Tarmac 2 Boots Type Examination Test Results

08
CARE INSTRUCTIONS:
Cleaning:
Use suede safe cleaner on the exterior suede portions of the boot only. Suede safe cleaners can be found at most shoe repair locations or retail stores
specializing in leather apparel. Use a rag dampened with clean water to wipe other exterior portions or sole of the boot. Note that suede safe cleaner
may darken the leather of the boot and may affect the other materials of the upper. Be sure not to apply suede safe cleaner to any portions of the boot
that are not suede. Be sure to test any suede safe cleaner on suede in an inconspicuous location, first, before cleaning the boot. Do not use solvents
or other toxic substances to clean the Tarmac 2 Boots. Do not use hair dryers or other heaters to dry the boots after cleaning.
Misuse That Will Degrade Tarmac 2 Boots Performance:
Tarmac 2 Boots must be worn to provide any protection. Improper use of the Tarmac 2 Boots can seriously compromise effectiveness and reduce
performance. In order for the Tarmac 2 Boots to retain their original protective capabilities only use the Tarmac 2 Boots for the purposes described in
the “Use Restrictions and Limitations” section of this user manual. Never tamper with any part of the boots. Never bend or twist the boots excessively
as this constitutes improper use. Do not paint the boots or use colorants of any nature.
Environmental Conditions That Will Degrade Tarmac 2 Boots Performance:
Contamination with foreign substances and/or improper care can seriously compromise the Tarmac 2 Boots‘ effectiveness and reduce their
performance. Do not expose the Tarmac 2 Boots to extreme, direct sunlight or extreme moisture. Do not expose the Tarmac 2 Boots to extremely high
or low temperatures like those found in a closed car or outdoor storage.
PROTECTION LIMITATIONS
General Use:
Tarmac 2 Boots are intended to protect against ambient conditions without excessively impairing the user’s ability to control the motorcycle while
operating the foot controls. Tarmac 2 Boots are designed with safety and dexterity in mind. Tarmac 2 Boots are considered to be PPE because they are
designed and manufactured to provide limited protection to the foot and ankle during an accident or in the event of a fall from a motorcycle. Additional
particular hazards encountered during an on-road motorcycle accident may include: impacts with the rider’s motorcycle, conflicting vehicles, and
other roadside objects. The chances of serious injury are increased if the rider is not wearing certified leg protectors in addition to Tarmac 2 Boots
and/or if the foot becomes trapped under the motorcycle during a sliding impact. Tarmac 2 Boots will not prevent traumas caused by high-energy
impacts, traumas caused by severe forces of bending, twisting, torsion, or crushing as the result of striking an object, or traumas caused by extreme
movements. The force levels used in the tests do not compare directly to the forces motorcyclists are exposed to in real-world accidents, therefore,
products that meet the requirements of the Directive 86/686/EEC may only reduce the severity of some minor injuries. No protective footwear, can
offer complete protection against all injuries, the principle is to create a product that will help to reduce the risk of injury to the area, for which, the
PPE was designed to provide limited protection.
SAFETY WARNINGS

09
MATERIALS CONTENT:
This product contains no known
harmful substances.
WAIVER AND RELEASE BY OWNER
NO PERSONAL PROTECTIVE EQUIPMENT IS ABLE TO SAFEGUARD AGAINST ALL IMPACTS. NO PERSONAL PROTECTIVE EQUIPMENT CAN
OFFER COMPLETE PROTECTION AGAINST ALL INJURIES. MOTORCYCLING IS INHERENTLY DANGEROUS IN NATURE AND USE OF THIS
EQUIPMENT CANNOT PREVENT INJURY OR DEATH. WHEN USING THIS EQUIPMENT, THE USER ASSUMES ALL RISK ASSOCIATED WITH
THIS ACTIVITY, WHICH MAY CAUSE INJURY OR DEATH. THE USER HEREBY WAIVES ALL CLAIMS AGAINST ICON® (A DIVISION OF LEMANS
CORPORATION) AND LEMANS CORPORATION FOR DEATH OR INJURY TO HIS OR HER PERSON AND HEREBY COVENANTS TO NOT SUE FOR
ANY CLAIMS ARISING AS A RESULT OF INJURY OR DEATH WHILE USING ICON® PRODUCTS.
SAFETY WARNINGS
Maintenance:
Regularly condition the exterior suede portions of the boots with a quality suede safe conditioner. Apply suede safe conditioner to exterior suede
portions only. Do not apply suede conditioner to, boot interior, hook and loop fastening material, or sole. Suede safe conditioners can be found at
most shoe repair locations or retail stores specializing in leather apparel.
Storage:
Store the boots in a dry, ventilated area away from sunlight or direct heat. Ensure that they cannot be crushed, hit, dropped, or otherwise damaged by
impact, and that they are not stored under heavy objects. Do not store the boots with their weight distributed across a few, single points only. If wet
after use, before storing, dry boots in a ventilated space at room temperature; do not use hair dryers or other heaters.
Transport:
When transporting the boots do not leave them in a closed car for long periods of time and expose them to extremely high or low temperatures. Ensure
that they cannot be crushed, hit, dropped, or otherwise damaged by impact and that they are not transported under heavy objects.
Spare Parts:
No replacement parts are available for this boot.
Disposal:
At the end of the Tarmac 2 Boots’ useful life, do not discard them into the environment. Dispose of them according to your local disposal requirements.

10
À NE RETIRER QUE PAR L’UTILISATEUR
ICON®
CHAUSSURES TARMAC 2
DIRECTIVE 89/686/EEC
CATÉGORIE II
CHAUSSURES ET BOTTES DE MOTO
ÉQUIPEMENT DE PROTECTION INDIVIDUELLE : MANUEL DE L’UTILISATEUR

11
ÉQUIPEMENTS DE PROTECTION INDIVIDUELLE (EPI) :
Conçues par Icon®, les chaussures Tarmac 2 sont considérées comme des équipements de protection individuelle (EPI), tels que définis par la
directive européenne 89/686/CEE. Les chaussures de protection décrites dans le présent manuel appartiennent aux EPI de catégorie II et, à ce
titre, ne peuvent porter le marquage CE qu’après avoir obtenu une approbation « CE de type », ainsi que la Certification correspondante auprès d’un
organisme notifié européen. Le marquage CE apposé sur ces chaussures de protection est le garant de leur conformité aux exigences sanitaires et
sécuritaires de la directive 89/686/CEE.
Les chaussures de protection décrites dans le présent manuel ont subi un examen « CE de type » auprès de Ricotest s.r.l., numéro d’organisme notifié
0498, pour vérifier leur conformité à la directive 89/686/CEE.
CONTRAINTES ET LIMITATIONS D’UTILISATION
L’utilisation des chaussures Tarmac 2 est strictement limitée aux activités de moto sur route. Les chaussures Tarmac 2 sont conçues pour offrir une
protection limitée dans des circonstances spécifiques uniquement. Les chaussures Tarmac 2 sont conçues uniquement pour le motocyclisme sur
route. Les chaussures Tarmac 2 doivent être utilisées avec des protège-tibias et jambes portant le marquage CE et être de type « L » catégorie « A », type « L » catégorie «
B », type « K+L » catégorie « A » ou type « K+L » catégorie « B ».Le seul ajout des chaussures Tarmac 2 à tout autre EPI ou vêtement spécial moto ne confère
en aucun cas auxdits EPI et vêtement spécial moto une certification CE. Le motocyclisme est, par nature, une activité dangereuse et le port des
chaussures Tarmac 2 ne saurait protéger de toute blessure ou d’un accident mortel. Icon® recommande vivement aux motards de toujours combiner
plusieurs sortes d’EPI compatibles et approuvés (casque, veste avec, au minimum, protections contre les chocs au niveau des épaules et des coudes,
protection dorsale, pantalon de moto avec, au minimum, protections contre les chocs aux genoux, jambes et hanches, gants, bottes agréées), pour
une protection supérieure lors de leurs activités de moto.
AVERTISSEMENTS DE SÉCURITÉ

12
La marque CE indique que les chaussures ou bottes de protection sont conformes aux exigences de la directive
89/686/CEE
Pictogramme indiquant qu’un Manuel de l’utilisateur (Notice d’information) a été fourni avec ce produit.
Symbole spécifique indiquant que les bottes de protection sont destinées uniquement à la moto
Pour obtenir des informations complémentaires concernant les niveaux de performances de ces bottes de protection,
veuillez consulter la rubrique PERFORMANCES de ce Manuel de l’utilisateur, ainsi que le tableau (inclus dans cette
même rubrique) nommé « résultats des tests de performance des bottes TARMAC 2 ».
Nom des bottes ou chaussures de protection ou code interne du fabricant
EXPLICATION DES SYMBOLES DU MARQUAGE CE
Veuillez trouver ci-après une explication du marquage CE qui apparaît sur les chaussures Tarmac 2, en fonction de la directive 89/686/CEE. Le
marquage CE est situé sur une étiquette cousue sur les chaussures Tarmac 2.
Exemple : Marquage Pour Les Chaussures Tarmac 2
Tableau 1: Explication De L’étiquette

13
Nom ou logo du fabricant
Pointure des bottes ou chaussures de protection en fonction du pays.
En plus du marquage mentionné ci-dessus, l’année et le trimestre de fabrication du produit
sont également indiqués sur une étiquette séparée. Des informations codées supplémentaires,
utilisées par Icon® pour effectuer le suivi du produit, peuvent également être spécifiées. Le
code peut également figurer dans d’autres versions du marquage.
UE 41 42 43 43,5 44 44,5 45 45,5 46 47 48,5
US 8 8,5 9 9,5 10 10,5 11 11,5 12 13 14
R.-U. 7,5 8 8,5 9 9,5 10 10,5 11 11,5 12,5 13,5
UTILISATION
Choix De La Bonne Pointure
Pour choisir la bonne pointure de chaussures Tarmac 2, veuillez-vous reporter au tableau ci-dessous
Pointures Homme

14
Recommandations D’utilisation Et Ajustement
Procéder de la même façon pour chaque chaussure : détachez la bride de fixation située au niveau de la cheville. Pour ce faire, tirez sur l’extrémité
de la bride de fixation située à l’intérieur du pied pour détacher les bandes scratch. La languette de la chaussure est attachée à l’aide de cordons
élastiques fixés de manière permanente. Abaissez la languette vers l’avant, en tirant suffisamment sur les cordons élastiques pour insérer le pied
dans la chaussure. Enfilez la chaussure. Placez le pied tout au fond de la chaussure. Assurez-vous que la chaussure vous va. Vous devez sentir que
votre pied est bien maintenu dans la chaussure, sans être trop serré. Le pied doit être de la même longueur que la chaussure. Les cordons élastiques
de la languette sont conçus pour s’adapter à votre pied. Maintenant, vous pouvez attacher la bride de fixation. Pour ce faire, saisissez l’extrémité de
la bride de fixation et recouvrez la partie supérieure de la chaussure jusqu’à l’intérieur du pied pour rattacher les bandes scratch. Vérifiez bien que
votre pantalon ou votre chaussette ne sont pas coincés dans la bride d’ajustement. Vous pouvez ajuster la bride de fixation. Il suffit de la détacher et
de rattacher les bandes scratch en repositionnant l’extrémité de la bride. La bride de fixation doit être suffisamment ajustée pour maintenir le pied
dans la chaussure mais pas serrée au point d’entraver la circulation sanguine du pied ou de bloquer tout mouvement du pied. Vérifiez que les bandes
scratch sont fermement attachées et que l’extrémité de la bride de fixation est bien plaquée contre la chaussure. Vérifiez que le port de ces chaussures
ne réduit pas votre capacité à utiliser les commandes de votre moto.
Pour une protection et une sécurité maximales, les bottes ou chaussures de protection ne doivent causer aucune gêne et ne doivent pas limiter la
liberté de mouvement du motard ou restreindre l’accès aux commandes de la moto, dans une position normale de pilotage. Si votre pointure n’est pas
disponible dans ce modèle de chaussures de protection, veuillez essayer un autre type de chaussures de protection certifiées CE.
Positionnement Et Fixation Des EPI :
Pour obtenir la meilleure protection possible, vous devez placer les EPI sur les parties du corps à protéger, et de manière à couvrir intégralement
les zones exposées. Si les EPI intègrent des renforts de protection, pour que ces derniers soient correctement positionnés sur les parties du corps à
protéger, il est essentiel que les EPI soient à la bonne taille. Dans tous les cas, l’équipement adéquat a été fourni de manière à ce que l’EPI reste
fermement en contact avec le corps.
Bottes Et Chaussures
Il est très important que les bottes ou chaussures de protection vous aillent. En fonction de leur conception et de leur fabrication, les divers types de
bottes ou chaussures de protection vous iront différemment. Portez uniquement des bottes ou chaussures de protection adaptées à votre morphologie.
N’utilisez pas de bottes ou chaussures de protection qui ne sont pas adaptées à votre morphologie. Assurez-vous que les bottes ou chaussures de
protection vous vont parfaitement et ne sont pas trop serrées. Assurez-vous que votre talon ne peut pas trop se soulever. Assurez-vous que vos orteils
ne sont pas trop à l’étroit.

15
INSPECTIONS DE SÉCURITÉ ET OBSOLESCENCE
Avant Chaque Utilisation
Examinez la semelle pour vous assurer qu’elle est en bon état et qu’elle est fixée solidement au reste de la botte ou chaussure. Vérifiez que la
doublure n’est pas arrachée ou déchirée. Vérifiez que la tige et la bride ne sont ni perforées ni craquelées. Vérifiez que la bride de fixation n’est ni
fendue, ni obstruée par quoi que ce soit. Assurez-vous que rien n’empêche la bride ou les bandes scratch d’être solidement attachées. Vérifiez que
les cordons élastiques permettant de maintenir la languette en place sont solidement fixés et qu’ils ne sont ni abîmés, ni coupés. Des bottes ou
chaussures de protection mal attachées ne protègent pas leur utilisateur. Si les bottes ou chaussures de protection ou toute partie constituante sont
usées, remplacez-les immédiatement.
En Cas D’impact
En cas d’impact, les éléments clés des bottes ou chaussures de protection peuvent être irrémédiablement abîmés et ces dernières peuvent ne plus
être en mesure d’assurer la protection limitée décrite ci-dessus. Il est possible que ce dégât ne soit pas visible à l’œil nu. En cas d’impact, remplacez
les bottes ou chaussures. Vous pouvez acheter de nouvelles chaussures Tarmac 2 auprès d’un distributeur Icon®.
Règle Des 2 Ans
En général, les EPI légers tels que les chaussures Tarmac 2 doivent être remplacés au moins tous les deux ans, même s’ils n’ont pas subi de dégâts.
Une simple inspection des EPI peut ne pas suffire à repérer les dégâts éventuels.
PERFORMANCES
Les chaussures Tarmac 2 ont subi un examen « CE de type » pour assurer leur conformité à la directive 89/686/CEE. En outre, elles ont été analysées
et testées pour vérifier leur conformité à la norme technique EN 13634:2010, à l’exception du chapitre 4.2.1 relatif à la hauteur de la tige. *Remarque
: les chaussures ont cependant été testées pour assurer leur conformité au protocole relatif aux chaussures montantes (Low boot height requirement
protocol, 1ère révision datée du 11 mai 2012). Développé avec l’approbation des organismes italiens notifiés, ce protocole a été proposé comme
future modification de la norme EN 13634:2010.
La norme européenne EN 13634:2010 prévoit deux niveaux de performance en termes de protection. Le degré de risque auquel est exposé un motard
est étroitement lié à l’utilisation qu’il fait de sa moto et à la nature de l’accident dans lequel il peut être impliqué. Dans le cadre de la norme EN
13634:2010, la performance de niveau 1 offre la protection minimum requise pour les bottes et chaussures en cas d’accident et un niveau de confort
optimum pour tous les types d’activités motocyclistes. Il appartient au motard de décider si son style de conduite ou le type d’activité qu’il pratique
l’exposent à un risque d’accident plus élevé. Dans ce cas, une performance de niveau 2 est prévue. Cependant, cette protection supplémentaire
implique des vêtements plus lourds et moins confortables qui peuvent ne pas convenir à tous les motards.
AVERTISSEMENTS DE SÉCURITÉ

16
Tableau 2 : Résultats Des Tests De Performance Des Chaussures Tarmac 2
Test Norme de référence technique Unité Exigences Résultat
Tige
Hauteur de
la tige EN 13634:2010, chapitre
4.2.1 mm
Non
appliqués
*voir la
remarque
ci-dessus
Résistance
à l’abrasion EN 13634:2010, chapitre
4.4.4 Secondes
Zone A : (talon d’Achille et coup-de-pied)
Niveau 1 : ≥ 1,5 s Niveau 2 : ≥ 2,5 s
Zone B : (autres parties de la tige)
Niveau 1 : ≥ 5 s Niveau 2 : ≥ 12 s
Le classement de la tige des bottes est établi en fonction des résultats
les plus faibles pour la zone A ou B. Pour consulter une définition des
zones A et B, reportez-vous à la figure 1 et au tableau 3.
Niveau 2
Résistance
à la
coupure
EN 13634:2010, chapitre
4.4.5 mm
Zone A : (talon d’Achille et coup-de-pied)
Niveau 1 : profondeur de la perforation de la lame ≤ 25 mm maximum
Niveau 2 : profondeur de la perforation de la lame ≤ 25 mm maximum
Zone B : (autres parties de la tige)
Niveau 1 : profondeur de la perforation de la lame ≤ 25 mm maximum
Niveau 2 : profondeur de la perforation de la lame ≤ 15 mm maximum
Le classement de la tige des bottes est établi en fonction des résultats
les plus faibles pour la zone A ou B. Pour consulter une définition des
zones A et B, reportez-vous à la figure 1 et au tableau 3.
Niveau 2
Pointure (point de Paris) Pointure R.-U. Hauteur (mm)
≤ 36 ≤ 3,5 44
37 à 38 4 à 5 46
39 à 40 5,5 à 6,5 48
41 à 42 7 à 8 50
43 à 44 8,5 à 10 52
≥ 45 ≥ 10,5 53

17
Test Norme de référence technique Unité Exigences Résultat
Semelle
Rigidité transversale des bottes
ou chaussures EN 13634:2010, chapitre 6.1 kN Niveau 1 : ≥ 1 kN
Niveau 2 : ≥ 1,5 kN Niveau 2
Exigences facultatives
Semelles anti-glissement EN 13634:2010, chapitre 5.4 B) Surface : acier lisse - Lubrifiant : glycérol
au talon (7°) ≥ 0,13
au plat ≥ 0,18 SRB
Tableau 2 : Résultats Des Tests De Performance Des Chaussures Tarmac 2
Figure 1. Tableau 3 : Dimensions Des Zones Apparaissant Dans La Fig.1
Pointure (point
de Paris) Pointure (point
anglais)
« E » « F »
Minimum
(mm) Maximum
(mm)
38 et inférieures 5 et inférieures 40 120
39 à 42 5,5 à 8 50 125
43 et supérieures 8,5 et supérieures 55 130
La tangente inférieure de la zone 2 est utilisée pour définir les limites
inférieures des mesures E et F. La zone 2 est définie en alignant le point
X sur le centre naturel de la cheville (tel que ressenti à travers la botte
lorsqu’elle est portée).
Légende
1 = Zone 1 tibia
2 = Zone 2 cheville
Zone A
Zone B

18
Conditions D’utilisation Risquant De Nuire Aux Performances Des Chaussures Tarmac 2
Les chaussures Tarmac 2 n’offrent de protection que si elles sont portées. Toute utilisation inappropriée des chaussures Tarmac 2 peut gravement
compromettre leur efficacité et leurs performances. Afin de maintenir leur capacité de protection originelle, veillez à utiliser les chaussures Tarmac
2 conformément aux indications de la rubrique « Contraintes et limitations d’utilisation ». N’essayez jamais de modifier un des composants de ces
chaussures. N’exercez jamais aucune torsion excessive sur les chaussures : cela constitue un cas d’utilisation inappropriée. Ne peignez pas les
chaussures et n’appliquez aucune teinture, de quelque nature que ce soit.
Conditions Environnementales Risquant De Nuire Aux Performances Des Chaussures Tarmac 2
Tout ajout de substances étrangères et/ou tout entretien non adapté peuvent gravement compromettre l’efficacité et les performances des chaussures
Tarmac 2. N’exposez pas les chaussures Tarmac 2 directement aux rayons du soleil ou à une humidité extrême. Conservez-les à l’abri des températures
extrêmes (basses ou élevées), telles que celles d’un véhicule fermé ou d’un lieu de stockage extérieur.
LIMITES DE PROTECTION
Utilisation Générale
Les chaussures Tarmac 2 doivent protéger des conditions ambiantes sans réduire excessivement la capacité de l’utilisateur à contrôler la moto à l’aide
des commandes activées avec le pied. Les chaussures Tarmac 2 sont conçues dans une optique de sécurité et de dextérité. Les chaussures Tarmac
2 sont considérées comme des équipements de protection individuelle (EPI) car elles sont conçues pour fournir une protection limitée des pieds et
chevilles en cas d’accident ou de chute de moto. Les dangers particuliers pouvant se présenter en cas d’accident de moto sur route comprennent
également : des impacts avec la propre moto du pilote, d’autres véhicules et des obstacles sur le bas-côté. Les possibilités de blessures graves
augmentent lorsque le motard ne porte pas de protège-jambes certifiés, outre les chaussures Tarmac 2, et/ou si le pied se retrouve coincé sous la
moto pendant un impact suivi d’une glissade. Les chaussures Tarmac 2 ne protègent pas contre les traumatismes causés par des torsions, des chocs
violents ou des mouvements extrêmes, ni contre les pressions résultant d’un impact. Les niveaux de force de ces tests sont loin d’être comparables aux
forces auxquelles sont exposés les motards lors d’un accident en conditions réelles. Cependant, les produits respectant les exigences de la directive
86/686/CEE peuvent atténuer certaines blessures mineures. Aucune botte ou chaussure de protection ne peut garantir de protection intégrale contre
toutes les blessures. Ces équipements visent seulement à réduire les risques de blessures pour les zones qu’ils protègent.
AVERTISSEMENTS DE SÉCURITÉ
Table of contents
Languages:
Popular Protection Device manuals by other brands

SNOWSOUND
SNOWSOUND TRI BU 584-A/L0 quick start guide

Husqvarna
Husqvarna X-COM R Operator's manual

ITR
ITR Energetyka Map 6 User manual and technical documentation

NSK
NSK Bruel & Kjaer Vibro VC-8000 Operation and maintenance

Salamander Designs
Salamander Designs FPSA/SC/GT user manual

Segen Solar
Segen Solar ACDB-250A-800A-3-1-1 installation manual