ICON QConEX User manual

N1630
User manual
Expansion unit for Qcon Pro -
MIDI/Audio control surface with
motorized faders for production

WARNING: To reduce the risk of fire or electric shock, do not expose this unit to
rain or moisture
Important Safety Instructions
1. Read this manual thoroughly before using this unit.
2. Keep this manual for future reference.
3. Take notice of and comply with all warnings included in the user's manual or indicated
on the appliance.
4. Follow all instructions included in this manual.
5. Do not expose this unit to rain or moisture. Avoid having water or other liquids spilled
on this unit.
6. When cleaning the cabinet or other parts of this appliance, use only a dry or slightly
damp soft cloth.
7. Do not block any ventilation openings or interfere with the proper ventilation of this unit.
Install in accordance with the manufacturer's instructions.
8. Do not use or store near any heat sources such as radiators, heat registers, stoves, or
other heat-producing appliances.
9. Do not interfere with the safety purpose of the polarized or grounding-type plug. A
polarized plug has two blades with one wider than the other. A grounding-type plug h
as two blades and a third grounding prong. These are designated for your safety. If the
provided plug does not fit into your outlet, consult an electrician.
10. Protect the power cord from being walked on or otherwise damaged by items placed
on or against them. Particular attention should be given to the plugs, receptacles, and
the point where the cord exits the appliance.
11. To avoid the risk of electrical shock, do not touch any exposed wiring while the unit is
in operation.
12. Only use attachments/accessories specified by the manufacturer.
13. Unplug this unit and all connected electrical equipment during lightning storms or when
left unused a long period of time.
14. Refer all servicing to qualified service personnel. Servicing is required when the
appliance has been damaged in any way or fails to operate normally.

Contents
Introduction
What's in the package?
Features
TM
Installing iMap Software for Windows
Top Panel Layout
Rear Panel Layout
Getting Started
Connecting Your Qcon EX Controller
TM
iMap Software for Mac OS X
TM
iMap Qcon EX software panel
Firmware upgrade
Connections
Specifications
Services
2
1
1
3-5
6-7
5
8
8-9
10
10
11
12
13

Introduction
Please write your serial number here for future reference:
Purchased at:
Date of purchase:
Thank you for purchasing the ICON Qcon EX Midi/Audio control surface. We sincerely trust
this product will provide years of satisfactory service, but if anything is not to your complete
satisfaction, we will endeavor to make things right.
In these pages, you'll find a detailed description of the features of the Qcon EX, as well as
a guided tour through its front and side panels, step-by-step instructions for its setup and
use, and full specifications.
You'll also find a warranty card enclosed - please don't forget to fill it out and mail it so that
you can receive online technical support at: www.icon-global.com. And so we can send you
updated information about these and other ICON products in the future. As with most
electronic devices, we strongly recommend you retain the original packaging. In the
unlikely event the product must be returned for servicing, the original packaging (or
reasonable equivalent) is required.
With proper care and adequate air circulation, your Qcon EX will operate without any trouble
for many years. We recommend that you record your serial number in the space provided
below for future reference.
What's in the package?
Qcon EX USB-MIDI Controller x 1pc.
AC adaptor x 1pc
Software CD / User’ Manual x 1
Quick Start Guide x 1
USB2.0 Cable x 1
1

Features
8 touch-sensitive motorized channel faders
12-segments LED channels level metering
8 x dual function encoder knobs (Enter & rotate)
11-segments LED surrounding the encoders to indicate the rotating position.
Large backlit LCD to display channel name, control values etc. for each channel
Illuminated buttons for each channel including Rec-enable, Solo, Mute, Select
and Monitor
Expandable to 32-channels control surface with 3units of Qcon EX and a Qcon Pro.
User A & User B RCA connectors for connecting with pedals
Class-compliant with Windows XP, Vista (32-bit), Windows 7 (32-bit & 64-bit),
and Mac OS X (IntelMac)
USB 2.0 high speed connectivity
Mackie control build-in for Cubase, Nuendo, Samplitude, Logic Pro and Abelton Live.
Mackie HUI protocol build-in for Pro Tool.
User self-define mode (MIDI Learn) for other DAW such as Sonar.
Firmware upgrade available simply via USB connection and iMap software.
Robust aluminum and metal casing with Kensington lock port
2

3
2
1
4
5
6
7
Top Panel Layout
Note: Function operates slightly difference between DAWs. Please refer to your DAW
manual for each function and overlap the provided labeling template according to your
current using DAW. The following description is based on the functions that operate in
TM
Apple Logic .
LCD backlit display
The two-line backlit LCD display shows the parameter values as you adjust them
and also provides feedback about channel selections, operating modes, and more.
Channel faders
The eight 100mm motorized faders are generally used for controlling the track
volume of your DAW. Depending on your DAW, you may use the “Flip” button to
switch the function of these faders to change other settings. They are all touch
sensitive to allow override automation the moment you touch a fader. Also, they
are motorized; they will automatically move to reflect the current level of the
selected channels in your DAW application. Any automation recorded in a project
will be reflected by the fader positions. Any parameter adjustments made with
these faders will be displayed directly above on the LCD display.
Channel level metering
The 12-led showing the associated channel level.
1
2
3
3

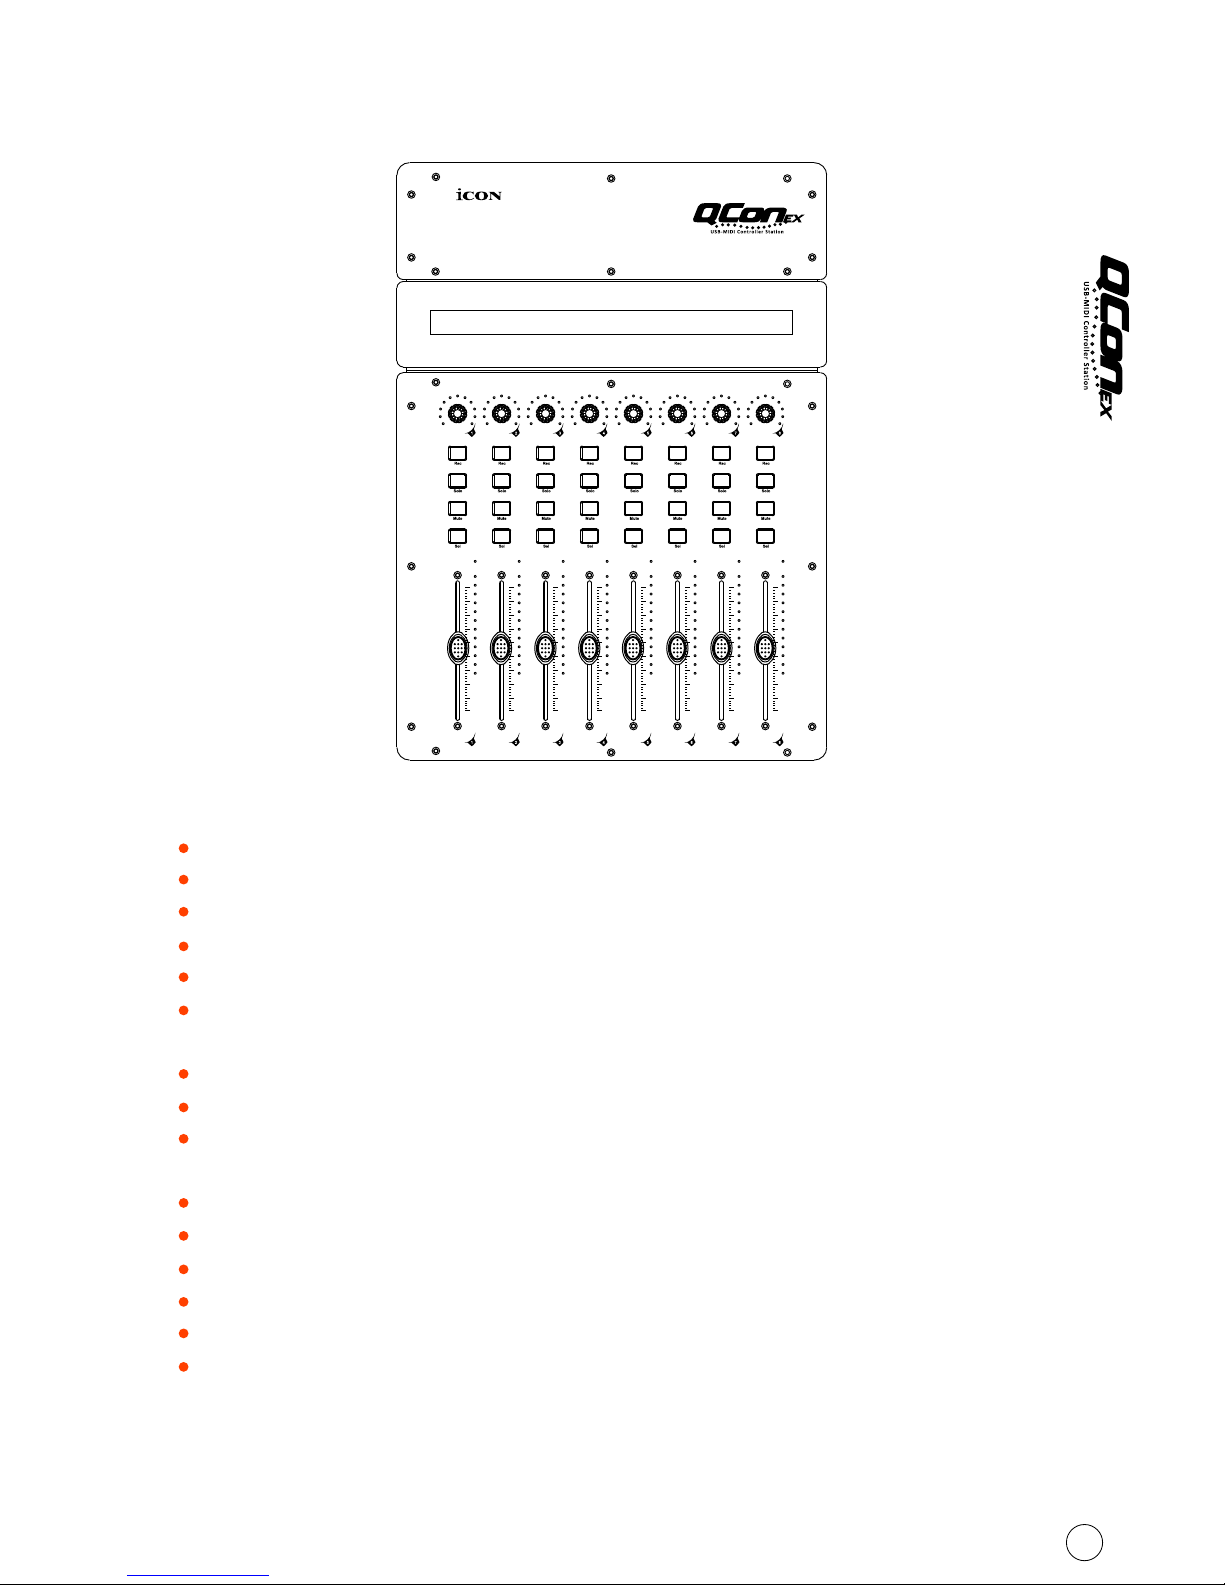
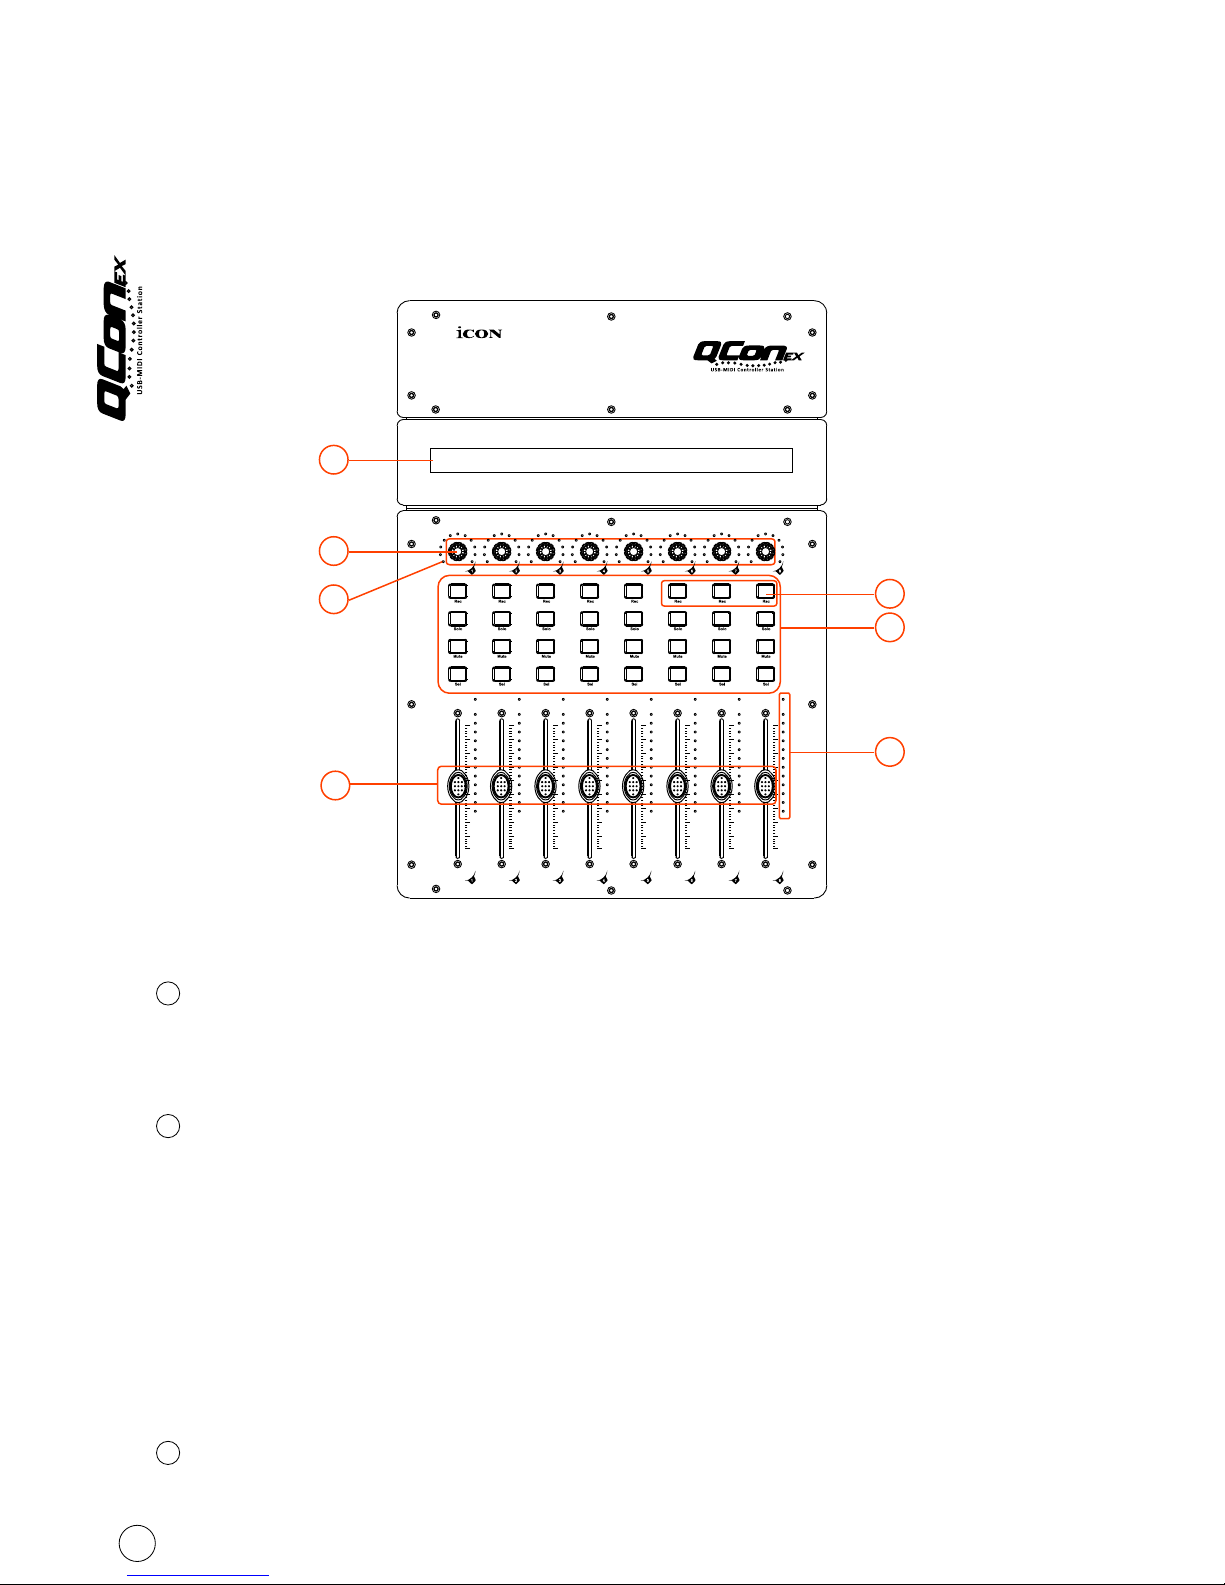
Dual function encoders
The dual functioned encoder acting as a push-button and a rotary control.
When an encoder is pressed, it may be used to change modes of operation or to
change what appears in the display above the channel strips. When an encoder
is rotated, depending on its assigned function, it can be used to adjust a channel's
pan, send level, or plug-in parameters.
Encoder LED
The 11-LED surrounding the encoder lights up to indicate the relative position
of the rotation without having to look at your computer.
Control buttons
4
5
Recording channel control buttons section
REC buttons - Activate and deactivate the recording state of the associated
channel. The switch will light red when the channel is armed.
SOLO buttons -Turn On and Off the solo state of the associated channel. The
switch will light green when the channel solo state is on and other channels will
be muted. You could solo multiple channel by pressing SOLO buttons on additional
channels.
MUTE buttons - Activate and deactivate the mute state of the associated channel.
The switch will light blue when the channel is muted.
SEL buttons -The SEL buttons activate the associated channels in the DAW software
in order to perform a specific operation (for example, when adjusting EQ with the
ASSIGNABLE ENCODERS, the SEL switch will be used to choose the channel you
want to adjust). When a channel is selected, the associated SEL switch's red LED
will light up.
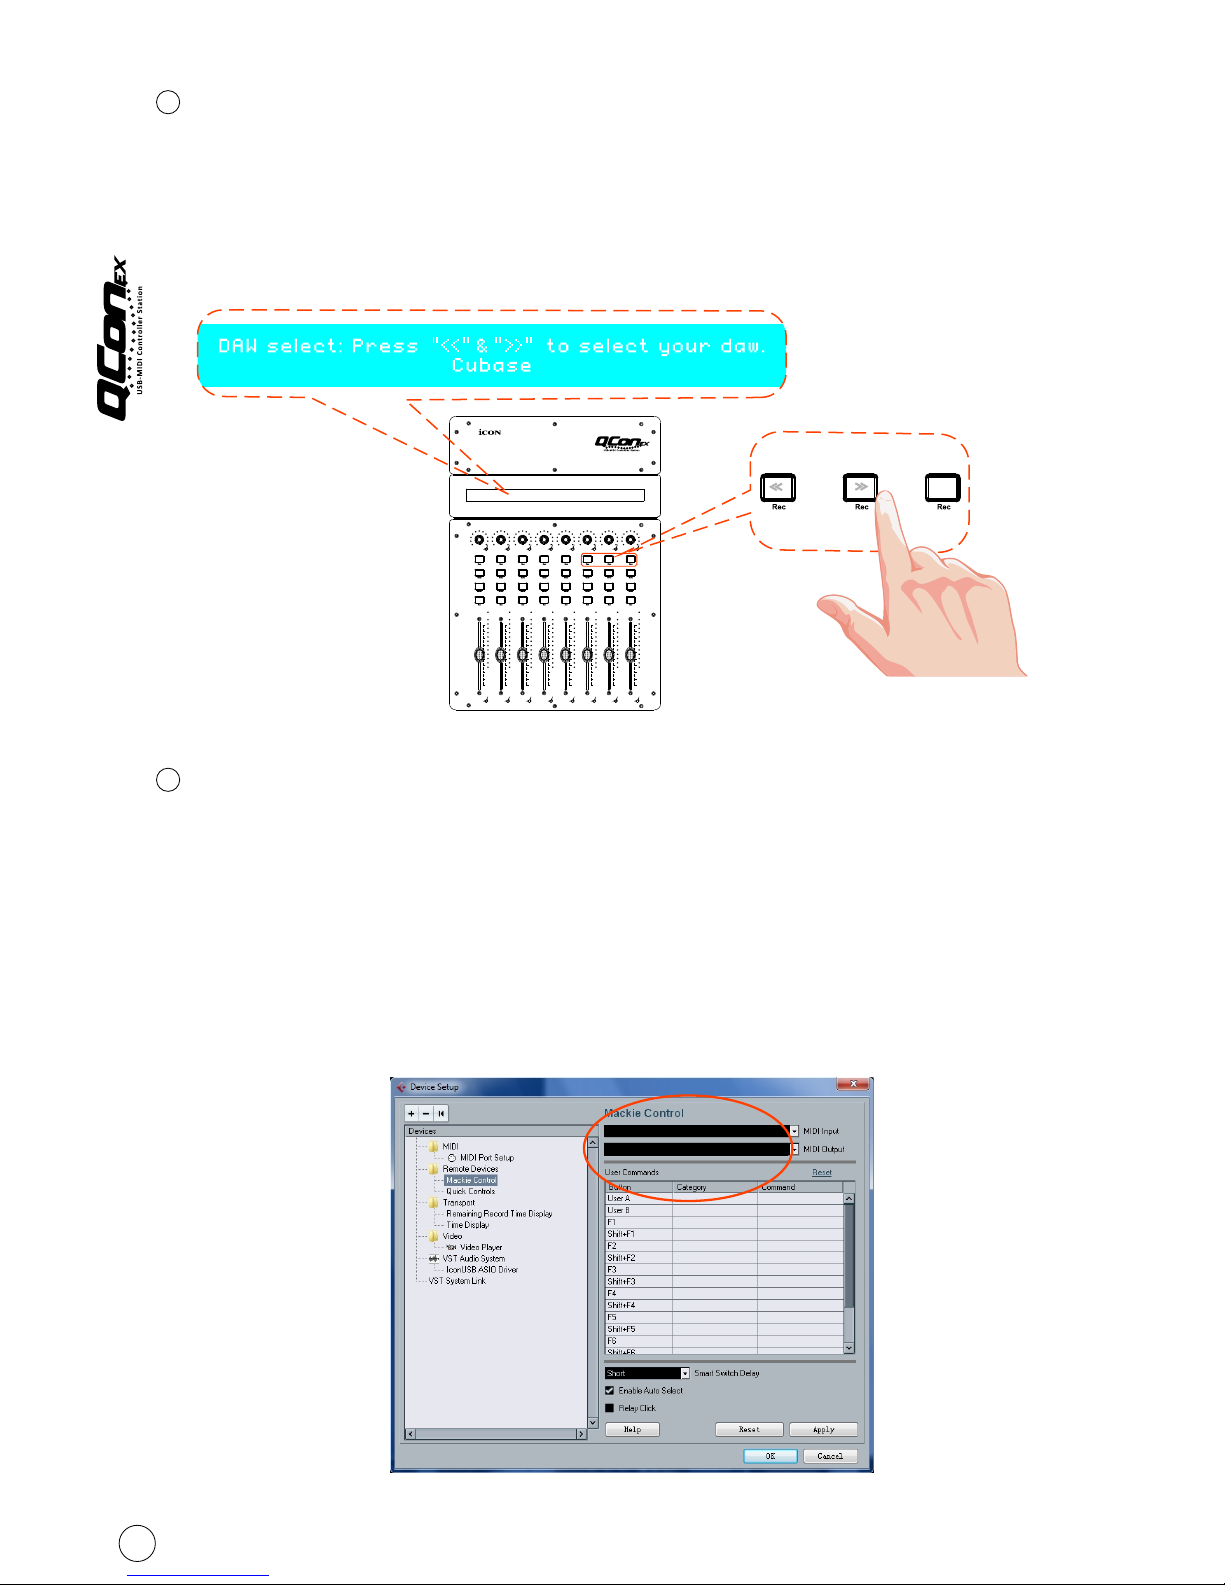
DAW Selector section
Qcon EX has built-in Mackie Control protocols & HUI for different DAW such as
TM TM TM TM TM
Cubase , Samplitude , Abelton Live , Logic Pro and ProTool By selecting the
correct DAW and Mackie control (HUI) protocol, Qcon EX has automatically
mapped the major functions and work seamlessly with that DAW.
<< / >> buttons -These arrow buttons are used to scroll through the DAW list.
The name of the DAW will display on the LCD.
DAW button - Press to enter the DAW selection.
To change your Qcon EX DAW mode, turn off and on the power switch to enter
the DAW selection mode. Select your desired DAW from the list with the
“<<” / “>>” buttons.
Note: You have to select the “Unit Number” for Qcon EX before you select the DAW.
6
7
4

Tips: DAW button could not be activated if a DAW software is running.
(Note: We will update Qcon EX firmware from time to time to support additional DAW apart from
the current existing list. Please check our official website to download and upgrade your Qcon EX
firmware).
Tips: Qcon EX will memorize your last selected DAW mode and re-enter the same mode few seconds
after it's been switched on. (i.e. DAW mode selection is not needed if last mode is being used.)
Rear Panel Layout
User A / User B RCA connectors
These RCA connectors are able to connect to foot pedals to activate your selected
functions. To set their parameters, select USER A and USER B parameters at Mackie
control mode.
USB port
Connect your Qcon EX to your Mac/PC via this USB port.
12V/5A power adaptor
Connect the provided power adaptor here.
(Note: Qcon EX is not able to work without the provided power adaptor connected.
The USB bus power is not able to provide sufficient power supply for Qcon EX.)
1
2
3
5
23
1

Getting Started
Connecting Your Qcon EX Controller
Connect the Qcon EX to your Mac/PC via the USB port.
Choose a USB port on your Mac/PC and insert the wide (flat) end of the USB cable.
Connect the cable's other end to the Qcon EX. Your Mac/PC should automatically
“detect” the new hardware and notify you that it is ready to use.
(Tip: We recommended that you use ICON's CubeHub USB hub, which allows you to
connect up to 3 units of Qcon EX, if you are not connecting Qcon EX directly to your
computer's USB port)
1
Select the “Unit number”
Press <</>> to scroll through the “Unit number 1 to 3” and press the “DAW”
button to confirm. You may connect up to a maximum of 3 units of Qcon EX.
Computer(MAC or PC)
Esc F1 F2 F3 F4
F5
F6
F7 F8 F9 F10 F11 F12
Prtsc
sysrq
pause
Break Lns Del
Home
Pgup
PgDN
End
$
~
`
!
1
··
23456778 90
)
)
*—
-
+
=
#¥%*##
QWERTYUIOP{}|
ASDFGHJKL:
;
ZXCVBNM<>?
Tab
CapsLook
Shift
Ctrl Alt AltGr Ctrl
Backspace
[
]
|
Enter
Shift
USB
Power Adaptor
2
expansion unit
6

Setup your DAW
Activate the ICON Qcon EX controller in your DAW or MIDI software using
“MIDI Setup” or “MIDI Devices”.
TM TM TM
For Logic , Cubase and Nuendo , choose Mackie Control/HUI at the
“Device List”.
(Note: Every application does this a little different, so refer to your software user
manual for the settings.)
Select the DAW at Qcon EX
Press <</>> to scroll through the DAW list after pressed the “DAW” button to
make the selection.
Tips: Qcon EX will memorize your last selected DAW mode and re-enter the same mode
few seconds after it's been switched on. (i.e. DAW mode selection is not needed if last
mode is being used.)
3
4
iCON Qcon EX Ver1.00
iCON Qcon Ver1.00EX
7

TM
iMap Software for Mac OS X
TM
Please follow the procedures below step-by-step to launch your iMap
software to Mac OS X
1Insert the Utility CD in your CD-Rom and double click “Qcon EX iMap” icon.
Tips: By “drag and drop” the “Qcon EX iMap” icon into the “Applications” folder,
you could create a “iMap” shortcut on your Mac's desktop.
TM
Please follow the procedures below step-by-step to install your iMap
software.
1
2
3
After you have inserted the CD into
your CD-Rom, an installation screen
should appear as shown in diagram 1;
TM
click "iMap ".
(Note: If the installation screen not
appear automatically go to the CD
folder and double click on "Setup")
installation
Turn on your PC.
Diagram 1
Insert the Utility CD in your CD-Rom
Setup Wizard appear
Setup wizard appears, please click
"Next"
Diagram 2
TM
Installing iMap Software for Windows
iMap
8

4Choose Install Location
Choose your preferred install
TM
location for iMap or use the
default location and click "Next"
5Select shortcut
Select the start menu folder in
which you would like to create
TM
the iMap shortcut. Then click
"Next"
Diagram 3
Diagram 4
6Create a shortcut on your desktop
Please untick the box if you do
not want to place a shortcut icon
TM
on your desktop for iMap ,
otherwise click "Next"
7TM
iMap started to install
TM
The iMap installation has now
started, wait for it to finish. Then
click "Finish"
8Installation finished
Click "Finish" to complete the
TM
iMap software installation.
Diagram 5
Diagram 6
Diagram 7
9

TM
iMap Qcon EX software panel
“Firmware Upgrade” button
Click this button to enter into the firmware upgrade window for Qcon EX.
Please refer to P.10 for the firmware upgrade procedure.
1
Step 3: Press the “MIDI Device” button at the top to select your connected
ICON product as the “MIDI In and Out” device at the pull-down menu.
Step 4: Click the “Open File” button to browse the new firmware file.
Step 5: Click the “Upload” button to upload the firmware.
Warning:The firmware upload process “MUST” be completed and not be interrupted
during the file uploading, otherwise the firmware may not be rewritten again.
Step 1: Connect the ICON product using a USB connection. Press the “MIDI
Device” button at the top to select your connected ICON product as the
“MIDI In and Out” device at the pull-down menu.
Note: If your connected ICON product model name does not appear on the
pull-down menu, select “USB Audio” as the MIDI In and Out device.
Step 2: Click the “Update” button.
Firmware upgrade
10

Connections
11
Computer(MAC or PC)
Esc F1 F2 F3 F4
F5
F6
F7 F8 F9 F10 F11 F12
Prtsc
sysrq
pause
Break Lns Del
Home
Pgup
PgDN
End
$
~
`
!
1
··
23456778 90
)
)
*—
-
+
=
#¥%*##
QWERTYUIOP{}|
ASDFGHJKL:
;
ZXCVBNM<>?
Tab
CapsLook
Shift
Ctrl Alt AltGr Ctrl
Backspace
[
]
|
Enter
Shift
USB
Qcon ProQcon EX Qcon EX Qcon EX
CubeHub

Specifications
Connector:
Power supply:
Current consumption:
Weight:
Dimensions:
USB connector (standard type)
12V/6A DC
3A or less
4.7kg (10.3lb)
342(L) X 475(W) X 82(H)
13.5”(L) x 18.7”(W) x 3.2”(H)
12

Services
If your Qcon EX needs servicing, follow these instructions.
2. Keep this owner's manual. We don't need it to repair the unit.
3. Pack the unit in its original packaging including end card and box. This is very
important. If you have lost the packaging, please make sure you have packed
the unit properly. ICON is not responsible for any damage that occurs due to
non-factory packing.
4. Ship to the ICON tech support center or the local return authorization.
U.S. OFFICE:
ICON Digital Corporation
8001 Terrace Ave., Suite 201
Middleton, WI, 53562
USA
ASIA OFFICE:
ICON (Asia) Corp.
Unit 807-810, 8/F., Sunley Centre,
No. 9 Wing Yin Street, Kwai Chung, NT.,
Hong Kong.
5. For additional update information please visit our website at:
www.icon-global.com
1. Ensure the problem is not related to operation error or external system devices.
13

info@icon-global.com
www.icon-global.com
QCONX PD3V100-E
Table of contents
Other ICON Recording Equipment manuals

ICON
ICON AIRMON PRO User manual

ICON
ICON PLATFORM M Plus User manual

ICON
ICON FireXon User manual

ICON
ICON Qcon ProX User manual

ICON
ICON QCon Pro Xs User manual

ICON
ICON i-Controls Pro User manual

ICON
ICON iKeyboard 4X User manual

ICON
ICON PLATFORM NANO User manual

ICON
ICON iConPad User manual

ICON
ICON MicU User manual

ICON
ICON MOBILE U User manual

ICON
ICON UMIX1010 RACK User manual

ICON
ICON QCon Pro G2 User manual

ICON
ICON Platform M+ User manual

ICON
ICON PlatformNano User manual

ICON
ICON U-Solo User manual

ICON
ICON Pro Audio UPorts2 Dyna User manual

ICON
ICON Cube G User manual

ICON
ICON i-creativ User manual

ICON
ICON QCon User manual