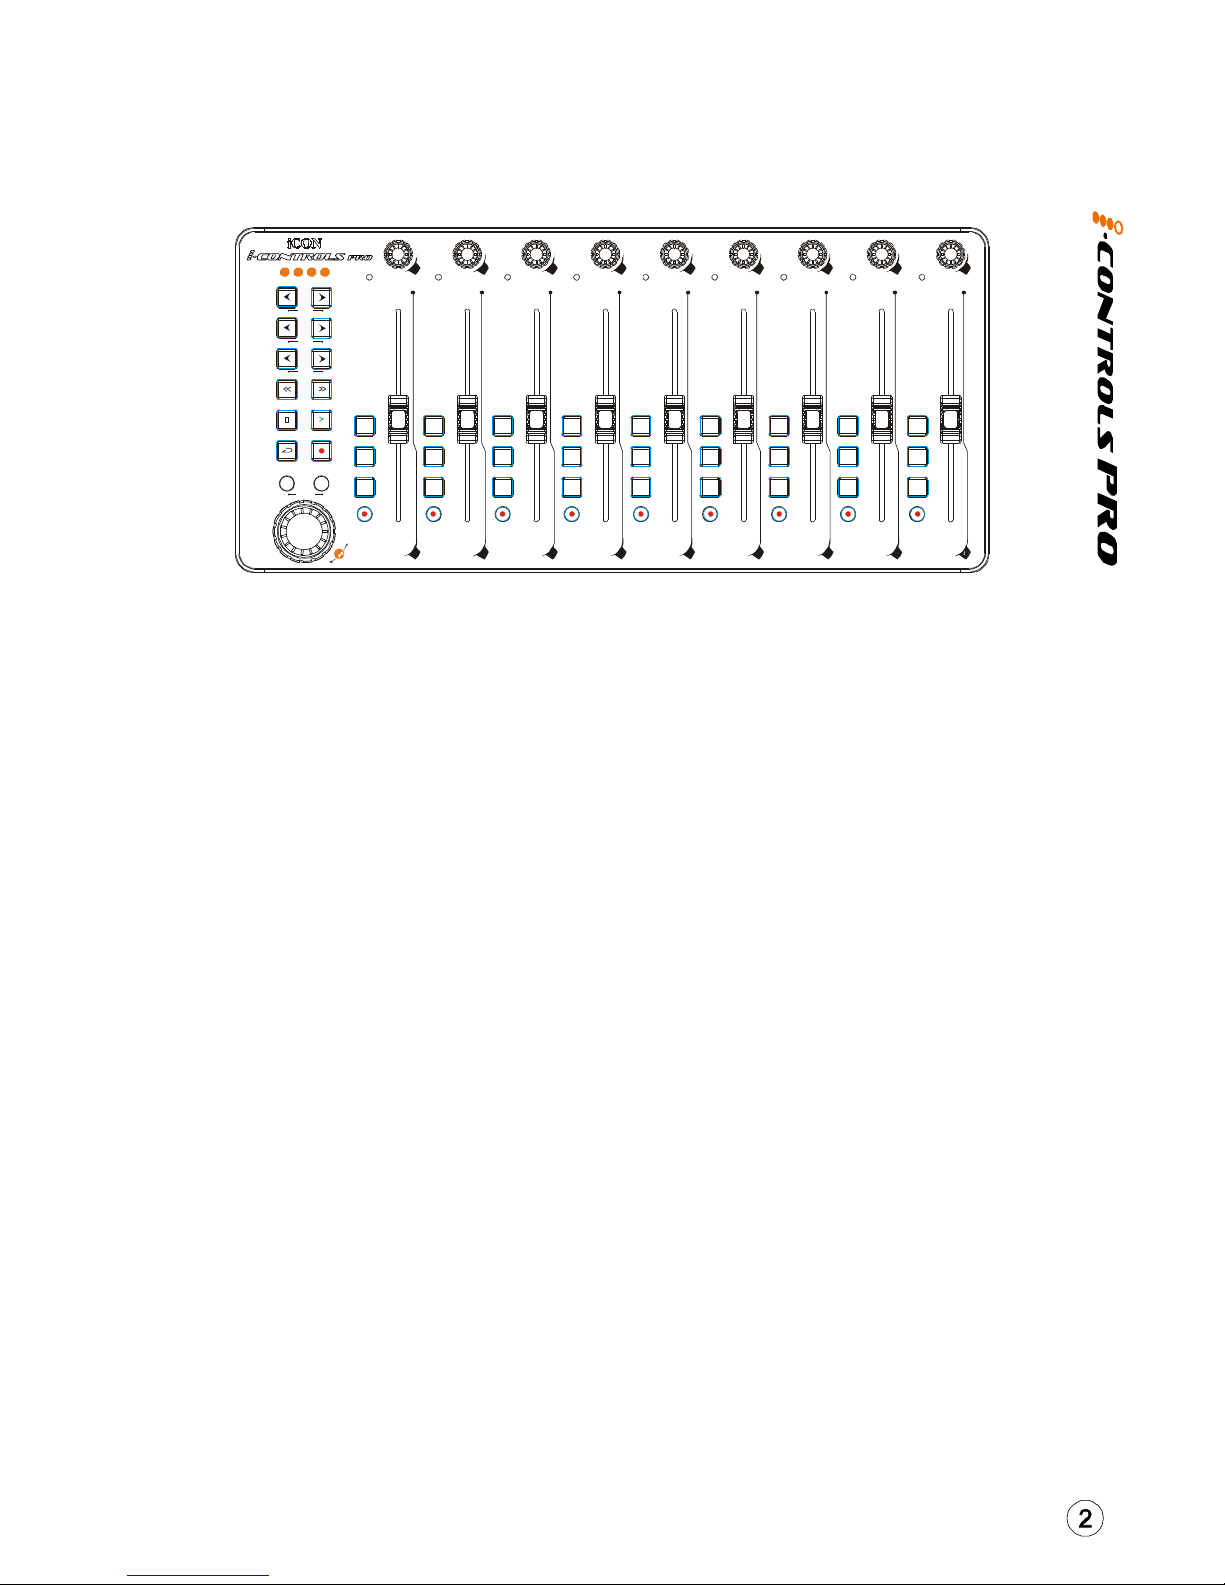
ICON i-Controls Pro User manual

N16549
MIDI/Audiocontrolsurfacewith
motorizedfaders
Controls Pro

ARNING: To reduce the risk of fire or electric shock, do not expose this unit to
rain or moisture
Important SafetyInstructions
. Read this manual thoroughly before using this unit.
2. Keep this manual for future reference.
3. Take notice of and comply with all warnings included in the user's manual or indicated
on the appliance.
4. Follow all instructions included in this manual.
5. Do not expose this unit to rain or moisture. Avoid having water or other liquids spilled
on this unit.
6. When cleaning the cabinet or other parts of this appliance, use only a dry or slightly
damp soft cloth.
7. Do not block any ventilation openings or interfere with the proper ventilation of this unit.
Install in accordance with the manufacturer's instructions.
8. Do not use or store near any heat sources such as radiators, heat registers, stoves, or
other heat-producing appliances.
9. Do not interfere with the safety purpose of the polarized or grounding-type plug. A
polarized plug has two blades with one wider than the other. A grounding-type plug h
as two blades and a third grounding prong. These are designated for your safety. If the
provided plug does not fit into your outlet, consult an electrician.
0. Protect the power cord from being walked on or otherwise damaged by items placed
on or against them. Particular attention should be given to the plugs, receptacles, and
the point where the cord exits the appliance.
. To avoid the risk of electrical shock, do not touch any exposed wiring while the unit is
in operation.
2. Only use attachments/accessories specified by the manufacturer.
3. Unplug this unit and all connected electrical equipment during lightning storms or when
left unused a long period of time.
4. Refer all servicing to qualified service personnel. Servicing is required when the
appliance has been damaged in any way or fails to operate normally.

Introduction
hat's in the package
Features
Front Panel Layout
Side Panel Layout
Getting Started
Connecting your iControls Pro controller system
Installing iMap Software for MAC OSX
Installing iMap Software for indows
Assigning MIDI functions with iMap
iMap iControls Pro software panel
TM
TM
TM
TM
Firmware upgrade
Restore the factory default settings
Daisy Chain with iControls Pro or any i-Pro series Controllers
Services
Specifications
Contents
2
1
1
3-5
5
5-6
6
7-8
9
9-10
11
12
13
14
11

Introduction
Please write your serial number here for future reference:
Purchased at:
Date of purchase:
Thank you for purchasing the ICON iControls Pro Midi/Audio control surface. We sincerely
trust this product will provide years of satisfactory service, but if anything is not to your
complete satisfaction, we will endeavor to make things right.
In these pages, you'll find a detailed description of the features of the iControls Pro, as well
as a guided tour through its front and side panels, step-by-step instructions for its setup and
use, and full specifications.
You'll also find a warranty card enclosed - please don't forget to fill it out and mail it so that
you can receive online technical support at: www.icon-global.com. And so we can send you
updated information about these and other ICON products in the future. As with most
electronic devices, we strongly recommend you retain the original packaging. In the
unlikely event the product must be returned for servicing, the original packaging (or
reasonable equivalent) is required.
With proper care and adequate air circulation, your iControls Pro will operate without any
trouble for many years. We recommend that you record your serial number in the space
provided below for future reference.
What's inthepackage?
iControls Pro USB-MIDI Controller x pc.
AC adaptor x pc
Software CD / User’ Manual x
Quick Start Guide x
USB2.0 Cable x

Features
1 2 3 4 5 6 7 8 M
Zoom
1234
Layer
Track
Bank
1 2 3 4 5 6 7 8
Solo
Mute
Sel
Solo
Mute
Sel
Solo
Mute
Sel
Solo
Mute
Sel
Solo
Mute
Sel
Solo
Mute
Sel
Solo
Mute
Sel
Solo
Mute
Sel
Solo
Mute
Sel
Extremely compact, designed to match the MacBook
8 touch-sensitive motorized channel faders
touch-sensitive motorized fader for master channel
9 encoder knobs
Jog wheel shuttle for fast search and control
Illuminated buttons for each channel including Sel, Mute, Solo and Record
6 illuminated transport buttons including Play, Stop, Rec, Rewind, Fast
forward and Loop
Illuminated “Zoom” buttons with 2 direction keys
2 illuminated “Track” buttons for easy selection of different channels
2 illuminated “Bank” buttons for shifting 8-channels
2 illuminated “Layer” buttons for selecting from layers to 4
2xUSB Connectors for a daisy chain with the i-Pro series product
Mackie control build-in for Cubase, Nuendo, Samplitude, Logic Pro and Abelton Live.
iMap software included for easy mapping of MIDI functions
Class-compliant with Windows XP, Vista (32-bit), Windows 7 (32-bit & 64-bit),
and Mac OS X (IntelMac)
USB 2.0 high speed connectivity
Robust aluminum and metal casing with Kensington lock port
An aluminium cover in different graphic designs and colours is available as
an optional extra
9V/3A power adapter included
ProTM
TM

Front Panel Layout
Functions described below for the different controls are based on the Mackie
Control mode that are set on layer of the iControls Pro. You may set your own
midi functions for each control at the “User defined” mode for 2-4 layers with
the iMap software provided.
Channel faders
Master fader
Knobs
The eight 00mm motorized faders are generally used for controlling the
track volume of your DAW. Depending on your DAW, you may use the “Flip”
button to switch the function of these faders to change other settings.
They are all touch sensitive to allow override automation the moment you
touch a fader. Also, they are motorized; they will automatically move to
reflect the current level of the selected channels in your DAW application.
Any automation recorded in a project will be reflected by the fader positions.
This 00mm motorized fader operates the same as the other 8 faders. It
controls your DAW software's master channel fader.
The nine rotary encoder knobs are generally used for controlling the track
pan position, aux send levels and EQ of your DAW. You may also preset them
to adjust specific parameters within plug-ins and virtual instruments.
1 2 3 4 5 6 7 8 M
Zoom
1234
Layer
Track
Bank
123 4 5 6 7 8
Solo
Mute
Sel
Solo
Mute
Sel
Solo
Mute
Sel
Solo
Mute
Sel
Solo
Mute
Sel
Solo
Mute
Sel
Solo
Mute
Sel
Solo
Mute
Sel
Solo
Mute
Sel

Control buttons
4a) Recording channel control buttons section
REC buttons -
SOLO buttons -
MUTE buttons -
SEL buttons -
Motorized fader control buttons section
Track < button -
Track > button -
BANK < button-
BANK > button -
Transport and Zoom control buttons section
PLAY button -
STOP button -
REC button -
REIND button -
FAST FORARD button -
LOOP button -
Zoom < button -
Zoom > button -
MIXER button -
READ button -
RITE button -
LOCK button -
Activate and deactivate the recording state of the associated
channel. The switch will light red when the channel is armed.
Turn On and Off the solo state of the associated channel.
The switch will light green when the channel solo state is on and other
channels will be muted. You could solo multiple channel by pressing SOLO
buttons on additional channels.
Activate and deactivate the mute state of the associated
channel. The switch will light blue when the channel is muted.Mute the
channel.
The SEL buttons activate the associated channels in the DAW
software in order to perform a specific operation (for example, when
adjusting EQ with the ASSIGNABLE ENCODERS, the SEL switch will be used
to choose the channel you want to adjust). When a channel is selected,
the associated SEL switch's red LED will light up
Shift “one” channel up for all faders (except the master
channel).
Shift “one” channel down for all faders (except the master
channel).
Shift “eight” channels up for all faders (except the master
channel).
Shift “eight” channels down for all faders (except the
master channel).
Activate the play function of the DAW.
Activate the stop function of the DAW.
Activate the record function of the DAW.
Activate the rewind function of the DAW.
Activate the fast forward function of the DAW.
Activate the loop function of the DAW.
The LEFT button is used to navigate (left movement)
through the Graphical User Interface (GUI) of the DAW application.
The RIGHT button is used to navigate (right movement)
through the Graphical User Interface (GUI) of the DAW application.
Press this button to launch the mixer window of theDAW.
Press the READ button to activate the read function of the
current audio track.
Press the WRITE button to activate the write function of
the current audio track.
Activate to lock all motorized faders.
4b)
4c)
4d)

Jog wheel
The jog wheel is used for various purposes specific to the DAW application,
including shuttle and scrubbing functions.
Layer Buttons
These two buttons allow you to switch between the four layers. Each layer
can be set to different parameters for the faders, knobs and buttons etc.
Side PanelLayout
Usetodaisychain withthesecondunitofiControlsProoranyi-Pro
seriescontrollers suchasiDJpro.
USB port (B-Type)
USB port
FunctionsasaMIDIporttoyournotebook(orcomputer) and compatible
software.AlsoprovidespowertoyouriControlsPro.
GettingStarted
Connecting your iControls Pro controller system
Connect the iControls Pro to your Mac/PC via the USB port.
Choose a USB port on your Mac/PC and insert the wide (flat) end of the USB
cable. Connect the cable's small jack end to the iControls Pro. Your Mac/PC
should automatically “see” the new hardware and notify you that it is ready
to use.
Note:Makesureyou haveconnectedthe9Vpowersupplyadapter(provided)to
youriControlsProastheUSB-busitselfisnotabletosupplysufficientpowerto
theiControlsPro.
Diagram 1Diagram 2
a
b

Set the iControls Pro's Mackie Control mode for your DA
and make your own midi mapping for layers 2-4
DA setup
Dependent on what mode you have set your iControls Pro with iMap,
please set your DA as followings:
User Define mode:
Mackie Control mode:
Traktor mode:
Launch the iMap software and select the Mackie Control mode according
to your DAW or Traktor for “MIDI Learn” at the “Control Mode” pull down
menu on layer . Then set your preferred midi function for each controller
for layers 2-4. Press the “MIDI Devices” button to select the iControls Pro
as the MIDI input and output device. Press the “Send Data” button to
upload the settings.
Select iControls Pro as your MIDI In and Out device at
your DAW.
Add “Mackie Control” device and select iControls
Pro at the MIDI In & Out sections.
Use MIDI Learn function to set your controls.
Note:IfiControlsProdoesnotappearonthepull-downmenu,select USBAudio”
as theMIDIInandOutdevice.
Installing iMapSoftware for MAC OSX
TM
Pleasefollowthe proceduresbelow step-by-step toinstallyouriMap
softwaretoMacOSX
TM
iMap “Device select” window pop-up, click the device button accordingly
to launch the iMap software.
TM
Insert the Utility CD in your CD-Rom and
double click “i-Pro Series iMap” icon.
Tips:By drag anddrop”the i-ProiMap”icon intothe Applications”folder,you
couldcreatea iMap”shortcuton yourMac'sdesktop.

Installing iMapSoftware for Windows
TM
Please follow the procedures below step-by-step to install your iMap
software.
TM
Turn on your PC.
Diagram1
Insert the Utility CD in your CD-Rom
After you have inserted the CD into
your CD-Rom, an installation screen
should appear as shown in diagram
; click "iMapinstallation".
TM
(Note:Iftheinstallation screennot
appearautomaticallygotothe CD
folderand doubleclickon "Setup")
Setup izard appear
Setup wizard appears, please click
"Next"
Choose Install Location
Choose your preferred install
location for iMap or use the
default location and click "Next"
TM
Select shortcut
Select the start menu folder in
which you would like to create
the iMap shortcut. Then click
"Next"
TM
Diagram3
Diagram2
Diagram4

Create a shortcut on your desktop
Please untick the box if you do
not want to place a shortcut icon
on your desktop for iMap,
otherwise click "Next"
TM
iMap started to install
TM
The iMap installation has now
started, wait for it to finish. Then
click "Finish"
TM
Installation finished
Click "Finish" to complete the
iMap software installation.
TM
Diagram5
Diagram6
Diagram7

Assigning MIDI functions with iMapTM
You can use iMap to assign the MIDI functions of your iControls Pro easily.
TM
Note:IfyouriControlsProisnotconnectedto
yourMac/PC,amessage of "Thereareno
MIDIinputdevices"willappear.Please
connectiControlstoyourMac/PCwith
theprovidedUSBcable.
Pro
iMapiControls Pro softwarepanel
TM
4 Layer buttons
Assign MIDI functions to the fader
You may have 4 different “Layers” settings for different applications. Each
“Layer” can have its own control settings.
Select the available DAW's Mackie Control mode for Mackie control
protocol or Traktor mode for “MIDI Learn” function from the “Mode” pull
down menu.
User Define mode allows you to set your own midi function for
each control.
Select your desired MIDI functions for the fader.
Layer 1:
Layers 2-4:
(User define mode only)
Assign MIDI functions to the control buttons (User define mode only)
Select your desired MIDI functions for the control button.

Select your desired MIDI functions for the buttons.
Select your desired MIDI functions for the jog wheel
Select the Mackie Control mode according to your DAW or Traktor mode
for “MIDI Learn' at the pull-down menu for layer . It will switch to “User
define” mode automatically if you switch to layers 2, 3 & 4.
Select “Master” if you are using iControls Pro as a standalone device or
select “Slave” if it is cascading with an i-Pro series controller.
Click this button to save your current settings for the iControls Pro. The file
is an “.iControlsPro” file.
Click this button to load a previously saved “.iControlsPro” setting file for
your iControls Pro.
Click this button to upload the iMap software settings to your iControls
Pro via USB connection.
Click this button, a MIDI device select window
will appear as shown in diagram . Please select
“ICON iControls Pro” for the MIDI Out Devices.
Click this button to enter into the firmware upgrade window for iControls
Pro. Please refer to P. for the firmware upgrade procedure.
Select your desired MIDI functions for the knob.
Assign MIDI functions to the knobs (User define mode only)
Assign MIDI functions to the buttons
Assign MIDI functions to the Jog wheel
Mode selector (Layer 1 only)
Status Selector
Save file” button
“Load file” button
“Send Data” button
MIDI Devices” button
“Firmware Upgrade” button
(User define mode only)
Tips:AMackieHuimodewillbeaddedsoon,pleasecheckourofficialwebsite
forupdates.
(Note:Youmusthave connectedyouriControlsProtoyourMac/PC,otherwise
thesettings upload willnotbesuccessful.)
TM
Diagram1

Firmware upgrade
Diagram 2Diagram 1
Step 1:
Step 2:
Step 3:
Step 4:
Step 5:
Connect the ICON product using a USB connection. Press the “MIDI
Device” button at the top to select your connected ICON product as the
“MIDI In and Out” device at the pull-down menu.
Click the “Update” button.
Press the “MIDI Device” button at the top to select your connected
ICON product as the “MIDI In and Out” device at the pull-down menu.
Click the “Open File” button to browse the new firmware file.
Click the “Upload” button to upload the firmware.
Note:IfyourconnectedICONproductmodelnamedoesnotappearonthe
pull-downmenu,select USBAudio”astheMIDIInandOutdevice.
Warning:Thefirmwareupload process MUST”becompletedand notbeinterrupted
during thefileuploading,otherwisethefirmwaremaynotbe rewrittenagain.
Restore the factory default settings
To restore your iControls Pro settings to factory default, simply import the
“Factory Default” setting file into your iControls Pro with the original setting
of the iMap software.

DaisyChain with iControls Proor any
i-Pro series Controllers
You may daisy chain i-Pro series controllers including iControls Pro. Because
most of the i-Pro series controllers are USB bus-powered (iControls Pro is
powered by an external power adapter) the stability depends on the total
power demand of the chain. Please visit our website for recommendations
on daisy chain sequences for different i-series controllers.
Connect the first of the i-Pro series controllers to your
Mac/PC via the USB port
Connect the next of the i-Pro series controllers
Select a USB port on your Mac/PC and insert the wide (flat) end of the USB
cable and the other small end (B-type USB pack) to i-Pro series controller.
Insert the wide (flat) end of the USB cable to the first i-Pro series
controller 's second USB port and the other small end (B-type USB jack) to
the second i-Pro series controller's USB port.
Note:Duetothelimitation of powersupplyviaUSBport,yourconnecteddevices
chainmightexcess thepowersupplylimitof theUSBportandcausemalfunction.
Forrecommendationsonthecombination and daisychainsequence ofdifferent
i-Proseriescontrollers,please visitthe ICONwebsiteatthefollowinglink:
www.icon-global.com
Controls
e1
Layer
e2 e3 e4 e5 e6 e7 e8 e9
1 2
3 4
f1 f2 f3 f4 f5 f6 f7 f8 f9
-+
USB2.0Cable
1 2 3 4 5 6 7 8 M
Zoom
1234
Layer
Track
Bank
12345678M
Solo
Mute
Sel
Solo
Mute
Sel
Solo
Mute
Sel
Solo
Mute
Sel
Solo
Mute
Sel
Solo
Mute
Sel
Solo
Mute
Sel
Solo
Mute
Sel
Solo
Mute
Sel

Specifications
Connector: To computer USB connector (mini B type)
To i-Pro series controller USB connector (standard type)
Power supply: 5V/3A DC
Current consumption: 2.0A or less
Weight: .80kg (3.96lb)
Dimensions: 392(L) X 80(W) X 26(H)
5.43”(L) x 7.09”(W) x .02”(H)

Services
2. Keep this owner's manual. We don't need it to repair the unit.
3. Pack the unit in its original packaging including end card and box. This is very
important. If you have lost the packaging, please make sure you have packed
the unit properly. ICON is not responsible for any damage that occurs due to
non-factory packing.
4. Ship to the ICON tech support center or the local return authorization.
ICON Digital Corporation
800 Terrace Ave., Suite 20
Middleton, WI, 53562
USA
ICON (Asia) Corp.
Unit 807-8 0, 8/F., Sunley Centre,
No. 9 Wing Yin Street, Kwai Chung, NT.,
Hong Kong.
5. For additional update information please visit our website at:
If your iControls Pro needs servicing, follow these instructions.
U.S. OFFICE:
ASIA OFFICE:
www.icon-global.com
. Ensure the problem is not related to operation error or external system devices.

info@icon-global.com
www.icon-global.com
ICPPD3V100-E
Table of contents
Other ICON Recording Equipment manuals

ICON
ICON iPAD User manual

ICON
ICON Pro Audio UPorts2 Dyna User manual

ICON
ICON P1-NANO User manual

ICON
ICON ProAudio PlatformNano Air User manual

ICON
ICON SHIELD User manual

ICON
ICON Upod Live User manual

ICON
ICON CUBE 4 Nano User manual

ICON
ICON QconProX Quick start guide

ICON
ICON QCon Pro G2 User manual

ICON
ICON PlatformNano User manual