Icy Box IB-SPL1027-C User manual
Manual IB-SPL1027-C
USB Type-C™to Dual DisplayPort™Graphics Splitter
Handbuch IB-SPL1027-C
USB Type-C™zu Dual DisplayPort™Grafik-Splitter
Manuel
Diviseur graphique USB Type-C™vers Dual DisplayPort™
Manuale
Splitter USB Type-C™per grafica Dual DisplayPort™
Manual
Repartidor (splitter) gráfico USB Type-C™a Dual DisplayPort™
Handleiding
USB Type-C™naar Dual DisplayPort™Graphics Splitter
Podręcznik obsługi
Rozdzielacz interfejsu USB Type-C™na Dual DisplayPort™
Használati utasítás
USB Type-C™– Dual DisplayPort™képernyő elosztó
Návod k použití
Grafický rozdělovač USB Type-C™– Dual DisplayPort™
Εγχειρίδιο
Διαχωριστής γραφικών USB Type-C™ σε Dual DisplayPort™

Safety information

Safety information
Please read carefully the following information to prevent injuries, da-
mage to material and device as well as data loss:
Warning levels
Signal words and safety codes indicate the warning level and provide immediate
information in terms of the probability of occurrence as well as the type and severity
of the consequences if the measures to prevent hazards are not complied with.
Warns of a directly hazardous situation causing
death or serious injury.
Warns of a potentially hazardous situation that may
cause death or serious injury.
Warns of a potentially hazardous situation that may
cause minor injury.
Warns of a potential situation that may cause ma-
terial or environmental damage and disrupt operative
processes.
1. Risk of electrical shock
Contact with parts conducting electricity
Risk of death by electrical shock
• Read the operating instructions prior to use
• Make sure the device has been de-energised prior to working on it
• Do not remove contact protection panels
• Avoid contact with conducting parts
• Do not bring plug contacts in contact with pointed and metal objects
• Use in intended environments only
• Operate the device using a power unit meeting the specifications of the type plate only!
• Keep the device/power unit away from humidity, liquid, vapour and dust
• Do not modify the device
• Do not connect the device during thunderstorms
• Approach specialist retailers if you require repairs
2. Hazards during assembly (if intended)
Sharp components
Potential injuries to fingers or hands during assembly (if
intended)
• Read the operating instructions prior to assembly
• Avoid coming into contact with sharp edges or pointed components
• Do not force components together
• Use suitable tools
• Use potentially enclosed accessories and tools only
DANGER
WARNING
CAUTION
IMPORTANT
WARNING
CAUTION
Safety information
3. Hazards caused by a development of heat
Insufficient device/power unit ventilation
Overheating and failure of the device/power unit
• Prevent externally heating up components and ensure an exchange of air
• Do not cover the fan outlet and passive cooling elements
• Avoid direct sunlight on the device/power unit
• Guarantee sufficient ambient air for the device/power unit
• Do not place objects on the device/power unit
4. Hazards caused by very small parts and packaging
Risk of suffocation
Risk of death by suffocation or swallowing
• Keep small parts and accessories away from children
• Store/dispose of plastic bags and packaging in an area that is inaccessible to children
• Do not hand over small parts and packaging to children
5. Potential data loss
Data lost during commissioning
Potentially irreversible data loss
• Always comply with the information in the operating instructions/quick installation guide
• Exclusively use the product once the specifications have been met
• Back up data prior to commissioning
• Back up data prior to connecting new hardware
• Use accessories enclosed with the product
6. Cleaning the device
Harmful cleaning agents
Scratches, discolouration, damage caused by moisture
or short circuit in the device
• Disconnect the device prior to cleaning
• Aggressive or intense cleaning agents and solvents are unsuitable
• Make sure there is no residual moisture after cleaning
• We recommend cleaning devices using a dry, anti-static cloth
7. Disposing of the device
Environmental pollution, unsuitable for
recycling
Potential environmental pollution caused by components, recycling circle interrupted
This icon on product and packaging indicates that this product must
not be disposed of as part of domestic waste. In compliance with the
Waste Electrical and Electronic Equipment Directive (WEEE) this elec-
trical device and potentially included batteries must not be disposed
of in conventional, domestic waste or recycling waste. If you would
like to dispose of this product and potentially included batteries, please
return it to the retailer or your local waste disposal and recycling point.
If you have any questions, please do not hesitate to contact our support at
IMPORTANT
WARNING
IMPORTANT
IMPORTANT
IMPORTANT
Sicherheitsinformationen
Sicherheitsinformationen
Zur Vermeidung körperlicher Schäden, sowie von Sach-, Geräteschäden
und Datenverlust beachten Sie bitte folgende Hinweise:
Warnstufen
Signalwort und Sicherheitszeichen kennzeichnen die Warnstufe und geben einen
sofortigen Hinweis auf Wahrscheinlichkeit, Art und Schwere der Folgen, wenn die
Maßnahmen zur Vermeidung der Gefahr nicht befolgt werden.
warnt vor einer unmittelbar gefährlichen Situation, die
zum Tod oder zu schweren Verletzungen führen wird.
warnt vor einer möglicherweise gefährlichen
Situation, die zum Tod oder zu schweren Verletzungen
führen kann.
warnt vor einer möglicherweise gefährlichen Situati-
on, die zu leichten Verletzungen führen kann.
warnt vor einer möglichen Situation, die zu Sach- und
Umweltschäden führen und den Betriebsablauf stören
kann.
1. Gefahren durch elektrische Spannung
Kontakt mit elektrisch leitenden Teilen
Lebensgefahr durch Stromschlag
• vor Benutzung Betriebsanleitung lesen
• vor Arbeiten am Gerät, Spannungsfreiheit sicherstellen
• Kontaktschutzblenden nicht entfernen
• Kontakt mit Spannungsführenden Komponenten vermeiden.
• Steckkontakte nicht mit spitzen und metallischen Gegenständen berühren
• Verwendung nur in dafür vorgesehenen Umgebungen
• Gerät ausschließlich mit Typenschildkonformen Netzteil betreiben!
• Gerät/Netzteil fern von Feuchtigkeit, Flüssigkeit, Dampf und Staub halten
• Eigenständige Modifikationen sind unzulässig
• Gerät nicht während eines Gewitters anschließen
• Geben Sie Ihr Gerät im Reparaturfall in den Fachhandel
2. Gefahren während Montage (wenn vorgesehen)
Scharfkantige Bauteile
Finger- oder Handverletzungen bei Zusammenbau
(wenn vorgesehen) möglich
• vor Montage, Betriebsanleitung lesen
• Kontakt mit scharfen Kanten oder spitzen Bauteilen vermeiden
• Bauteile nicht mit Gewalt zusammensetzen
• geeignetes Werkzeug verwenden
• nur gegebenenfalls mitgeliefertes Zubehör und Werkzeug verwenden
GEFAHR
WARNUNG
VORSICHT
ACHTUNG
WARNUNG
VORSICHT
Sicherheitsinformationen
3. Gefahren durch Wärmeentwicklung
Mangelhafte Belüftung des Geräts/Netzteils
Überhitzung und Ausfall des Geräts/Netzteils
• externe Erwärmung vermeiden und Luftaustausch zulassen
• Lüfter-Auslass und passive Kühlkörper freihalten
• direkte Sonneneinstrahlung auf Gerät/Netzteil vermeiden
• ausreichend Umgebungsluft für Gerät/Netzteil sicherstellen
• keine Gegenstände auf dem Gerät/Netzteil abstellen
4. Gefahren durch Kleinstteile und Verpackung
Erstickungsgefahr
Lebensgefahr durch Ersticken oder Verschlucken
• Kleinteile, Zubehör für Kinder unzugänglich verwahren
• Plastiktüten und Verpackung für Kinder unzugänglich verwahren/entsorgen
• Kleinteile und Verpackungen nicht in Kinderhände geben
5. Möglicher Datenverlust
Datenverlust bei Inbetriebnahme
Unwiederbringlicher Datenverlust möglich
• Unbedingt Hinweise in der Bedienungsanleitung/Schnellinstallationsanleitung beachten
• Produkt nur verwenden, wenn Spezifikationen erfüllt sind
• Datensicherung vor Inbetriebnahme durchführen
• Datensicherung vor Anschluss neuer Hardware durchführen
• dem Produkt beiliegendes Zubehör verwenden
6. Reinigung des Gerätes
Schädigende Reinigungsmittel
Kratzer, Farbveränderungen, Feuchteschäden oder
Kurzschluss am Gerät
• vor Reinigung, das Gerät außer Betrieb nehmen
• aggressive bzw. scharfe Reinigungs- und Lösungsmittel sind ungeeignet
• nach der Reinigung sicherstellen, dass keine Restfeuchtigkeit vorhanden ist
• Reinigung der Geräte am besten mit trockenem Antistatiktuch durchführen
7. Entsorgung des Gerätes
Umweltverschmutzung, Wiederverwertung nicht möglich
Mögliche Umweltbelastung durch Bestandteile,
Recyclingkreislauf unterbrochen
Dieses auf dem Produkt und der Verpackung angebrachte Symbol
zeigt an, dass dieses Produkt nicht mit dem Hausmüll entsorgt werden
darf. In Übereinstimmung mit der Richtlinie über Elektro- und Elekt-
ronik-Altgeräte (WEEE) darf dieses Elektrogerät und ggf. enthaltene
Batterien nicht im normalen Hausmüll oder dem Gelben Sack ent-
sorgt werden. Wenn Sie dieses Produkt und ggf. enthaltene Batterien
entsorgen möchten, bringen Sie diese bitte zur Verkaufsstelle zurück
oder zum Recycling-Sammelpunkt Ihrer Gemeinde.
oder besuchen Sie unsere Internetseite www.raidsonic.de.
ACHTUNG
WARNUNG
ACHTUNG
ACHTUNG
ACHTUNG
Manual IB-SPL1027-C
Manual IB-SPL1027-C
Package content
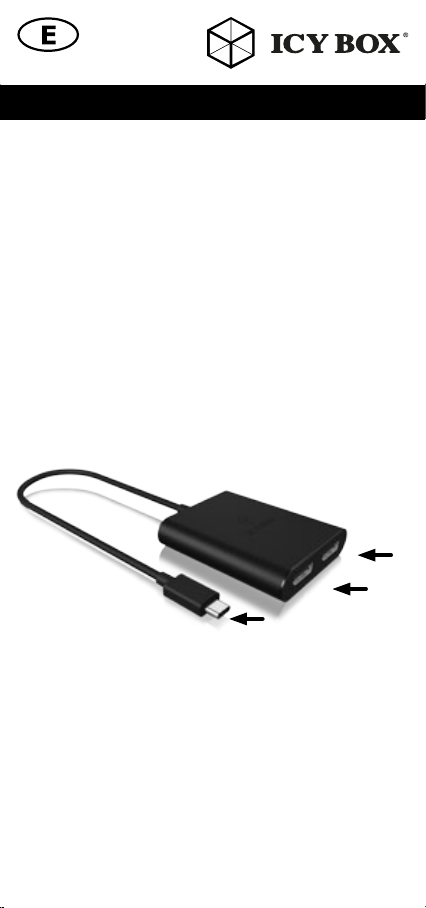
IB-SPL1027-C with integrated USB Type-C™cable (330 mm),
manual
Introduction
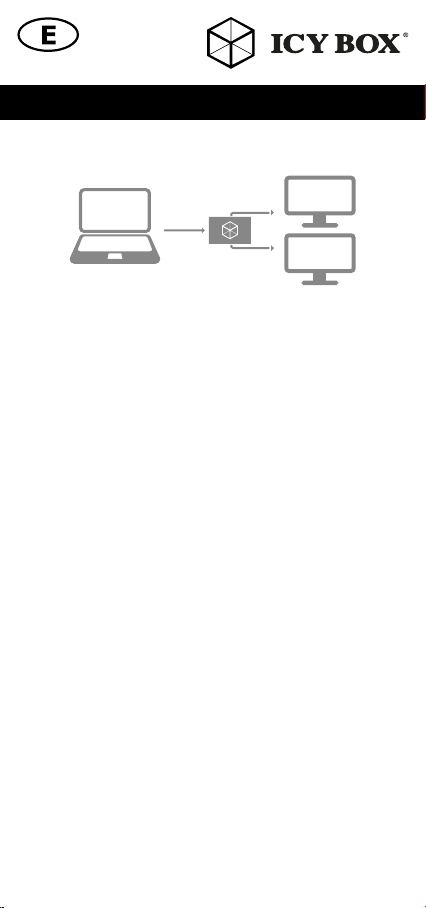
The IB-SPL1027 USB Type-C™DisplayPort™splitter is an innovative,
external multi-display adapter that allows end users to enjoy multiple
monitors from a single USB Type-C™source for each application, such
as gaming, graphics design or spreadsheet analysis. Users can choose
to dedicate each monitor to a separate application.
ICY BOX DisplayPort™graphics splitter lets clone your primary display
and function as a 2 port DisplayPort™video splitter.
ICY BOX IB-SPL1027 USB Type-C™DisplayPort™graphics splitter requi-
res no software installation for multi-display applications, plug-n-play,
simplifying configuration and saving time. It works for any computer with
USB Type-C™connectivity and Windows®operating system.
Overview
1) Integrated USB Type-C™cable (330 mm)
2) DisplayPort™port 1
3) DisplayPort™port 2
System requirements
• 1x USB Type-C™and Windows®enabled computer
• 2x DisplayPort™enabled monitors with cabling
Important: Your computer must support USB Type-C™and
DisplayPort™Alt Mode in order to work with this adapter.
3
2
1
Manual IB-SPL1027-C
Installation
Follow the steps to install the DisplayPort™graphics splitter.
4K monitor installation
Step 1: Connecting the graphics splitter USB Type-C™cable
to graphic source, such as desktop or notebook PC USB Type-C™
output interface.
Step 2: Connecting graphics splitter DisplayPort™output to monitor/s
(cables are not included).
Maximum connection: 2 different types of DisplayPort™monitors.
Step 3: Power on your PC and monitor/s. Select monitor/s to the
correct input source.
Step 4: Changing the display to clone mode, change the output display
resolution on your computer.
It is recommended that to use the same size, type and resolution
monitors for connecting. Same type monitor means the monitors have the
same native resolution and display refresh rate.
After installation, you will see a single image spread across multiple
monitors or the same image on all monitors (clone mode).
To change the display setting, simply change the graphic card output
resolution via the display properties page.
NOTE:
Display resolution with one connected 4k monitor
up to 3840 x 2160@60 Hz
Display resolution with two connected 4k monitors
up to 3840 x 2160@30 Hz /each
Type-C™DP
DP
Handbuch IB-SPL1027-C
Handbuch IB-SPL1027-C
Verpackungsinhalt
IB-SPL1027-C mit integriertem USB Type-C™Kabel (330 mm),
Handbuch
Einleitung
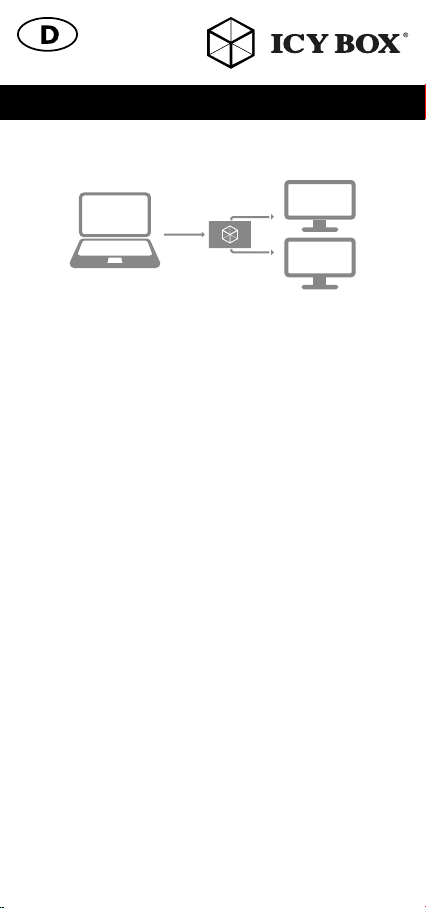
Der IB-SPL1027-C DisplayPort™Videosplitter ist ein innovativer,
externer Mehrfach-Videoadapter, der es dem Nutzer ermöglicht, die
Hauptanzeige auf zwei Monitore zu spiegeln, oder auf zwei Monitore
zu erweitern. Somit sind Sie in der Lage verschiedene Anwendungen
auch auf unterschiedlichen Monitoren auszuführen.
Es wird keine zusätzliche Softwareinstallation für die Nutzung der
Mehrfachanzeige benötigt.
Kurz gesagt „Plug-n-Play“, einfache Konfiguration über die Betriebssys-
temoberfläche spart Zeit, Nerven und funktioniert an jedem Standar-
drechner mit USB Type-C™Funktionalität und Windows®Betriebssystem.
Übersicht
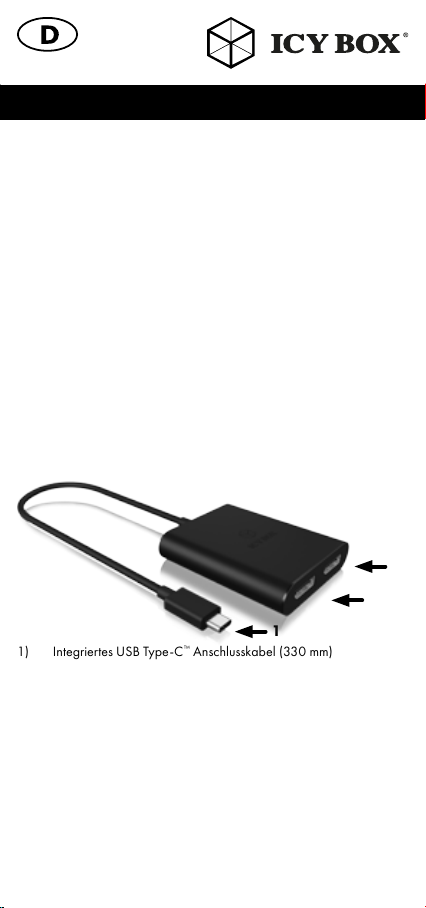
1) Integriertes USB Type-C™Anschlusskabel (330 mm)
2) DisplayPort™Schnittstelle 1
3) DisplayPort™Schnittstelle 2
Systemanforderungen
• 1x Computer mit Windows®Betriebssystem und
USB Type-C™Schnittstelle.
• 2x DisplayPort™4K Monitore mit entsprechenden Kabeln
Wichtig: Ihr Computer muss zwingend mit einer zertifizierten
USB Type-C™DisplayPort™Alt Mode Schnittstelle ausgestattet sein.
3
2
1
Handbuch IB-SPL1027-C
Inbetriebnahme
Folgen Sie der Beschreibung um den Splitter in Betrieb zu nehmen.
Schritt 1: Verbinden Sie das USB Type-C™Kabel des Splitters mit dem
USB Type-C™Ausgang Ihres Computers.
Schritt 2: Verbinden Sie die zwei DisplayPort™Ausgänge des Splitters
mittels geeignetem DisplayPort™Kabeln (nicht enthalten) mit den
DisplayPort™ Eingängen Ihrer Monitore.
Maximale Verbindungen: Zwei Monitore mit DisplayPort™
Unterstützung.
Schritt 3: Schalten Sie den verbundenen Rechner und die entsprechen-
den Monitore an. Wählen Sie am Monitor die korrekte DisplayPort™
Eingangsschnittstelle aus.
Schritt 4: Durch das Einstellen der Anzeige im “Spiegel-Modus” verän-
dert sich die Ausgabeauflösung an Ihrem Computer/Hauptbildschirm.
Es wird empfohlen Monitore der gleichen Größe, Auflösung und des
gleichen Typs zum Anschluss zu verwenden. Gleicher Typ bedeutet, dass
die Geräte die gleiche native Auflösung und Bildwiederholrate verfügen.
Nach der Installation sehen Sie das gleiche Bild auf beiden Monitoren
(Spiegelmodus) oder ein Bild über beide Monitore verteilt. Um die An-
zeigeeinstellungen zu verändern, passen Sie einfach die Einstellungen
unter „Auflösung anpassen“ Ihres Betriebssystems an.
Hinweis:
Anzeigeauflösung bei einem angeschlossenen 4k Monitor
bis zu 3840 x 2160@60 Hz
Anzeigeauflösung bei zwei angeschlossenen 4k Monitoren
bis zu 3840 x 2160@30 Hz/je Monitor
Type-C™DP
DPt
Manual IB-SPL1027-C

Manual IB-SPL1027-C
FR
Installation
Procédez comme suit pour installer le diviseur graphique DisplayPort™.
Étape 1 : Branchement du diviseur graphique, entrée USB Type-C™
avec câble vers source graphique, comme le connecteur de sortie
graphique USB Type-C™du bureau ou d‘un notebook.
Étape 2 : Branchement de la sortie DisplayPort™du diviseur graphique
au moniteur.
Branchement maximal : 2 différents types de moniteurs
DisplayPort™.
Étape 3 : Mettez le PC et les monitors sous tension. Sélectionnez les
moniteurs pour obtenir la bonne source d‘entrée.
Étape 4 : Faire passer l‘affichage en mode clonage a pour effet de
modifier la résolution d‘affichage de sortie sur votre ordinateur.
Il est recommandé d‘utiliser la même taille, le même type et la même
résolution pour le branchement. Le fait que le moniteur soit du même
type signifie que les moniteurs ont la même résolution native et le même
taux de rafraîchissement.
Après l‘installation, vous verrez la même image sur tous les moniteurs
(mode clonage) ou une image unique répartie sur plusieurs moniteurs.
Pour modifier l‘affichage, changez simplement la résolution de sortie de
la carte graphique via la page des propriétés d‘affichage.
IT
Installazione
Seguire le seguenti fasi per installare lo splitter grafico DisplayPort™.
Fase 1: Mediante apposito cavo, collegare l’ingresso USB Type-C™
dello splitter a un PC o a un notebook dotato di un connettore uscita
grafica USB Type-C™.
Fase 2: Collegare al monitor l’uscita DisplayPort™dello splitter.
Max numero di connessioni: 2 tipi differenti di monitor DisplayPort™
Fase 3: Accendere il PC e i monitor. Impostare i monitor sulla corrette
origine di input.
Fase 4: Portare il display in modalità clone, adattare la risoluzione di
visualizzazione in uscita del computer.
Si consiglia di utilizzare monitor di dimensioni, tipo e risoluzione uguali.
In questo modo i monitor hanno la stessa risoluzione nativa e la stessa
frequenza di aggiornamento della visualizzazione.
A installazione completata, la stessa immagine appare sui due monitor
(modalità clone) o appare una singola immagine distribuita nei due mo-
nitor. Per modificare l’impostazione di visualizzazione, basta modificare
la risoluzione in uscita della scheda grafica, nella pagina proprietà di
visualizzazione.

Manual IB-SPL1027-C
ES
Instalación
Siga los pasos para instalar el repartidor gráfico DisplayPort™.
Paso 1: Conectar el repartidor gráfico, la entrada de USB Type-C™
con cable a la fuente de gráficos, como un conector de salida de gráfi-
cos USB Type-C™de un ordenador de sobremesa o Notebook PC.
Paso 2: Conectar la salida DisplayPort™del repartidor gráfico al
monitor.
Conexiones máximas: Dos tipos de distintos de monitores Display-
Port™.
Paso 3: Conectar el PC y los monitores. Seleccionar los monitores para
la fuente de entrada correcta.
Paso 4: Cambiar la pantalla al modo de clonación, cambiar la resolu-
ción de pantalla de salida.Se recomienda conectar monitores del mismo
tamaño, tipo y resolución. Esto quiere decir que los monitores tiene que
tener la misma resolución nativa y frecuencia de actualización. Tras la
instalación, se verá la misma imagen en todos los monitores (modo de
clonación) o bien, una sola imagen distribuida en múltiples monitores.
Para cambiar la configuración de la pantalla, basta con cambiar la
resolución de salida de la tarjeta de gráficos a través de la página
propiedades de pantalla.
NL
Installatie
Volg onderstaande stappen om de DisplayPort™Graphics Splitter te
installeren.
Stap 1: Sluit de graphics splitter aan. Hierbij wordt de USB Type-C™-in-
put via een kabel verbonden met de weergavebron, zoals een desktop
of een notebook-pc- USB Type-C™Graphics uitgangsconnector.
Stap 2: Verbind de DisplayPort™-output via de graphics splitter met de
monitor.
Maximale verbinding: Twee verschillende types DisplayPort™-mo-
nitors.
Stap 3: Schakel de pc en de monitors in. Kies de juiste monitors bij de
juiste ingangsbron.
Stap 4: Als u het beeldscherm wijzigt in de kloonmodus, moet u de
outputresolutie van het beeldscherm op uw computer veranderen.
Wij raden u aan om voor de verbinding monitors te gebruiken die qua
formaat, type en resolutie identiek zijn. Daardoor zullen de monitors
dezelfde originele resolutie en snelheid van beeldverversing hebben.
Als u de graphics splitter hebt geïnstalleerd, ziet u op alle monitors het-
zelfde beeld (kloonmodus) of er wordt één enkel beeld verdeeld over
meerdere monitors. Om de beeldscherminstellingen te wijzigen, hoeft u
alleen maar via de pagina ‘Display Properties’ de outputresolutie van
de grafische kaart aan te passen.

Manual IB-SPL1027-C
PL
Instalacja
Wykonaj poniższe kroki, żeby zainstalować rozdzielacz graficzny
DisplayPort™.
Krok 1: za pomocą kabla podłącz wejście USB Type-C™rozdzielacza
graficznego do źródła sygnału graficznego, np. wyjścia graficznego
USB Type-C™komputera stacjonarnego lub notebooka.
Krok 2: podłącz wyjście DisplayPort™rozdzielacza graficznego do
monitora.
Limit połączeń: 2 różne typy monitorów z interfejsem DisplayPort™.
Krok 3: włącz komputer i monitory. Ustaw w monitorach właściwe
źródła sygnału wejściowego.
Krok 4: zmień tryb wyświetlania na klonowanie oraz rozdzielczość
wyświetlania komputera.
Zaleca się podłączanie monitorów identycznych rozmiarów, typów i
rozdzielczości. Identyczny typ oznacza takie same parametry rozd-
zielczości natywnej oraz częstotliwości odświeżania.
Po zakończeniu instalacji na wszystkich monitorach pojawi się ten sam
obraz (tryb klonowania) lub obraz zostanie podzielony na poszc-
zególne monitory. Żeby zmienić ustawienie wyświetlania, wystarczy
zmienić rozdzielczość wyjściową karty graficznej za pomocą strony
Właściwości wyświetlania.
HU
Telepítés
Kövesse a lépéseket a DisplayPort™képernyő elosztó telepítéséhez.
1. lépés: A képernyő elosztó csatlakoztatásához csatlakoztassa a
USB Type-C™bemenetet a jelforráshoz, például asztali vagy notebook
számítógép grafikus kimeneti csatlakozójához.
2. lépés: Csatlakoztassa a képernyő elosztót képernyő DisplayPort™
kimenetéhez.
Maximális csatlakozás: 2 különböző típusú DisplayPort™képernyő.
3. lépés: Kapcsolja be a számítógépet és a képernyőket. Válassza ki a
képernyőkön a megfelelő jelforrást.
4. lépés: A képernyő klónozási üzemmódra történő átállításával a
kimeneti képernyő felbontása a számítógép felbontására áll át.
Javasoljuk, hogy ugyanolyan méretű, típusú és felbontású képernyőket
csatlakoztasson. Az ugyanolyan típusú képernyő alatt azt értjük, hogy a
képernyők ugyanazzal a natív felbontással és ugyanazzal a képernyő
frissítési frekvenciával rendelkezzenek.
A telepítést követően az összes képernyőn ugyanaz a kép jelenik meg
(klónozási üzemmód) vagy a kép elnyújtásra kerül több képernyőn. A
képernyő beállítás módosításához egyszerűen módosítsa a grafikus
kártya kimeneti felbontását a Képernyő tulajdonságok alatt.

Manual IB-SPL1027-C
CZ
Instalace
Na základě tohoto postupu si nainstalujete grafický rozdělovač
DisplayPort™.
Krok č. 1: Připojte grafický rozdělovač, vstup USB Type-C™s kabelem
ke grafickému zdroji, jako je výstupní konektor grafiky stolního počítače
nebo notebooku.
Krok č. 2: Připojte výstup grafického rozdělovače DisplayPort™k
monitoru.
Maximální připojení: 2 různé typy monitorů DisplayPort™
Krok č. 3: Zapněte počítač a monitory. Vyberte monitory pro správný
vstupní zdroj.
Krok č. 4: Změnou zobrazení na režim klonu změníte výstupní rozlišení
zobrazení na svém počítači.
Doporučujeme použít stejnou velikost, typ a rozlišení monitorů pro při-
pojování. Stejný typ monitoru znamená, že monitory mají stejné nativní
rozlišení a obnovovací frekvenci zobrazení.
Po instalaci uvidíte na všech monitorech stejný obraz (režim klonu)
nebo jeden obraz rozdělený napříč několika monitory. Chcete-li změnit
nastavení zobrazení, stačí pouze změnit rozlišení výstupu grafické karty
na stránce Vlastnosti zobrazení.
GR
Εγκατάσταση
Βήμα 1: Συνδέστε τη μια πλευρά ενός καλωδίου στην είσοδο
USB Type-C™ του διαχωριστή γραφικών και την άλλη πλευρά
του καλωδίου στην υποδοχή εξόδου γραφικών USB Type-C™
της πηγής γραφικών, όπως π.χ. σε επιτραπέζιο υπολογιστή ή
notebook.
Βήμα 2: Συνδέστε τη μια πλευρά ενός καλωδίου στην έξοδο
DisplayPort™ του διαχωριστή γραφικών και την άλλη πλευρά
του καλωδίου στην υποδοχή της οθόνης.
Μέγιστη σύνδεση: 2 υποδοχές για οθόνες DisplayPort™
διαφορετικού τύπου.
Βήμα 3: Ενεργοποιήστε τον υπολογιστή και τις οθόνες.
Επιλέξτε οθόνες για διόρθωση της πηγής εισόδου.
Βήμα 4: Αλλάξτε τη ρύθμιση της οθόνης σε λειτουργία
κλωνοποίησης και την ανάλυση της οθόνης εξόδου στον
υπολογιστή.
Συνιστάται η χρήση οθονών ίδιου μεγέθους, τύπου και
ανάλυσης για τη σύνδεση. Η χρήση οθονών ίδιου τύπου
συνεπάγεται ότι οι οθόνες θα έχουν την ίδια εγγενή ανάλυση
και ρυθμό ανανέωσης οθόνης.
Μετά την εγκατάσταση, θα εμφανίζεται η ίδια εικόνα σε
όλες τις οθόνες (λειτουργία κλωνοποίησης) ή μία εικόνα
επεκταμένη σε πολλές οθόνες. Για αλλαγή της ρύθμισης
εμφάνισης, απλώς αλλάξτε την ανάλυση εξόδου της κάρτας
γραφικών στη σελίδα «Ιδιότητες οθόνης».
γραφικών στη σελίδα «Ιδιότητες οθόνης».

Manual IB-SPL1027-C

© Copyright 2017 by RaidSonic Technology GmbH. All Rights Reserved
The information contained in this manual is believed to be accurate and reliable. RaidSo-
nic Technology GmbH assumes no responsibility for any errors contained in this manual.
RaidSonic Technology GmbH reserves the right to make changes in the specifications and/
or design of the above mentioned product without prior notice. The diagrams contained
in this manual may also not fully represent the product that you are using and are there
for illustration purposes only. RaidSonic Technology GmbH assumes no responsibility for
any differences between the product mentioned in this manual and the product you may
have. DisplayPort
™
and the DisplayPort
™
logo are trademarks owned by the Video Elec-
tronicsStandards Association (VESA
®
) in the United States and other countries. All other
trademarks and brand names are the Property of their respective owners.
Table of contents
Other Icy Box Media Converter manuals

Icy Box
Icy Box IB-2537StS User manual

Icy Box
Icy Box IB-SPL1041 User manual

Icy Box
Icy Box Thunderbolt IB-SPL1026-TB3 User manual

Icy Box
Icy Box IB-RD2121StS User manual

Icy Box
Icy Box IB-SPL1025-TB3 User manual

Icy Box
Icy Box IB-SPL1029AC User manual

Icy Box
Icy Box IB-SPL1028-C User manual

Icy Box
Icy Box IB-2536 User manual

Icy Box
Icy Box IB-CVB513 User manual


