iGenix IG9801 User manual

Please read these instructions carefully before use and retain for future reference
Before switching on your appliance,
always check for any damage which may have been caused in transit
IG9801
Batch code:
200ML Portable Mini Air Dehumidier White
USER MANUAL

2
CONTENTS
Important Safety Instructions...............................................3-4
Intended Use................................................................................4
Specication .................................................................................5
Appliance Overview...................................................................5
Operating Instructions...............................................................6
Cleaning and Maintenance ........................................................6
Trouble Shooting Guide.............................................................7
Disposal Information..................................................................8
Igenix Warranty Terms and Conditions............................... 10
Warranty Registration ............................................................ 11

3
IMPORTANT SAFETY INSTRUCTIONS
Read and follow all of the instructions even if you feel you are familiar
with the product, and nd a place to keep this manual handy for future
reference.
Important: This appliance is intended for use in a domestic
environment only.Any other use is not recommended by the manufacturer
and may cause re, electrical shocks or other injury to user or property.
When using electrical appliances, basic safety precautions should always be
followed:
• It is recommended that you only use the mains adapter supplied with
this unit.
• Do not operate the appliance with a damaged cord or plug; after
it malfunctions or has been dropped or damaged in any way. All
electrical repairs must be carried out by a qualied electrician.
Inadequate repairs may result in a major source of danger for the user
and invalidate the warranty.
• Ensure hands are not wet when inserting the plug into the power
socket.
• Do not use in the following locations:-
• Next to a source of re.
• An area where oil is likely to splash.
• An area exposed to direct sunlight.
• An area where water is likely to splash.
• Near a bath, shower or a swimming pool.
• In a greenhouse.
• An area where ammable gases or liquids are present.
• Appliance should be placed on a at level surface.
• This appliance can be used by children aged from 8 years and above if
they have been given supervision or instruction concerning the use of
the appliance in a safe way and understand the hazards involved.
• Cleaning and maintenance shall not be made by children.
• Keep the appliance and its cord out of reach of children.
• Children should not play with the appliance.
• This appliance can be used by persons with reduced physical, sensory
or mental capabilities or lack of experience and knowledge if they have

4
been given supervision or instruction concerning use of the appliance
in a safe way and understand the hazards involved.
• Never insert your ngers or any foreign objects into the air outlet.
Take special care to warn children of these dangers.
• Do not cover the unit.
• Do not obstruct the air inlets/outlets of the appliance.
• When appliance is not being used for an extended period of time,
unplug from the power socket and ensure the water tank is drained
before storing in a dry and well ventilated area.
This lightweight portable Mini Air Dehumidier helps to prevent build-
up of mould and mildew by removing excessive moisture from the
atmosphere. This dehumidier is ideal for use around the home, kitchen,
bedroom, garage or basement, as well as caravans or other small areas up
to 5m².
Air always contains a certain amount of water in the form of water vapour.
This is known as humidity. The capacity of the air to hold water vapour
increases with the temperature.This is why in our homes, as soon as the
temperature decreases, the vapour contained in the air condenses leaving
moisture on the colder surfaces in the room such as the windows and the
walls etc.
The purpose of the dehumidier is to remove the excess moisture
from the air to control the condensation in the home.The optimum
environmental conditions for the home are between 40% and 60%
Relative Humidity (RH).
Below these levels the air can feel too dry and may cause skin complaints
and create static.
If temperatures in the home are below 10°C for prolonged periods, low
level heating will be necessary to allow the condensation to evaporate
into the air before dehumidication can take place. The air will however be
slightly warmed by the dehumidier as the dry air leaving the dehumidier
is between 1°C to 4°C higher than ambient room temperature.
INTENDED USE - Purpose of a Dehumidier
5
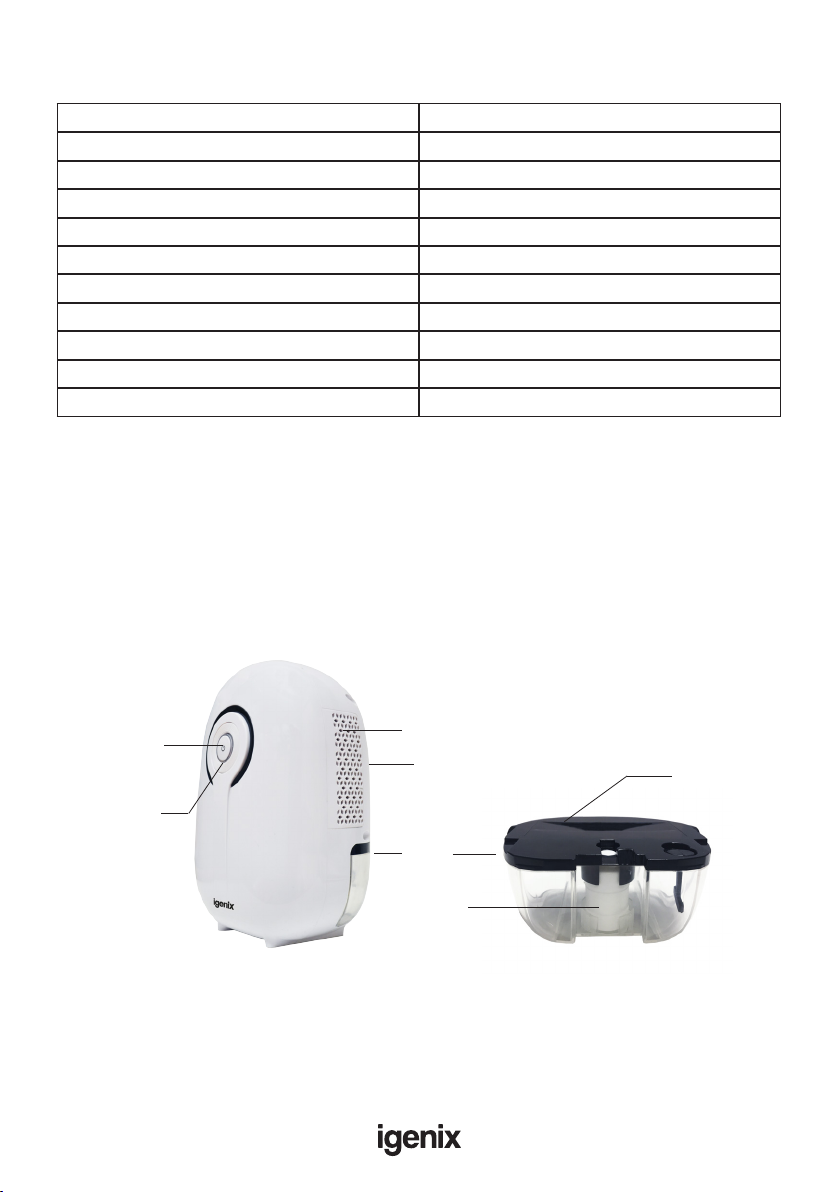
SPECIFICATION
APPLIANCE OVERVIEW
Air Inlet
Float
On/Off Switch
Model No: IG9801
Dehumidifying Capacity 220ml /Day (30°C RH80%)
Voltage AC 100-240V
Frequency 50-60 Hz
Rated Input Power 22W (30°C RH80%)
Water Tank Capacity 400ml
Operating Temperature 15°C - 35°C
Relative Humidity > 45%
Noise Level ≤35dB(A)
Transformer Voltage 9V DC / 2.5 Amp
Product Dimensions (mm) (H)218 x (W)154 x (D)130
Water
Tank
Air Outlet
Indicator Light
Drain Cover

6
OPERATING INSTRUCTIONS
• Plug the mains adaptor in to the back of the appliance and ensure that
the water tank is correctly positioned.
• Insert the plug into a mains socket.
• Press the On/Off Switch to turn on the appliance, the blue indicator
light around the On/Off Switch will illuminate and the fan will run
continuously.
Note: If the water tank is not correctly positioned the indicator light will
not illuminate.
• When the tank reaches full capacity, the indicator light will turn red
and the unit will automatically stop the dehumidication.
• Turn off the power supply, then take out the water tank and remove
the black drain cover to discard the collected water.
• Wipe and dry both the water tank and the dehumidier before
inserting the tank back into the unit to recommence dehumidication.
CLEANING AND MAINTENANCE
Always switch off the unit and unplug from the mains socket before
cleaning or performing any maintenance.When not in use for long periods
it is also advisable to remove the plug from the power socket.
Wipe the outside of the unit with a soft damp cloth.You may use a mild
detergent if necessary. Dry with a cloth. Do not use any harsh abrasives or
solvents. Never immerse this appliance in water or any other liquid.
The water tank should be cleaned every few weeks to prevent growth of
mould, mildew and bacteria. Partially ll the tank with clean water and add
a little mild detergent. Swish it around and then empty the tank and rinse.
Note: After cleaning and drying the tank, it must be reinserted securely
into dehumidier in order to restart operation.

7
TROUBLE SHOOTING GUIDE
If you experience difculties with the appliance, please check the suggestions below before contacting
customer services on 01473 271272:
Problem Possible Cause Possible Solution
The red indicator lights up when
the dehumidier is connected
to power.
The water tank is full. Turn off the power, empty the
water tank and insert back into
the appliance.
The oat inside the water
tank has become jammed or is
obstructed.
Turn off the power, take out
the water tank and remove
the drain cover. Remove
anything obstructing the oat
before replacing the cover and
repositioning the water tank
inside the appliance.
The dehumidier is not working There is no power supply to the
appliance.
Make sure the power adapter is
plugged into both the machine
and the wall socket, and that the
unit is turned on.
DC switch is off. Turn the switch on.
The air outlet is blocked. Ensure there is at least
10cm clearance around the
dehumidier at all times whilst
the unit is in operation.

8
DISPOSAL INFORMATION
The European Directive 2012/19/EU on Waste Electrical and
Electronic Equipment (WEEE), requires that old household
electrical appliances must not be disposed of in normal unsorted
municipal waste.
Old appliances must be collected separately in order to optimise
the recovery and recycling of the materials they contain and reduce the impact
on human health and the environment.
The crossed out “wheeled bin” symbol on the product reminds you of your
obligation, that when you dispose of the appliance it must be separately collected.
Consumers should contact their local authority or retailer for information
concerning the correct disposal of their old appliance.

9

10
lgenix Warranty Terms & Conditions
This product is guaranteed for a period of 12 months as standard from the date of purchase
against mechanical and electrical defects.You can extend your warranty for a further 12 months by
registering your product.
Upon registration we will cover your product for a period of 24 months from the original purchase
date against any mechanical or electrical defects.
To qualify for the guarantee, the product must be used for domestic household use only and in
accordance with the instructions in the user manual.Any misuse of the product will result in the
warranty being void.
The guarantee does not cover accidental damage, misuse, neglect, tampering or incorrect
adjustment or installation.
The guarantee will be rendered invalid if the product is resold, has had its serial number removed
(or has an invalid serial number), or if an unauthorised person has carried out any repairs or
alterations.
The warranty does not cover accessories or consumable parts that require replacement under
normal use. This includes shelving, dials, lters, belts and trays etc.
In the unlikely event of a breakdown please refer to the Troubleshooting guide in your user manual
and check all plugs, fuses and the electricity supply.
If you still require assistance please contact our Customer Service department on
01473 271 272 or write to us at the following address:
Customer Service Department
38 Bluestem Road, Ransomes Europark
Ipswich, IP3 9RR
Please quote the Product Code which begins ‘IG’ or ‘DF’ and the Batch Coder beginning ‘5’ and give
details of the exact fault.We will then decide whether to repair or replace the item.
Before we arrange the repair or replacement you will be required to return a copy of your proof
of purchase. Please retain your original.
If an item is replaced within the agreed guarantee period, the guarantee for the replacement item
will be calculated from the purchase date of the original.
In the event that the product is inspected and no fault is found or the product is not within the
guarantee period you will be charged for the repair and any carriage costs.

11
Thank you for choosing lgenix
As a valued customer we would like to offer you a FREE 2 year warranty to cover your product
against any electrical or mechanical defects.
This means that in the unlikely event you develop a fault or problem with your product we will
happily repair or replace the item free of charge.
To qualify for the 2 year warranty you must register your product within 30 days of purchase.The
full Terms & Conditions of our warranty policy are shown on the opposite page.They are also
available on our website. www.igenix.co.uk
To register your product, please complete all sections of the form below and return to us at the
following address: lgenix, 38 Bluestem Road, Ransomes Europark, Ipswich, IP3 9RR.
Alternatively you can visit the lgenix website and complete the form online.
Customer Details:
Title: First Name Surname:
Address:
Post Code:
Email:
Telephone:
Product Information:
Product Code (Beginning IG or DF): Product Description:
Batch Number (Beginning 5): Serial Number (If applicable):
Date of Purchase:
Retailer Name:
Retailer Location:
Please tick here to conrm you have read and accept our Terms & Conditions
Please tick here if you DO NOT wish to receive marketing information from us
Customer Signature: Date:

38 Bluestem Road, Ransomes Europark, Ipswich, IP3 9RR
Tel. 01473 271 272
Disclaimer: Igenix operate a policy of continual improvement and development.
We therefore reserve the right to change/alter the specication and appearance of our appliances without prior notice.
All diagrams and images shown in this manual are for illustration purposes only.
Table of contents
Other iGenix Dehumidifier manuals


Popular Dehumidifier manuals by other brands

Wood’s
Wood’s LD40PRO operating instructions

Black & Decker
Black & Decker BDT50 Series instruction manual

Legend Brands
Legend Brands DRIEAZ LGR 6000Li owner's manual

Zibro
Zibro D 510 operating manual

Andrews Dehumidification
Andrews Dehumidification FD 40 Operating instructions & safety guide

Frigidaire
Frigidaire CAD504DUD14 use & care


