inbody BP170 User manual

User’s Manual
BP170 / BP170B
INDICATIONS FOR USE: The InBody blood pressure monitor is designed to measure blood pressure
(diastolic and systolic) and pulse rate in adult patients with an arm circumference range between 17cm -
42cm Rx Only.
BP170(B) User Manual for Measurement Guide and Setup
Thank you for purchasing the BP170(B). This user’s manual describes all the features of the BP170(B).
Please read before use and keep it in a safe place. By following the manual instructions, you will be able to
use the BP170(B) more safely and eectively.
129x183_BP170_manual_ENG_D_210702.indd 1129x183_BP170_manual_ENG_D_210702.indd 1 2021-07-01 오후 5:55:582021-07-01 오후 5:55:58
©2021 InBody Co., Ltd. All rights reserved. IM-ENG-L5-D-210702
Please note the important information below before reading this manual.
InBody Co., Ltd. [HEAD OFFICE]
625, InBody Bldg., Eonju-ro, Gangnam-gu, Seoul 06106 KOREA
TEL: +82-2-501-3939
FAX: +82-2-578-5669
Website: inbody.com
E-mail: info@inbody.com
©2021 InBody Co., Ltd. All rights reserved.
Reproduction, adaptation, or translation of this manual is prohibited without prior written consent from
InBody Co., Ltd. under the copyright laws. This manual may be printed incorrectly and subject to change
without notice. InBody Co., Ltd. shall not be liable for any errors, incidental, or consequential damages that
occurred by not complying with the content of the User᾽s Manual.
Visit our website (inbody.com) to view and download additional information about the BP170(B).
InBody Co.,Ltd. reserves the right to modify the appearance, specifications, etc. of this product to improve
its quality, without prior notice.
Failure to observe these precautions can result in personal injury or equipment damage.
Warning
Caution
Failure to comply with safety precautions can damage the equipment.
Note
Reading the notes can help you get the most out of your device your user experience.
Le non-respect de ses précautions peut causer des blessures ou des dommages à l'appareil.
Avertissement
Attention
Le non-respect de ses précautions peut causer des dommages à l'appareil.
Remarque
Se référer aux notes peut aider à améliorer l'utilisation de l'appareil.
129x183_BP170_manual_ENG_D_210702.indd 2129x183_BP170_manual_ENG_D_210702.indd 2 2021-07-01 오후 5:55:582021-07-01 오후 5:55:58

Representative & Sponsor Information
InBody Europe B.V. [EUROPE]
Gyroscoopweg 122, 1042 AZ, Amsterdam, The Netherlands
TEL: +31-20-238-6080 FAX: +31-6-5734-1858 Website: nl.inbody.com E-mail: [email protected]
Australian Sponsor. [AUSTRALIA]
Emergo AUSTRALIA. Level 20, Tower II, Darling Park, 201 Sussex Street, Sydney, NSW 2000, AUSTRALIA
TEL: +61-2-9006-1662 FAX: +61-2-9006-1010 Website: emergogroup.com E-mail: [email protected]
USA CONTACT
BIOSPACE INC. dba INBODY 13850 CERRITOS CORPRT DR STE C, Cerritos, California, 90703
TEL: (323) 932-6503
Customer Service Information
InBody USA [USA]
13850 Cerritos Corporate Dr. Unit C Cerritos, CA 90703 USA
TEL: +1-323-932-6503 FAX: +1-323-952-5009 Website: inbody.com E-mail: [email protected]
InBody Japan [JAPAN]
Tani Bldg., 1-28-6, Kameido, Koto-ku, Tokyo 136-0071 Japan
TEL: +81-3-5875-5780 FAX: +81-3-5875-5781 Website: www.inbody.co.jp E-mail: inbody@inbody.co.jp
InBody China [CHINA]
904, XingDiPlaza, No.1698 YiShanRoad, Shanghai 201103 China
TEL: +86-21-64439705 FAX: +86-21-64439706 Website: inbodychina.com E-mail: [email protected]
InBody India [INDIA]
Unit No. G-B 10, Ground Floor, Art Guild House, Phoenix Market City, L.B.S. Marg, Kurla (West), Mumbai 400070 India
TEL: +91 22-6223-1911 Website: inbody.in E-mail: india@inbody.com
InBody Asia [ASIA]
Unit 3A-11, Oval Damansara, 685 Jalan Damansara Kuala Lumpur, WP KL 60000 Malaysia
TEL: +60-3-7732-0790 FAX: +60-3-7733-0790 Website: inbodyasia.com E-mail: [email protected]
129x183_BP170_manual_ENG_D_210702.indd 3129x183_BP170_manual_ENG_D_210702.indd 3 2021-07-01 오후 5:55:582021-07-01 오후 5:55:58

129x183_BP170_manual_ENG_D_210702.indd 4129x183_BP170_manual_ENG_D_210702.indd 4 2021-07-01 오후 5:55:582021-07-01 오후 5:55:58

I. Introduction
II. Using the BP170(B)
A. Preparing for Measurement
B. Blood Pressure Measurement
C. Saving Measurement Results
D. Check the Stored Blood Pressure
III. Storage
IV. FAQ
A. Regarding Measurement
B. Troubleshooting
V. Others
A. Safety Information
B. Optional Equipment
C. Safety Information
D. Classication
E. Specications
F. EMC Declaration
Warranty
6
8
11
17
18
19
21
24
25
31
31
32
32
34
User’s Manual Contents
BP170 / BP170B
129x183_BP170_manual_ENG_D_210702.indd 5129x183_BP170_manual_ENG_D_210702.indd 5 2021-07-01 오후 5:55:582021-07-01 오후 5:55:58
6
I. Introduction
The InBody BP170(B) is a compact and easy-to-use automatic blood pressure monitor.
The BP170(B) operates on the oscillometric principle to measure your blood pressure and pulse rate.
The BP170(B) is primarily designed for general household use and for individuals who need
regular blood pressure management.
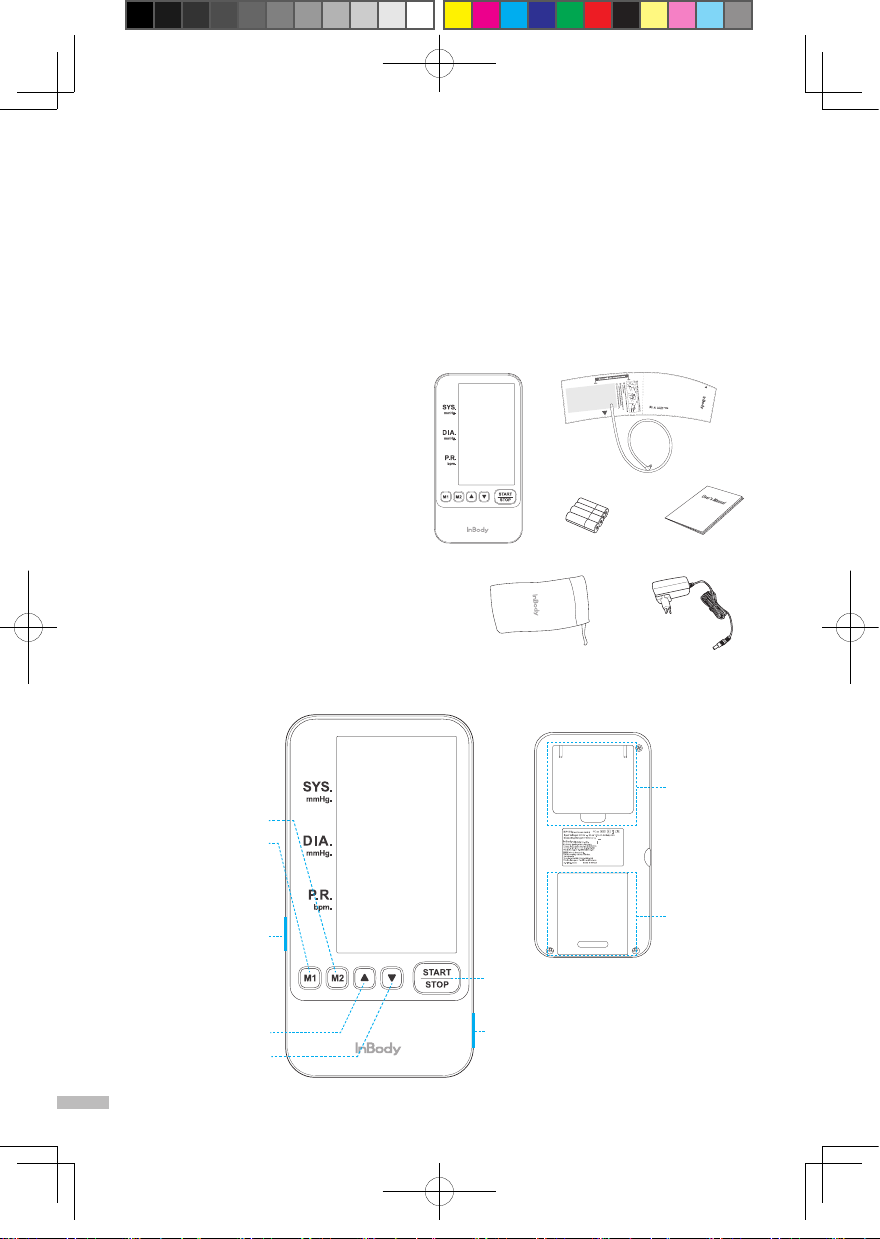
* Product Components
❶ Main unit (1EA)
❷ One-touch cuff (1EA)
❸ "AA" alkaline batteries (4EA)
❹ User᾿s manual (1EA)
❺ Storage pouch (1EA)
❻AC adapter (110V or 220V) (Optional)
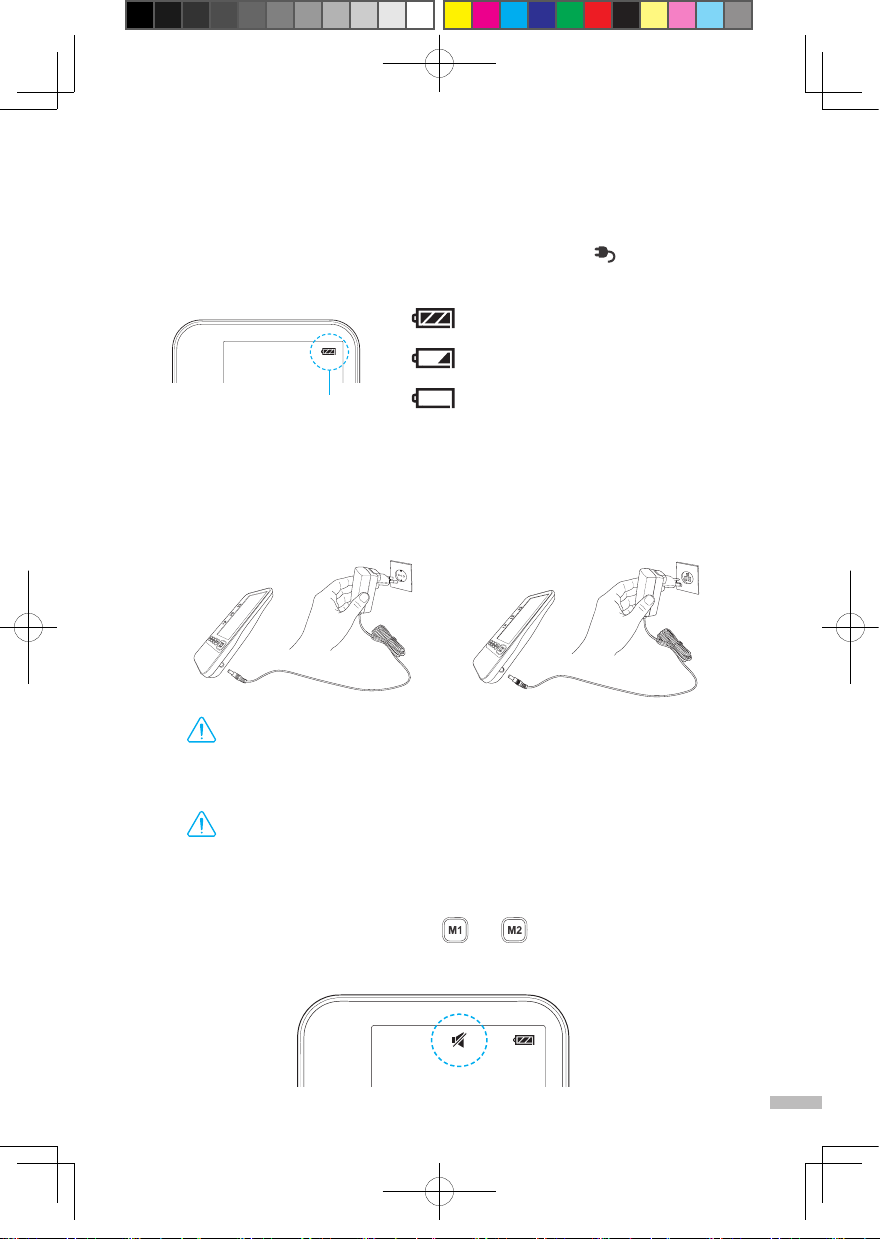
* Main Unit Parts
Memory button 1
Down button
Memory button 2
Air jack
Up button
Start / Stop button
AC adapter jack (for optional AC adapter)
Rear mount
Battery tray
❶❷
❸❹
❺❻
<110V or 220V>
129x183_BP170_manual_ENG_D_210702.indd 6129x183_BP170_manual_ENG_D_210702.indd 6 2021-07-01 오후 5:55:592021-07-01 오후 5:55:59
7
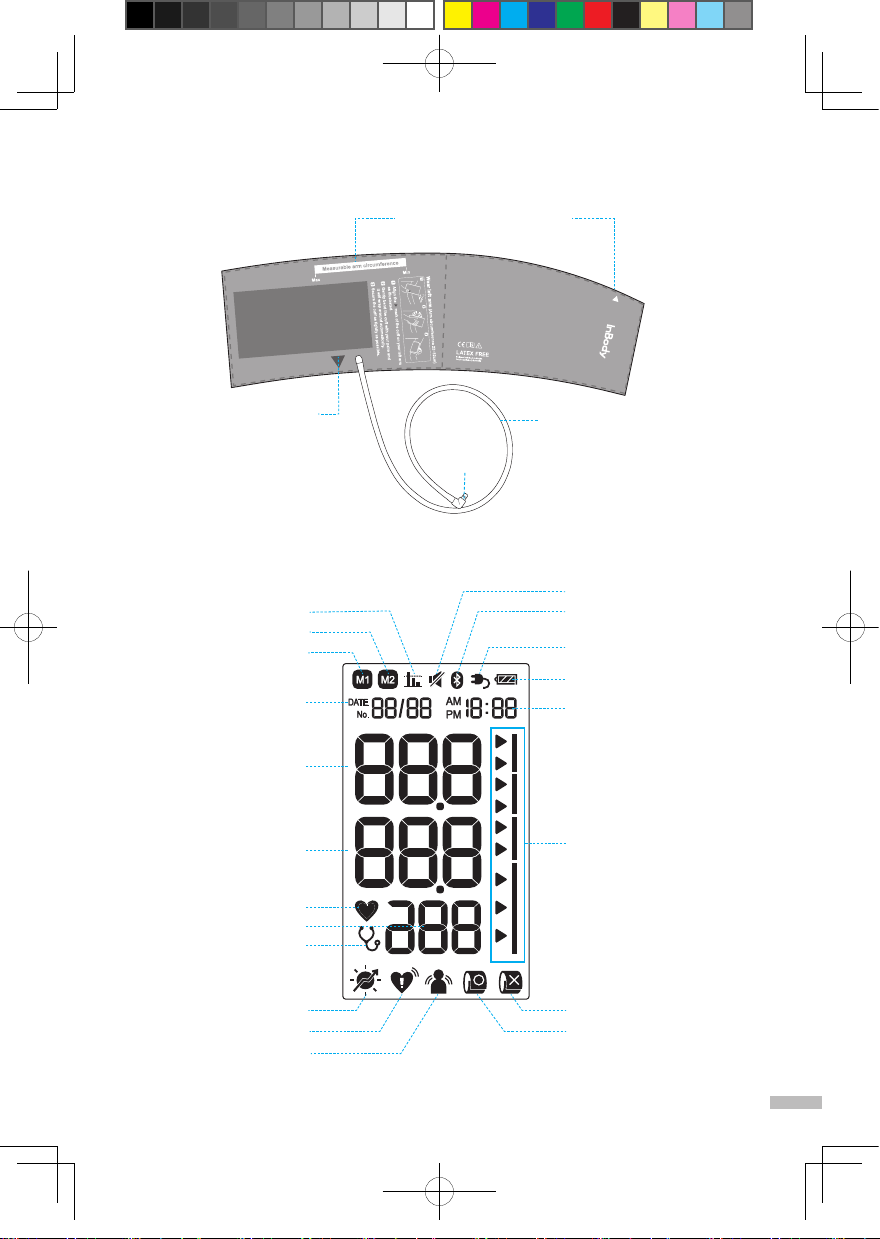
* Cuff Parts
Checking mark for the
available arm circumference
Artery mark
Air plug
(Connection to
the main unit)
Air tube
* Display Screen Parts
Improper cu position
Blood pressure level indicator
Time display
Battery level indicator
Mute symbol
Bluetooth connection
symbol
AC adapter connection symbol
Proper cu position
Systolic blood pressure
Date display
Diastolic blood pressure
Memory 1 symbol
Memory 2 symbol
Average value symbol
Heartbeat symbol
Pulse rate
Manual pressurization symbol
Early morning
hypertension symbol
Irregular pulse rate symbol
Movement detection symbol
129x183_BP170_manual_ENG_D_210702.indd 7129x183_BP170_manual_ENG_D_210702.indd 7 2021-07-01 오후 5:55:592021-07-01 오후 5:55:59
8
II.Using the BP170(B)
A. Preparing for Measurement
* If the BP170(B) has been stored in a hot or cold environment, keep it at room temperature for
at least one hour.
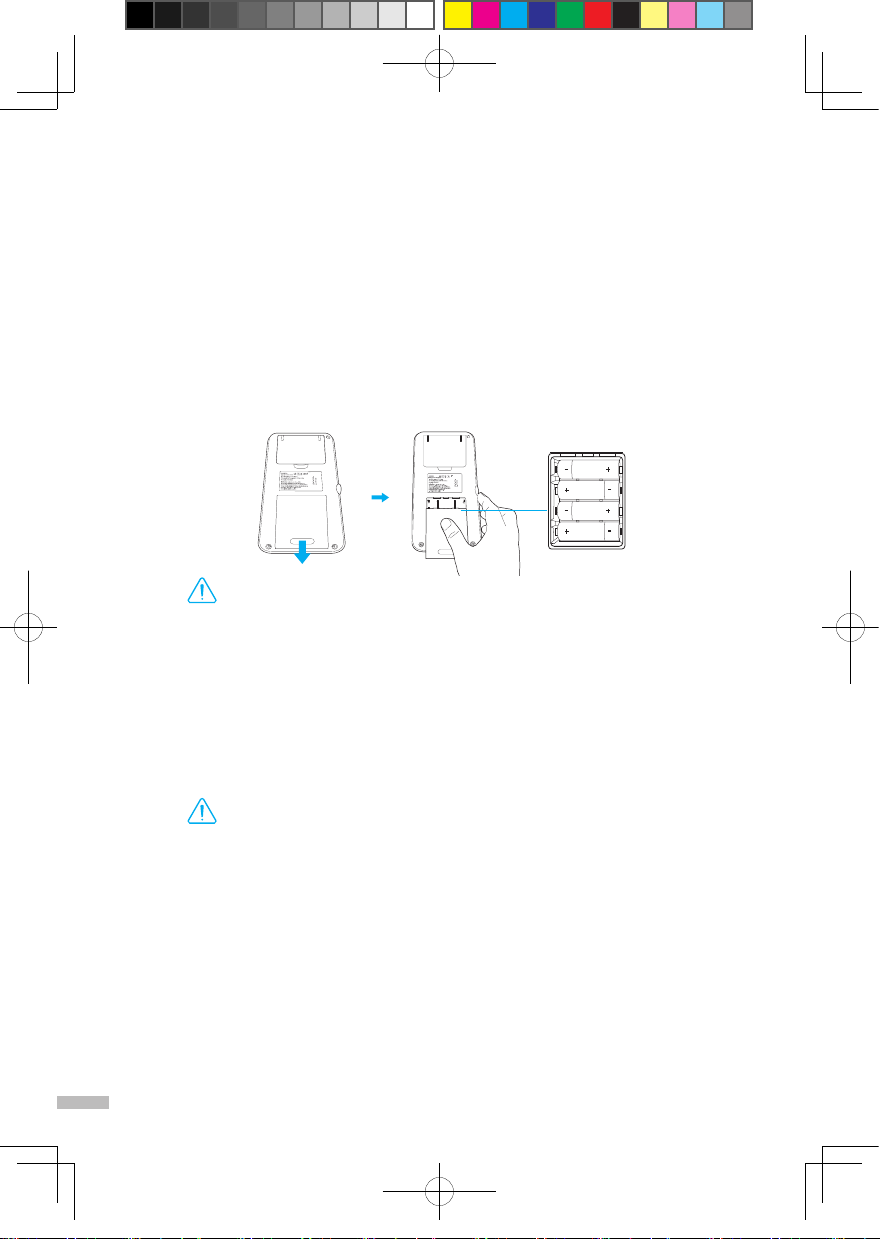
(1) Inserting / replacing the batteries
❶ Remove the battery cover.
❷Insert four (4) "AA" alkaline batteries in the correct orientation as indicated on the battery
tray.
❸ Close the battery cover.
• Be careful with the polarity + and - of the batteries during insertion.
• Dispose of used batteries in a designated location.
• Use 1.5V "AA" alkaline or manganese batteries.
• Replace four batteries with new batteries of the same brand and model.
• When inserting the batteries, refer to the guideline in the battery tray and the image
above for the correct orientation.
• Check battery level shown on the battery level indicator after inserting the first "AA" batteries.
• In case of low battery level, refer to the battery replacement (page 8) to replace the batteries.
Caution
• Portez attention à la polarité des piles + et – lorsque vous les insérez.
• Disposez des piles usagées uniquement aux endroits désignés à cette fin.
• Utilisez des piles alcalines ou au manganèse de taille AA 1.5 V.
• Utilisez des piles de la même marque et du même modèle au moment deles remplacer.
• Lorsque vous insérez les piles, référez-vous aux directives inscrites à l’intérieur du panneau
et à l’image au-dessus pour insérer les piles dans la bonne direction.
• Vérifiez le niveau de charge des piles affiché sur l’icône des piles aprèsavoir inséré les
premières piles AA.
• Si le niveau de charge s’avérait faible, lisez les directives de remplacement(p. 8), et utilisez
l’appareil BP170 seulement une fois les piles remplacées.
Attention
-
-
-
-
129x183_BP170_manual_ENG_D_210702.indd 8129x183_BP170_manual_ENG_D_210702.indd 8 2021-07-01 오후 5:55:592021-07-01 오후 5:55:59
9
II.Using the BP170(B)
A. Preparing for Measurement
* If the BP170(B) has been stored in a hot or cold environment, keep it at room temperature for
at least one hour.
(1) Inserting / replacing the batteries
❶ Remove the battery cover.
❷Insert four (4) "AA" alkaline batteries in the correct orientation as indicated on the battery
tray.
❸ Close the battery cover.
(3) Using the AC adapter (Optional)
❶ Insert the AC adapter plug into the AC adapter jack on the side of the main unit.
❷Plug the AC adapter into an electrical outlet.
*When the BP170(B) is used with the AC adapter connected, " AA" alkaline batteries are not required to operate
the BP170(B).
• To disconnect the AC adapter, unplug the AC adapter from the electrical outlet first and then
remove the AC adapter from the main unit of the BP170(B).
Caution
• Lors de la déconnexion de l'adaptateur CA, d'abord déconnecter l'adaptateur CA de la prise,
et ensuite déconnecter l'adaptateur CA de la partie principale du BP170(B).
Attention
❶
❷
(4) Mute setting
To turn off the beep sound, press and hold and buttons at the same time for more
than 3 seconds while the blood pressure monitor is turned off.
Mute Icon
(2) Battery level indicator
- The user may check the remaining battery level in the upper right corner of the screen
while using the blood pressure monitor.
- When using the AC adapter, the AC adapter connection symbol ( )displays instead
of the battery level indicator
: The capacity of the batteries is sufficient.
: Battery level is low.
: Battery is depleted.
Please replace with new batteries.
<220V> <110V>
❶
❷
129x183_BP170_manual_ENG_D_210702.indd 9129x183_BP170_manual_ENG_D_210702.indd 9 2021-07-01 오후 5:56:002021-07-01 오후 5:56:00

10
(5) Date/Time Setting
❶When the batteries are inserted into the blood pressure monitor or the AC adapter
is connected, the blood pressure monitor is automatically turned on, and the date and time
can be set.
❷ Set the date and time in the order of year, month, day, hour, and minute.
(The number being set flashes.)
❸ Use the ▲ or ▼ button to change year, and press the Start / Stop button to set the year.
❹ Set the month, day, hour, and minute in the same way as described in step ❸.
Month Day Hour
*AM: before noon PM: afternoon
Minute
Year
• For proper blood pressure management, please set the date and time before using
the BP170(B).
• If the user did not set the time or set it wrong, the early morning hypertension function
may be incorrect.
• When the batteries are removed, the time will be initialized. To reset the time, remove
the batteries and insert them again after waiting 10 seconds.
• For the BP170B, the date and time are automatically set by connecting data through
application. (However, the time of previously measured data cannot be changed.)
• Pour une gestion appropriée de vos données de tension artérielle, régler la date et
l'heure avant d'utiliser le BP170(B).
• Si l'heure est mal réglée, la fonction Hypertension élevée matinale peut être inexacte.
• L'horloge est formatée lors du remplacement des piles. Pour réinitialiser l'horloge,
enlever les quatre(4) piles et les réinsérer après 10 secondes.
• Pour le BP170B, l'horloge est réglée automatiquement lors de la connexion aux
données par l'application. (Cependant, l'heure des données mesurées auparavant ne
peut être changée.)
Caution
Attention
129x183_BP170_manual_ENG_D_210702.indd 10129x183_BP170_manual_ENG_D_210702.indd 10 2021-07-01 오후 5:56:002021-07-01 오후 5:56:00

11
(5) Date/Time Setting
❶When the batteries are inserted into the blood pressure monitor or the AC adapter
is connected, the blood pressure monitor is automatically turned on, and the date and time
can be set.
❷ Set the date and time in the order of year, month, day, hour, and minute.
(The number being set flashes.)
❸ Use the ▲ or ▼ button to change year, and press the Start / Stop button to set the year.
❹ Set the month, day, hour, and minute in the same way as described in step ❸.
B. Blood Pressure Measurement
(1) How to wear the one-touch cuff
• Please remove thick clothing from your upper arm. It is recommended to take
measurement on bare skin.
• Please sit down comfortably at a table.
• Connect the air plug of the cuff into the air jack located on the left side of the main unit.
• Please put on the cuff in the following order.
• For correct measurement, please wear the cuff properly.
• If the user wears the cuff too loosely, the measured blood pressure values may not be correct.
• M-size cuff is recommended for users with an arm circumference between 22 to 32 cm
(9 to 13 in).If the user's arm circumference exceeds 32cm (13 in), please use L-size cuff
(optional).
• Blood pressure may be affected by the measuring environment, posture, prior and/or
current physical activity, as well as psychological state of the user. If you feel that your
blood pressure is incorrect, please consult with a doctor.
Caution
• Pour une mesure correcte, porter la manchette convenablement.
• La valeur de la tension artérielle pourrait ne pas être exacte si la manchette est trop relâchée.
• Une manchette de taille M est recommandée pour les usagers ayant un tour de bras entre
22 et 32 cm (9 et 13 in). Si le tour de votre bras dépasse les 32cm (13 in), bien vouloir utiliser
une manchette de taille L(optionnel).
• La tension artétielle peut être affectée par l'environnement de mesure, la posture, l'activité
physique avant/ou pendant, ainsi que l'état psychologique de l'utilisateur. Si vous pensez
que votre tension artérielle est incorrecte, veuillez consulter un médecin.
Attention
❶Place the ▼ mark of the cuff on the left arm as shown above.
❷Bend the cuff with your palm. The cuff will automatically wind around your arm.
❸ Secure the cuff firmly around the arm.
❶❷ ❸
※Caution for right arm measurement
Make sure to wear the cuff so that the air tube is placed
on the inner arm.
129x183_BP170_manual_ENG_D_210702.indd 11129x183_BP170_manual_ENG_D_210702.indd 11 2021-07-01 오후 5:56:002021-07-01 오후 5:56:00
12
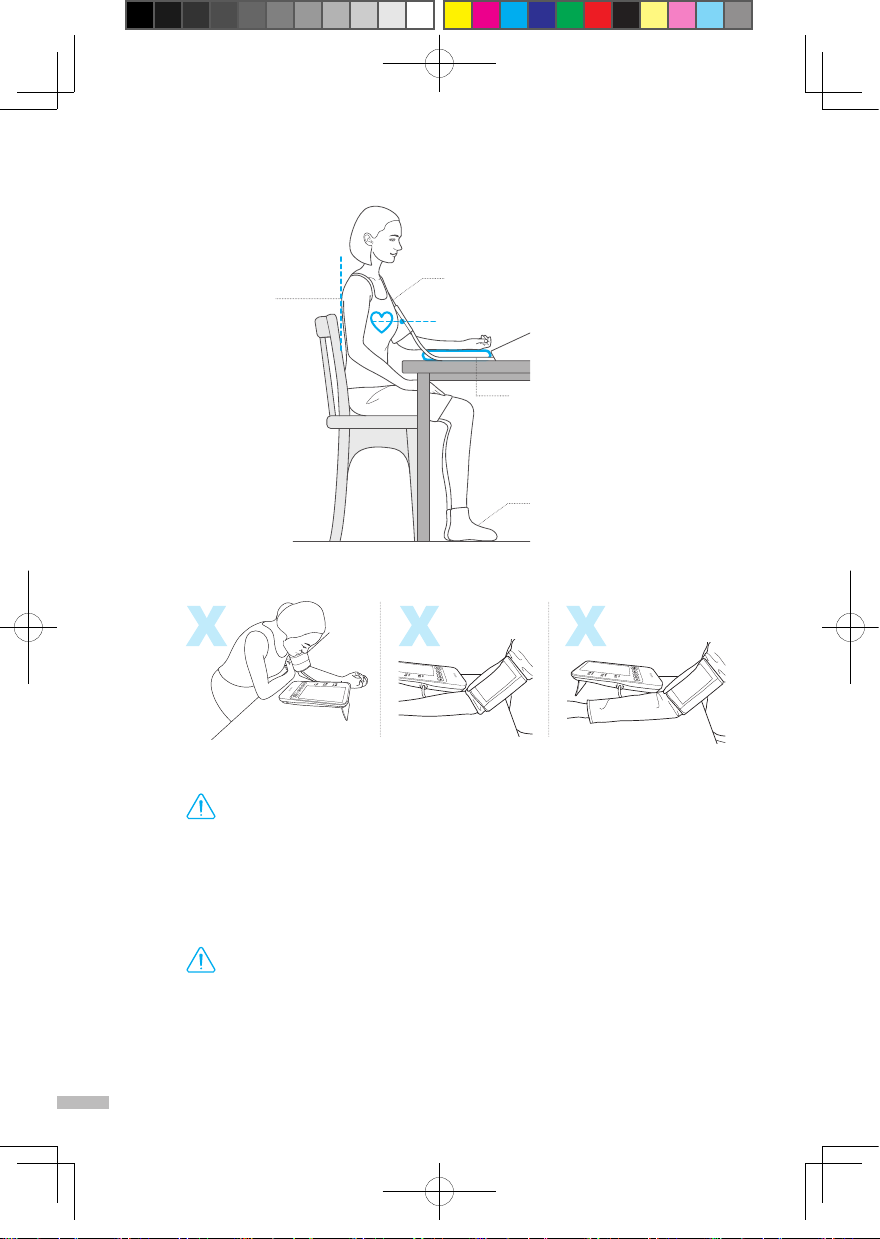
(2) Proper measurement posture
(3) Improper measurement posture
Bending the upper body Rolling up the sleeve Dressed in thick clothes
• The measurement posture may affect the blood pressure values.
• Please keep the proper measurement posture for accurate measurement.
• If the arm position is too low, place a towel or cushion under the elbow.
• Be in a resting state for at least 5 minutes prior to measurement in order for your body
to be in a stable state.
• La posture de mesure peut affecter les valeurs de la tension artérielle
• Maintenir une position de meure appropriée pour une mesure exacte.
• Si la position du br as est trop basse, placer une serviette ou un coussin sous le coude.
• Être dans un état de repos pendant au moins 5 minutes avant la prise de mesure pour
que l'état de votre corps soit stable.
Caution
Attention
Measure on bare skin or while dressed
in thin clothes.
The cuff should be placed on
the arm at the same level as the
heart. Use a cushion or pillow for
correct alignment.
Back is straight
Put the feet flat on the floor with the
legs uncrossed.
129x183_BP170_manual_ENG_D_210702.indd 12129x183_BP170_manual_ENG_D_210702.indd 12 2021-07-01 오후 5:56:002021-07-01 오후 5:56:00
13
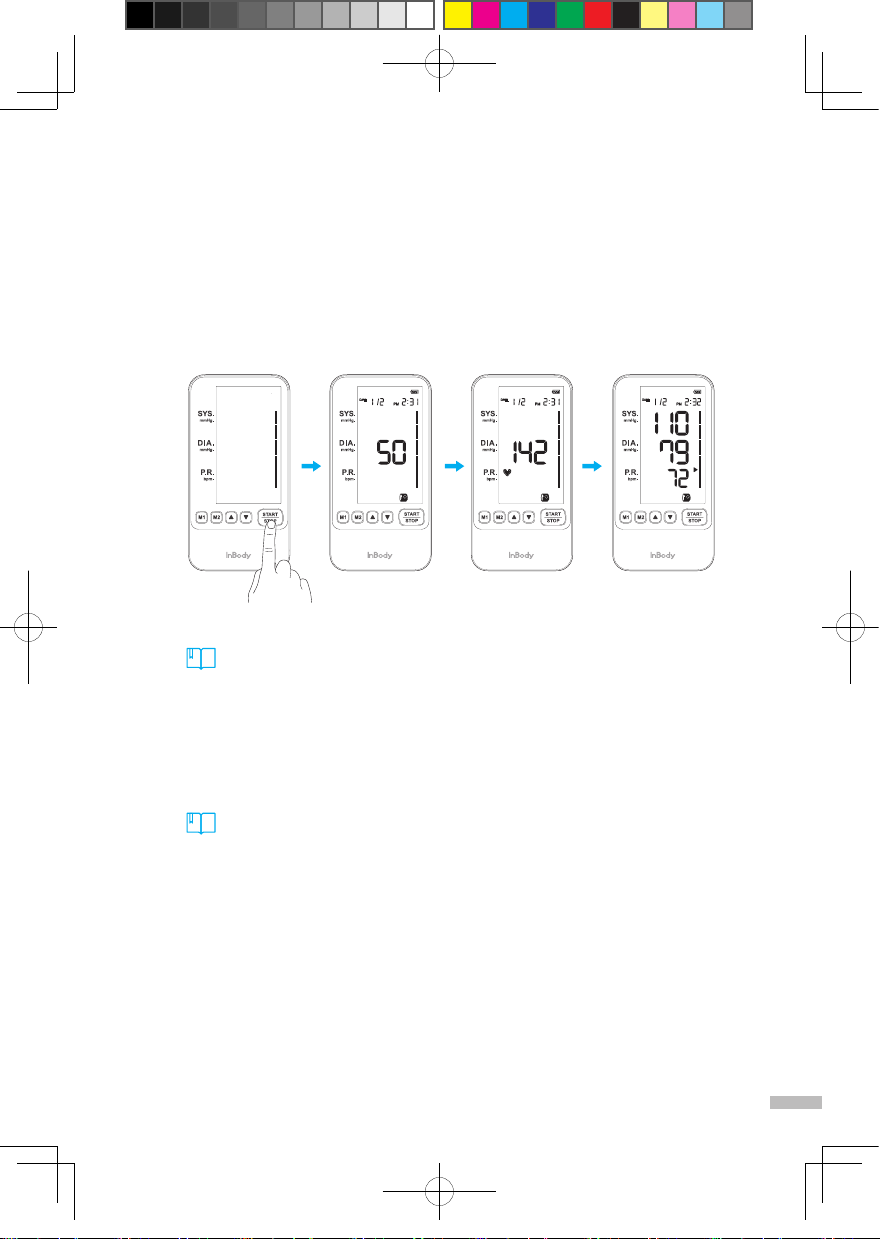
(4) Start measurement
❶Check again that the cuff is properly worn and measurement posture is correct
❷ Press the Start / Stop button to start the blood pressure measurement.
❸ The BP170(B) begins to inflate the cuff, and when it reaches a certain pressure point,
it slowly deflates and measures the blood pressure.
❹When the measurement is complete, the blood pressure is displayed on the screen.
• The user can adjust the pressure as desired by pressing ▲ or ▼ buttons during pressurization.
• Target pressure value during pressurization is displayed in the pulse rate area.
• If you are aware that your systolic blood pressure is 210mmHg or higher, set the target
pressure to be 30-40mmHg higher than your systolic blood pressure.
• If an error number is shown on the screen during measurement (E1 to E7 or Lo) and thus
measurement has failed, please refer to page 23.
• L'utilisateur peut ajuster la pression à sa guise en appuyant sur les boutons ▲ ou ▼ pendant
la pressurisation.
• La valeur de la pression cible pendant la pressurisation est affichée dans la zone du pouls.
• Si votre tension artérielle systolique est supérieure ou égale à 210 mmHg, fixer la te pression
cible à 30-40 mmHg plus élevée que votre tension artérielle systolique.
• Si une note d'erreur s'affiche sur l'écran pendant la mesure (E1 à E7 ou Lo) et que la mesure
échoue, veuillez vous référer à la page 23.
Note
Remarque
Start Inflate Deflate Complete
129x183_BP170_manual_ENG_D_210702.indd 13129x183_BP170_manual_ENG_D_210702.indd 13 2021-07-01 오후 5:56:002021-07-01 오후 5:56:00

14
• Do not pressurize more than necessary.
• Pain may occur if/when cuff is inflated too much.
• Do not talk or move during measurement.
• If user is in pain or has any problem during the measurement, press the Start / Stop button.
If pressing the start / stop button does not lead to automatic rapid deflation, remove the air
tube from the main unit of the BP170(B) or unwind the cuff on your arm.
Caution
• Ne pas pressuriser plus que nécessaire.
• Trop pressuriser la manchette peut provoquer des douleurs.
• Ne pas parler ou bouger pendant la mesure.
• Si l'utilisateur a mal ou rencontre tout autre problème pendant la mesure, appuyer sur le bouton
Arrêt / Marche. Si appuyer sur le bouton Arrêt / Marche ne libère pas rapidement la pression,
déconnecter le tube à air de la partie principale du BP170(B) ou d"rouler la manchette de
votre bras.
Attention
(5) Check the measured values
❶Check the basic blood pressure readings and proper cuff status.
Measurement date/time
Systolic blood pressure
Diastolic blood pressure
Pulse rate
Red: Stage 3 hypertension
Red: Stage 2 hypertension
Orange: Stage 1 hypertension
Yellow: High normal
Green: Normal
Green: Optimal
Pressure (Reference: ESC-ESH Guidelines
for the management of arterial hypertension, 2018)
The cuff was properly worn.
The cuff was loosely worn.
Please wear the cuff properly and measure again.
Please remove any thick clothing before measuring
again.
ESC/ESH
129x183_BP170_manual_ENG_D_210702.indd 14129x183_BP170_manual_ENG_D_210702.indd 14 2021-07-01 오후 5:56:012021-07-01 오후 5:56:01

15
Measurement date/time
Systolic blood pressure
Diastolic blood pressure
Pulse rate
Red: Hypertensive Crisis
Red: Stage 2 hypertension
Orange: Stage 1 hypertension
Yellow: Elevated
Green: Normal
The cuff was properly worn.
The cuff was loosely worn.
Please wear the cuff properly and measure again.
Please remove any thick clothing before measuring
again.
ACC/AHA
❷ Check for early morning hypertension, irregular pulse rate, and detected movement.
The symbols shown in the bottom of the screen represent abnormality or unusuality of the
measured values.
Early morning hypertension:
High blood pressure in the morning.
Irregular pulse rate detection:
Irregular pulse rate detected. Please measure again. If irregular pulse rate is continuously
detected, check the average of three measurements.
Movement detection:
Movement was detected during the measurement. Please measure again.
Pressure (Reference: ACC/AHA Task Force
on Clinical Practice Guidelines, 2017)
129x183_BP170_manual_ENG_D_210702.indd 15129x183_BP170_manual_ENG_D_210702.indd 15 2021-07-01 오후 5:56:012021-07-01 오후 5:56:01

16
• Among measured values between 4a.m. and 10a.m., early morning hypertension is
detected if the systolic blood pressure is greater than 135mmHg and/or the diastolic
blood pressure is greater than 85mmHg.
• Irregular pulse rate is detected when there is a difference in the pulse of more than 25%
of the reference pulse.
• Irregular pulse rate may be detected by physical movement during measurement.
Note
• L'hypertension élevée matinale est détectée lorsque la mesure est prise entre 4h et 10h
du matin, avec une tension artérielle systolique supérieure à 135 mmHg et une tension
artérielle diastolique supérieure à 85 mmHg.
• Le rythme cardiaque irrégulier est détecté lorsqu'il y a une différence de pouls
supérieure à 25 % du pouls de référence.
• Le rythme cardiaque irrégulier peut être détecté par un mouvement physique pendant la prise.
Remarque
129x183_BP170_manual_ENG_D_210702.indd 16129x183_BP170_manual_ENG_D_210702.indd 16 2021-07-01 오후 5:56:012021-07-01 오후 5:56:01

17
C. Saving Measurement Results
(1) After finishing the blood pressure measurement, press or to save the results in
Memory1 or Memory2. The same symbol as the button pressed is displayed at the top of the
screen.
(2) Press the Start / Stop button to complete the save, and the BP170(B) will shut down.
• M1 and M2 can store blood pressure measurement results up to 100 times each. If it exceeds
100 records, the oldest data is automatically deleted.
• After the measurement is complete, the BP170(B) will automatically shut down after one
minute has elapsed without pressing any buttons.
• BP170B provides Health Device Profile function. The BP170B may save the measured data
into a compatible mobile application.
• M1 et M2 peuvent sauvegarder jusqu'à 100 valeurs de mesure. Les données les plus
anciennes seront automatiquement supprimées au-delà de la 100e valeur de mesure.
• Le BP170(B) s'éteindra automatiquement s'il reste oisif pendant une minute après la dernière
mesure.
• Le BP170(B) fournit une fonction de Profil de santé sur l'appareil. Le BP170(B) peut
sauvegarder des valeurs de tension artérielle prises en utilisant une application compatible.
Note
Remarque
129x183_BP170_manual_ENG_D_210702.indd 17129x183_BP170_manual_ENG_D_210702.indd 17 2021-07-01 오후 5:56:012021-07-01 오후 5:56:01

18
: To the older results
: To the more recent results
D. Check the Stored Blood Pressure
(1) With the BP170(B) turned off, press or to check the blood pressure results
stored in the corresponding location.
(2) When the button is pressed, the average blood pressure for the last three measurements is
displayed on the screen. Press or button to check the stored results in turn.
Average value symbol
Display storerd resultsDisplay average results
• Remove stored blood pressure measurement result.
- To delete the result, press the save button (M1 or M2) and the Start / Stop button at
the same time and hold for 3 seconds.
- All records in the corresponding storage space (M1 or M2) will be deleted.
• The average blood pressure will not be displayed if the number of stored measurements is
less than three.
Note
• Suppression des résultats de tension artérielle de la mémoire.
- Pour le faire appuyer sur le bouton de sauvegarde (M1 ou M2) et sur le bouton Arrêt
Marche en même temps et maintenir pendant trois secondes.
- Tous les enregistrements contenus dans la zone correspondante de stockage (M1 et M2) rimés.
• La tension artérielle moyenne ne s'affichera pas si le nombre de mesures prises est inférieur à
trois.
Remarque
129x183_BP170_manual_ENG_D_210702.indd 18129x183_BP170_manual_ENG_D_210702.indd 18 2021-07-01 오후 5:56:012021-07-01 오후 5:56:01

19
III. Storage
(1) Always maintain the BP170(B) in a clean state.
(2) Wipe any stains on the main unit with a smooth and lint-free cloth.
(3) Unfold the one-touch cuff and place it in a storage pouch with the main unit.
The BP170(B) should be transported or stored under the following conditions.
Temperature range -10 ~ 70˚C (14 ~ 158 °F)
Relative humidity 10 ~ 80% RH (No Condensation)
Atmospheric pressure range 50 ~ 106 kPa
• To unfold the cuff, hold the both sides of the cuff and stretch them in the opposite direction
that the cuff winds.
• If the cuff is contaminated and can no longer be used, please replace with a new cuff.
• Please contact Product Support to purchase a replacement cuff.
Note
• Tenir la manchette aux extrémités et les étirer dans le sens contraire de l'enroulement.
• Si le manchon est contaminé, et qu’il ne peut plus être utilisé, veuillez le remplacer par un
nouveau manchon
• Communiquez avec le représentant InBody de votre région pour vous procurer des manchons
additionnels.
Remarque
129x183_BP170_manual_ENG_D_210702.indd 19129x183_BP170_manual_ENG_D_210702.indd 19 2021-07-01 오후 5:56:012021-07-01 오후 5:56:01

20
• Do not store the air tube with the tube bent or folded severely.
• Do not place any object on the BP170(B). Keep away from water, humid environments,
direct sunlight, dust, bleach, corrosive gas, etc. during storage.
• Do not store in a place subject to vibration or impact.
• Do not use volatile liquids, benzene thinner, etc. when cleaning the main unit or cuff.
• Cuffs cannot be washed. Keep cuff away from water.
• Do not bend or press cuff with force. Cuff may be damaged.
• Use a soft and dry cloth, or a soft and moistened cloth and neutral soap to clean the monitor
and cuff. The user may also use UV sterilizer to disinfect the cuff or follow hospital infection
control protocols.
Caution
• Ne pas ranger le tube courbé ou plié.
• Ne placer aucun objet sur le BP170(B). Tenir à distance de l'eau, d'un environnement humide,
de la lumière directe du soleil, de la poussière,du javel, des gaz d'érosion, etc..., pendant le
rangement.
• Ne pas ranger dans un lieu sujet aux vibrations ou à un impact.
• Ne pas utiliser des liquides volatiles, du benzène lors du nettoyage de la partie principale ou
de la manchette.
• Les manchettes ne peuvent pas être lavées. Tenir la manchette à distance de l'eau.
• Ne pas plier ou presser fortement la manchette.
• Utilisez un linge sec et doux, ou un linge légèrement humide et un savonneutre pour nettoyer le
moniteur et le manchon. Vous pouvez également utiliser un stérilisateur UV pour désinfecter le
manchon ou suivre lesprotocoles de prévention des infections du milieu hospitalier.
Attention
129x183_BP170_manual_ENG_D_210702.indd 20129x183_BP170_manual_ENG_D_210702.indd 20 2021-07-01 오후 5:56:022021-07-01 오후 5:56:02
Other manuals for BP170
1
This manual suits for next models
1
Table of contents
Other inbody Blood Pressure Monitor manuals


