inbody 770 User manual

User’s Manual

ⓒ
1996 ~ Biospace Co., Ltd. All rights reserved. BM-ENG-C7-A-131213
Biospace Co., Ltd. [HEAD OFFICE]
Biospace Bldg., 54, Nonhyeon-ro 2-gil, Gangnam-gu, Seoul 135-960 KOREA
TEL: +82-2-501-3939
FAX: +82-2-578-2716
Website: http://www.inbody.com
E-mail: info@inbody.com
ⓒ1996 ~ Biospace Co., Ltd. All rights reserved.
Reproduction, adaptation, or translation of this manual is prohibited without prior written consent from Biospace Co., Ltd
under the copyright laws. This manual might have typographical errors, and its content can be changed without
a prior notice. Biospace Co., Ltd shall not be liable for any errors, incidental, or consequential damages that
occurred by not complying with the content of the User’s Manual.
Visit our website http://www.inbody.com to view and download further information about the functions of the
InBody770, the explanation of results output, and more. Biospace Co., Ltd reserves the right to modify the appearance,
specifications, and etc. of the InBody770 to improve the quality of the product, without prior notice for reasons of
performance improvement.
Please note the important information below before reading this manual.
Failure to comply with safety warnings and regulations can cause serious injury or death.
DANGER
NOTECAUTION
참 조 주 의참 고 주 의
Failure to comply with safety cautions and regulations can cause injury or property damage.
DANGER
NOTECAUTION
참 조 주 의참 고 주 의
Warning
Caution
Customer Service Information
Biospace, Inc. [USA]
13850 Cerritos Corporate Dr., Unit C, Cerritos, CA 90703, USA
TEL: +1-323-932-6503 FAX: +1-323-952-5009 Website: http://www.biospaceamerica.com E-mail: [email protected]
Biospace Japan Inc. [JAPAN]
Second Floor Ayabe Bldg., 2-17-3 Sotokanda, Chiyoda-ku, Tokyo JAPAN
TEL: +81-03-5298-7667 FAX: +81-03-5298-7668 Website: http://www.inbody.co.jp E-mail: inbody@inbody.co.jp
EU Representative. [EUROPE]
DongBang Acuprime. 1 Forrest Units, Hennock Road East, Marsh Barton, Exeter EX2 8RU, U.K
TEL: +44-1392-829500 FAX: +44-1392-823232 Website: http://www.inbody.com E-mail: [email protected]
Biospace China. [CHINA]
904, Xing Di Plaza, No. 1698 Yishan Road, Shanghai, 201103, CHINA
TEL: +86-21-64439738, 9739, 9705 FAX: +86-21-64439706 Website: http://www.biospacechina.com E-mail: info@biospacechina.com
Australian Sponsor. [AUSTRALIA]
Emergo AUSTRALIA. Level 20, Tower II, Darling Park, 201 Sussex Street, Sydney, NSW 2000, AUSTRALIA
TEL: +61-2-9006-1662 FAX: +61-2-9006-1010 Website: http://www.emergogroup.com E-mail: [email protected]

User’s Manual Contents
I. InBody 770 Installation
A. Product Components
B. Operating Environment
C. Installation Instructions
D. Initial Setup
E. Connecting Printer, Stadiometer,
Blood Pressure Monitor, and Barcode Reader
F. Maintenance
II. InBody Test
A. Precautionary Steps
B. Test Instructions
C. Test Posture
III.
Transportation and Storage
A. Cautions during Transportation
B. Repacking Instructions
C. Transportation and Storage Environment
IV.
Frequently Asked Questions (FAQ)
A. Regarding the InBody
B. Regarding the InBody Test
V. Others
A. Exterior and Functions
B. Safety Information
C. Classication
D. Specications
4
5
5
10
14
16
17
18
19
20
20
22
23
25
26
29
30
30

4
I. InBody770 Installation
A. Product Components
The InBody770 consists of the following components. Please make sure all of the following components are
present.
* Please inspect each component of the InBody770 for defects prior to installation.
➊
InBody770
➋
Adapter (DC 12V, 3.4A) 1 EA
➌
Power cord 1 EA
➍
User’s Manual 1EA
➎
Hexagonal Wrench
➏
Hinge Cover
Hand electrodes
Keypad
Upper part
Footplate
Foot electrodes
➊
➍
➌
➎
➋
➏
➊
5
B. Operating Environment
Please make sure that the environment is adequate for the InBody770 installation. This equipment is designed
for indoor use. If installing outdoors, the following requirements must be fullled.
C. Installation Instructions
1. Open the packing box of the InBody770 and remove the packing pads. Then take the InBody770 out of the box.
•
If you have any problems installing your InBody770, please contact BIOSPACE for assistance.
•
Do not transport the equipment by holding the screen portion or the joints of the hand electrodes.
•
Keep the packing materials provided for repacking the equipment in the future. Other wastes should be
disposed of according to relevant laws and regulations.
DANGER
NOTECAUTION
참 조 주 의참 고 주 의
Caution
Temperature range 10 ~ 40℃ (50 ~ 104℉)
Relative humidity 30 ~ 75% RH
Atmospheric pressure 70 ~ 106kPa
Polyethylene foam cover
Packing pads
•
Using the InBody770 on carpet may cause static electricity, which could damage the equipment. If installing
the InBody770 on carpet is unavoidable, please use an antistatic mat.
•
Install the InBody770 on a leveled, non-vibrating surface. Installing the equipment on an uneven surface may
cause the examinee to fall down. Test results may also be inaccurate.
•
Never clean the hand and foot electrodes with liquid spray or detergent directly. The equipment may corrode
and/or malfunction if the liquid or detergent leaks inside. Use the InBody Tissue when cleaning the InBody770.
DANGER
NOTECAUTION
참 조 주 의참 고 주 의
Caution
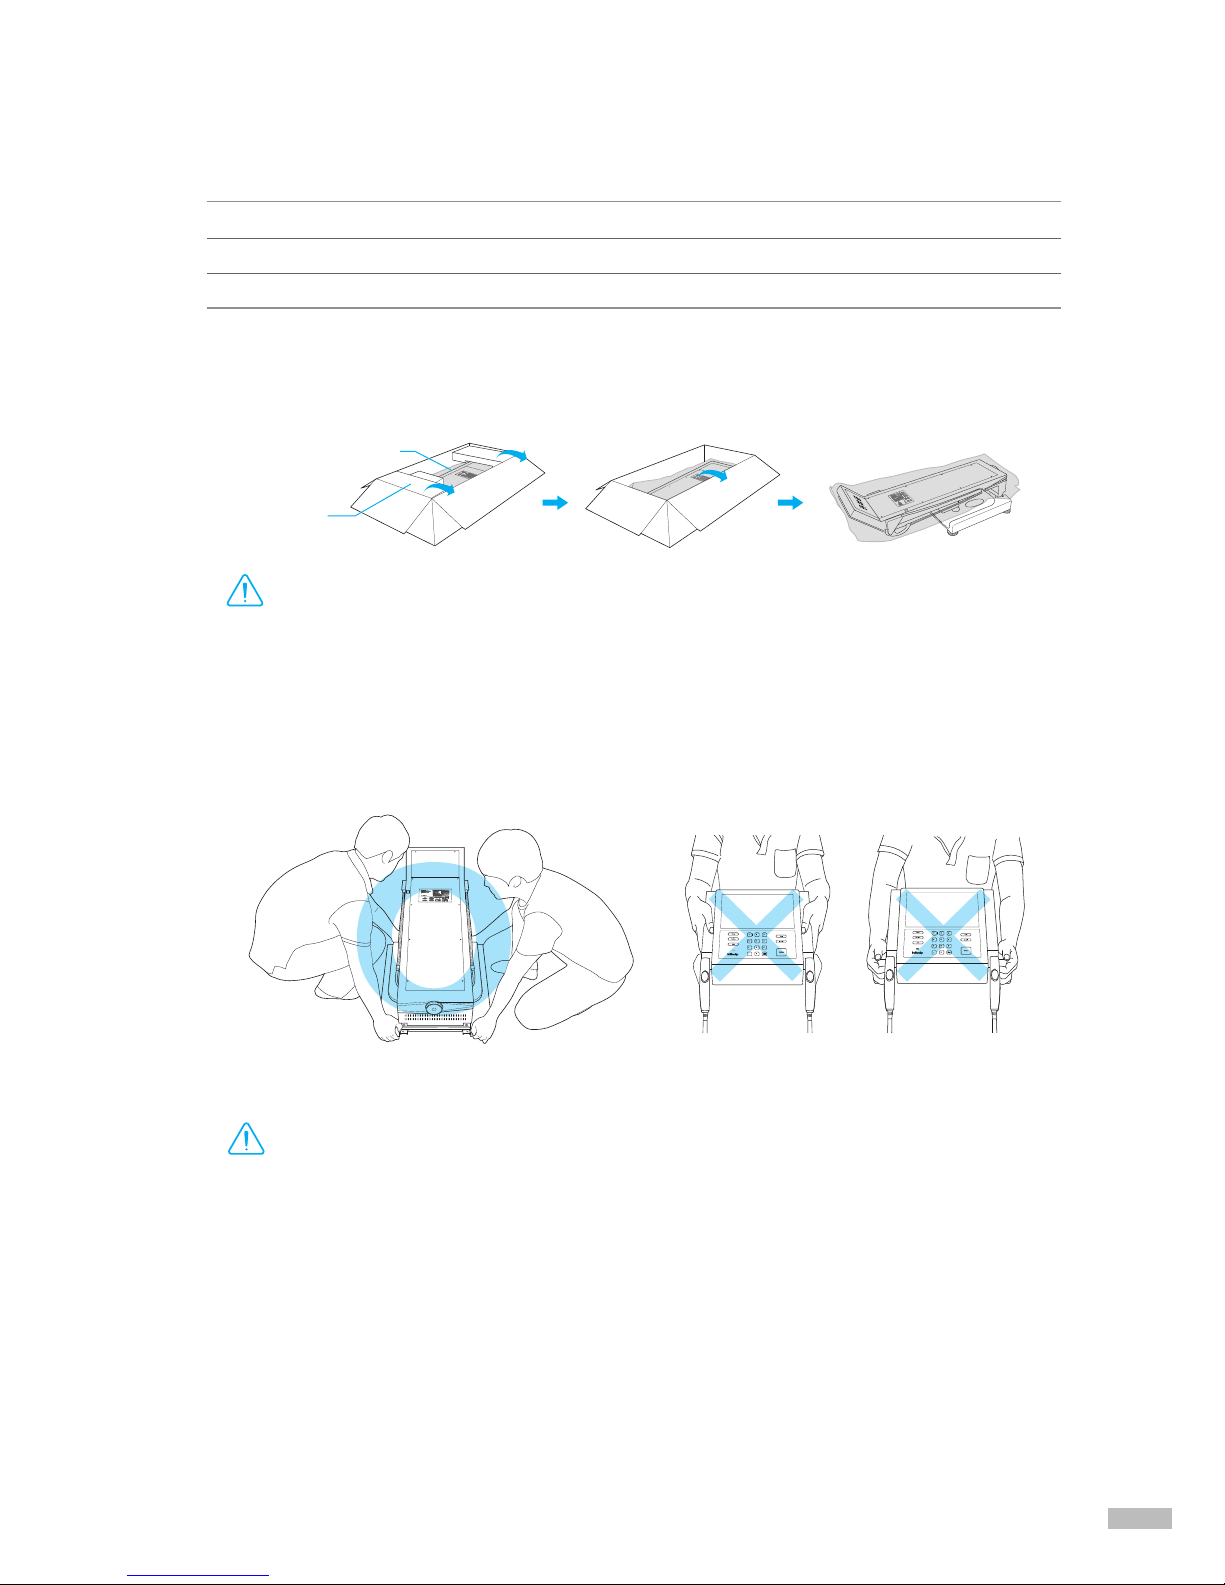
* Please refer to the following illustrations to properly transport the equipment.

6
2. After completely raising the upper part of the InBody770, remove the polyethylene foam cover. Then remove
the packing material from the footplate.
5. Completely raise the upper part of the InBody770.
Packing material
3. Slightly lower the upper part of the InBody770 and remove the packing bands, which are used to connect the
leveling screws and the hand electrode cables.
•
Do not use a knife or scissors to remove the packing bands. Keep packing bands for repacking the InBody
in the future.
DANGER
NOTECAUTION
참 조 주 의참 고 주 의
Caution
Leveling screws
Packing Bands
4. Please refer to the following illustrations to remove the Packing Bands from both hand electrode cables.

7
6. Tighten the hexagonal screws, on the InBody770 joint, by rotating the Hexagonal Wrench clockwise.
7. Please refer to the following illustrations to insert the Hinge Cover.
8. Level the InBody770 by rotating the leveling screws under the footplate to the left and right so that the
air bubble is centered.
* Leveling the equipment is necessary for accurate measurement of weight. There are a total of 5 leveling screws.
DANGER
NOTECAUTION
참 조 주 의참 고 주 의
Caution
•
Avoid injuring your hands when rotating the leveling screws under the footplate.
Leveling screws under the footplate
Leveling screws under the footplate
Leveled
Not leveled
Level Indicator
Hexagonal screws
8
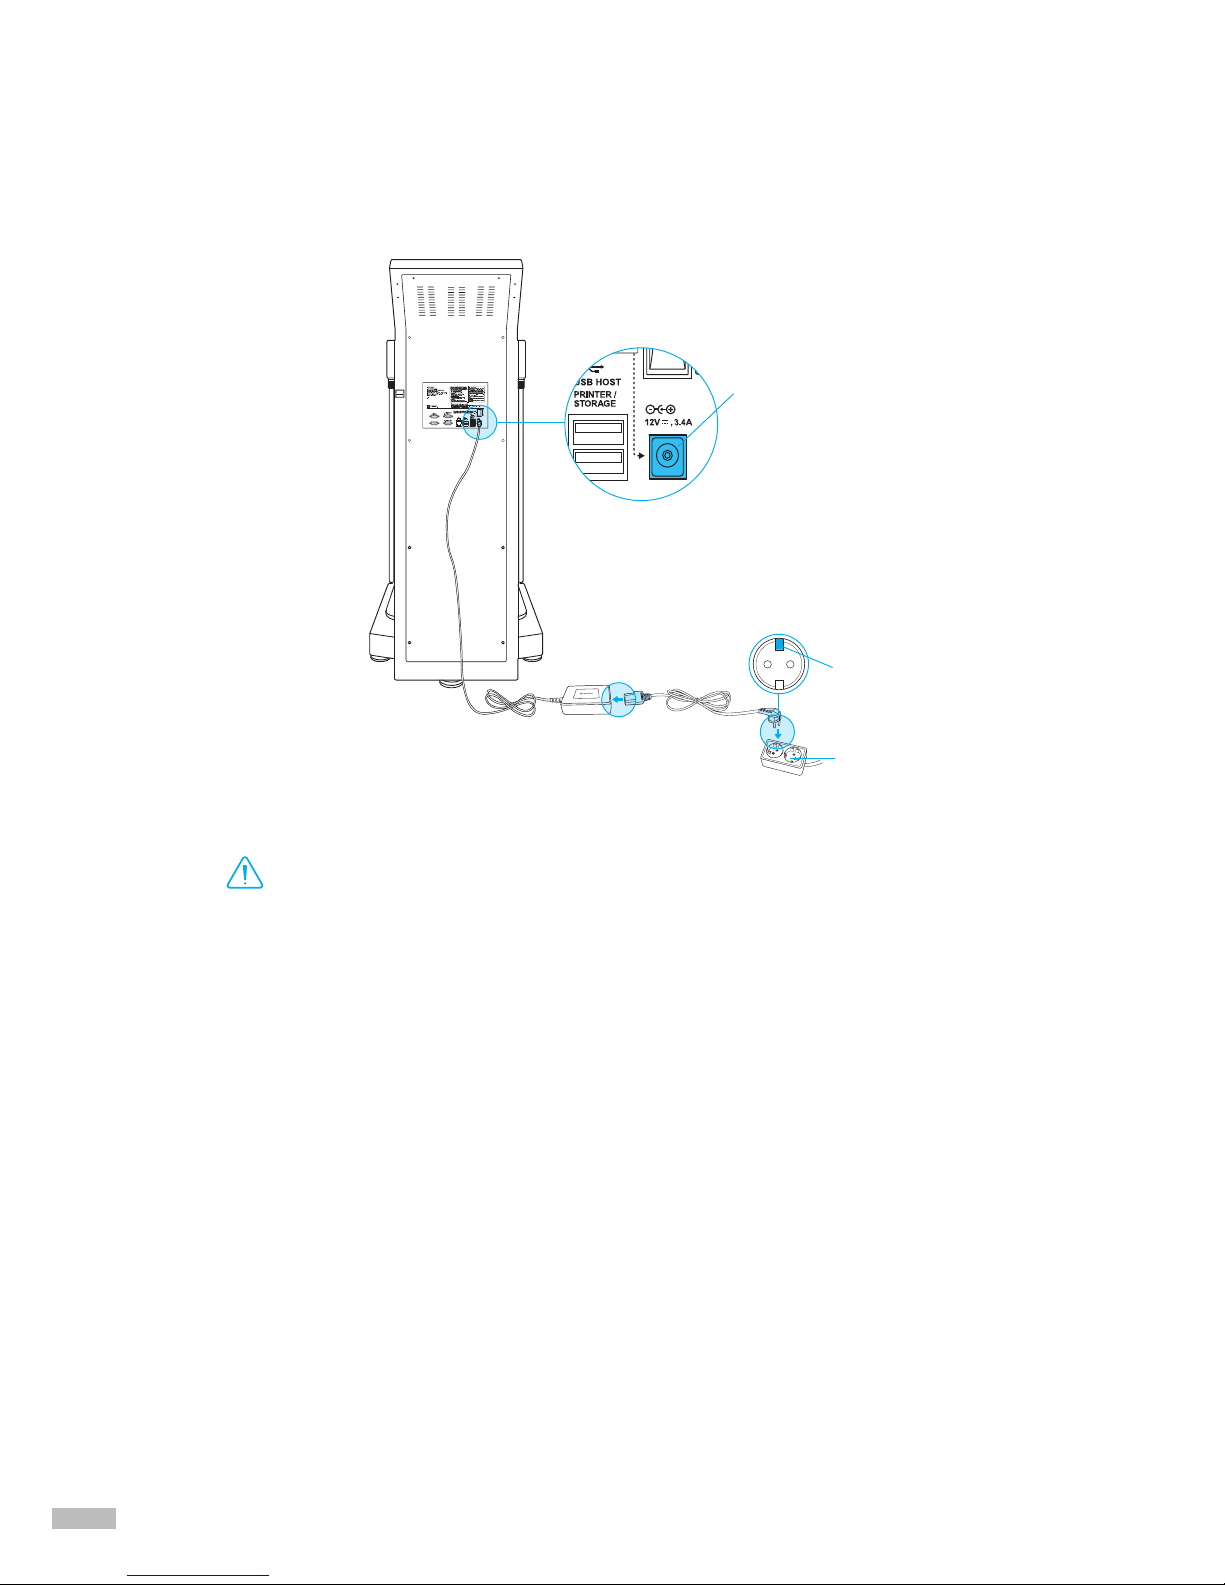
9. Connect the adapter (➋) to the power input port, which is located on the rear panel (➊). Connect the adapter (➋)
to the power cord (➌). Plug the power cord (➌) into a grounded 3-socket outlet.
* The InBody770 can be used in connection with other test equipment such as a stadiometer, a blood pressure monitor, or data management
software called Lookin’Body120. For more information, please refer to ‘A. Exterior and Functions 3. Rear Panel’ in section ‘V. Others’
in this User’s Manual.
•
Do not place the InBody770 in a location making it difficult to disconnect the power cord.
•
Do not plug in or pull out the power cord with wet hands. There is a risk of an electric shock.
•
Always use an outlet connected to the rated power (AC 100 - 240 V). Using other power rated outlets may result
in fire or malfunction.
•
When using a power surge protector, make sure that the outlet or the extension cable has adequate power capacity.
•
Do not disassemble or modify the equipment including internal parts without written consent from the
manufacturer. This may cause electric shock or injury, product malfunction, inaccurate results, and will void the
manufacturer’s warranty.
•
Do not directly contact the InBody770 with any other electronic device when the InBody770 is on.
This may result in an electric shock.
DANGER
NOTECAUTION
참 조 주 의참 고 주 의
Warning
Power input port
➊
Rear panel
➌
➋
Grounded outlet
3-socket outlet
9
• If the InBody770 is not plugged into a grounded outlet, it may cause damage through electric surges or
product malfunction. This may affect the test results.
• The test results may be inaccurate if the InBody770 is under electrical interference. Do not install the InBody770
near products that generate electrical interference such as fluorescent lights, large AC motor equipment
(treadmill, vibration plate, refrigerator, air-conditioner, compressor, etc.), high-frequency thermal therapy
equipments, or heating appliances. Do not share the power source of the InBody770 with other electrical
devices. This may affect the test results.
• When connecting the InBody770 with other test equipment, turn on the other equipment first. When
turning off other equipment, turn off the InBody770 first. This is necessary to minimize electrical surges on the
InBody770.
• Always use the specified adapter provided by BIOSPACE as it is a part of the InBody770. Using other adapters
may result in malfunction of the InBody770.
• Operation of the InBody770 2,000m above sea level may affect the weight measurement.
DANGER
NOTECAUTION
참 조 주 의참 고 주 의
Caution
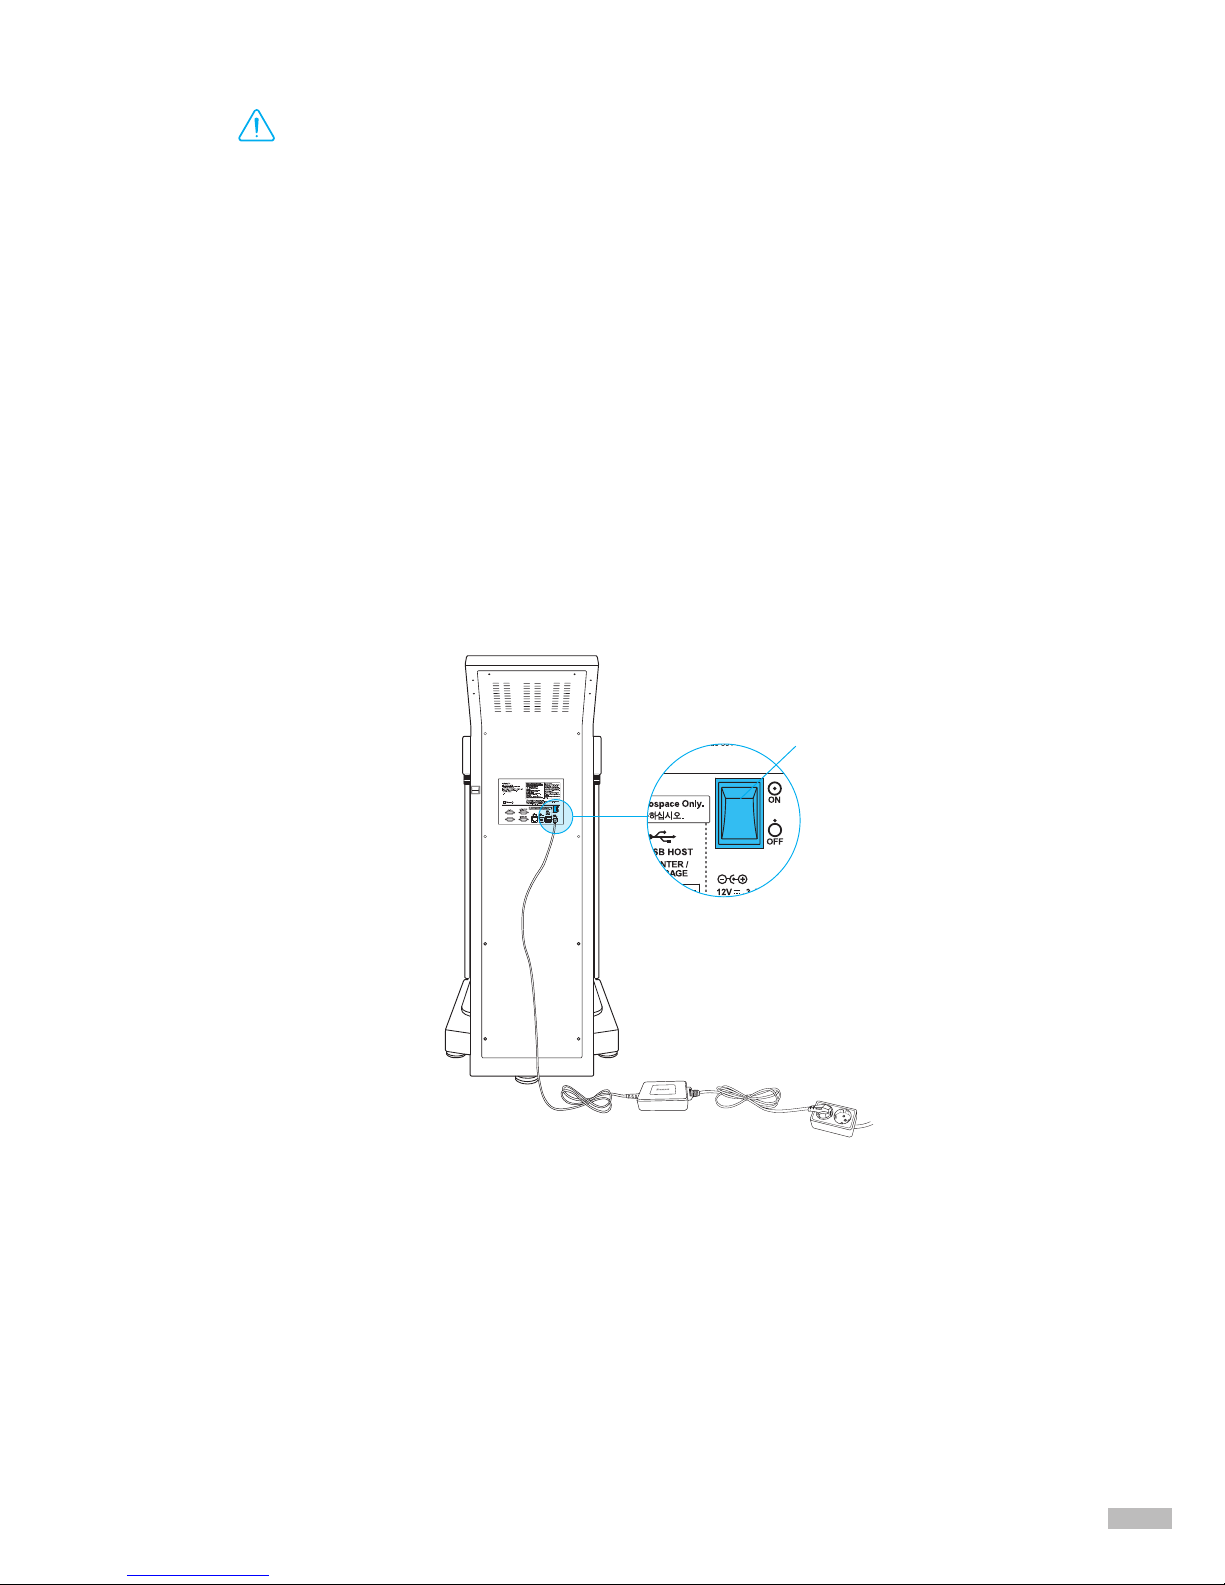
10. Flip the power switch to turn on the InBody770.
Power switch

10
D. Initial Setup
1. The InBody770 automatically starts booting when it is turned on. While booting, it performs a self weight
calibration.
* While booting (about 5 minutes), make sure there is nothing on top of the footplate. Please do not stand on the footplate, or
place objects on the footplate.
2. Press the [Administrator Menu] button on the screen, which appears when no one is on the footplate.
3. Input the password (default password: 0000) to access the Administrator Menu.
4. The Administrator Menu will give you access to ‘Setup’ and ‘Troubleshooting’.
* If you store the contact information for Customer Service under ‘24. Customer Service Information’ in Setup of
the Administrator Menu, you can refer to it when you have a question or a problem with the InBody770.
Administrator Menu
Setup Troubleshooting

11
1) Setup: Congure settings and manage data according to the test environment.
01. Date/Time/Units/Country/Language/Password/Volume
: Change or modify the InBody’s basic settings.
02. Self Mode/Professional Mode
• Self Mode: The examinee takes the InBody Test by entering only his/her height.
Throughout the test, instructions and the InBody Information will be shown on screen.
• Professional Mode: An examiner is present and guiding the examinee through the InBody Test.
03. N/A
04. N/A
05. Bypass Age/Gender
: The examinees can bypass inputting their age or gender if the test environment is designed for testing
only adults or a specic gender.
06. View/Print/Delete Data
: The administrator can manage test results using ID.
07. Export Data as Excel
: You can export test results as an excel le on a USB Thumb Drive. Exported test results can be viewed
as an excel le on a computer.
08. Data Backup/Restoration
: Back up the InBody Test results to a USB Thumb Drive or restore test results using a backup le on
a USB Thumb Drive.
09. Printer Setup
: Connect the printer to the InBody. A connected printer will allow for printing results sheets after testing.
10. Results Sheet Types
: Select which results sheets to print among the results sheets provided by the InBody770
(InBody Results Sheet, InBody Results Sheet for Children, and Body Water Results Sheet).
11. Automatic Printing Options
: Print applicable results sheets automatically after each completed test. The InBody can print up to
2 copies after every test.
12. Paper Types
: Select the paper type for printed results sheets. Options include blank A4 paper or pre-printed InBody
Results Sheets provided by BIOSPACE.
13. Outputs/Interpretations for Results Sheet
: Select outputs or interpretations that will appear on the right side of the InBody Results Sheet,
InBody Results Sheet for Children, and Body Water Results Sheet.

12
14. Results Sheet Custom Logo
: Insert a logo on upper right corner of the printed results sheet.
* Please contact BIOSPACE for help with uploading or modifying a logo.
15. Printing Alignment
: Adjust the alignment of where the results will be printed on the results sheets.
16. Internet Options
: You can connect the InBody to the Internet. When the InBody is connected to the internet, can
connect to data management software Lookin’Body120, regardless of location.
17. Bluetooth
: Connect the InBody to data management software Lookin’Body120, via Bluetooth connection.
18. Manual/Automatic Weight
: Select whether to proceed testing by entering the examinee’s weight manually or by taking the
weight measurement automatically.
19. Adjust Weight
: Adjust measured weight by a xed value on the InBody. (Example: Workout clothes at the gym are
approximately 0.2kg; most examinees are assumed to be wearing workout clothes, so the examiner
may adjust the set value to -0.2kg.)
20. Normal Range
: Set the normal range for BMI, Percent Body Fat and Waist-Hip Ratio.
* The ideal value of BMI may also be set.
21. N/A
22. Standard Child Growth Curve
: Set the type of standard child growth curve to use on the InBody Result Sheet for Children.
23. Touchscreen Alignment
: Adjust the alignment of the touchscreen.
24. Customer Service Information
: Save the customer service (supplier) contact information. Please refer to the customer service information
if you have any inquiries regarding the InBody Test, or problems that cannot be resolved through the
‘Troubleshooting’ menu.
25. Auto-Lock
: Set a password or screen lock (auto-lock) time to secure the InBody usage.

13
2) Troubleshooting: See additional information on how to use the InBody. Refer to troubleshooting checklist
when there are problems that occur during the InBody use/test.
01. Customer Service Information
: See the customer service contact information saved under the Setup of the Administrator Menu
‘24. Customer Service Information’. Please contact the customer service if your problem cannot be
resolved through the ‘Troubleshooting’ or if you need further inquiries regarding the InBody Test.
02. Results Sheet does not print.
: View the troubleshooting checklist when the Results Sheet does not print by the printer connected
to the InBody.
03. Weight is not being measured.
: View the troubleshooting checklist when weight is not being measured, after stepping on to the
InBody footplate.
04. Weight measurement seems to be inaccurate.
: View the troubleshooting checklist when the weight measurement seems to be inaccurate.
05. The InBody Test has stopped.
: View the troubleshooting checklist when the InBody Test has stopped.
06. Test results seem to be inaccurate.
: View the troubleshooting checklist when the test results seem to be inaccurate.

14
E. Connecting Printer, Stadiometer, and Blood Pressure Monitor
1. Printer
In order to print InBody Results Sheets, an InBody770 compatible printer is required.
* A list of printers compatible with the InBody770 can be found at http://www.inbodyservice.com.
1) First turn off the InBody770 and then the printer.
* You may experience connection issues in connecting the printer to the InBody770 if the InBody is turned on.
2) Plug the USB cable provided with the printer into the USB HOST port on the rear panel of the InBody770 and
plug the other end of the USB cable into the printer.
3) Turn on the printer.
4) Turn on the InBody770 and setup your printer under Setup of the Administrator Menu ‘09. Printer Setup’.
5) You can edit your printing settings under Setup of the Administrator Menu from ‘10. Results Sheet Types’
through ‘15. Printing Alignment’.
2. Stadiometer
If a stadiometer is connected to the InBody770, the height values measured by the stadiometer will be sent
directly to the InBody770.
* Always connect a stadiometer from BIOSPACE.
1) First turn off the InBody770 and then the stadiometer.
* You may experience connection issues in connecting the stadiometer to the InBody770 if the InBody is turned on.
2) Plug the serial cable provided with the stadiometer to the 9-pin stadiometer serial port on the rear panel of
the InBody770.
3) Turn on the stadiometer.
4) Turn on the InBody770. If the stadiometer is connected to the InBody770, the stadiometer icon( ) will
appear on the top left corner of the screen when no one is on the footplate.
USB HOST port
9-pin stadiometer
serial port

15
3. Blood Pressure Monitor
If a blood pressure monitor is connected to the InBody770, the blood pressure values measured by the blood
pressure monitor will be sent directly to the InBody770.
* Always connect a blood pressure monitor from BIOSPACE.
* If you select to print blood pressure measurements under Setup of the Administrator Menu ‘13. Outputs/Interpretations for Results
Sheet’, the blood pressure measurements will be printed on the InBody Results Sheet.
1) First turn off the InBody770 and then the blood pressure monitor.
* You may experience connection issues in connecting the blood pressure monitor to the InBody770 if the InBody is turned on.
2) Plug the serial cable provided with the blood pressure monitor to the 9-pin blood pressure monitor serial
port on the rear panel of the InBody770.
3) Turn on the blood pressure monitor.
4) Turn on the InBody770. If the blood pressure monitor is connected to the InBody770, the blood pressure
monitor icon ( ) will appear on the top left corner of the screen when no one is on the footplate.
4. Barcode Reader
If a barcode reader is connected to the InBody770, the ID will be inputted automatically.
* If the InBody cannot recognize the barcode reader, please contact BIOSPACE.
1) First turn off the InBody770.
* You may experience connection issues in connecting the barcode reader to the InBody770 if the InBody is turned on.
2) Plug the USB cable of the barcode reader into the USB HOST port on the rear panel of the InBody770.
3) Turn on the InBody770. If the barcode reader is connected to the InBody770, the barcode reader icon( )
will appear on the top left corner of the screen when no one is on the footplate.
9-pin blood pressure monitor
serial port
USB HOST port

16
DANGER
NOTECAUTION
참 조 주 의참 고 주 의
Caution
•
Place the hand electrodes on the hand electrode holder to prevent the electrodes from falling down. Dropped
hand electrodes may cause malfunctions.
•
Do not extend the handles of the hand electrodes beyond its limitation.
•
Do not place any objects on the footplate.
•
Do not apply excessive force on the equipment.
•
Turn off the equipment if you are not using it for a day or longer.
•
Do not allow any liquid substances to contact the equipment directly. Keep food and drinks away from the
equipment. Substances getting inside the equipment can cause critical damage to the electronic components.
•
Use a lint-free cloth to gently wipe the external surface of the equipment about once every week. Be careful not
to scratch the LCD screen.
F. Maintenance

17
II. InBody Test
A. Precautionary Steps
DANGER
NOTECAUTION
참 조 주 의참 고 주 의
Warning
•
Individuals with medical implant devices such as pacemakers, or essential support devices such as patient
monitoring systems, must not use this equipment. Safe, low-level currents will flow through the body during
the test, which may cause malfunctioning of the device or endanger lives.
•
Bioelectrical Impedance Analysis (BIA) uses safe low level currents, which are not harmful to the body. However,
we do not recommend pregnant women test.
•
Children and people with limited mobility should be supervised or assisted when attempting to test on the InBody.
•
After an individual with any kind of contagious disease or infection tests on the InBody, use an InBody Tissue
to clean the equipment.
DANGER
NOTECAUTION
참 조 주 의참 고 주 의
Caution
•
Stand upright for about 5 minutes before testing. Taking the test immediately after lying in bed or sitting for
a long period of time might result in a slight change in the test results. This is because body water tends to
move to the lower body as soon as the person stands or gets up.
•
Do not eat before testing. In cases where the examinee has already eaten, the test should be put off for at least
two hours after the meal. This is because food mass is included in the examinee’s weight and thus, may result
in measurement errors.
•
Use the bathroom before testing. Waste is not included in the body’s compositional elements, but the volume
of urine and excrement is included in the weight measurement affecting accuracy of the test results.
•
Do not exercise before testing. Strenuous exercise or sharp movements can cause temporary changes in body
composition. Even light exercise can change your body composition temporarily.
•
Take the test in the morning, if possible. Body water tends to gravitate towards the lower body throughout
the day, affecting accuracy of the test results.
•
Thoroughly wipe the palms and soles with the InBody Tissue before testing. Testing may be difficult if the
examinee’s palms and soles are too dry or if the examinee has too many calluses.
•
Avoid contact with the examinee during testing. Contact may lead to interference affecting test results.

18
B. Test Instructions
1. Step on the footplate when the screen below is shown.
* The screens vary according to the Setup of the Administrator Menu ‘02. Self Mode/Professional Mode’.
Professional Mode: An examiner is present and guiding the examinee through the InBody Test.
Self Mode: The examinee takes the InBody Test following the instructions that are displayed on screen.
2. Weight measurement begins.
3. Input personal information.
* Input height only if using Self Mode.
4. Maintain proper posture to take the test.
* Refer to ‘C. Test Posture’ for the proper posture.
5. The InBody Test begins.
* InBody Information is shown if using Self Mode.
Professional Mode Self Mode
Professional Mode Self Mode

19
6. When the test is completed, the results will be shown on screen.
C. Test Posture
The examinee must maintain proper posture to have accurate test results.
* The test will proceed when there is good electrical contact.
Professional Mode
Self Mode
Keep the arms straight.
The thighs should not touch.
Your arms must not touch the
sides of your body.
Step on the footplate barefoot.
Hold the hand electrode so that
the 4 ngers wrap the surface
of the bottom hand electrode,
and place the thumb on the oval
electrode.
Place the heels on the rear sole
electrodes.
20
III.
Transportation and Storage
A. Cautions during Transportation
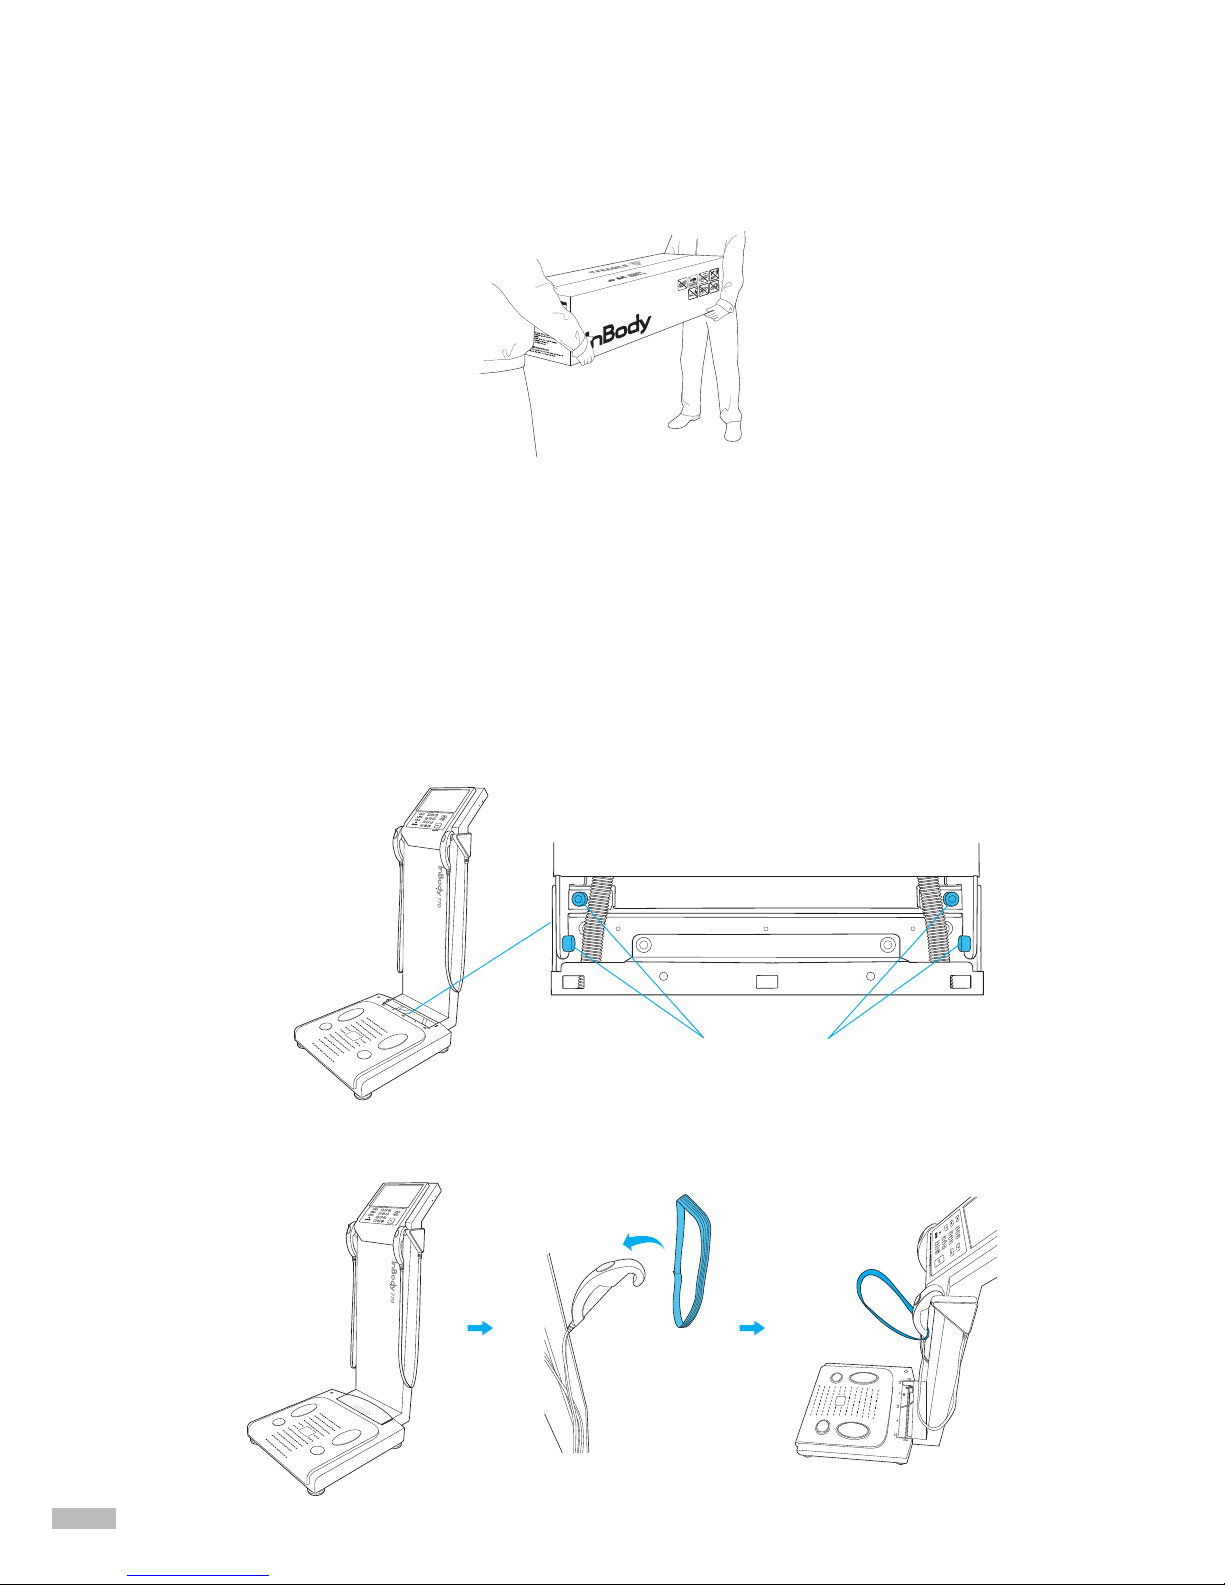
When transporting, have two people keep the InBody770 parallel to the ground.
B. Repacking Instructions
Once the InBody770 is installed, avoid transporting the equipment. If it must be transported, repack it in
the following sequence.
1. Turn off the InBody770.
2. Separate the connected Adapter, cords and cables from the equipment. Place both hand electrodes on the
hand electrode holders.
3. Loosen the hexagonal screws which are located on the joints of the InBody770 to counter-clockwise
using the Hexagonal Wrench.
4. Please refer to the following illustrations to properly hang the Packing Bands on the hand electrodes.
Hexagonal screws
Other manuals for 770
1
Table of contents


