Industrial Rivet & Fastener Co. RK-797 Series User manual

INDUSTRIAL RIVET & FASTENER CO.
RIVETING TOOL MANUAL
MODEL #
RK-797
MANUAL
VERSIO
N
1.5

FREESET
Technical Data Sheet
MODEL# RK-797-1 RK-797-3
Device Stroke 25mm 25mm
Setting Force 18kn 18kn
Drive Brushless DC motor Brushless DC motor
Lighting Power LED Power LED
Battery Li-Ion 18V Li-Ion 18V
Weight 1.9 kg w/o battery 2.0 kg w/o battery
Application 3/16” and ¼” Lockbolts 3/16” and ¼” Lockbolts with Process Monitoring

Table of Contents
BASIC INFORMATION ............................................................. 1
1PURPOSE OF THIS DOCUMENT ................................... 1
1.1Intended Use ........................................................................ 1
1.2Improper Use ........................................................................ 1
1.3Warranty and Liability ........................................................... 2
1.4Copyright .............................................................................. 2
2BASIC SAFETY INFORMATION ..................................... 3
2.1Information contained in this document ................................ 3
2.2Owner Responsibilities ......................................................... 3
2.3Personnel Responsibilities ................................................... 3
2.4Personnel Training ............................................................... 3
2.5Risks When Using This Tool ................................................ 3
2.6Electrical Hazards ................................................................ 4
2.7Basic Safety Measures ......................................................... 4
2.8Electrical Safety .................................................................... 5
2.9Personal Safety .................................................................... 5
2.11Use and care of the power tool............................................. 6
2.12Service ................................................................................. 6
2.13Lithium Ion Battery ............................................................... 7
2.14Battery Chargers .................................................................. 8
2.15Structural Modifications ........................................................ 8
2.16Cleaning the tool and disposal ............................................. 9
2.17Risk of injury and tool damage ............................................. 9
3CONTENTS & OPTIONS ............................................... 10
3.1Standard Components ....................................................... 10
3.2Optional Nose Equipment .................................................. 10
3.3Freeset Anatomy ................................................................ 11
3.4Technical Details (ALL MODELS) ...................................... 12
4OPERATION .................................................................. 13
4.1Quick Start ......................................................................... 13
4.2Checklist ............................................................................. 13

4.3Inserting The Battery .......................................................... 15
4.4Emptying The Container ..................................................... 16
4.5Setting The First Rivets ...................................................... 17
5MAINTENANCE AND SERVICE .................................... 18
5.1Service Principles ............................................................... 18
5.2Preventive Maintenance ..................................................... 18
5.3Approved Lubricants .......................................................... 19
5.4Removing The Jaws ........................................................... 19
5.5Removing The Nose Piece .... Error! Bookmark not defined.
6LED STATUS LIGHT ..................................................... 20
7QUICKDRAW FUNCTION ............................................. 21
7.1Enabling QuickDraw ........................................................... 21
8DRAWINGS ................................................................... 22
8.1Main Components ............................................................. 22
8.2Drive Shaft Assembly PRIV-B1 ..................................... 23
8.3Limit Switch Circuit Board PRIV-B3 .................................... 23
8.4Drive Unit Assembly PRIV-B2 ............................................ 24
8.5Motor Assembly & Main Circuit Board PRIV-B4 ................. 25
8.6Mandrel Container Assembly PRIV-B5 .............................. 25
8.7Mandrel Container Holder PRIV-B6 ................................... 26
8.8Tool Holder PRIV-B8 .......................................................... 26
8.9Nose Assembly Parts ......................................................... 27
9Parts Ordering ................................................................ 28

RIVETKING FREESET MANUAL RK-777
1
BASIC INFORMATION
1 PURPOSE OF THIS DOCUMENT
This document is intended for persons responsible for the operation of the FreeSet
lockbolt setting tool (the "tool"). Please read, understand and follow all instructions
contained in this document. Please read this document prior to starting to use the tool
and pay attention to the safety information. The information contained in this
document is important for avoiding workplace mishaps and ensuring problem-free
operation. We assume no liability for damage or business disruption due to failure to
adhere to the instructions contained in this document. Should you Nonetheless
encounter problems, please contact us and we will do our utmost to assist you.
1.1 Intended Use
This tool may only be used for setting lock bolts and blind rivets as described in this
document.
NOTE!
Intended use also includes
- Compliance to all information in this document
- Compliance with inspection and maintenance procedures
Any other use is considered improper use of the tool.
Industrial Rivet is not liable for damage resulting from improper use.
1.2 Improper Use
We assume no liability for damage or business disruption due to failure to adhere to
the instructions contained in this document or due to improper use of the setting tool.
Sectio
n
1

2
1.3 Warranty and Liability
Warranty and liability claims for personal and property damage are excluded if they
occur as the result of one or more of the following:
•Improperuse
•Improperinstallation,placementintoservice,operationandmaintenance
•Operatingthetoolwithdefectivesafetyequipmentor
improperly installed or non-functioning safety and protective devices
•Failuretocomplywiththeinformationcontainedinthisdocumentregarding
transport,storage, assembly, placement into service, operation, and maintenance of
the tool
•Unauthorizedmodificationstothetool
•Improperlyperformedrepairwork
•Catastrophiceventsbeyondhumancontrolandactsofgod
1.4 Copyright
This document is intended only for the owner and personnel authorized to operate the
tool.
It contains the relevant rules and information, which may not be:
- Duplicated
- Distributed or
- Otherwiseshared,eitherinwholeorinpart.
ThecopyrightforthisdocumentremainswithIndustrialRivetandFastenerCo.
Addressofthemanufacturer:
IndustrialRivetandFastenerCo.,Inc.
200ParisAvenue
Northvale,NewJersey07647
Ph.201‐750‐1040

3
2 BASIC SAFETY INFORMATION
2.1 Information contained in this document
•Toensuresafeuseandproblem‐freeoperation,pleasemakesurethat
youarefamiliarwiththebasicsafetyinformationandguidelines.
•Alsobesuretoobservealllocalrulesandregulations.
2.2 Owner Responsibilities
The owner is responsible for ensuring that all persons using the tool are familiar with
basic work safety and accident prevention rules and have been briefed on tool
operation. Safety practices should be reviewed regularly with all personnel operating
the tool.
2.3 Personnel Responsibilities
All persons assigned to work with the tool should be aware of the basic work safety
and accident prevention rules prior to commencing work.
2.4 Personnel Training
Personnel must be trained and briefed before operating this tool.
Personnel responsibilities for installation, placement into service, operation,
maintenance andrepairmustbeclearlydefined.Personnel in training may operate
the tool only under the supervision of an experienced person.
2.5 Risks When Using This Tool
All possible safety risk factors must be addressed immediately.
Warning!
The tool is designed using state-of-the-art technology and according to
recognized safety standards. Nonetheless, operating the tool involves the
risk of life-threatening injury to the user, third parties, and/or property.
Warning!
The tool may only be used:
- For intended purposes
- If the tool is in proper and safe working order.

4
2.6 Electrical Hazards
Warning!
Work on this tool is to be performed only by a qualified electrician. Inspect
the tool’s electrical components on a regular basis. Repair loose
connections and damaged cables immediately. Remove the battery before
performing tool repairs.
Note!
The tool must always be kept locked in a secure location.
2.7 Basic Safety Measures
Warning!
The terms “tool” and “power tool” used in the safety information refers
to tools powered from a wall outlet (with power cord) and battery –
powered tools (without a power cord).
1. Keep your working area clean and well lighted.
A cluttered or poorly illuminated working area may result in accidents.
2. Do not operate the tool in areas which explosions can occur.
Where flammable liquids, gases, or dusts are located. Power tools produce
sparks that can ignite dust or vapors.
3. Pay attention to environmental conditions
Do not expose the tools to rain or water.
Do not use tools in a damp or wet environment.
4. Keep children and other persons away when using the tool.
Distractions may cause you to lose control of the tool.

5
2.8 Electrical Safety
1. Avoid contact with grounded surfaces such as pipes, heaters, stoves,
and refrigerators.
When your body is grounded there is an increased risk of electrical shock.
2. Keep the tool away from rain and humidity
The penetration of water into a tool increases the risk of electrical shock.
3. Keep the tool away from heat, oil, sharp edges or moving parts
4. Minimize the effects of ESD “Electro Static Discharge”
ESD can effect the performance of electronic components on the tool.
2.9 Personal Safety
1. Alwayspaycloseattentionandusecautionwhenworkingwitha
powertool.Donotoperatepowertoolswhenyouaretiredorunderthe
influenceofdrugs,alcohol or medications. Even one moment of carelessness
when operating the tool can result in serious injury.
2. Alwayswearpersonalprotectivegearandsafetygoggles.Wearing
personal protective gear appropriate to the type of tool and the work being
performed, such as a dust mask, non-slip safety shoes, a safety helmet and ear
protection, minimizes the risk of injury.
3. Avoid accidentally starting the tool. Make sure that the tool is switched off
before connecting it to the battery, picking it up or carrying it.
Carryingthetoolwithyourfingeronthepowerswitchorconnecting to a
power source when it is switched on may result in accidents.
4. Maintainanergonomicworkingposture.Standfirmlyandalways
maintainbalance.Bydoingthis,you can control the tool better in unexpected
situations.
5. Wear suitable clothing. Do not wear loose clothing or jewelry. Keep hair,
clothing, and gloves away from moving parts. Loose clothing, jewelry or long
hair can get caught in moving parts.

6
2.11 Use and care of the power tool
1. Do not overload the tool. Use the appropriate tool for your work. Using the
correct tool allows you to perform yourworkmoreefficientlyandsafely.
2. Donotuseapowertoolthathasadefectivepowerswitch.Power
tools that cannot be switched on and off are dangerous and must be repaired.
3. Removethebatterybeforechangingtoolsettings,replacing
accessorypartsor storing. By doing this, you can prevent the tool from
starting accidentally.
4. Keep unused tools out of the reach of children. Do not allow anyone to use
the tool who is unfamiliar with it or has not read this document. Power tools
are hazardous when used by inexperienced persons.
5. Maintain the tool carefully. Make sure that moving parts are in good working
condition and do not jam, and check for broken or damaged parts that may
impair proper function. Ensure that any damaged parts are repaired before
using the tool.
Poorly maintained power tools are responsible for many accidents.
6. Keep tools clean. Carefullymaintainedtoolsjamlessfrequentlyandare
easiertooperate.
7. Followtheseinstructionswhenusingthetoolandaccessories.Take
into account the working conditions and the work to be performed. Using
power tools for unintended purposes may be hazardous.
8. Use the correct tool. Donotusetoolswithinsufficientpowertoperform
thetask.Do not use tools for purposes and work for which they are not
intended.
9. Check your tool for damage. Beforeusingthetool,checkfordamaged
partsandensurethatsafetyequipmentis in good working order and
functions as intended. Check that moving parts are in working order and do not
jam, that all parts are properly mounted and none are broken, and that all
conditions are correct for operating the tool. Damagedprotectiveequipment
andpartsshouldbeproperlyrepairedbyacustomerservice workshop or
replaced,unlessthisdocumentspecifiesotherwise.Damaged power
switches must be replaced by a customer service workshop. Do not use a tool if
the start switch does not function properly.
2.12 Service
Warning!
All repairs should be carried out by qualified personnel, using only original
replacement parts available from Industrial Rivet and Fastener Co. Doing
this will ensure that the tool safety is maintained.

7
2.13 Lithium Ion Battery
Warning!
Please observe the following when handling the provided lithium ion
batteries.
a) Use only devices recommended by the manufacturer to charge the
batteries. Using an improper charger may ruin the battery.
b) Usethecorrectbatteriesinthepowertools.Usingotherbatteriesmay
resultininjuryandfirehazard.
c) Ifthebatteryisnotusedforanextendedperiod,itshouldnotremain
in the charger or in the tool. If it is expected that the riveting tool will remain
unused for more than 3 hours, the battery must be removed. Failure to do so
entails the risk of permanent battery damage.
d) Forsafetyreasons,thelithiumionbatteryshouldnotremaininan
activechargingdevice for more than 36 hours. After charging, remove the
battery from the charger as soon as possible.
e) Anemptybatteryshouldnotremaininthetoolorinanunpowered
chargingdevice foranextendedperiodoftime.Inbothcases,the
residualcurrentflowmay completely discharge and ruin the battery.
f) Ifpossible,rechargethelithiumionbatteryimmediatelyafteruse
anddo not store whenempty. If the battery is stored separately from the
tool and the charger, it will retain its charging capacity for a longer time.
(Maximum loss 5% per year)
g) Alwaystransportthebatteryseparatelyfromthetoolwhenever
possible.This ensures that the tool is not accidentally switched on, thus
preventing the battery from discharging.
h) Donotexposethelithiumionbatterytohightemperatures
(120°F/50°C)ordirect sunlight. If the battery temperature exceeds
120°F/50°C during operation (charging or discharging), it must be removed
from the charger or riveting tool immediately.
i) Keepunusedbatteriesawayfrompaperclips,coins,keys,nails,
screwsorothersmallmetalobjectsthatcouldcreateashortcircuit
betweenthebatterycontacts.Donotopenorshort‐circuitthe
battery.A short circuit between the battery contacts may result in burns,fire
orexplosion.

8
j) Batteriesmayleakunderextremeoperatingconditionsorhigh
temperatures.Ifabatteryleaks,avoidcontactwiththeskinoreyes.
Batteryfluidiscorrosiveandcancausechemicalburnstobodytissues.If
fluidcomesincontactwiththeskin,washoffimmediatelyusingsoapand
water,andthenapplylemonjuiceorvinegar.Shouldfluidgetintheeyes,
rinseforatleast10minuteswithwaterandconsultaphysician
immediately.
k) Donotdropthelithiumionbatteryorsubjectittophysicalshock.
l) Cleanthebatterycontactsregularlyusingcottonswabsdippedin
alcohol.
Warning!
Lithium ion batteries hold their charge almost indefinitely and are
not subject to memory effects.
With proper care, you can reliably charge your battery for years to come
(approx. 700-1000 charging cycles).
Avoid completely discharging or overcharging the lithium ion
batteries under all circumstances. Doing so will prematurely will
ruin them.
2.14 Battery Chargers
a) DonotchargethebatteryattemperaturesUNDER50°F/10°Cor
OVER100°F/40°C.
b) Thebatterychargermustnotbeconnectedtoastep‐uptransformer,
generatororDCoutlet.
c) Makesurethatthebatterychargerairventsarenotcoveredor
blocked.
d) Donotstorethetool,batterychargerorbatteryinplaceswherethe
temperaturemightexceed120°F/50°C.
e) Neverchargethebatteryinaboxoraclosedcontainer
2.15 Structural Modifications
No changes, additions or modifications may be made to the tool components without
the written permission of the manufacturer. All modifications require written
confirmation by Industrial Rivet and Fastener Co.
Warning!
Should repairs or maintenance be required, use only original replacement
parts.

9
2.16 Cleaning the tool and disposal
Handling and disposal of used substances and chemicals, especially when cleaning with
solvents.
Do not place used batteries into household garbage, fire or water. Ask the dealer
or manufacturer to handle disposal.
2.17 Risk of injury and tool damage
1. Attach the mandrel collection container before using the tool. Failure to do so
will allow the mandrels to be thrown off when they detach, which may result
in injury.
2. Make sure that there are no damaged tool parts. All damaged parts must be
repaired before use.
3. Working with damaged tool parts creates the risk of injury. If you work in an
elevated area, wear a safety harness, be mindful of falling rivets, and avoid
dropping the tool. Failure to do so could result in injury and substantial
damage.
4. Remove the battery before cleaning or performing general maintenance on the
tool.
5. Keep your face away from the exhaust vents.
6. Avoid skin contact with substances such as lubricants and grease. These
substancesareflammableontheskin.Ifyoushouldcomeincontact with
them, wash the affected area carefully.
7. Avoid unsafe working positions. You could fall and injure yourself.
8. Take good care of your tool. Follow the operating instructions for maintenance
and cleaning. Keep the handgrip free from lubricants and dirt.
9. Use the tool carefully and make sure to operate it correctly. Use the tool with
care. Proper working conditions should exist. Maintain concentration and
focus while working.

10
3 CONTENTS & OPTIONS
3.1 Standard Components
POS. DESCRIPTION
Q
TY
1 Batter
y
p
ower tool FreeSet® 1
2 Batter
y
Char
g
er 1
3 Batter
y
2.5a
h
1
4
T
ool Han
g
er 1
5 Nose Piece Se
t
1
3.2 Nose Equipment
POS. PULLIN
G
HEAD
A
DAPTERS
RK7971-NA Nose Adapter included with Model RK-797-1, without force sensor
RK7973-NA Nose Adapter included with Model RK-797-3, with force sensor
POS. NOSE ASSEMBLIES **
p
urchased as an o
p
tio
n
MG06-722-20 3/16” MagnaGrip Nose Assembly
MG08-722-20 ¼” MagnaGrip Nose Assembly
LB06-722-20 3/16” C6L Nose Assembly
LB08-722-20 ¼” C6L Nose Assembly
* Included with tool
NOTE: Nose Piece must match the desired lockbolt

11
3.3 Freeset Anatomy
POS. Description
1 Nose Assembly (not included)
Nose Adapter (included)
2 Serial Number
3 Mandrel Collector
4
Model Number
5 Status LED
6
T
ri
gg
er
7 Workli
gh
t
8 Batter
y

12
3.4 Technical Details (ALL MODELS)
* WEIGHT NOTED WITHOUT BATTERY
** TOOLS COME WITH PROGRAMMING FEATURES
MODEL# RK-797-1 RK-797-3**
Device Stroke 25mm 25mm
Setting Force 18kn 18kn
Drive Brushless DC motor Brushless DC motor
Lighting Power LED Power LED
Battery Li-Ion 18V Li-Ion 18V
Weight 1.9 kg w/o battery and nose assembly 2.0 kg w/o battery and nose assembly
Application 3/16” and ¼” Lockbolts 3/16” and ¼” Lockbolts with Process

13
4 OPERATION
4.1 Quick Start
This section describes how to start operating the RK-797-1 FreeSet and setting rivets.
See section x for details about additional setup options on RK-797-3 in the FreeSet
Manager Software.
4.2 Checklist
Check the following before using the riveting tool:
The housing is closed and there are no obvious defects
The battery is correct for the riveting tool and shows no damage
Thenosepiecefitstherivetstobeused.
Iftherivetdoesnotfitintothenosepieceoristooloose,another
nosepiecemustbe used.
The mandrel container is attached
Note!
Only batteries approved by Industrial Rivet and Fastener Co., Inc for
use in FreeSet tools may be used.
Using incorrect batteries can ruin both the batteries and the riveting
tool. Industrial Rivet assumes no liability for the use of incorrect
batteries

14
15
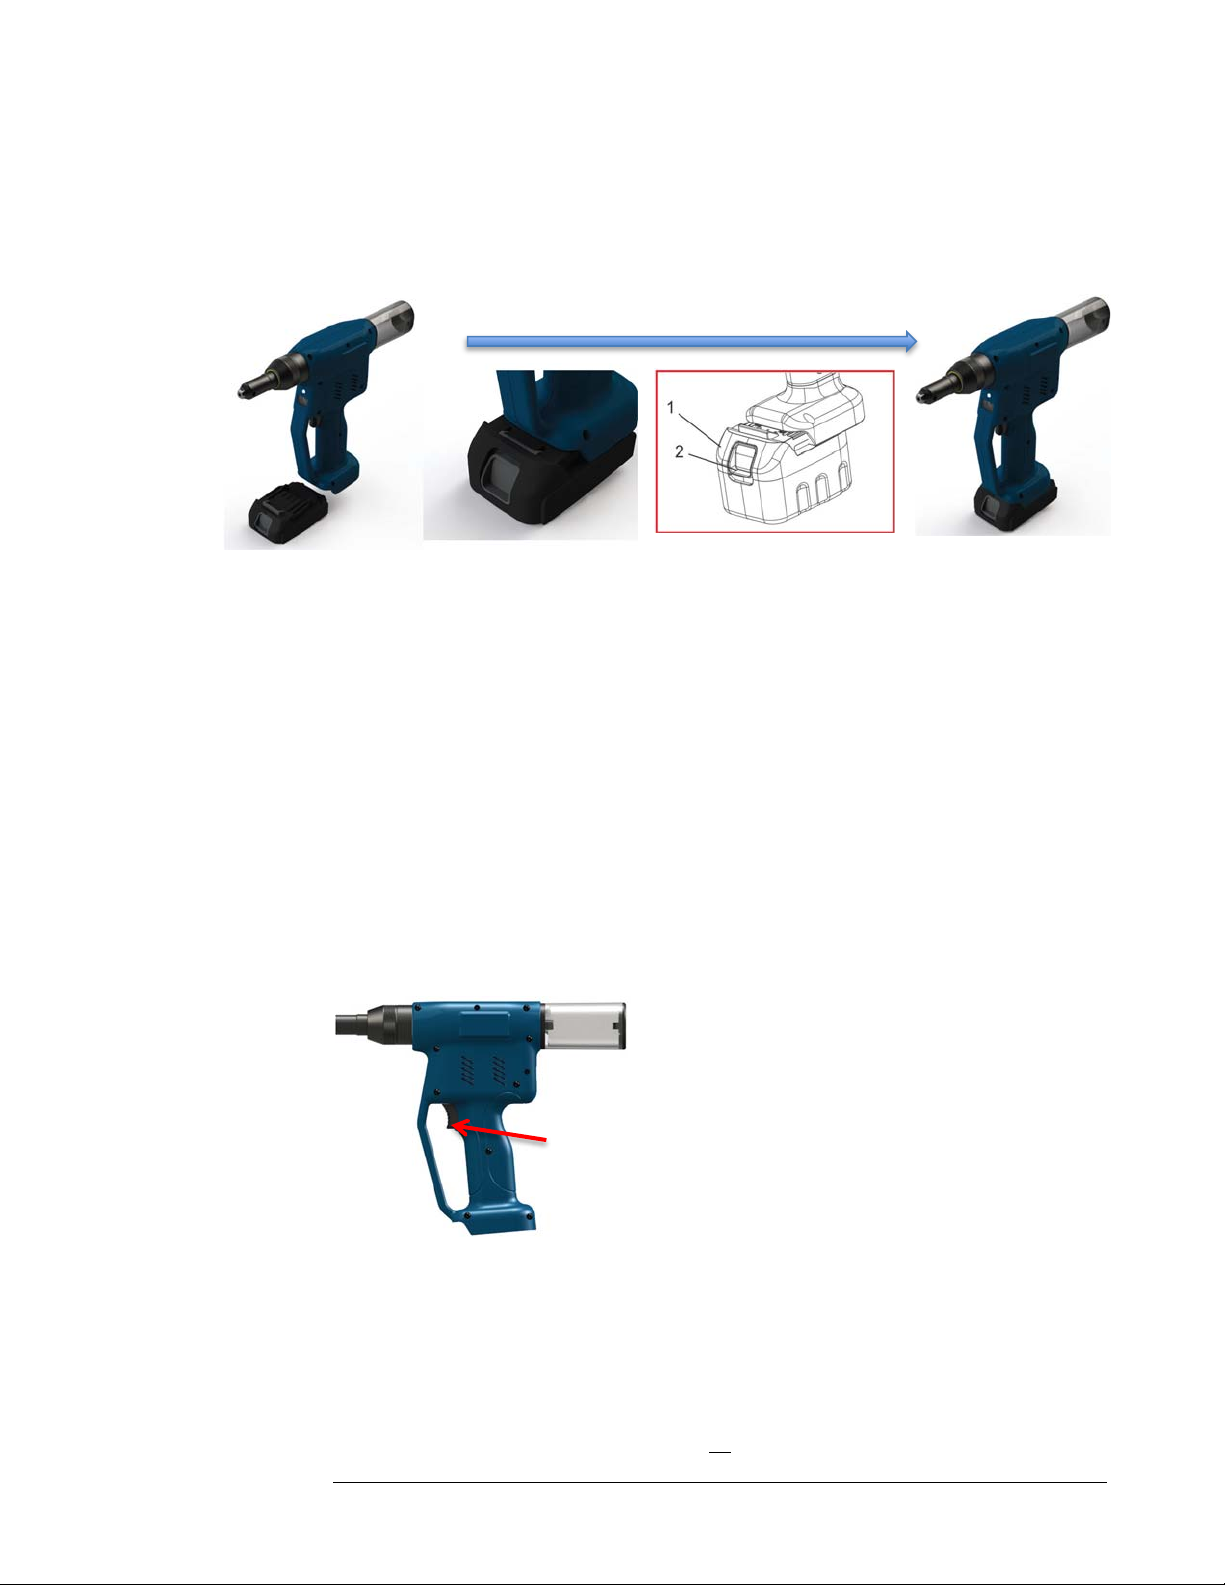
4.3 Inserting The Battery
To attach the battery (1), align the battery tab with the groove in the housing such that
it slides easily into place.
Always attach the battery completely so that it locks into place with a click. If the
battery is not properly attached to the tool, it can become detached and cause
substantial damage.
Never use force when attaching the battery. If the battery does not slide into place, it is
not correctly aligned. In this case, remove the battery and guide it once again into the
grooves.
To remove the battery, press down the clip (2) on the front of the battery. The battery
can now easily be removed by sliding it forward out of the holder.
After the battery has been inserted, a green light will appear in the LED status display
if there is enough battery power to operate. Subsequently, the light will go off.
Press the start switch “trigger” (1)

16
4.4 Emptying The Container
The detached mandrels must be emptied from the container. The nail container should
be emptied when full. The container can be opened and closed through turn left or
right.
Turn the collection container by hand to the left or right to remove it. After emptying
the container it can be mounted in the same way it was opened.
Note!
The mandrel container must be emptied regularly, otherwise mandrels
will become jammed in the tool which can cause costly damage.
This manual suits for next models
2
Table of contents
Other Industrial Rivet & Fastener Co. Rivet Tools manuals


Popular Rivet Tools manuals by other brands


Rivet King
Rivet King FreeSet RK-777C-1Q operating instructions

Gesipa
Gesipa taurus 1 Operating manual with spare parts list

Rivet King
Rivet King RK-59SPS Operation manual

Würth
Würth HNG 26 N Translation of the original operating instructions

Sealey
Sealey VS0204B.V2 manual

Power Fist
Power Fist 8843708 manual