Ingo Maurer Wo-Tum-Bu 2 User manual

Ingo Maurer GmbH
Kaiserstrasse 47
80801 München
Tel. 089-381606-0
Fax 089-381606 20
Oktober 1999 Made in Germany
b
&
Instructions
The MaMoNouchies®
Wo-Tum-Bu 2

Montageanleitung
Bitte vor der Montage aufmerksam lesen und
aufbewahren!
Mounting Instructions
Please read the following instructions carefully
before proceeding any further, and keep them
in a safe place for future reference!
Instructions de montage
Avant le montage veuillez lire attentivement les
instructionset les conserver!
Istruzioni di montaggio
Prima del montaggio, leggere attentamente le
istruzioni e conservarle!
1

Deutsch Seite 4
English Page 8
Français Page 12
Italiano Pagina 16
Zeichnungen Seite 20
Drawings Page 20
Dessins Page 20
Disegni Pagina20
3

Deutsch
Montageanleitung
Bitte nehmen Sie die Lampe vorsichtig aus der Verpackung.
Achtung: Schließen Sie die Lampe erst nach der Montage an
das Netz an.
Einsetzen des Leuchtmittels
Achtung: Das neue Leuchtmittel nicht mit bloßen Händen
berühren!
Setzen Sie das beiliegende Leuchtmittel in die Fassung ein und
achten Sie auf festen Sitz. Überprüfen Sie bitte den mittigen Sitz
der Halterung in der Schutzblende (1).
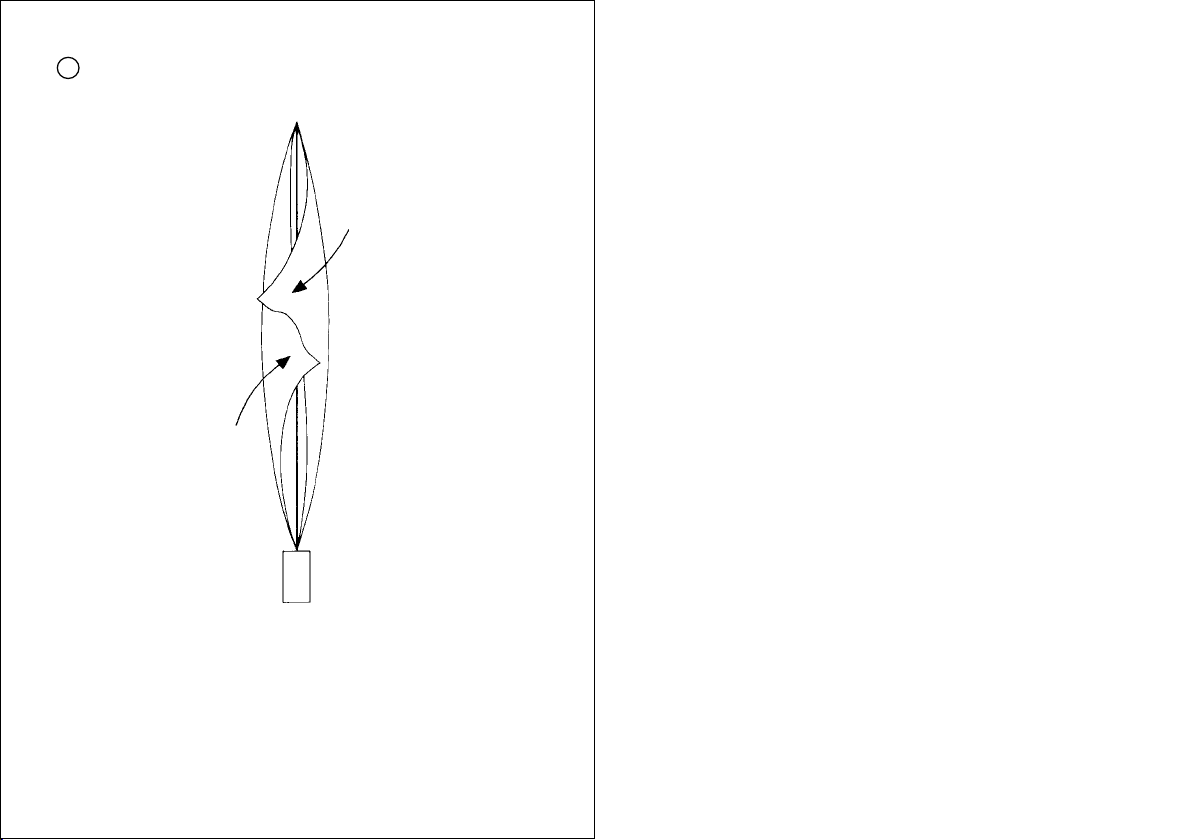
Einhängen des Papierschirms
Nehmen Sie den gerollten Papierbogen vorsichtig aus der Ver-
packung. Das Papier hat zwei Polycarbonatverstärkungen mit Loch.
Hängen Sie ein Ende des Papierbogens mit der Verstärkung in
die obere Halterung ein.
Greifen Sie das andere Ende des Papierbogens an der Lochver-
stärkung, ziehen Sie ihn vorsichtig nach unten und hängen Sie ihn
im unteren Häkchen ein.
Wichtig: Bitte achten Sie darauf, dass die Halterung in der
Schutzblende (1)immer mittig ausgerichtet sein muss. Das Papier
darf auf keinen Fall Fassung oder Leuchtmittel berühren.
▲
54
Deutsch
3
4
Wichtige Information zum Papier
Das Papier dieser Lampe ist ein unbehandeltes Naturprodukt:
Kleinere Einschlüsse und Verdickungen sind produktionstechnisch
bedingt. Der Papierschirm wird in aufwendiger Handarbeit (bis
zu acht verschiedene Arbeitsgänge) in einem patentierten
Verfahren hergestellt, das auf einer traditionellen japanischen
Textilfärbetechnik beruht. Obwohl alle Papierschirme gleich
aussehen, ist jeder ein Unikat.
Um das Papier zu schützen, sollten folgende Punkte beachtet
werden:
•Unbedingt vor Feuchtigkeit schützen, d.h. weder in Feucht-
räumen noch in Küchen usw.aufstellen, da das Papier sonst
seine Spannung verliert.
•Vermeiden Sie extreme Sonneneinstrahlung und starkeZugluft.
•Das Papier ist ein empfindliches Material, kann aber durch vor-
sichtiges Auseinanderziehen in Form gebracht werden.
Sie sollten das Papier jedoch nicht überdehnen, da es sonst die
Spannung verliert und nicht mehr die gewünschte Form
zurück erhält.
Der Papierschirm erhält in manchen Fällen erst nach einiger Zeit
seine endgültige Form, da sich das Papier aushängen muss.
Kleine Dellen, die evtl. durch Berührungen entstanden sind,
verschwinden leicht durch vorsichtiges Drücken von der Gegen-
seite des Papiers.
1
2
▲

Bitte schlagen Sie die freien Papierenden nicht ineinander; beide
Enden sollen außen sichtbar sein, wie in Zeichnung gezeigt.
Anschließen des Transformators
Wickeln Sie das Lampenkabel ab und stecken Sie die beiden Kabel-
stecker in die Buchsen des Transformators. Achten Sie auf festen
Sitz.
Wechsel des Leuchtmittels
Achtung: Den Netzstecker ziehen und die Lampe vollständig
abkühlen lassen. Das neue Leuchtmittel nicht mit bloßen Händen
berühren!
Haken Sie das Papier oben und unten aus und nehmen Sie den
Papierbogen ab. Halten Sie mit einer Hand von unten die
Fassung fest, während Sie mit der anderen Hand von oben das
alte Leuchtmittel ersetzen. Achten Sie auf festen Sitz.
Pflege
Wichtig: Den Papierschirmunter keinen Umständen feucht
abwischen! Bitte nur mit einem Staubwedel, Pinsel o.ä. reinigen.
Die Metallteile können mit einem trockenen Tuch abgestaubt
werden.
Deutsch
7
▲
Technische Daten
230/125 Volt. Niederdruck-Halogen 12 Volt, 50 Watt, Sockel GY 6,35.
Mit elektronischem Transformator und Schieberegler.
Das Symbol auf der Schutzblende weist darauf hin, dass
unbedingt ein Niederdruck-Leuchtmittel eingesetzt
werden muss.
Eventuell notwendige Reparaturen dürfen nur von einer Elektro-
fachkraft durchgeführt werden.
▲
▲
6
Deutsch
5
▲
2

Instructions for assembly
Please take care when removing the lamp from the packaging.
Caution: Do not connect the lamp to the power supply until
the assembly is completed.
Inserting the bulb
Caution: Do not touch the bulb with your bare hands.
Insert the bulb supplied in the socket and make sure that it is
securely in place. Check that the cylindrical shield (1)is correctly
positioned, with the socket squarely in the centre.
Attaching the paper shade
Carefullyremovethe rolled-up shade from the packaging.The
paper has two polycarbonate reinforcing rings with holes in the
centre. Attach one end of the shade to the holder at the top of
the mounting rod.
Grasp the reinforcement at the other end of the shade,pull it
gently downwards and attach it to the hook at the bottom of
the mounting rod.
Important: Ensure that the cylindrical shield (1)is correctly
positioned, with the socket squarely in the centre. Never allow
the paper shade to touch the socket or bulb.
Please do not fold the ends of the shade inwards. Both ends
should be freelyvisible,as shown in figure .
▲
3
4
2
Important information about the paper
The paper used in this lamp is a natural, untreated product.
Minor surface flaws are a result of the manufacturing process.
The paper shade is hand-made, by a patented process (requiring
up to eight different treatments) based on a traditional Japanese
method of textile dyeing.The results look superficially similar,
but in fact each shade is unique.
To protect the paper, the following points should be noted:
•Avoid exposure to damp: do not use the lamp in bathrooms,
kitchens or other rooms where condensation may occur.
•Avoid exposure to strong sunlight or draughts.
•Although the paper is a sensitivematerial, it can, if necessary,
be gently extended.
Do not overstretch it, otherwise it will lose its elasticity and
become unable to regain its shape.
In some cases, the shade takes some time to assume its proper
shape, as the paper has to hang and relax for a while.
Touching the surface maycause shallowdents – these can be
removed by gently pushing them out from the opposite side
with your fingers.
1
English
9
English
8
5
▲

Technical specification
230/125 volts. Low-pressure halogen, 12 volts, 50 watts,
GY 6,35 socket. Electronic transformer with sliding dimmer.
The symbol on the cylindrical shield means that only low-
pressure light bulbs may be used.
Any repairs that may become necessary must be carried out by
aqualified electrician.
▲
Connecting the transformer
Unwind the lamp cable and plug the two connectors into the
sockets on the transformer. Ensure that the connectors are
securely in position.
Changing the light bulb
Caution: Unplug the lamp from the power supply and allow it
to cool down completely. Do not touch the new bulb with your
bare hands!
Unhook the paper shade at both ends and remove it. Hold the
socket from above with one hand and use your free hand to
reach down and replace the spent bulb. Check that the replace-
ment bulb is securely in place.
Cleaning
Important: Never use damp cloths, sponges or similar on the
paper shade. Clean the shade if necessary with a light feather
duster or paintbrush.The metal parts can be wiped with a dry
cloth.
▲▲
English
11
English
10
▲
2

Instructions de montage
Prière de retirer la lampe avec précaution de son emballage.
Attention: Ne connecter la lampe au réseau électrique qu’une
fois le montage terminé.
Insertion de l’ampoule
Attention: Ne jamais toucher l’ampoule neuve à main nue!
Insérer l’ampoule jointe dans la douille et s’assurer qu’elle
est bien fixée. Prière de vérifier le positionnement central du
supportdans l’écran de protection (1).
Accrocher la feuille de papier
Retirer prudemment la feuille de papier enroulée de son embal-
lage. La feuille de papier a deux renforcements en polycarbonate
avec perforations. Accrocher une extrémité de la feuille de
papier dans le crochet supérieur.
Saisir l’extrémité opposée de la feuille de papier par le renfor-
cement, la tirer prudemment vers le bas et l’accrocher dans le
petit crochet inférieur.
Important: Prière de vérifier le positionnement central du
support dans l’écran de protection (1). S’assurer que le papier
ne touche surtout pas la douille ou l’ampoule.
Prière de ne pas enrouler les extrémités libres de la feuille de
papier;les deux extrémités doivent être visibles extérieure-
▲
3
4
2
Informations importantes concernant le
papier
Le papier de cette lampe est un produit naturel non-traité; de
petites imperfections ou épaississements sont dus au procédé
technique. La feuille de papier est le produit d’une fabrication
manuelle laborieuse (jusqu’à huit opérations sont nécessaires)
selon un procédé breveté s’inspirant des techniques traditionnelles
japonaises de la teinture. Bien qu’elles soient en apparence iden-
tiques, chaque feuille est unique.
Pour protéger le papier, veuillez respecter les indications suivantes:
•Il est indispensable de protéger le papier de l’humidité, c.à.d.
de ne pas l’utiliser dans des pièces humides ou cuisines etc.
•Eviter l’exposition à un ensoleillement extrême ou à de forts
courants d’air.
•Le papier est un matériel sensible mais peut être formé par de
prudents étirages.
Eviter de trop étirer le papier sinon il perd sa tension et ne
reprend pas la forme souhaitée.
Parfois la feuille de papier prend sa forme définitive après
quelques temps seulement étant donné que le papier doit se
défroncer.
De petits enfoncements causés éventuellement par un contact
imprudent disparaissent facilement en appuyant légèrement sur
le côté opposé du papier.
1
Français
13
Français
12
▲
5

Données techniques
230/125 volts. Ampoule halogène basse pression 12 volts, 50 watts,
culot GY 6,35. Avec transformateur électronique à curseur.
Le symbole imprimé sur l’écran de protection indique que
l’utilisation d’une ampoule basse pression est obligatoire.
Les réparations éventuellement nécessaires ne sont à effectuer
que par un spécialiste.
▲
Connexion du transformateur
Dérouler le câble de la lampe et insérer les deux fiches du câble
dans les prises du transformateur. S’assurer qu’elles sont bien
fixées.
Changement de l’ampoule
Attention: Retirer la fiche de la prise de courant et laisser
refroidir la lampe complètement. Faire attention à ne pas toucher
l’ampoule neuve à main nue!
Décrocher la feuille de papier en haut et en bas et la retirer.
Maintenir la douille d’une main par le bas et remplacer en même
temps l’ampoule usée avec l’autre main par le haut. S’assurer
que l’ampoule est bien fixée.
Entretien
Important: Ne jamais nettoyer la feuille de papier avec un chiffon
humide! Nettoyer uniquement avec un plumeau, un pinceau ou
équivalent. Nettoyer les parties en métal avec un chiffon sec.
▲ ▲
Français
15
Français
14
2
▲

Istruzioni di montaggio
Estrarre la lampada con cautela dall‘imballaggio.
Attenzione: Effettuare il collegamento alla rete soltanto a
montaggio avvenuto!
Inserimento della lampadina
Attenzione: Non toccare la nuova lampadina a mani nude!
Inserire la lampadina in dotazione nel portalampada e assicurarsi
che sia correttamente e saldamente inserita. Accertarsi che il
supporto si trovi al centro dello schermo di protezione (1).
Applicare il paralume
Estrarre attentamente il paralume avvolto dall‘imballaggio.La
carta ha due rinforzi in policarbonato con un foro. Agganciare
un‘estremità del paralume con il rinforzo al supporto superiore.
Poi, prendere l‘altra estremità per il rinforzo, tirarla cautamente
verso il basso e fissare il paralume nel gancetto inferiore.
Importante: Fare attenzione che il supporto all‘interno dello
schermo di protezione sia sempre collocato al centro. La carta
non deve assolutamente toccare né il portalampada né la lam-
padina.
Non sovrapporre le due estremità libere del paralume; entrambe
devono essere visibili dall‘esterno, come mostrato in figura .
▲
4
2
Informazioni importanti sulla carta
La carta di questa lampada è un prodotto naturale non trattato;
piccole imperfezioni e ispessimenti sono dovuti alla tecnica di
lavorazione. Il paralume è frutto di una lavorazione a mano
complicata (fino a otto diversi trattamenti), brevettata, che si
basa su un tradizionale procedimento giapponese di colorazione
dei tessili. Sebbene tutti i paralumi sembrino uguali, ognuno è un
pezzo unico.
Per proteggere la carta, rispettare i seguenti accorgimenti:
•Proteggere assolutamente dall‘umidità. Evitare la sistemazione
in luoghi umidi, cucine etc., perché la carta potrebbe perdere
la forma.
•Evitare raggi di sole diretti e forti correnti d‘aria.
•Sebbene la carta sia un materiale delicato, può tuttavia – se
necessario – essere messa in forma tirandola attentamente.
Attenzione però a non tenderla troppo, si otterrebbe una
perdita della tensione e quindi della forma.
In alcuni casi il paralume in carta prende la sua forma definitiva
soltanto dopo un determinato periodo, visto che la carta si
deve stendere.
Lievi ammaccature che dovessero sorgere toccando la lampada,
spariscono spingendo delicatamente dalla parte opposta della
carta.
1
IItaliano
17
IItaliano
16
▲
5
3

Dati tecnici
230/125 volt. Lampadina alogena a bassa pressione 12 volt,
50 watt, base GY 6,35. Con trasformatore elettronico e varia-
luce lineare.
Il simbolo riportato sullo schermo di protezione indica
che è consentito esclusivamente l‘impiego di lampadine a
bassa pressione.
Eventuali riparazioni possono essere eseguite esclusivamente da
un elettricista specializzato.
▲
Collegamento del trasformatore
Srotolare il cavo della lampada e inserire le due spine del cavo
nelle prese del trasformatore. Assicurarsi che siano saldamente
inserite.
Sostituzione della lampadina
Attenzione: Staccare la spina di alimentazione e attendere che
la lampada sia completamente fredda. Non toccare la nuova
lampadina a mani nude!
Staccare la carta dal gancio inferiore e superiore e rimuoverla.
Con una mano tenere dal basso il portalampada, con l‘altra mano
dall‘alto sostituire la vecchia lampadina. Accertarsi che sia salda-
mente inserita.
Cura
Importante: Non pulire mai il paralume con un panno umido.
Usare esclusivamente uno spolverino o un pennello ecc. Le
parti in metallo possono essere pulite con un panno asciutto.
▲▲
IItaliano
19
IItaliano
18
2
▲

2
1
21
3
20
1
4
22
5

Achtung:
Bitte fassen Sie den Betonfuß nur mit trockenen und
fettfreien Fingern an, um Flecken zu vermeiden!
Caution:
Please only touch the concrete base with dry and grease-
free fingers to avoid visible marks.
Attention:
Veuillez toucher le pied en béton uniquement avec
les mains sèches et exemptes de graisses, afin d‘éviter
l‘apparition de tâches!
Attenzione:
Per evitare macchie, toccare la base in calcestruzzo solo
con dita asciutte e non unte!
Table of contents
Languages:
Other Ingo Maurer Lighting Equipment manuals

Ingo Maurer
Ingo Maurer 18x18 User manual

Ingo Maurer
Ingo Maurer Delight User manual

Ingo Maurer
Ingo Maurer Spock Assembly instructions

Ingo Maurer
Ingo Maurer Satel.light User manual

Ingo Maurer
Ingo Maurer Birdie's Busch User manual

Ingo Maurer
Ingo Maurer Maru User manual

Ingo Maurer
Ingo Maurer MAX KUGLER User manual

Ingo Maurer
Ingo Maurer Ringelpiez User manual

Ingo Maurer
Ingo Maurer My New Flame User manual

Ingo Maurer
Ingo Maurer TheMaMoNouchies Babadul User manual


