Innovaciones M.S. SPOON User manual

MANUAL DE INSTRUCCIONES
REFS.: 21154
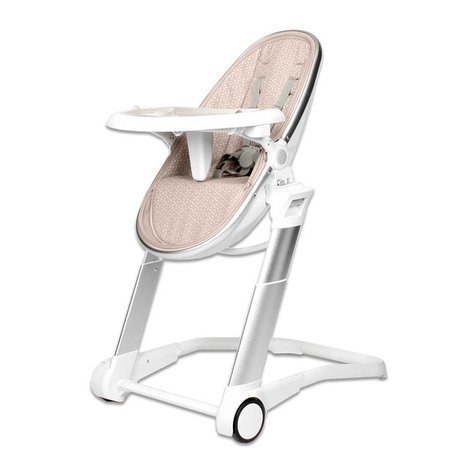
TRONA
SPOON
SILLITA
SILLA
ELEVADORA
TRANSPORTABLE
IMPORTANTE!! LEER DETENIDAMENTE Y MANTENERLAS PARA FUTURAS CONSULTAS
ESTA TRONA CUMPLE
CON LA NORMA
UNE EN
14988:2018

2
IMPORTANTE, MANTENER PARA
FUTURAS CONSULTAS.
LEER ATENTAMENTE
ADVERTENCIAS
INFORMACIÓN DE SEGURIDAD Y
MANTENIMIENTO IMPORTANTE
INSTRUCCIONES DE SEGURIDAD
Siga atentamente las instrucciones de montaje.
Mantenga estas instrucciones para futuras referencias.
- No deje al niño nunca desatendido.
- Utilice siempre el sistema de sujeción.
- Riesgo de caída: Evite que el niño trepe por el producto.
- Utilice el producto únicamente cuando todos sus componentes
estén correctamente fijados y ajustados.
- Existe un riesgo al situar el producto cerca del fuego o de otras
fuentes importantes de calor.
- Existe riesgo de vuelco si el niño apoya los pies en una mesa o
cualquier otra estructura.
- No utilice la trona antes de que el niño pueda sentarse sin ayuda.
- No utilice la trona si si hay alguna parte rota, doblada o perdida.
- Revise todos los accesorios y vuelva a apretarlos si es necesario.
- Mientras se pliega y despliega la trona, mantenga alejados a los
niños para evitar daños.
- Esta trona está indicada para niños que puedan sentarse sin ayu-
da y hasta 3 años o un peso máximo de 15 kgs.
- Cualquier arnés adicional al proporcionado por el fabricante,
debe cumplir con la norma EN 13210.
Limpie con una solución jabonosa suave
Secar con un paño suave y limpio

33
1. Coja el asiento y póngalo boca abajo ,
compruebe que no falta ninguna pieza.
3. Ponga las patas superiores en la silla
de plástico, si el muelle salta hacia arriba
es porque está bien instalada. Mire la
foto.
4. Después de instalar las patas superio-
res, instale los topes para el reposa pies.
Estos topes son izquierdo y derecho.
2. La trona necesita 8 piezas para las
patas , 4 piezas superiores y 4 piezas
inferiores, la que tiene dos diámetros
diferentes es la pata inferior.
INSTRUCCIONES DE MONTAJE
TRONA
Patas Superiores
Patas Inferiores con
tapón antideslizante
Tapón antideslizante
del reposapies Reposapies
Bandeja para
comer con
asiento

4
5. Instale las partes inferiores de las pa-
tas, el muelle salta hacia arriba.
7. Abra el respaldo de la silla, tire el
respaldo hacia detrás y oirá un clic. Esto
quiere decir que está bien colocado.
Para plegar el asiento cuando no vaya a
utilizarlo, apriete los dos botones blan-
cos al mismo tiempo.
1. Quite las patas inferiores del reposa-
piés
2. Coloque la tapa antideslizante en las
patas superiores.
8. Instale la bandeja. La bandeja tiene
que coincidir al menos en dos puntos de
cada lado de la silla, para poder sujetar-
se.
6. Coloque el reposa-pies en su lugar
correspondiente. Utilice los tornillos para
apretarlo.
SILLITA

55
1. Coja el asiento y colóquelo en una silla
lisa.
3. Luego ate el cinturón del respaldo de
forma que se quede también tenso.
PRECAUCIONES: nunca levante la trona por la bandeja cuando el niño esté sentado
dentro.
Nunca levante la trona cuando el niño esté sentado dentro.
2. Ate el cinturón a la base, y haga que
se quede bien estirado.
4. Cierre el arnés una vez el niño esté
sentado y a continuación ajuste la largaría
según las necesidades del niño, coloque la
bandeja como si la colocara en la trona.
SILLA ELEVADOR

POSICIONES DE LA BANDEJA
Agujero 1
POSICIÓN 1
Instale el agujero 1 en la tapa B y
el agujero 2 en la tapa C, por favor
debe instalarlo correctamente
hasta que oiga un claro “clic”.
POSICIÓN 2
Instale el agujero 1 en la tapa A y el
agujero 2 en la tapa B y el agujero
3 en la tapa C, por favor, instálela
bien de forma que oiga un “clic”.
POSICIÓN 3
Instale el agujero 2 en la tapa A
y el agujero 2 en la tapa B y el
agujero 3 en la tapa B, por favor
instálela correctamente hasta que
oiga el “clic”.
ASEGÚRESE DE QUE TODOS LOS MECANISMOS DE CIERRE ESTÉN
BIEN COLOCADOS ANTES DE UTILIZARLA.
Tapa AAgujero 3 Tapa C
Agujero 2 Tapa B
6

77
LIMPIEZA:
- Las partes de metal deben limpiarse con un trapo húmedo y
secarse con otro trapo suave.
- Limpie el arnés y las partes de plástico con jabón para ropa
delicada y agua. Enjuague y déjelo secar.
- No utilice detergentes fuertes o lejía.
MANTENIMIENTO:
-Compruebe que ninguna parte esté rota o se haya perdido y
que no quede ningún borde afilado. Si encuentra cualquiera
de estas cosas, deje de utilizar la trona inmediatamente.
-Inspeccione que todos los clavos, tuercas y tornillos estén
bien apretados. Compruebe que todas las tiras y los arneses
estén en buenas condiciones.
- No utilice piezas de repuesto que no estén recomendadas
por el fabricante o distribuidor. Si no lo hace, puede invalidar
la garantía.
MANTENIMIENTO Y LIMPIEZA:
77

8
GARANTIA FORMAL
Los contenidos de este documento como se muestra a continua-
ción tendrán efecto desde el momento que se compra el producto.
Innovaciones M.S. S.L. el distribuidor oficial situado en Pol. Ind.
La Cava. Avda. Generalitat Valenciana s/n. Sector Industrial 5. 46892
MONTAVERNER. Valencia.(Spain) garantiza al consumidor que este es
un producto nuevo y no tiene ningún fallo en cuanto a los materiales,
diseño y fabricación y que tiene las características que ha declarado el
fabricante.
Esta garantía formal, es válida para todos los países miembros de
la Comunidad Europea sin quedar en ninguno excluido el derecho del
consumidor según medidas legales que obligan a la tienda que vende el
producto a ofrecer esta garantía.
Para beneficiarse de esta garantía formal, el Consumidor debe devol-
ver el producto defectuoso a la tienda donde lo adquirió presentando al
comerciante la prueba de compra del producto que debe mostrar deta-
lladamente la dirección de la tienda, la fecha de compra del producto
con el sello de la tienda y una firma indicando de que producto se trata,
o , en su defecto, el recibo que no debe ser alterado y que claramente
debe mostrar la misma información que hemos dicho antes.
La garantía formal es válida durante veinticuatro (24) meses des de
que se compra el producto.
Durante este periodo INNOVACIONES M.S. S.L. arreglará o cambiará
cualquier producto defectuoso bajo su criterio.
La garantía formal es para el comprador final del producto (Consumi-
dor) y no excluye ni limita los derechos del Consumidor según marca la
ley y/o los derechos que el Consumidor tiene respecto a la tienda que
vende el producto.
LA GARANTÍA NO SERÁ VÁLIDA EN LOS SIGUIENTES CASOS.
La garantía formal queda excluida en el caso de daño causado al pro-
ducto por las siguientes razones: si el producto se utiliza de una forma
que no cumple con la información de las instrucciones para su uso y
montaje, si le han dado un golpe al producto o se ha caído, si el pro-

9
GARANTIA FORMAL
ducto está expuesto a la humedad, o al calor extremo o a condiciones
ambientales adversas, o a cambios repentinos de tiempo, cuando el
producto se corroe , se oxida o se repara o se altera el producto sin
autorización previa, si lo repara utilizando piezas de repuesto no auto-
rizadas , si el uso o mantenimiento del producto no es el correcto, o no
hace ningún tipo de mantenimiento sin hacer lo que se dice en el ma-
nual de instrucciones, se monta mal, tiene algún accidente , se estropea
a causa de la comida o la bebida, por cualquier producto químico o
causas de fuerza mayor.
En cualquier caso, INNOVACIONES M.S. S.L. ,rechaza toda respon-
sabilidad por daños causada a las personas o a la propiedad , otra que
no sea el producto, si el daño lo causa por no seguir las instrucciones,
consejos o precauciones que hay en el manual de instrucciones por
parte del propietario o persona que esté utilizando el producto. (Sólo
como ejemplo, no deje nunca al niño solo o el niño debe de tener siem-
pre el arnés puesto…)
Es más, INNOVACIONES M.S. S.L. , rechaza toda responsabilidad de
daño a personas y a la propiedad cuando la rotura del producto se debe
a un deterioro de los componentes del producto normal por el uso que
se hace de éste. Todos los componentes de este producto hechos de
plástico, se desgastan con el uso.
Importado por INNOVACIONES M.S. S.L.
Pol. Ind. La Cava
C/. Beniganim, 9
46892 MONTAVERNER (Valencia) Spain
Tel. 96 229 76 70 - Fax 96 229 76 76
Sello del establecimiento vendedor para garantía
9

IMPORTADO POR:
INNOVACIONES M.S. S.L.
Pol. Ind. La Cava.
C/ Benigànim, 9
46892 MONTAVERNER
(Valencia) Spain
Tel. 96 229 76 70
Fax 96 229 76 76
INNOVACIONESMS.COM
INSTRUCTION MANUAL

IMPORTANT!! READ CAREFULLY AND KEEP THEM FOR FUTURE CONSULTATIONS
INSTRUCTION MANUAL
REFS.: 21154
HIGH CHAIR
SPOON
SMALL CHAIR
BOOSTER CHAIR
PORTABLE
THIS TRONA COMPLIES
WITH THE STANDARD
UNE EN
14988:2018

12
IMPORTANT KEEP
FOR FUTURE REFERENCE
READ CAREFULLY
WARNING
IMPORTANT SAFETY AND
MAINTENANCE INFORMATION
CARE INSTRUCTION
Follow the assembly instructions carefully.
Keep for future reference.
- Never leave the child unattended.
- Always use the fastening system.
- Risk of falling: Prevent the child from climbing the product.
- Use the product only when all its components are correctly
fixed and adjusted.
- There is a risk when placing the product near fire or other
important sources of heat.
- There is a risk of overturning if the child rests his feet on a
table or any other structure.
- Do not use the high chair before the child can sit without help.
- Do not use the high chair if there is any broken, bent or lost part.
- Check all accessories and re-tighten if necessary.
- While folding and deploying the high chair, keep children away
to avoid damage.
- This high chair is suitable for children who can sit without help
and up to 3 years or a maximum weight of 15 kg.
- Any harness additional to that provided by the manufacturer
must comply with EN 13210.
Wipe clean with a mild soapy solution.
Wipe dry with a soft, clean cloth.

1313
1. Fetch the seat and put the plate upsi-
de, check the chair whether missing any
parts
3. Put the upper legs into the plastic
chair, the snap spring pop-up means
install well, see the picture.
4. After installed the uppder legs then
install the suits for foot-rest in the front
legs. The suits have left and right ones.
2. High chair need 8 pcs legs, 4 pcs uper
and 4 pcs under, Th one has two diffe-
rent diameter heads is under leg.
ASSEMBLY INSTRUCTION
HIGH TRAY
Upper leg
Under leg
non-slip cover
Suit foot-rest Foot-rest
Dinnig Tray
With Seat

14
5. Install the under legs, the snap spring
need pop-up
7. Open the chair backrest push it to
back and you will hear a “KA” voice then
it’s well. Fold the chair need put the two
white buttons together when don’t use
it.
1. Uninstall the under legs and foot-rest
2. Install anti-slip cover on upper legs.
8. Install the dinning plate. The plate
need two buttons points connected
with chair each side at least to fasten it.
6. Place the foot-rest on the suits. Using
the screws to fasten it.
SMALL CHAIR

1515
1. Fetch the seat and place on a flat chair.
3. Then fasten the black belt keep it light
WARNING: Never use the tray to lift the highchair when the child is seated in it.
Never lift the highchair when the child is seated in it.
2. Fasten the belt on the bottom, and
keep it tight.
4. Fasten the safe belt after chillad sit well
and adjust length according to the child if
need, install the tray same as high chair.
BOOSTER CHAIR

SETTING TRAY
Hole 1
POSITION 1
Install hole 1 to key B and hole 2 to
key C, please install correctly until
you hear “clark” voice.
POSITION 2
install hole 1 to key A and hole 2 to
key B and hole 3 to key C, please
install correctly until you hear
“clark”voice.
POSITION 3
Install hole 2 to key A and hole 2 to
key B and hole 3 to key B, please
install correctly until you hear
“clark” voice.
ENSURE THAT ALL THE LOCKING DIVICES ARE ENGAGED WELL
BEFORE USE.
Key AHole 3 Key C
Hole 2 Key B
16

1717
CLEANING:
- Metal parts may be cleaned with a damp cloth and wiped
dry with a soft cloth.
- Clean the harness and plastic parts with a mild soap and wa-
ter solution. Rinse and wipe dry.
- Do not use abrasive cleaners or bleach.
MAINTENANCE:
- Check that nothing is broken and missing and that no sharp
edges have been exposed. Stop using the highchair immedia-
tely if any are found.
- Inspect all studs, nuts and screws or tightnes. Check that all
straps and harness attachment points are in good working
order.
- Do not use replacement parts other than those approved by
the manufacture distributor. Failure to do this may invalidate
your warranty.
MAINTENANCE AND CLEANING:
1717

18
FORMAL WARRANTY
The contents of this document as it is shown in the following part will
be effective since the product is bought.
Innovaciones M.S., S.L. the official distributor located in Pol. Ind La
Cava, C/. Beniganim, 9, 46892 MONTAVERNER (Valencia - Spain) gua-
rantees the consumer that this product is new and it has not got any fault
in the materials, design and manufacturing process and that it has got the
features declared by the manufacturer.
This formal guarantee is valid for every country in the European Union
and in all of them the consumer has the same right according to legal
measures which say that the shop which sells the product has to offer
this guarantee.
To benefit from this formal guarantee, the Consumer has to take back
the faulty product to the shop when this product was bought showing the
shop assistant the buying ticket of the product with the stamp of the shop
and a signature indicating which product it is being sold, or, failing that,
the bill which must not be modified and it clearly has to show the same
information we have mentioned before.
The formal guarantee is valid for twenty-four (24) months since the pur-
chase of the product. During this period INNOVACIONES M.S., S.L. will
repair and change any faulty product according to its judgement.
The formal guarantee is for the final buyer of the product (Consumer)
and it does not exclude, neither limits the rights of the Consumer accor-
ding to the law and/or the rights which the Consumer has in relation to the
shop which is selling this product.
THE GUARANTEE IS NOT VALID IN THE FOLLOWING CASES.
The formal guarantee is excluded in case of any damaged produced to
the product for the following reasons: if the product is used in a different
way from the information given in the manual book of instructions for its
assembly and use, if the product has been hit or has fallen down, if the
product has been exposed to extreme humidity or heat or any negative
environmental conditions, or sudden weather changes, when the pro-
ducts corrodes itself, it rusts or the product is repaired or modified without
previous authorization, or if it is repaired using spare pieces which are not

19
FORMAL WARRANTY
authorized, if the use and maintenance of the product are not correct, or
it is not made any maintenance at all not following the instructions on the
manual, it is not assembled properly, it has some accident, it is damaged
because the food or drink, or any chemical product or major force.
In any case, INNOVACIONES M.S., S.L., rejects any responsability for
damages caused to the people or the goods, which are not the product
itself, if the damaged is caused because the user has not followed the
instructions, advices or warnings which are in the manual book of ins-
tructions by the owner or any person who is using the product. (Just an
example, never leave the child alone or the child has to wear the harness
all the time...).
It is more, INNOVACIONES M.S., S.L., rejects any responsibility of da-
maged caused to people or goods when the breakage of the product has
been caused due to the fact that the components have been damaged
because of the use of the product. Every component in this product made
of plastic are worn out because the daily use.
Imported by INNOVACIONES M.S. S.L.
Pol. Ind. La Cava
C/. Beniganim, 9
46892 MONTAVERNER (Valencia) Spain
Tel. 96 229 76 70 - Fax 96 229 76 76
Dealer’s stamp for warranty.
19

IMPORTED BY:
INNOVACIONES M.S. S.L.
Pol. Ind. La Cava.
C/ Benigànim, 9
46892 MONTAVERNER
(Valencia) Spain
Tel. 96 229 76 70
Fax 96 229 76 76
INNOVACIONESMS.COM
INSTRUÇÕES DE MONTAGEM
This manual suits for next models
1
Table of contents
Languages:
Other Innovaciones M.S. High Chair manuals
Popular High Chair manuals by other brands
Graco
Graco slim snacker owner's manual

Carl Hansen & Søn
Carl Hansen & Søn NANNA DITZEL ND54 Assembling instructions

homechoice
homechoice Zoo High Chair Assembly instruction
asalvo baby
asalvo baby TRONA MANET instruction manual

J is fot the Jeep
J is fot the Jeep 25008-340 instruction manual

Carena
Carena SILLO manual


