Innovative Technology DA2 User manual

DA2 Installation Guide
DA2
Installation Guide
Pre-release Development Issue
Innovative Technology Ltd Page 1 of 12

DA2 Installation Guide
CONTENTS
Section 1 System Requirements Page 4
Section 2 Installing your DA2 Page4
Section 2.1 Windows 98/98SE Installation Page 5
Section 2.2 Windows 2000 Installation Page 6
Section 2.3 Windows XP (Home and Professional) Installation Page 9
Section 3 Verifying Installation Page 11
Section 4 Installing Additional DA2s Page 12
Section 5 Uninstalling your DA2 Page12
Innovative Technology Ltd Page 2 of 12

DA2 Installation Guide
DA2 Kit Contents
You will have received the following items in your DA2 kit.
• DA2
• USB type-A to type-B cable
• DA2 to NV7/NV8 cable
• DA2 CD
If any of these items are missing please contact Innovative Technology Ltd to arrange for
replacement.
Innovative Technology Ltd Page 3 of 12

DA2 Installation Guide
1.0 System Requirements
1.1 Operating systems
To use the DA2 kit you must ensure that your PC’s operating is one of the following
• Windows 98
• Windows 98SE
• Windows 2000
• Windows XP Home
• Windows XP Professional
Windows 95 and Windows NT do not support USB devices. However you can use a DA1 kit –
this will allow you to use any of the current Innovative Technology Bank Note Validator download
tools.
1.2 Hardware
The DA2 is a Universal Serial Bus (USB) device. It must be connected to a USB port on your
PC.
A USB type-A to type-B cable is included with the DA2. The type-A plug connects to your PC.
The type-B plug connects to the DA2.The USB ports on your PC will be marked with the following
symbol.
2.0 Windows Installation
To install a DA2 you do not need to connect a Bank Note Validator or a power supply. Simply
connect the DA2 to the PC with the included USB cable.
Innovative Technology Ltd Page 4 of 12

DA2 Installation Guide
2.1 Windows 98/Windows 98SE
Before connecting your DA2 insert the DA2 CD-ROM
into your PC.
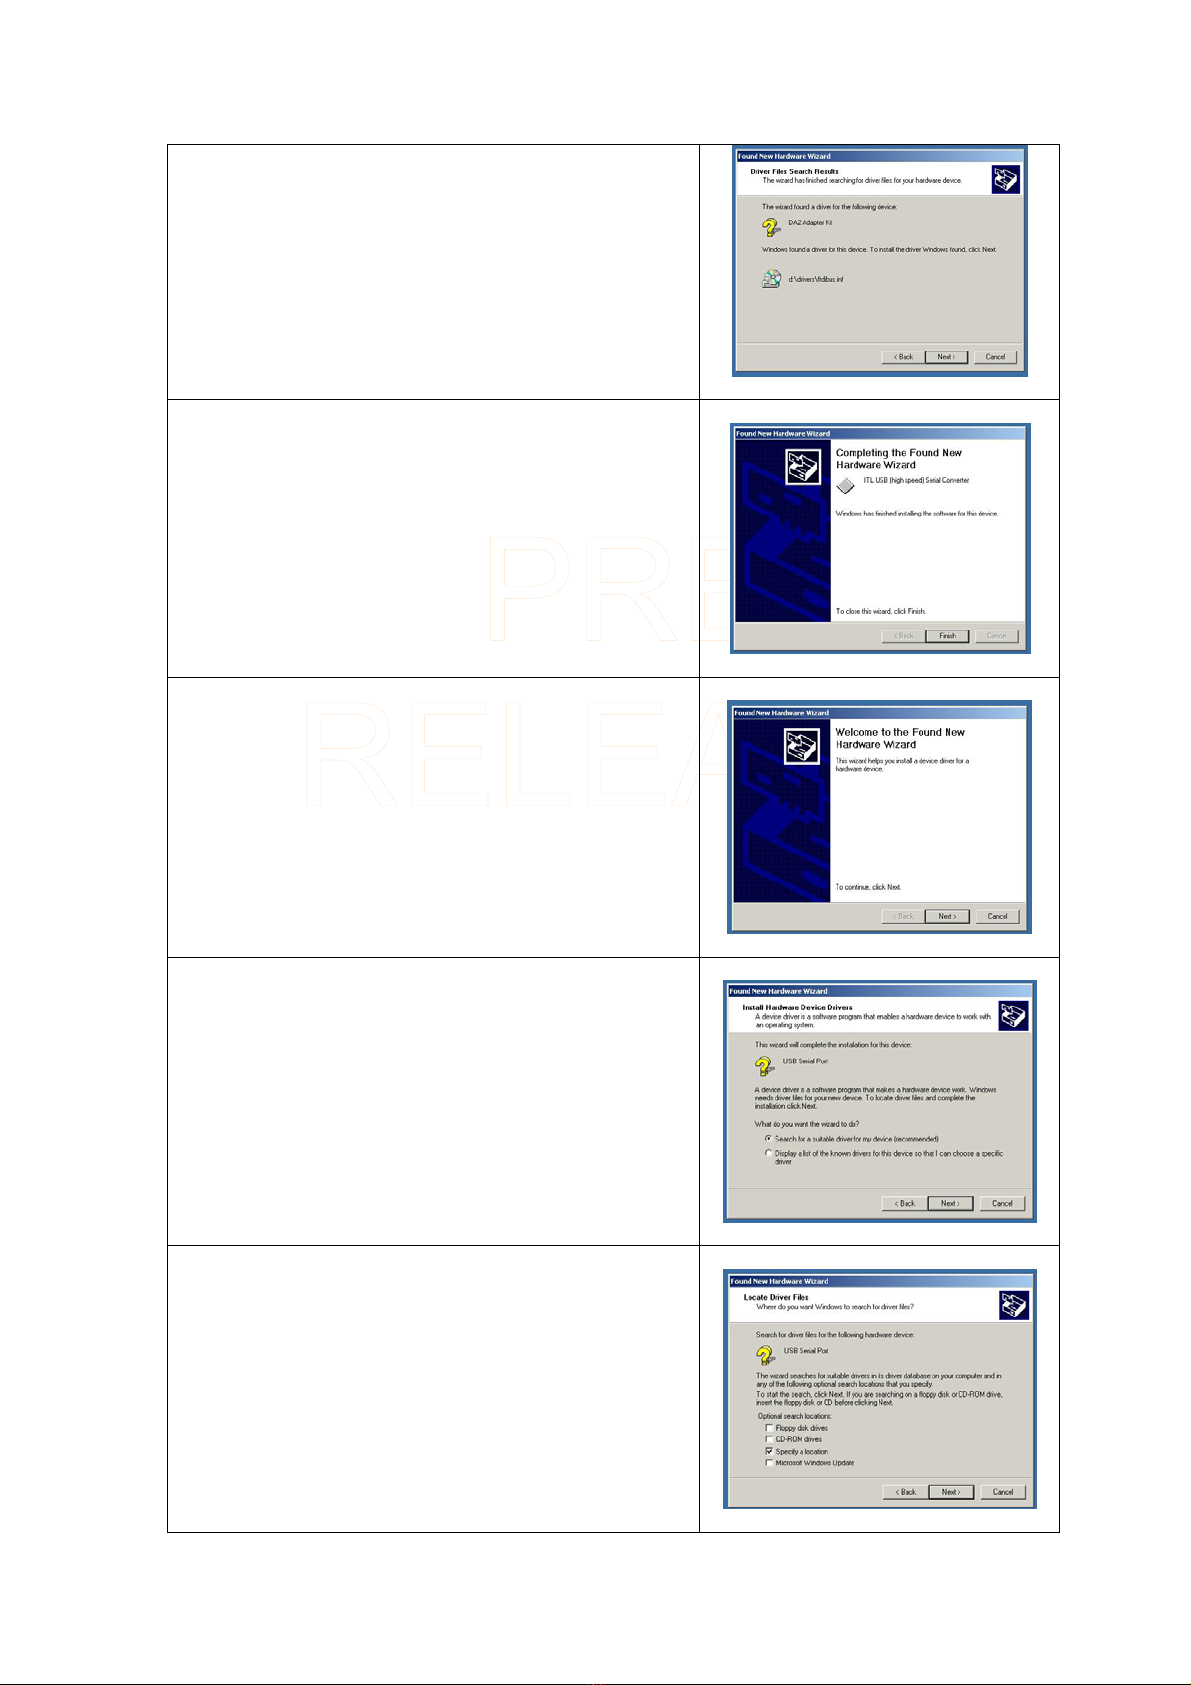
Once you have connected your DA2 the Add New
Hardware Wizard will start and the following screen will
be displayed.
Click on Next >
The following screen allows you to select a method for
finding the driver for the DA2. Make sure that “Search for
the best driver for your device” is selected.
Click on Next >
Make sure that “specify a location” is checked. In the
location box type “χ:\drivers” where χrepresents your
CD-ROM drive letter (usually D).
Click on Next >
The Add New Hardware Wizard will show that the ITL
USB (high speed) Serial Controller has been found.
Click on Next > to load the driver.
The following screen will be displayed when the driver is
loaded.
Click on Finish
Your DA2 is ready for use.
Innovative Technology Ltd Page 5 of 12

DA2 Installation Guide
2.2 Windows 2000
Before connecting your DA2 insert the DA2 CD-ROM into
your PC.
Once you have connected your DA2 a window open
showing your PC has found a new device.
When the Add New Hardware Wizard starts the following
screen will be displayed.
Click on Next >
Make sure that Search for a suitable driver for my device
is checked.
Click on Next >
On the following screen make sure that Specify a location
is checked.
Click on Next >
A browser window will open to allow you to select the
driver’s location. In the location box type “χ:\drivers”
where χrepresents your CD-ROM drive letter (usually D).
Click on Next >
A box will be displayed indicating that the driver has been
found.
Innovative Technology Ltd Page 6 of 12

DA2 Installation Guide
Click on Next >
When the driver has been successfully installed, the
following screen will be shown.
Click on Finish
A second New Hardware Wizard will open.
Click on Next >
Make sure that Search for a suitable driver for my device
is checked.
Click on Next >
On the following screen make sure that Specify a location
is checked.
Click on Next >
Innovative Technology Ltd Page 7 of 12

DA2 Installation Guide
A browser window will open to allow you to select the
driver’s location. In the location box type “χ:\drivers”
where χrepresents your CD-ROM drive letter (usually D).
Click on Next >
A box will be displayed indicating that the driver has been
found.
Click on Next >
When the driver has been successfully installed, the
following screen will be shown.
Click on Finish
Innovative Technology Ltd Page 8 of 12

DA2 Installation Guide
2.3 Windows XP (Home and Professional)
Before connecting your DA2 insert the DA2 CD-ROM
into your PC.
Once you have connected your DA2 a message bubble
will appear informing you that a new device has been
connected.
After a few moments the Add New Hardware Wizard will
start and the following screen will be displayed.
Make sure that Install the software automatically is
checked.
Click on Next >
The following screen will be displayed while the Wizard
searches for the driver. IF you have already inserted the
DA2 CD-ROM Windows XP will automatically find the
driver.
When the driver has been found a message will be
displayed informing you that the driver has not passed
Windows Logo testing. Click on Continue Anyway
When the driver has successfully loaded you will see the
following screen.
Click Finish
Innovative Technology Ltd Page 9 of 12

DA2 Installation Guide
A second Found New Hardware Wizard will now
open.
Make sure that Install the software automatically is
checked.
Click on Next >
The search window will again be displayed.
When the driver has been found a message will be
displayed informing you that the driver has not
passed Windows Logo testing. Click on Continue
Anyway
When the driver has successfully loaded you will see
the following screen.
Click Finish
Your DA2 is now ready for use.
Innovative Technology Ltd Page 10 of 12

DA2 Installation Guide
3.0 Verifying Installation and identifying the DA2 Com Port
3.1 Windows 98/98SE/Me
1. Right Click on the My Computer icon, then select
Properties.
2. Click on the Device Manager tab.
3. Locate the Port (Com & LPT) icon and click on
the + sign next to it.
4. You should see a list of your PC’s RS232, LPT
(Parallel) and the DA2 port (which will be labelled
as ITL USB Serial Port (Com
χ
) where χindicates
the Com Port number the DA2 had been installed
to).
3.2 Windows 2000
1. Right click on the My Computer icon, and then
select Properties.
2. Click on the Hardware tab then the Device
Manager button.
3. Locate the Port (Com & LPT) icon and click on
the + sign next to it.
4. You should see a list of your PC’s RS232, LPT
(Parallel) and the DA2 port (which will be labelled
as ITL USB Serial Port (Com
χ
) where χindicates
the Com Port number the DA2 had been installed
to).
3.3 Windows XP (Home and
Professional)
1. Right click on the My Computer icon, and then
select Properties.
2. Click on the Hardware tab then the Device
Manager button.
3. Locate the Port (Com & LPT) icon and click on
the + sign next to it.
4. You should see a list of your PC’s RS232, LPT
(Parallel) and the DA2 port (which will be labelled
as ITL USB Serial Port (Com
χ
) where χindicates
the Com Port number the DA2 had been installed
to).
Innovative Technology Ltd Page 11 of 12

DA2 Installation Guide
Innovative Technology Ltd Page 12 of 12
4.0 Installing additional DA2s
To install additional DA2s follow the instructions for installation for your Operating System.
You will not need to insert the DA2 CD-ROM for additional DA2s if you are using Windows XP (Home
or Professional).
5.0 Uninstalling the DA2
5.1 Windows 98/98SE/Me
1. Right Click on the My Computer icon, then select
Properties.
2. Click on the Device Manager tab.
3. Locate the Port (Com & LPT) icon and click on
the + sign next to it.
4. You should see a list of your PC’s RS232, LPT
(Parallel) and the DA2 port (which will be labelled
as ITL USB Serial Port (Com
χ
) where χindicates
the Com Port number the DA2 had been installed
to).
5. Click on the DA2 (it should now be highlighted).
6. Click on the REMOVE button. Follow the on
screen instructions.
5.2 Windows 2000
1. Right click on the My Computer icon, and then
select Properties.
2. Click on the Hardware tab then the Device
Manager button.
3. Locate the Port (Com & LPT) icon and click on
the + sign next to it.
4. You should see a list of your PC’s RS232, LPT
(Parallel) and the DA2 port (which will be labelled
as ITL USB Serial Port (Com
χ
) where χindicates
the Com Port number the DA2 had been installed
to).
5. Click on the DA2 (it should now be highlighted).
6. Right click on the DA2 and select uninstall. Follow
the on screen instructions.
5.3 Windows XP (Home and
Professional)
1. Right click on the My Computer icon, and then
select Properties.
2. Click on the Hardware tab then the Device
Manager button.
3. Locate the Port (Com & LPT) icon and click on
the + sign next to it.
4. You should see a list of your PC’s RS232, LPT
(Parallel) and the DA2 port (which will be labelled
as ITL USB Serial Port (Com
χ
) where χindicates
the Com Port number the DA2 had been installed
to).
5. Right click on the DA2 and select uninstall. Follow
the on screen instructions.
Table of contents