Intralot Genion II PN323 User manual

User Manual
Genion II
[PN223, PN323,
PN224, PN324]
Version 4.0
Confidential

Confidential | Final
Information Owner: K. Vrahatis
2
of 20
USER MANUAL
Genion II [PN223, PN323, PN224, PN324]
Approval, Distribution, and Revision History
Version
Date
Author(s)
Content
Reviewer(s)
QA
Reviewer
Information
Owner
Approved for
Release by
Comments
1.0
05.01.2018
T. Lekkas
L. Papanastasiou
N. Angelopoulos
T. Lekkas
K. Vrahatis
S. Rentifis
FirstRelease
2.0
26.04.2018
T. Lekkas
L. Papanastasiou
T. Lekkas
K. Vrahatis
S. Rentifis
Updated:FCCRFRadiationExposure
Statement,p.5
3.0
10.05.2018
T. Lekkas
L. Papanastasiou
A. Diamandis
T. Lekkas
K. Vrahatis
S. Rentifis
Updated:FCCCaution, p.5
4.0
15.05.2018
T. Lekkas
L. Papanastasiou
T. Lekkas
K. Vrahatis
S. Rentifis
Updated:Operating&Environmental
Conditions–Dimensions–Technical
Specifications
Code: 6.500.010
Distribution List: INTRALOT S.A.
QMS.PR.1.F.13 | User Manual Template v2.0

Genion II [PN223, PN323, PN224, PN324] | v4.0
Date: 15.05.2018
Confidential | Final
Information Owner: K. Vrahatis
3
of 20
INTRALOT, 2014 All rights reserved.
All copyright, intellectual and industrial rights in this document and in the technical knowledge
it contains are owned by INTRALOT and/or their respective owners.
This document is made available to the end users only for their internal use.
No part of this document nor any data herein may be published, disclosed, copied,
reproduced, redistributed by any form or means, electronically or mechanically, or used for
any other purpose whatsoever without the prior written approval of INTRALOT.
All trademarks and copyrights mentioned herein are the property of INTRALOT and/or their
respective owners.
Any rights not expressly granted herein are reserved.

Genion II [PN223, PN323, PN224, PN324] | v4.0
Date: 15.05.2018
Confidential | Final
Information Owner: K. Vrahatis
4
of 20
Table of Contents
1CONFORMITY, COMPLIANCE AND SAFETY ...................................................................................5
2SAFETY AND PRECAUTIONS............................................................................................................6
3OVERVIEW...........................................................................................................................................8
4GETTING STARTED............................................................................................................................9
4.1 UNPACK THE EQUIPMENT................................................................................................................9
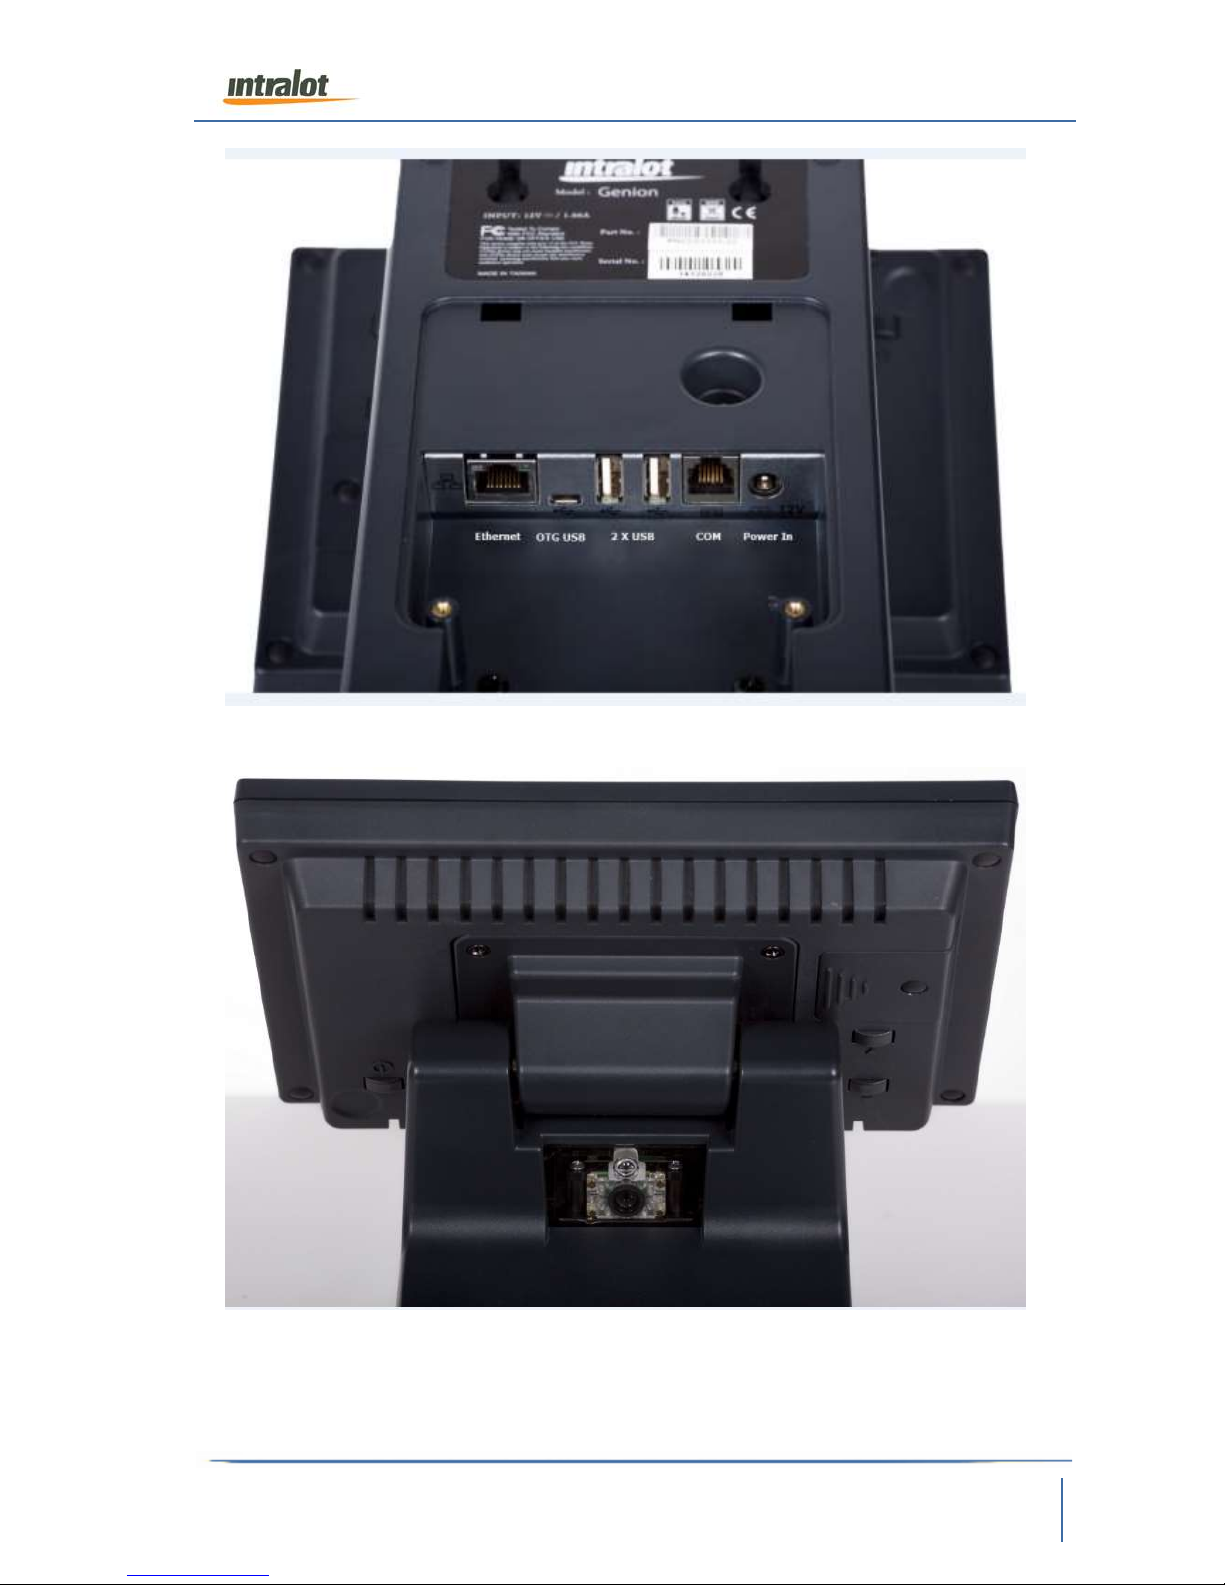
4.2 PORTS AND MODULES ....................................................................................................................9
5PREPARE TERMINAL FOR USE......................................................................................................11
5.1 REMOVE GENION SD CARD...........................................................................................................11
5.2 INSTALL GENION IMAGE ................................................................................................................12
5.3 PREPARE GENION ........................................................................................................................13
6TEST GENION....................................................................................................................................14
6.1 DIAGNOSTICS SCREEN..................................................................................................................14
6.2 ETHERNET PING...........................................................................................................................15
6.3 MAC ETHERNET ..........................................................................................................................15
6.4 MEMORY TEST.............................................................................................................................15
6.5 BARCODE SCANNER .....................................................................................................................15
6.6 USB HOST TEST..........................................................................................................................15
6.7 IRBEAM TEST...............................................................................................................................16
6.8 TOUCH PANEL..............................................................................................................................16
6.9 BACKLIGHT TEST..........................................................................................................................16
6.10 TFT PANEL TEST .........................................................................................................................17
6.11 AMBIENT SENSOR TEST................................................................................................................17
6.12 SAVE LOG ....................................................................................................................................17
7TROUBLESHOOTING .......................................................................................................................18
8OPERATING & ENVIRONMENTAL CONDITIONS –DIMENSIONS –TECHNICAL
SPECIFICATIONS ......................................................................................................................................19
Table of Figures
FIGURE 1: SD CARD PORT.............................................................................................................................. 9
FIGURE 2: I/O BOARD ................................................................................................................................... 10
FIGURE 3: BARCODE SCANNER MODULE........................................................................................................ 10
FIGURE 4: GENION DIAGNOSTICS SCREEN..................................................................................................... 14
FIGURE 5: TECHNICAL SPECIFICATIONS ......................................................................................................... 19

Genion II [PN223, PN323, PN224, PN324] | v4.0
Date: 15.05.2018
Confidential | Final
Information Owner: K. Vrahatis
5
of 20
1Conformity, Compliance and Safety
The current Manual for the Genion II [PN223, PN323, PN224, PN324] lottery terminal is
provided in order to guide the authorized service personnel throughout the installation of
these terminals in the Lottery shops, agencies or in any other public environment.
This equipment has been tested and found to comply with the limits for a Class B digital
device, pursuant to Part 15 of the FCC Rules. These limits are designed to provide
reasonable protection against harmful interference in a residential installation. This
equipment generates, uses and can radiate radio frequency energy and, if not installed
and used in accordance with the instructions, may cause harmful interference to radio
communications. However, there is no guarantee that interference will not occur in a
particular installation. If this equipment does cause harmful interference to radio or
television reception, which can be determined by turning the equipment off and on, the
user is encouraged to try to correct the interference by one of the following measures:
Reorient or relocate the receiving antenna.
Increase the separation between the equipment and receiver.
Connect the equipment into an outlet on a circuit different from that to which the
receiver is connected.
Consult the dealer or an experienced radio/TV technician for help.
FCC Caution
Any changes or modifications not expressly approved by the party responsible for
compliance could void the user's authority to operate this equipment.
This device complies with Part 15 of the FCC Rules. Operation is subject to the
following conditions:
(1) This device may not cause harmful interference
(2) This device must accept any interference received, including interference that may
cause undesired operation.
(3) FCC ID: 2ADEN-INTRALOT-GNN2 doesn’t include RF TX function except NFC、
WIFI
FCC RF Radiation Exposure Statement
This Transmitter must not be co-located or operating in conjunction with any other
antenna or transmitter.

Genion II [PN223, PN323, PN224, PN324] | v4.0
Date: 15.05.2018
Confidential | Final
Information Owner: K. Vrahatis
6
of 20
2Safety and Precautions
Attention:
Please read the safety warnings and the precautions provided in the
following paragraphs, to ensure that you use your terminal safely. Do not
attempt to use the terminal in any way not described in this manual.
Warning:
Failure to follow these recommendations could result in serious injury to
the personnel or in damage to the terminal.
Electrical Safety Warning
Warning:
High Voltage, disconnect power supply and power off UPS before
moving or servicing
Follow all applicable national regulations when making power
connections and grounding or mounting hardware.
Carefully examine the working area for possible hazards such as moist
floors, ungrounded power extension cables and missing safety
grounds.
Keep always the equipment and site area clean and free of dust.
The power cables must be disconnected before installing or moving
the equipment.
Electrostatic Discharge Warning
Keep the equipment in the original packaging material and sheltered in
the carton box until its installation.
It is always a good practice not to wear loose clothing, jewelry or other
items that could get caught in the equipment.
Do not handle the equipment unnecessarily.
Safety Instructions
The environment for use must be within the range specified in the environment
specifications.
Follow all applicable regulations when making power connections and
grounding or mounting hardware.
Avoid using power extension cables.
Always keep the equipment and site area clean and free of dust.
Always use the power ON/OFF switch to turn the equipment on and off.
Disconnect any power cables prior to moving the equipment.
Locate a power outlet near the equipment for quick and easy removal of the
power plug in case of emergency.

Genion II [PN223, PN323, PN224, PN324] | v4.0
Date: 15.05.2018
Confidential | Final
Information Owner: K. Vrahatis
7
of 20
Make sure that the equipment is connected to a grounded power outlet and do
not use ungrounded power extension cables.
In case the equipment develops smoke, unusual odors or makes strange
noises, immediately shut it down, unplug the power cord and contact the Help
Desk.
Take care to remove excessive tickets/receipts from the printer’s paper output
prior to printing.
Warning
Do not spill liquids on the terminal or expose it in rain or moisture. Risk of fire or
electric shock.
Do not try to connect the equipment with devices other than those approved for
the designated use.
Do not block the equipment’s ventilation holes and take care to provide
adequate space for ensuring proper ventilation.
Do not squeeze the power cords or place anything heavy on them.
Do not connect/disconnect any cables from the terminal or its peripheral devices
when in operation.
Do not turn off the terminal while the printer operates.
Do not unplug the power cord when the equipment operates, unless in case of
emergency.
Do not block the paper output of the printer as this can cause the paper to jam.
DANGER!
High-voltage inside the terminal. To reduce the risk of electric shock, do
not remove the cover. No user-serviceable parts inside. Refer servicing to
qualified service personnel.
CAUTION
Replace used batteries only with the same type. Risk of explosion
when using an incorrect or not approved type.
Protect the environment by disposing used batteries according to
the instructions.

Genion II [PN223, PN323, PN224, PN324] | v4.0
Date: 15.05.2018
Confidential | Final
Information Owner: K. Vrahatis
8
of 20
3Overview
Genion II is a compact and multi-functional terminal and a paperless access point for
players that is ideally small for any store counter size.
Main features include:
Ticket Checker: Scans tickets for winnings
Transaction Display: Displays useful information during transactions.
Advertising Display: when idle, displays promotional /informative videos, images
and animated graphics.
Player Access Point: Using their smartphone, contactless card, smartcard and
voucher, layers gain access to: 1. player account, 2. players digital wallet, 3. player
loyalty schemes
Autonomous Retailer Terminal: As a standalone device, it serves as a selling
point for instant tickets. When connected to a printer, it offers lottery quick picks
and players may autonomously validate instant tickets.

Genion II [PN223, PN323, PN224, PN324] | v4.0
Date: 15.05.2018
Confidential | Final
Information Owner: K. Vrahatis
9
of 20
4Getting Started
4.1 Unpack the equipment
Please make sure that the illustrated accessories are included in the packages prior to
testing the equipment.
Genion II Package
Power supply adaptor
Power cable
Genion II
4.2 Ports and Modules
Figure 1: SD Card Port

Genion II [PN223, PN323, PN224, PN324] | v4.0
Date: 15.05.2018
Confidential | Final
Information Owner: K. Vrahatis
10
of 20
Figure 2: I/O Board
Figure 3: Barcode Scanner Module

Genion II [PN223, PN323, PN224, PN324] | v4.0
Date: 15.05.2018
Confidential | Final
Information Owner: K. Vrahatis
11
of 20
5Prepare Terminal for Use
5.1 Remove Genion SD card
Turn the Genion so that the OOBT
technician has the back side in front
of him. Locate on the left side the SD
Card slot cover and remove the
Rubber cover. A Philips Screw will be
revealed.
Unscrew the Philips Screw with a
corresponding Screwdriver and
reveal the SD card slot along with the
SD card inside it.
Press gently on the back of the card
with your finger (press from the left
side towards the right side to release
the card from its socket). The SD
card is ready to have the Image
installed.
The needed equipment for the Image installation is a card reader that can accept SD
cards of normal size, either portable or on a laptop socket.

Genion II [PN223, PN323, PN224, PN324] | v4.0
Date: 15.05.2018
Confidential | Final
Information Owner: K. Vrahatis
12
of 20
5.2 Install Genion Image
1 All needed software is provided by Intralot in a USB stick carrying the Genion Image
file and the application is called Win32DiskImager.
2 Identify the executable file Win32DiskImager.exe in the corresponding folder and run
it.
3 Click on the blue folder and locate the file Genion-Field.img, if it is compressed into
a file named Genion-Field.img.gz extract it. It is located on the provided USB stick.
The file size of the extracted Image file is around 4GB.
4 Once the file is selected from its location you should see the screen on the right.
5 Select the proper device where the SD card is located and press Write.
6 The time needed for an SD to be written, is approximately 6 minutes.
7 Once Image file installation is completed follow the procedure described in the
previous paragraph backwards to secure back into position the SD card.

Genion II [PN223, PN323, PN224, PN324] | v4.0
Date: 15.05.2018
Confidential | Final
Information Owner: K. Vrahatis
13
of 20
5.3 Prepare Genion
1 Plug the Genion to the mains power.
2 Remove back cover for ease of access.
3 Plug the provided USB stick with Diagnostics in a USB port at the back of the
Genion. Power on the Genion.
4 Wait for the Genion to show the diagnosticsmenu. The Genion is ready for testing.

Genion II [PN223, PN323, PN224, PN324] | v4.0
Date: 15.05.2018
Confidential | Final
Information Owner: K. Vrahatis
14
of 20
6Test Genion
6.1 Diagnostics Screen
Upon plugging in the Diagnostics USB flash, and powering up the machine the following
screen appears.
Using single mode you perform a single test, Batch mode, all the tests and Burn
in Mode (which will not be used)
Using Config you choose which tests will be performed in the OOBT, Network will
present a form to fill with the network connections (not to be used in OOBT) and
reset to reset the sequence of the tests.
Shutdown shuts down the Genion.
Figure 4: Genion Diagnostics Screen

Genion II [PN223, PN323, PN224, PN324] | v4.0
Date: 15.05.2018
Confidential | Final
Information Owner: K. Vrahatis
15
of 20
6.2 Ethernet Ping
Description
Tests the Ethernet port.
Steps
1. Plug the special Loopback Ethernet cable (see Error! Reference
source not found. Error! Reference source not found.) to the
LAN port at the back of the device.
2. Touch the [Ethernet Ping] button.
3. Note down the result.
6.3 MAC Ethernet
Description
Tests the MAC Address.
Steps
1. Touch the [MAC Ethernet] button.
2. Note down the result.
6.4 Memory Test
Description
Tests the device’s built-in memory.
Steps
1. Touch the [Memory Test] button.
2. Note down the result (Pass/Fail)
6.5 Barcode Scanner
!!!ATTENTION!!! To be able to perform this test you need to print a test barcodes using a
laser printer.
Description
Tests the scanning ability of the integrated barcode reader.
Steps
1. Touch the [Barcode Test] button.
2. When prompted, scan the PDF-417 barcode.
3. When prompted, scan the QR test barcode.
4. When prompted, scan the interleaved test symbol barcode.
5. If any of the above tests failed, repeat the test. Then, note down
the result.
6.6 USB Host Test
Description
Tests the USB host ports.
Steps
1. Insert three formatted USB sticks into the device’s USB ports. The
third will be connected via a USB OTG cable
2. Touch the [USB Test] button and wait for the test to complete.
3. Note down the result.

Genion II [PN223, PN323, PN224, PN324] | v4.0
Date: 15.05.2018
Confidential | Final
Information Owner: K. Vrahatis
16
of 20
6.7 IRBeam test
Description
Tests the IR led and sensor.
Steps
1. Touch the [IRBeam Test] button.
2. Place your hand under the camera, in order to block the beam.
3. Note down the result.
6.8 Touch Panel
Description
Tests the touch screen functionality.
Steps
1. Touch the [Touch Panel] button.
2. The screen should look like this:
Touch the screen in the four designated circles.
On every corner you press the coordinates are shown and the circle
becomes green.
3. Upon completion the test will exit.
4. Note down the result.
6.9 Backlight Test
Description
Tests the monitor’s backlight.
Steps
1. Touch the [Backlight Test] button. The screen turns white and
the backlight loops between four (4) levels of intensity.
2. Verify that there are four (4) clearly distinguishable intensity levels
and when prompted respond within 10 seconds (else, the test will
result in an ‘UNDETERMINED’ status).
3. Note down the result.

Genion II [PN223, PN323, PN224, PN324] | v4.0
Date: 15.05.2018
Confidential | Final
Information Owner: K. Vrahatis
17
of 20
6.10 TFT Panel Test
Description
Tests the LCD screen for bad pixels.
Steps
1. Touch the [TFT Panel Test] button. The screen displays five (5)
colors (red, green, blue, white and black) in succession.
2. Verify that there are no visible bad pixels and when prompted
respond within 10 seconds (else, the test will result in an
‘UNDETERMINED’ status).
3. Note down the result.
6.11 Ambient Sensor Test
Description
Test the ambient light sensor.
Steps
1. Make sure that the testing facility is
well lit.
2. Touch the [Ambient sensor Test]
button.
3. Use your finger to cover the light sensor
located next to the power led. Keep
your finger on the light sensor until the
test completes.
4. Note down the result.
6.12 Save log
Use this button to save the log of the aforementioned tests

Genion II [PN223, PN323, PN224, PN324] | v4.0
Date: 15.05.2018
Confidential | Final
Information Owner: K. Vrahatis
18
of 20
7Troubleshooting
Symptom
Possible cause
Suggested action
Does not start
The power cable is either
loosely connected or
damaged.
Reconnect the power cable to both
the terminal and the mains socket. If
the problem remains, replace the
power cable and recheck.
The terminal’s power supply
unit has a fault.
Check whether the LED on the
power supply unit is lit. If not, then
you may need to replace the power
supply unit.
Does not display an
image
The terminal has ‘frozen’.
Press and hold the terminal’s power
switch for about 4 seconds to power
off. Wait for 30 seconds, then power
back on.
Shuts down or reboots
while in operation
The terminal’s power supply
unit has a fault.
Replace the power supply unit and
recheck.
The terminal or its
power supply unit
makes an abnormal
noise and/or emits a
burning odor
A severe fault has occurred.
Immediately power off and remove
the terminal from the mains socket.
Send the terminal along with its
power supply unit to the Repair Lab.
Fails to read some
play slips or the
barcodes of some
tickets
The camera’s reading tray is
not uniformly lit.
Reposition the device away from a
strong or reflective light source.
The paper is severely
wrinkled or folded.
Flatten the paper and try scanning
again.
The protective glass in front
of the image sensor is dirty.
Clean the glass with a soft cloth.
The image displayed is
faded
The display’s brightness
and/or contrast may be set
too low.
Use the display’s control buttons to
increase the brightness and/or
contrast.
The speakers make no
sound.
The volume is too low.
Raise the volume.
The sound subsystem has
‘hanged’.
Power off the terminal, wait 30
seconds and then power back on.
The touch screen does
not respond as it
should.
The touch screen is not
properly calibrated.
Use the Diagnostics tool’s specific
function to calibrate the touch
screen.

Genion II [PN223, PN323, PN224, PN324] | v4.0
Date: 15.05.2018
Confidential | Final
Information Owner: K. Vrahatis
19
of 20
8Operating & Environmental Conditions –
Dimensions –Technical Specifications
Figure 5: Technical Specifications
(1) Note: FCC ID: 2ADEN-INTRALOT-GNN2 doesn’t include RF TX function except NFC
WIFI

INTRALOT S.A., 64 Kifissias Ave. & 3 PremetisStr, 151 25, Athens, Greece
Tel: +30 210 6156000 | Fax: +30 210 6106800
www.intralot.com
This manual suits for next models
3
Table of contents
Other Intralot Touch Terminal manuals