Inventini PASCAL BALL User manual

KULA PASCAL
INSTRUKCJA
www.inventini.com
PASCAL BALL - USER’S MANUAL
PASCAL KUGEL - AUFBAUANLEITUNG

INSTRUKCJA MONTAŻU KULI PASCAL
2
WARUNKI
BEZPIECZEŃSTWA
ZALECENIA
1.
2. Podczas silnego wiatru zaleca się bezwzględnie złożenie produktu.
3. Trzymaj produkt z dala od źródeł ciepła i otwartego ognia. Nie
umieszczaj blisko kuli żadnych źródeł ciepła, mogą doprowadzić
do stopienia się materiału przy wysokich temperaturach.
4. Na specjalne zamówienie istnieje możliwość wykonania powłoki
z tkaniny trudnopalnej, spełniającej wymogi normy B1.
1. Przed przystąpieniem do rozłożenia należy dokładnie zapoznać się
z poniższą instrukcją montażu.
2. Podczas rozkładania i składania należy zachować ostrożność, aby
zapobiec obrażeniom ciała i innym szkodom.
Przed złożeniem produktu należy go dokładnie wyczyścić. Ewentualne
zabrudzenia należy usunąć z tkaniny za pomocą zwilżonej w ciepłej
wodzie szmatki. Nie należy używać myjek wysokociśnieniowych.
3.
4. Przed rozpoczęciem składania należy upewnić się, że produkt
jest suchy. Jeśli jednak z przyczyn od użytkownika niezależnych
(np. pogody) zostanie złożony wilgotny, należy najszybciej jak to
możliwe ponownie go rozłożyć w celu całkowitego wysuszenia.
WARUNKI
GWARANCJI
Warunki gwarancji pobierzesz na stronie internetowej producenta.
Kula stałociśnieniowa nie jest przeznaczona do użytkowania podczas
ekstremalnych warunków pogodowych takich jak silny wiatr, silne
odpady deszczu lub śniegu, burze, gradobicia itp.
5. Przy występujących porywach wiatru należy systematycznie
sprawdzać osadzenie wszystkich kotew.
6. Pod żadnym pozorem nie należy blokować zaworów bezpieczeństwa.
7. Do pompowania produktu używaj wyłącznie pompki dostarczonej przez
producenta. Stosowanie innych pompek grozi uszkodzeniem produktu.
UWAGA Powietrze zamknięte w produkcie zmienia swą objętość wraz ze
zmianami temperatury. Wysoka temperatura powoduje wzrost objętości
powietrza - produkt zwiększa swoją sztywność. Niska temperatura
powoduje zmniejszenie objętości powietrza - produkt traci sztywność.

www.inventini.com
PL
3
INSTRUKCJA MONTAŻ
1. Wybierz odpowiednie miejsce do rozłożenia kuli.
3. Rozłóż stopy podstawy stojaka i wkręć zewnętrzne śruby (Rys. 4).
4. Złóż stojak, wkładając kolejno elementy jeden w drugi.
Kolejno są to: podstawa stojaka z ramionami, długa rura, krótka rura, talerz.
5. Przypnij pierwszy koniec linki do oczka z boku kuli. Powtórz czynność
ze wszystkimi linkami.
6. Upewnij się, że zawór pompowania jest w pozycji „CLOSED” (Rys. 5).
7. Podłącz pompę i pompuj produkt aż do uzyskania minimalnej sztywności (Rys. 6).
8. W pierwszej kolejności odłącz wąż pompki od zaworu, następnie
wyłącz ją (w przeciwnym razie ucieknie część powietrza) (Rys. 7).
9.
Jeśli kula ma oświetlenie, zepnij końcówki przewodów głównego
i zasilacza, i przypnij zasilacz do stojaka za pomocą rzepów (Rys. 9, Rys. 10).
10.
Przypnij drugi koniec linki do oczka umieszczonego na stopie stojaka.
Powtórz czynność ze wszystkimi linkami (Rys. 8).
W przypadku wykorzystania kuli na zewnątrz:
11.
Umocuj stopy stojaka za pomocą kotew kątownikowych (Rys. 11).
12. Jako alternatywę dla sposobu mocowania opisanego w pkt. 9 i 11
możesz zastosować mocowanie drugich końców linek do wbitych
do ziemi kotew kątownikowych (Rys. 12)
2. Jeśli kula ma oświetlenie, przeciągnij przewód zasilający przez górną
rurę stojaka (krótszą) i talerz, tak aby końcówka wystawała ze środka
talerza (Rys. 1). Zepnij końcówki przewodów głównego i kuli (Rys. 2).
b.
a.
Przypnij poszycie do talerza za pomocą karabinka (Rys. 3).
Rys. 1
Rys. 7
Rys. 6
Rys. 4
Rys. 5
Rys. 2
Rys. 9 Rys. 10
Rys. 8
Rys. 3
CLOSED OPEN
Rys. 12Rys. 11

INSTRUKCJA MONTAŻU KULI PASCAL
4
NAPRAWA
WKŁADU USZKODZENIE WKŁADU:
Mały otwór można naprawić, wykorzystując zestaw naprawczy
składający się z kleju i folii dołączony do produktu.
W razie uszkodzenia wkładu produktu:
1. Zlokalizuj uszkodzenie.
2. Odtłuść powierzchnię.
3. Nałóż klej w miejscu wystąpienia dziury, uważając, aby klej nie
dostał się do środka produktu.
4. Przyłóż foliową łatkę.
5. Odczekaj 60 minut, aby klej w pełni związał.
Istnieje możliwość odesłania produktu do producenta.
Gwarantujemy odpłatny serwis uszkodzeń mechanicznych.
DEMONTAŻ
1. Ustaw zawór w pozycji OPEN.
3. Odepnij linki odciągowe lub / i wyjmij kotwy.
4. Odepnij poszycie od talerza.
5. Jeśli kula posiada oświetlenie rozepnij i wyjmij przewody. Odepnij zasilacz.
6. Rozłóż elementy stojaka. Odkręć zewnętrzne śruby stóp podstawy stojaka.
7. Spakuj całość do toreb.
2.
Aby usunąć powietrze, możesz skorzystać z:
• pompki, podłączając ją w konfiguracji „wypompuj”. Podczas usuwania
powietrza za pomocą pompki, nie ma konieczności ustawiania
zaworu w pozycji OPEN, pompka wykonuje tę czynność sama,
jednak wykonanie tej czynności znacznie przyspiesza proces
usuwania powietrza.
• ręcznego usuwania powietrza. W tym celu zablokuj zawór
w pozycji OPEN.

www.inventini.com
PL
OŚWIETLENIE OŚWIETLENIE I ŁADOWANIE
1. Czas świecenia produktu wynosi do 8 godzin ciągłej pracy w zależności
od temperatury otoczenia i stopnia naładowania.
2. Produkty z oświetleniem wewnętrznym wyposażone są w akumulatory.
Ładowanie odbywa się za pomocą dołączonej do zestawu ładowarki.
3. Czas ładowania do 100% wynosi ok. 10h.
UŻYTKOWANIE / ŻYWOTNOŚĆ BATERII
1. Nie należy przekraczać 8 -godzinnego czasu pracy bez ładowania
produktu.
Baterie w akumulatorach powinny być naładowane również podczas
magazynowania produktu.
UTYLIZACJA
Elektryczne/elektroniczne produkty nie są odpadami z gospodarstwa
domowego!
Produkt należy utylizować po zakończeniu jego eksploatacji, zgodnie
z obowiązującymi przepisami prawnymi.
Należy usunąć wszystkie włożone baterie/akumulatory i pozbyć się ich
w odpowiedni sposób, oddzielnie od produktu. Konsument jest prawnie
zobowiązany (odpowiednimi przepisami dotyczącymi baterii) do zwrotu
wszystkich zużytych baterii i akumulatorów; utylizacja wraz z odpadami
z gospodarstw domowych jest zabroniona.
Baterie i akumulatory zawierające substancje szkodliwe
oznaczone są tym symbolem, oznaczającym zakaz pozbywania
się ich wraz z odpadkami domowymi.
Zużyte akumulatory/baterie można bezpłatnie oddawać na lokalne
wysypiska śmieci, do oddziałów firmy producenta lub wszędzie tam,
gdzie sprzedawane są baterie/akumulatory.
Dostosowując się do powyższych zaleceń, spełniacie Państwo wszystkie
odpowiednie wymogi prawne i przyczyniacie się do ochrony środowiska.
2.
5

SAFETY RULES
RECOMMENDATIONS
1. Inflatable ball is not adapted to severe weather conditions such
as strong winds, heavy rains, storms or hailstorms.
2. In case of strong winds, disassemble the ball.
3. You shouldn’t leave your ball unattended.
4. Keep the ball away from sources of heat and open flames. Please
do not place any sources of heat direclty at the ball beacuse the
materials can melt at high temperatures.
5. By special order, you can have your ball made of flame retardant
fabric (which meets the standards of B1 requirements).
1. Read these instructions carefully before you get to work.
2. Be cautious while setting up the ball to avoid being hurt and prevent
other damage.
3. Before disassembling the structure, the ball must be thoroughly
cleaned. Any spots or stains on the fabric should be removed
immediately with a warm damp cloth. Do not use pressure washers.
Follow the instructions on the label.
4. Storing a dirty or damp ball can result in a breakdown of
the materials as fabrics tend to mold, mildew and/or rot. Before
putting your ball in its transport bag for storage, make sure
it is clean and dry. Store it in a dry place to avoid moisture
contamination. In case of bad weather, repack your ball to avoid
damage, but as soon as it’s possible, unpack it once again to let it dry.
5. With recurring gusts of wind, check anchoring systematically.
6. Do not block the safety valves in any case.
7. Only use the pump supplied by the manufacturer to pump the product.
The use of other pumps risks damaging the product.
GENERAL TERMS
OF WARRANTY
General terms of warranty can be downloaded from the
manufacturer’s website.
6
CAUTION The air in the product changes it’s volume under the influence
of temperature. High temperature increases the volume of air.
The product becomes more taut. Low temperature reduces the volume
of air. The product becomes less taut.
PASCAL BALL ASSEMBLY INSTRUCTIONS

www.inventini.com
EN
7
INSTRUCTION ASSEMBLY
1. Choose a flat even spot where you want to pitch the product.
3. Unfold the feet of the stand base and screw in the outer screws (Fig. 4).
4. Assemble the stand by inserting the components one by one into the other.
The following are successively: stand base with feet, long tube, short tube, plate.
5. Clip the first end of the rope to the eyelet on the side of the ball.
Repeat the action with all the ropes.
6. Make sure the pump valve is in the position CLOSED (Fig. 5).
7. Use the pump to inflate the product until it gets its shape (minimally taut) (Fig. 6).
8. Disconnect the pipe of the pump from the product, then turn the pump off
(otherwise the air will escape from product) (Fig. 7).
9.
If the ball has a lighting, connect the plug of the main power cord to that of power
supply, then pin the power supply to the stand with Velcro straps (Fig. 9, Fig. 10).
10.
Clip the second end of the rope to the eyelet located on the foot of the stand.
Repeat the action with all the ropes (Fig. 8).
When using the ball outdoors:
11.
Anchor the feet of the stand with angle anchors (Fig. 11).
12. As an alternative to the attachment method described in points 9 and 11,
you can attache the second ends of the ropes to eyelets of the angle anchors
driven into the ground (Fig. 12)
2. If the ball has lighting pull the main power cord through the top tube
(shorter one) of the stand and the plate, so that the plug protrudes from
the center of the plate (Fig. 1). Connect the plug of main power cord to that
of the ball (Fig. 2).
b.
a.
Clip the cover to the plate with a carabiner (Fig. 3).
Fig. 1
Fig. 7
Fig. 6
Fig. 4
Fig. 5
Fig. 2
Fig. 9 Fig. 10
Fig. 8
Fig. 3
CLOSED OPEN
Fig. 12Fig. 11

8
DISASSEMBLY
1. Block the pump valve in the OPEN position.
3. Detach the ropes or / and remove the anchors.
4. Detach the cover from the plate.
5. If the ball has lighting unplug and remove the wires. Unplug the power supply.
6. Unfold the stand components. Remove the outer foot screws of the stand base.
7. Pack product into the transport bags.
2.
To remove the air from the product, you can:
• use the pump in ‚pump out’ mode. When you remove the air from the
product using a pump, there is no need to block the valve in the
OPEN position as the pump does it automatically. Anyway, by doing
it you will fasten the process of removing the air.
• do it manually by blocking the pump valve in the OPEN position.
REPAIR DAMAGE
A small hole can be repaired by using repair kit - glue and foil.
If the product foil is damaged:
1. Locate the damage.
2. Degrease the surface.
3. Apply the adhesive to the hole, taking care that the adhesive does
not get inside the product.
4. Apply the foil patch.
5. Wait 60 minutes for the adhesive to fully bond.
There is a possibility of sending the product back to the manufacturer.
We offer paid service for mechanical damage.
PASCAL BALL ASSEMBLY INSTRUCTIONS

www.inventini.com
EN
9
LIGHTS LIGHTING ANG CHARGING
1. The product lighting time is up to 8 hours of continuous operation
depending on the ambient temperature and the degree of charge.
2. Products with internal lighting are equipped with accumulators.
Charging takes place using the charger included with the kit.
3. The charging time up to 100% is about 10 hours.
USE AND BATTERY LIFE
1. Do not exceed the 8 hour usage period without charging the product.
The batteries should be charged even when the product is stored.2.
UTILIZATION
Electrical / electronic products are not domestic waste!
Dispose of the product after its use in accordance with applicable law.
Remove all inserted batteries / accumulators and dispose of them
correctly, separately from the product.
The consumer is legally obliged (in accordance with the relevant
regulations regarding batteries) to return all used batteries and
accumulators; disposal along with household waste is prohibited.
Batteries and accumulators containing harmful substances
are marked with this symbol. This means that they can not
be disposed of with household waste.
Used batteries / accumulators can be transferred to local waste
disposal sites, producer’s branches or wherever batteries / accumulators
are sold.
By following the above recommendations, you meet all relevant legal
requirements and contribute to environmental protection.

10 PASCAL KUGEL MONTAGEANLEITUNG
BEDINGUNGEN
SICHERHEIT
1.
2. Bei starkem Wind wird unbedingt empfohlen, das Produkt abzubauen.
3. Die aufgebaute Kugel sollte nicht unbeaufsichtigt gelassen werden.
5. Auf speziellen Wunsch besteht die Möglichkeit, die Zeltbeschichtung
aus flammhemmendem Stoffgemäß der B1-Norm herzustellen.
4. Halten Sie das Produkt von Wärmequellen und offenen Flammen fern.
Stellen Sie keine Wärmequellen in die Nähe der Kugel.
Sie können das Material bei hohen Temperaturen schmelzen.
Die aufblasbare Kugel ist nicht für den Gebrauch bei extremen
Wetterbedingungen wie starkem Wind, starkem Regen oder Schnee,
Sturm, Hagel usw. geeignet.
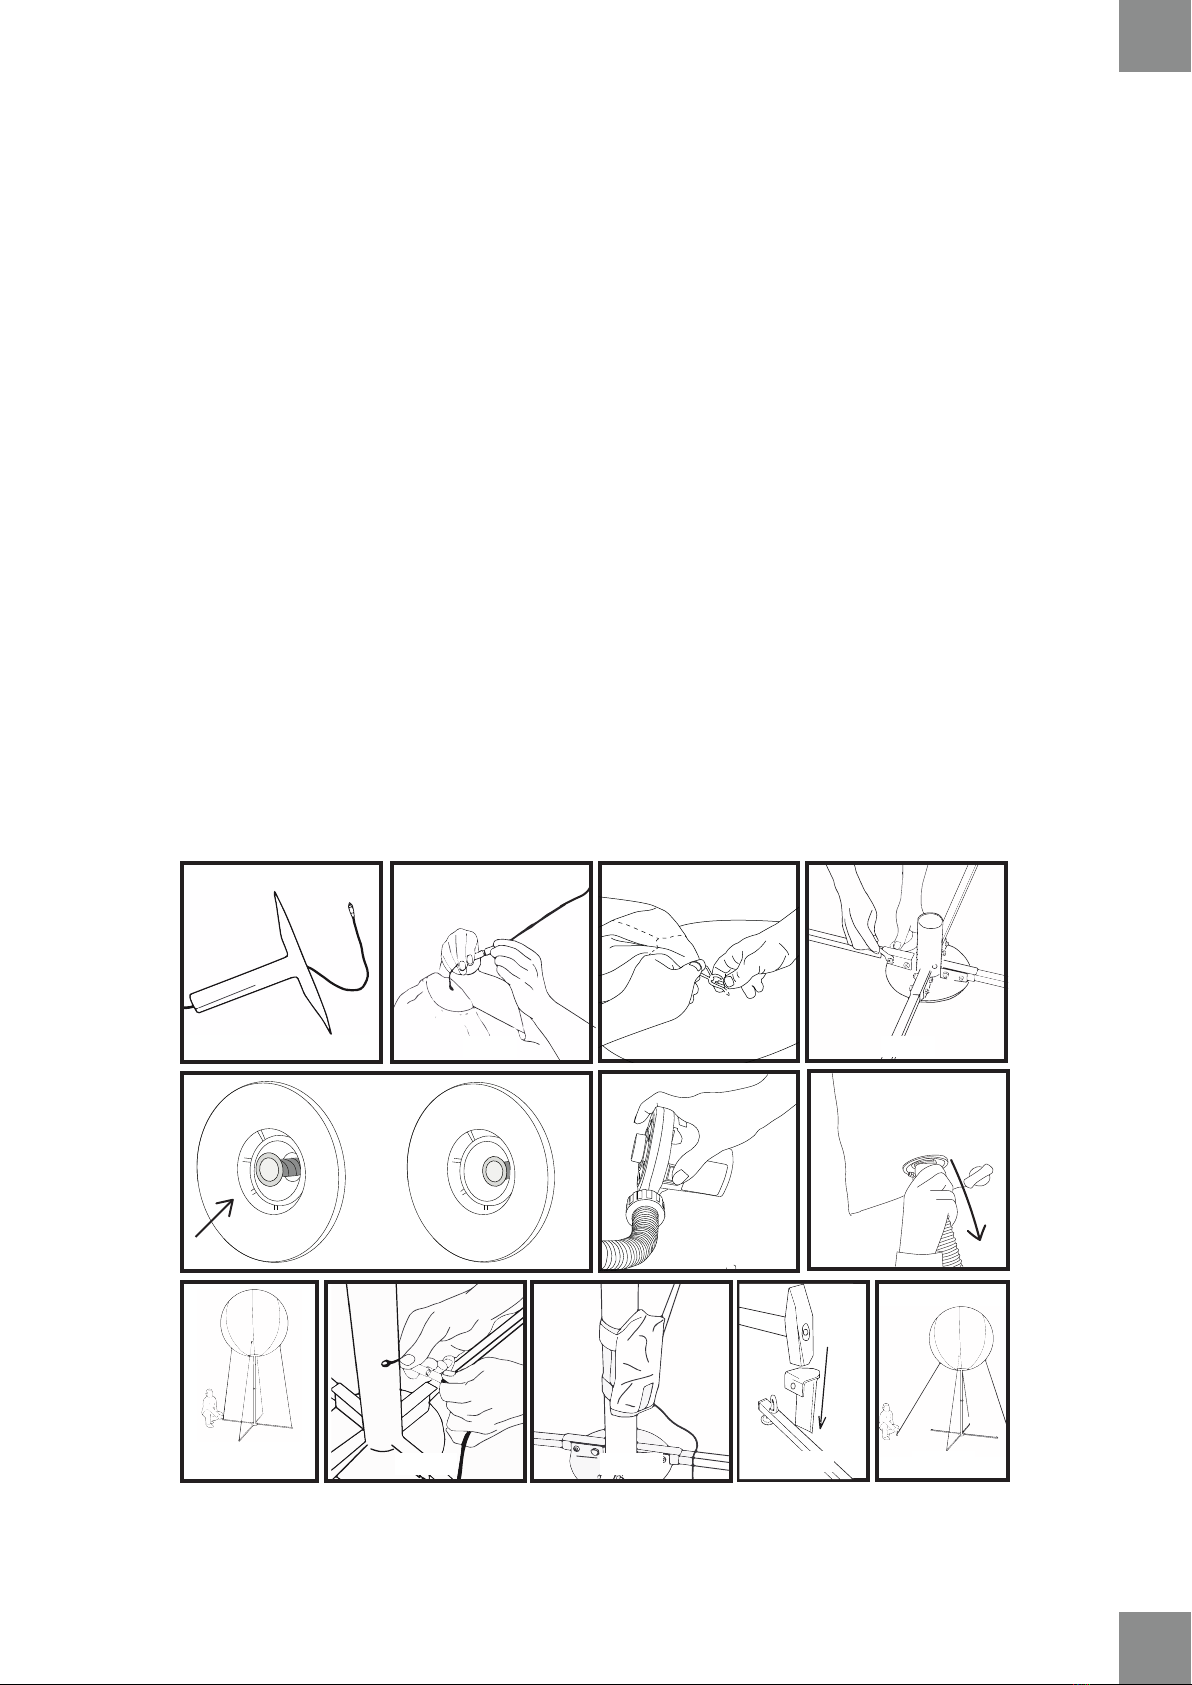
EMPFEHLUNGEN 1. Bevor Sie die Kugel aufbauen, lesen Sie die folgende Aufbauanleitung
sorgfältig durch.
2. Seien Sie vorsichtig beim Auf- und Abbau, um Personen - und andere
Schäden zu vermeiden.
3. Bevor Sie das Produkt abbauen, reinigen Sie es gründlich.
Jeglicher Schmutz sollte mit einem in warmem Wasser angefeuchteten
Tuch vom Stoffentfernt werden. Verwenden Sie keine Reinigungsmittel
oder Hochdruckreiniger.
4. Stellen Sie sicher, dass das Produkt trocken ist, bevor Sie es falten.
Wenn es jedoch aus Gründen, die der Anwender nicht zu vertreten
hat (z. B. Witterung), feucht gefaltet wird, sollte es so schnell wie
möglich wieder auseinandergefaltet werden, um es vollständig
zu trocknen.
5. Kontrollieren Sie bei Windböen systematisch den Sitz aller
Winkel-Anker.
6. Die Sicherheitsventile dürfen unter keinen Umständen blockiert werden.
7. Verwenden Sie ausschließlich die vom Hersteller mitgelieferte
Pumpe zum Abpumpen des Produkts. Die Verwendung anderer
Pumpen kann das Produkt beschädigen und stellt ein Risiko dar.
ACHTUNG Die im Produkt eingeschlossene Luft ändert ihr Volumen bei
Temperaturänderungen. Hohe Temperatur erhöht das Luftvolumen -
das Produkt erhöht seine Steifigkeit. Niedrige Temperatur verringert
das Luftvolumen - das Produkt verliert an Steifigkeit.
BEDINGUNGEN
GARANTIE
Die Garantiebedingungen können Sie auf der Website des
Herstellers herunterladen.

www.inventini.com
DE
11
AUFBAUANLEITUNG INSTALLATION
1. Wähle die richtige Stelle, um die Kugel aufzubauen.
3.
Klappen Sie die Füße des Ständers aus und drehen Sie die äußeren
Schrauben ein (Abb. 4).
4.
Bauen Sie den Ständer zusammen, indem Sie die Elemente
nacheinander einfügen.
Diese sind: Ständerbasis mit Füßen, langes Rohr, kurzes Rohr, Platte
fur die Kugel.
5. Befestigen Sie das erste Ende der Abspannseile an der Öse an der Seite
des Kugels. Wiederholen Sie den Vorgang mit allen Seilen.
6. Stellen Sie sicher, dass sich das Füllventil in der Position CLOSED
befindet (Abb.5).
7.
Schließen Sie die Pumpe an und pumpen Sie das Produkt bis zur minimalen
Steifigkeit auf (Abb. 6).
8.
Zuerst den Pumpenschlauch vom Ventil trennen, dann abschalten
(sonst entweicht etwas Luft) (Abb. 7).
9.
Wenn die Kugel über eine Beleuchtung verfügt, verbinden Sie die Enden
des Haupt- und des Stromversorgungskabels und befestigen Sie das
as Stromversorgungsgerät mit Klettband am Ständer (Abb. 9, Abb. 10).
10.
Befestigen Sie das andere Ende der Abspannseile an der Öse am Fuß
des Ständers. Wiederholen Sie den Vorgang mit allen Seilen.
Wenn der Kugel im Außenbereich verwendet wird:
11.
Befestigen Sie die Füße des Ständers mit Winkel-Anker (Abb. 11).
12. Als Alternative zu der unter den Nummern. 9 i 11 beschriebenen
Befestigungsmethode können Sie die anderen Enden der Abspannseile an
den in den Boden getriebenen Winkel-Ankern befestigen (Abb. 12).
2. Wenn die Kugel über ein Beleuchtung verfügt, führen Sie das Netzkabel
durch das obere (das kürzere) Rohr des Ständers und die Platte, so dass
das Ende aus der Mitte der Platte herausragt (Abb. 1). Klemmen Sie
die Enden des Hauptkabels und des Kugelkabels zusammen (Abb. 2).
b.
a.
Befestigen Sie den Bezug der Kugel, mit einem Karabinerhaken
an der Platte (Abb. 3).
Abb. 1
Abb. 7
Abb. 6
Abb. 4
Abb. 5
Abb. 2
Abb. 9 Abb. 10
Abb. 8
Abb. 3
CLOSED OPEN
Abb. 12Abb. 11

DEMONTAGE
1. Arretieren Sie das Ventil in der OPEN-Stellung.
3. Lösen Sie die Abspannseile und/oder entfernen Sie die Winkel-Anker.
4. Lösen Sie die Bezug von der Platte ab.
5. Wenn die Kugel über eine Beleuchtung verfügt, trennen und entfernen
Sie die Kabel. Ziehen Sie den Stecker des Stromversorgungsgerät.
2.
Um die Luft zu entfernen, können Sie Folgendes verwenden:
• eine Pumpe, die in einer "Pump-Out"-Konfiguration angeschlossen wird.
Beim Heraussaugen von Luft mit einer Pumpe ist es nicht
erforderlich, das Ventil in die OPEN-Stellung zu bringen, die Pumpe führt
diesen Vorgang selbst durch, aber die Durchführung dieses Vorgangs
beschleunigt den Vorgang des Entfernens von Luft erheblich.
• manuelle Entlüftung. Arretieren Sie dazu das Ventil in der OPEN-Stellung.
PASCAL KUGEL MONTAGEANLEITUNG
12
REPARATUR BEI SCHÄDEN:
Ein kleines Loch kann mit dem im Lieferumfang enthaltenen
Reparaturset bestehend aus Kleber und Folie repariert werden.
Wenn die Produktkartusche beschädigt ist:
1. Lokalisieren Sie den Schaden.
2. Entfetten Sie die Oberfläche.
3. Tragen Sie Klebstoff auf das Loch auf und achten Sie darauf, dass
der Klebstoff nicht in das Produkt gelangt.
4. Bringen Sie das Folienpflaster an.
5. Warten Sie 60 Minuten, bis der Klebstoff vollständig ausgehärtet ist.
Es besteht die Möglichkeit, das Produkt an den Hersteller zurückzusenden.
Wir bieten eine kostenpflichtige Reparatur bei Schäden an.

www.inventini.com
DE
13
BELEUCHTUNG BELEUCHTUNG UND AUFLADUNG
1. Die Beleuchtungszeit des Produkts beträgt je nach Umgebungstemp-
eratur und Ladezustand bis zu 8 Stunden Dauerbetrieb.
2. Produkte mit Innenbeleuchtung sind mit Batterien ausgestattet.
Das Aufladen erfolgt über das mitgelieferte Ladegerät.
3. Die Ladezeit auf 100 % beträgt etwa 10 Stunden.
VERWENDUNG / AKKULAUFZEIT
1. Überschreiten Sie nicht 8 Stunden Arbeitszeit ohne Aufladen
des Produktes.
Die Batterien in den Akkumulatoren sollten auch geladen werden,
wenn das Produkt gelagert wird.
2.
NUTZUNG
Elektro-/Elektronikprodukte sind kein Hausmüll!
Das Produkt sollte nach seiner Verwendung gemäß den geltenden
gesetzlichen Bestimmungen entsorgt werden. Entnehmen Sie eingelegte
Batterien/Akkus und entsorgen Sie diese getrennt vom
Produkt fachgerecht. Der Verbraucher ist gesetzlich (nach geltendem
Batteriegesetz) verpflichtet, alle gebrauchten Batterien und Akkus
zurückzugeben; Die Entsorgung über den Hausmüll ist verboten.
Schadstoffhaltige Batterien und Akkus sind mit diesem
Symbol gekennzeichnet und dürfen nicht mit dem Hausmüll
entsorgt werden.
Gebrauchte Akkus/Batterien können auf den kommunalen Deponien,
in den Filialen des Herstellers oder überall dort, wo Batterien/Akkus
verkauft werden, unentgeltlich zurückgegeben werden.
Durch die Einhaltung der oben genannten Empfehlungen erfüllen
Sie alle relevanten gesetzlichen Anforderungen und tragen zum Schutz
der Umwelt bei.
Table of contents
Languages:
Popular Educational Equipment manuals by other brands

Enabling Devices
Enabling Devices Talkable II user guide

Enabling Devices
Enabling Devices Drummin' Billy 9350 user guide

Simulaids
Simulaids RANDY 9000 Instruction and Care Manual

Copernicus
Copernicus Tech Tub TEC600C Assembly guide

Kyoto Kagaku
Kyoto Kagaku AbdoAbby instruction manual

Quanser
Quanser QNET 2.0 HVAC user manual

Learning Resources
Learning Resources STEM Explorers Motioneering LER 9308 quick start guide

Limbs & Things
Limbs & Things 60000 user guide

Sphero
Sphero indi Getting started

SeaPerch
SeaPerch Remotely Operated Vehicle Construction manual

Pretorian
Pretorian SimplyWorks Control PRO manual

Sphero
Sphero BOLT user guide