Invitrogen E-Gel Power Snap Plus User manual

For Research Use Only. Not for use in diagnostic procedures.
E‑Gel™Power Snap Plus Electrophoresis
System
USER GUIDE
For use with E‑Gel™, E‑Gel™EX, E‑Gel™48, and E‑Gel™96
Agarose Gels, and E-PAGE™Gels
Catalog Numbers G9100, G9200, G9101, G9201, G9301, G9341, G9342, G9391, G9392
Publication Number MAN0002591
Revision A.0

Life Technologies Holdings Pte Ltd | Block 33 | Marsiling Industrial Estate Road 3 | #07-06, Singapore 739256
For descriptions of symbols on product labels or product documents, go to thermofisher.com/symbols-definition.
The information in this guide is subject to change without notice.
DISCLAIMER: TO THE EXTENT ALLOWED BY LAW, THERMO FISHER SCIENTIFIC INC. AND/OR ITS AFFILIATE(S) WILL NOT BE
LIABLE FOR SPECIAL, INCIDENTAL, INDIRECT, PUNITIVE, MULTIPLE, OR CONSEQUENTIAL DAMAGES IN CONNECTION WITH OR
ARISING FROM THIS DOCUMENT, INCLUDING YOUR USE OF IT.
Revision history: Pub. No.MAN0002591
Revision Date Description
A.0 5 April 2022 New user guide for the E‑Gel™Power Snap Plus Electrophoresis System.
Important Licensing Information: These products may be covered by one or more Limited Use Label Licenses. By use of these
products, you accept the terms and conditions of all applicable Limited Use Label Licenses.
TRADEMARKS: All trademarks are the property of Thermo Fisher Scientific and its subsidiaries unless otherwise specified.
©2022 Thermo Fisher Scientific Inc. All rights reserved.

Contents
■CHAPTER1Productinformation .................................................. 7
Productdescription ............................................................. 7
Product contents ................................................................ 7
Base module kit contents .................................................... 7
Camera module kit contents ................................................. 8
Systemcomponents ............................................................. 8
Parts of the E‑Gel™Power Snap Plus Base Module and AC/DC power adapter ..... 8
Parts of the E‑Gel™Power Snap Plus cameramodule ........................... 9
Rear view of the E‑Gel™Power Snap Plus camera module and base module ....... 9
Touchscreen controls ...................................................... 10
Required materials not provided ................................................. 12
First time instrumentsetup ...................................................... 12
Set up the basemodule .................................................... 12
Set up the cameramodule .................................................. 12
■CHAPTER2Methods ............................................................. 24
Using the E‑Gel™Power Snap Plus ElectrophoresisDevice .......................... 24
User interface overview ..................................................... 24
Required materials ......................................................... 25
Preparesamples ........................................................... 25
Dilute samples containing highsalt .......................................... 26
DNA ladder preparationguidelines ........................................... 26
Prepare thegel ............................................................ 27
Sample loadingguidelines .................................................. 27
Loadsamples ............................................................. 28
Run thegel ............................................................... 28
Checkstatus .............................................................. 29
Modify arun .............................................................. 30
Using the E‑Gel™Power Snap Plus Camera ....................................... 31
User interface overview ..................................................... 31
Attach the camera ......................................................... 32
Remove the camera ........................................................ 32
Viewgel .................................................................. 32
Captureimage ............................................................ 32
E‑Gel™Power Snap Plus Electrophoresis System User Guide 3

View image gallery ......................................................... 33
Exportimage .............................................................. 36
Maintenance .................................................................. 38
Cleaning and maintenance .................................................. 38
Materials required .......................................................... 38
Clean the E‑Gel™Power Snap Plus ElectrophoresisDevice ..................... 38
Replace the camera battery ................................................. 39
Upgrade the systemfirmware ............................................... 39
Self Verification test ........................................................ 42
Restore factory settings (Administrator profile only)............................ 42
■APPENDIXATroubleshooting .................................................... 43
■APPENDIXBRecommended instrumentsettings .............................. 45
AboutInstrument .............................................................. 45
Recommended instrumentsettings .............................................. 45
Instrumentsettings ........................................................ 46
Maintenance & services ......................................................... 50
■APPENDIXCE‑Gel™agarosegels ............................................... 51
Nucleic acid stains used in E‑Gel™agarosegels ................................... 51
SYBR™Safe DNA gelstain .................................................. 51
SYBR™gold II gelstain ..................................................... 52
Opening E‑Gel™cassettes ...................................................... 52
Gelknife .................................................................. 52
Open E‑Gel™EX and NGS cassettes with a gel knife ........................... 53
Cleaning and storage ....................................................... 54
E‑Gel™agarose gel disposalguidelines ........................................... 54
■APPENDIXDE‑Gel™CloneWell™II AgaroseGels .............................. 55
Generalguidelines ............................................................. 55
Preparesamples ............................................................... 55
Prepare thegel ................................................................ 56
Loadsamples ................................................................. 56
Run thegel .................................................................... 57
Checkstatus .................................................................. 57
Preparewells .................................................................. 58
Collect DNA fragment .......................................................... 58
Guidelines for estimating runtime ................................................ 59
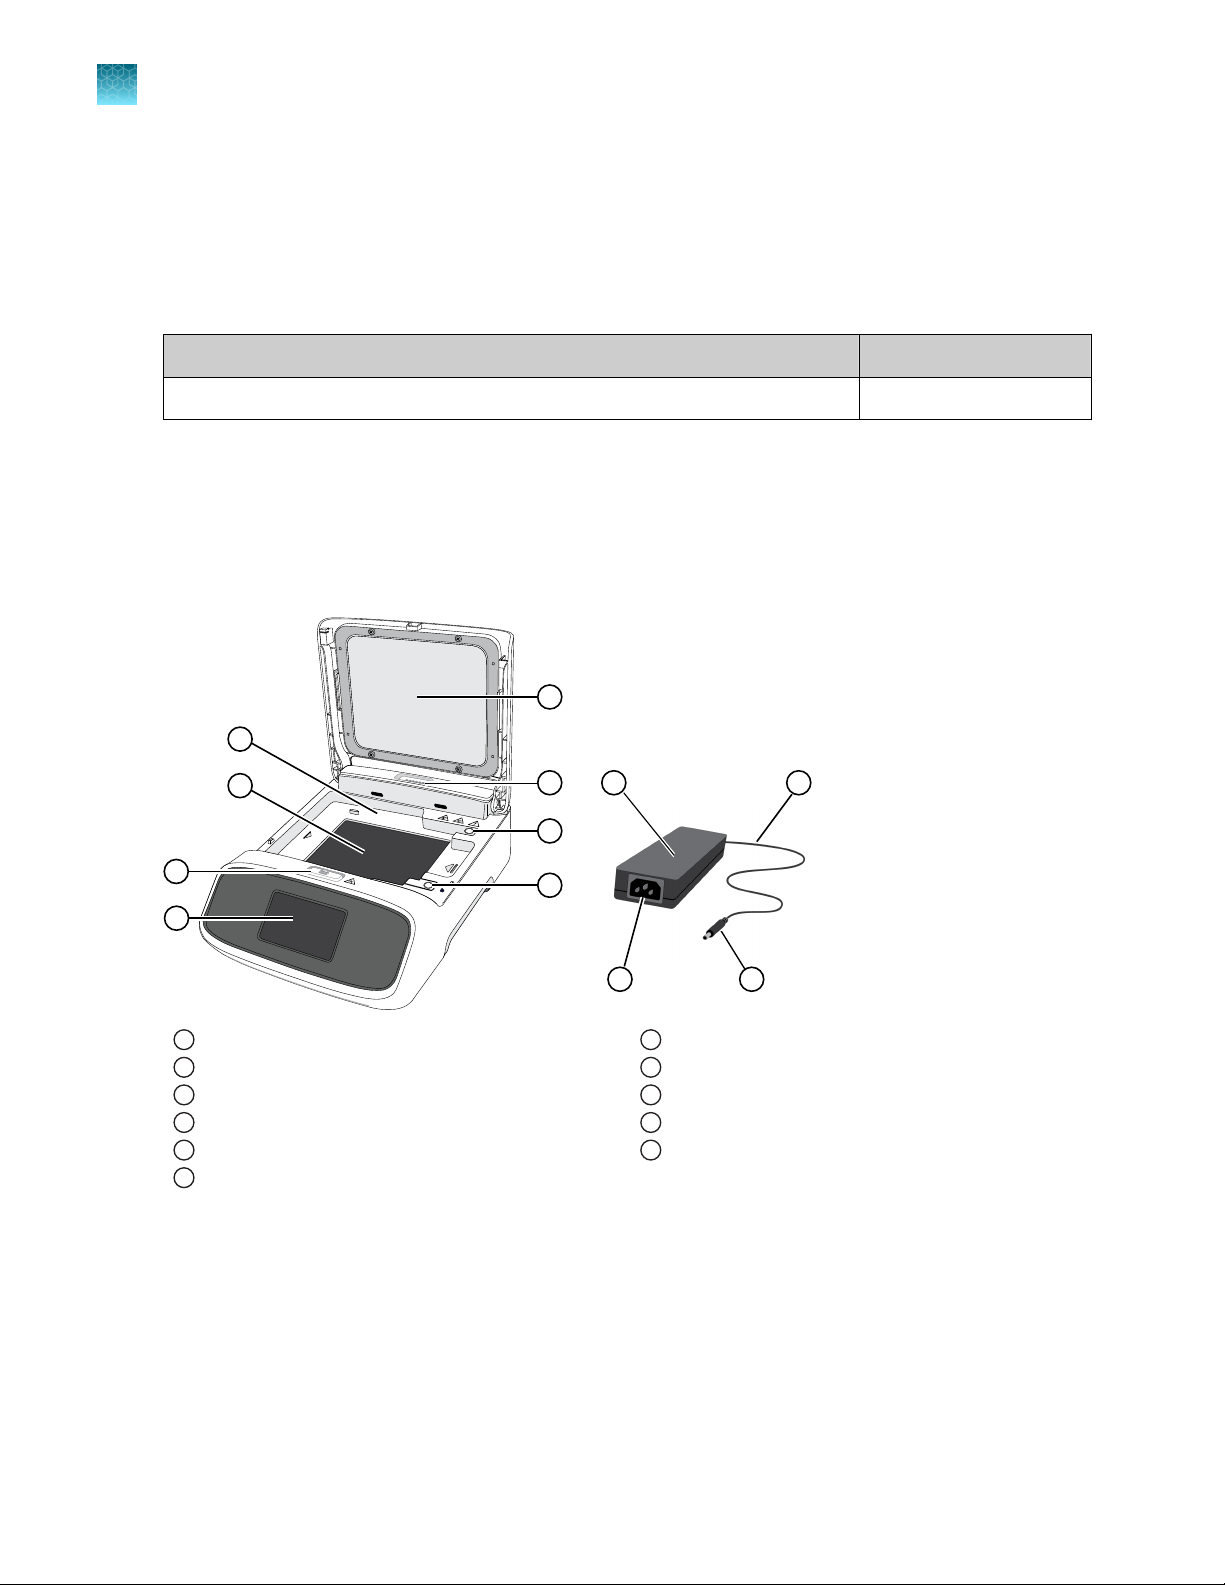
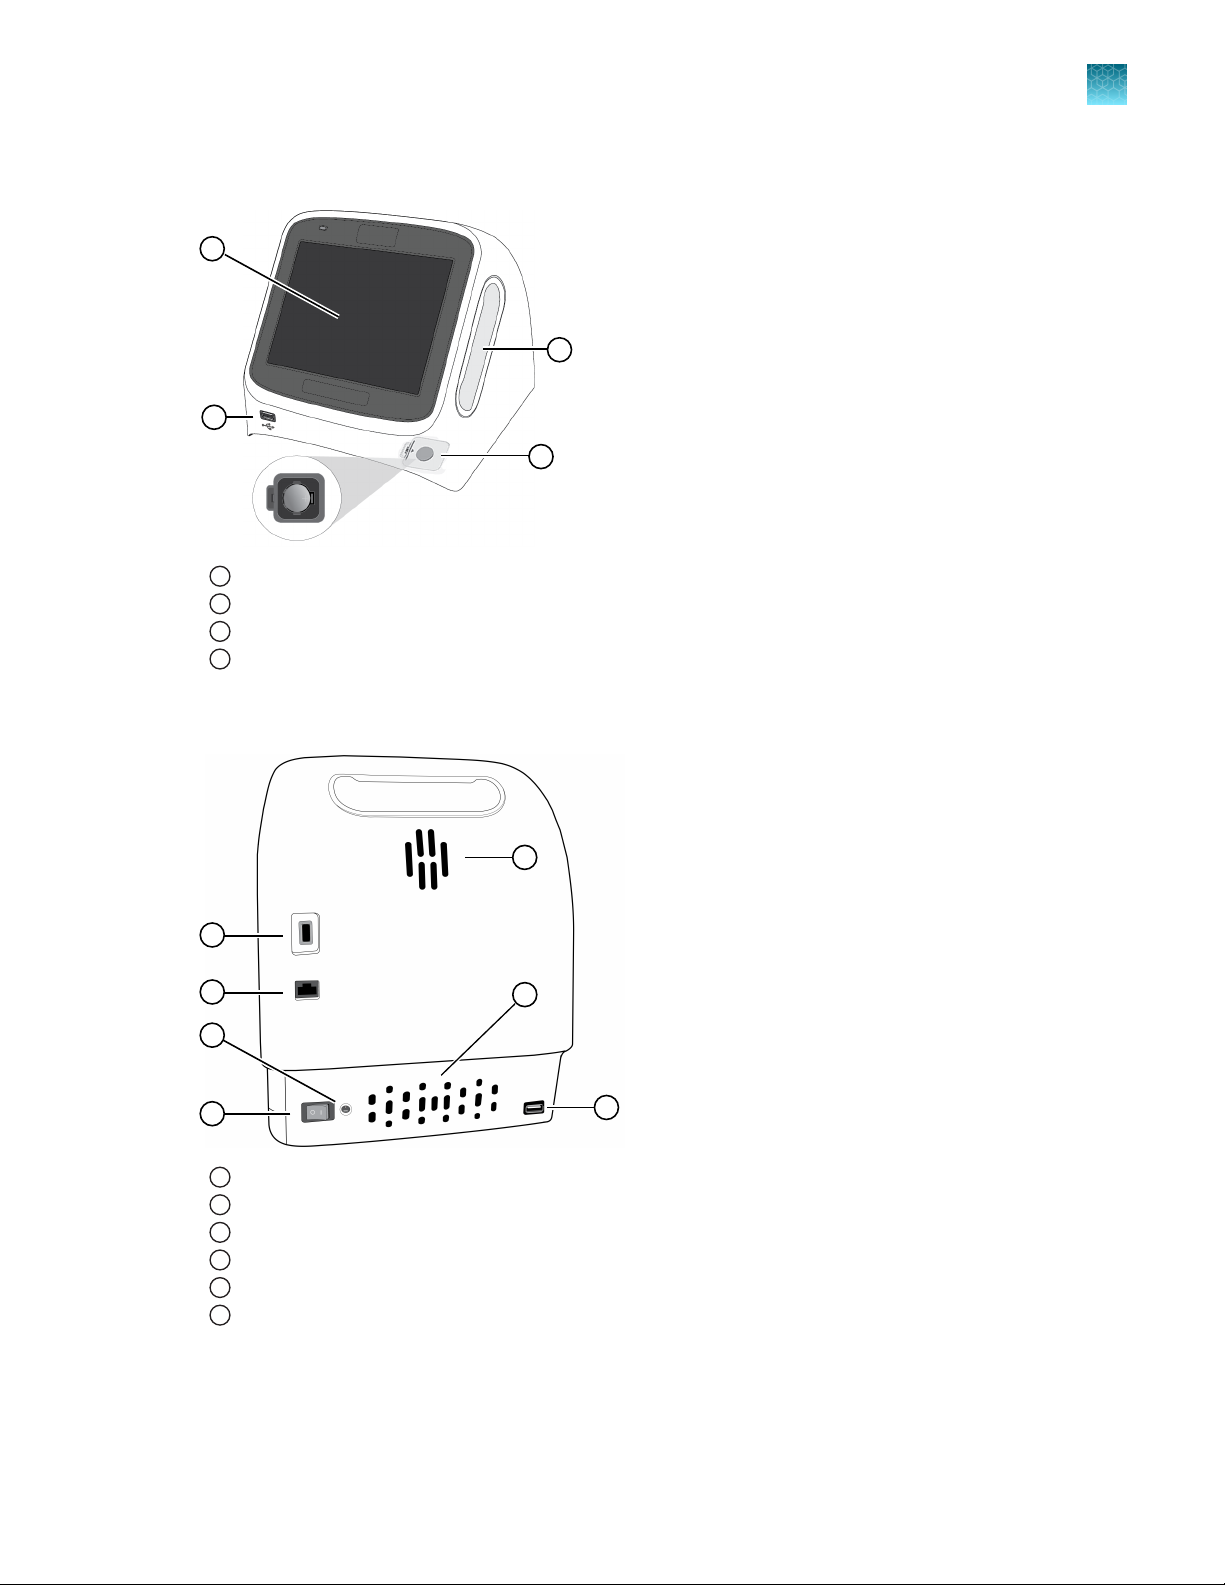
Contents
4E‑Gel™Power Snap Plus Electrophoresis System User Guide

■APPENDIXEE‑Gel™SizeSelect™II AgaroseGels .............................. 60
Generalguidelines ............................................................. 60
Preparesamples ............................................................... 60
Prepare thegel ................................................................ 61
Loadsamples ................................................................. 61
Run thegel .................................................................... 62
Checkstatus .................................................................. 62
Preparewells .................................................................. 63
Collect DNA fragment .......................................................... 63
Guidelines for estimating runtime ................................................ 65
Quantitation of isolatedDNA .................................................... 67
■APPENDIXFSpecifications ...................................................... 68
Systemspecifications .......................................................... 68
■APPENDIXGRelated products .................................................. 70
Accessory products ............................................................ 70
Choosing the rightgel ...................................................... 70
E‑Gel™AgaroseGels ....................................................... 72
Choosing the right DNAladder .............................................. 74
Ladders andbuers ........................................................ 75
Accessory items ........................................................... 75
■APPENDIXHSafety ............................................................... 76
Before starting ................................................................. 76
Installing theinstrument ......................................................... 77
Explanation of symbols andwarnings ............................................ 77
Symboles d’information ........................................................ 78
Environmental requirements ..................................................... 80
Electromagnetic compatibility (EMC) standards .................................... 81
Class Anotice ............................................................. 81
Electricalsafety ................................................................ 81
Service operation requirements .............................................. 81
LED (Light-Emittingdiode) ...................................................... 82
Chemicalsafety ................................................................ 83
Biological hazardsafety ......................................................... 84
Contents
E‑Gel™Power Snap Plus Electrophoresis System User Guide 5

■APPENDIXIDocumentation and support ....................................... 85
Customer and technical support ................................................. 85
Limited product warranty ........................................................ 85
Contents
6E‑Gel™Power Snap Plus Electrophoresis System User Guide

Product information
Product description
The Invitrogen™E‑Gel™Power Snap Plus Electrophoresis System is an easy-to-use system designed for
performing electrophoresis and documentation of nucleic acids with pre-cast E‑Gel™agarose gels and
E-PAGE™gels.
The system consists of a base module containing a power supply, blue light transilluminator, and amber
filter in one unit, and a camera module capable of high-resolution image capture and documentation
without the need for focusing or adjustment.
The system is compatible with precast E‑Gel™, E‑Gel™EX, E‑Gel™48, and E‑Gel™96 agarose gels, as
well as E-PAGE™gels.
Product contents
Base module kit contents
The contents of the E‑Gel™Power Snap Plus Electrophoresis Device kit are listed in the following table.
The device is shipped at room temperature.
See “System components” on page8 for specifications and description of the E‑Gel™Power Snap
Plus Electrophoresis Device, and “First time instrument setup” on page12 to set up the instrument.
Product Quantity
E‑Gel™Power Snap Plus Electrophoresis Device 1
E‑Gel™Adapter for E‑Gel™Power Snap Plus Electrophoresis Device 1
Power cord with AC/DC power adapter (for US/Canada/Taiwan/Japan, Europe,
or UK)
1
Safe Imager™Viewing Glasses 1
1
E‑Gel™Power Snap Plus Electrophoresis System User Guide 7

Camera module kit contents
The contents of the E‑Gel™Power Snap Plus Camera kit are listed in the following table. The camera is
shipped at room temperature.
See “System components” on page8 for specifications and description of the E‑Gel™Power Snap
Plus Camera, and “First time instrument setup” on page12 to set up the instrument.
Product Quantity
E‑Gel™Power Snap Plus Camera 1
System components
Parts of the E‑Gel™Power Snap Plus Base Module and AC/DC power
adapter
1
2
4
3
5
6
7
7
8 9
1011
1E‑Gel™cassette compartment
2Blue-light transilluminator
3Open button for filter lid
4Electrophoresis unit control touch screen
5Lid with amber filter (open)
6Docking connector
7Electrodes
8Adaptor
9DC output cable
10 Connector to DC input of electrophoresis unit
11 AC power cord inlet
Chapter1Product information
System components
1
8E‑Gel™Power Snap Plus Electrophoresis System User Guide

Parts of the E‑Gel™Power Snap Plus camera module
1
2
3
4
1Touch screen
2USB port for image export/camera module firmware upgrade
3Handhold for lifting (on both sides)
4Battery compartment
Rear view of the E‑Gel™Power Snap Plus camera module and base module
6
3
4
2
6
5
1
1USB port for wireless module
2Ethernet port
3DC input port
4Power switch
5USB port for image export/base module firmware upgrade
6Ventilation ports
Chapter1Product information
System components 1
E‑Gel™Power Snap Plus Electrophoresis System User Guide 9

Touchscreen controls
Table1General touchscreen controls
Button Function
Returns to the previous screen
Go to Home screen
Go to Sign in screen
Go to Settings screen
Close the current modal window.
Touchscreen status indicators
See page24 for an overview of the base module, and page31 for an overview of the camera module.
Table2Status indicators
Button Function
1
4
View instrument status
1. Time remaining
2. Protocol status (step, paused, etc.)
Indicates whether a USB device is inserted into the
instrument.
Indicates whether the Wi-Fi is on or o.
Indicates whether the instrument is connected to wired
network.
Indicates whether the instrument is connected to the
Thermo Fisher™Connect Platform.
Chapter1Product information
System components
1
10 E‑Gel™Power Snap Plus Electrophoresis System User Guide

Enter text
When you press a field that requires the input of text, the text editor, as seen in the following figure,
opens.
23 5 4
16
1Enter a letter
2Change letter case
3Enter punctuation or other symbols
4Delete
5Close and save
6Close without saving
Enter numbers
When you press a field that requires a numerical input, the numeric editor, as seen in the following
figure, opens.
23
4
1
1Enter a number
2Delete/backspace
3Close and save
4Close without saving
Chapter1Product information
System components 1
E‑Gel™Power Snap Plus Electrophoresis System User Guide 11

Required materials not provided
•(Optional) Electrical protective devices.
The use of one or more of the following electrical protective devices is recommended.
–Power line regulator (100–240V)
–Surge protector/line conditioner (10-kVA)
–Uninterruptible power supply (1.5-kVA)
•USB-enabled Wi-Fi Module (for wireless connection)
First time instrument setup
The E‑Gel™Power Snap Plus Electrophoresis System consists of a base module, the E‑Gel™Power
Snap Plus Electrophoresis Device, and a camera module, the E‑Gel™Power Snap Plus Camera.
The E‑Gel™Power Snap Plus Electrophoresis Device can be used independently of the camera module,
and is ready to use once the power cord and adapter are attached.
The E‑Gel™Power Snap Plus Camera is used in conjunction with the E‑Gel™Power Snap Plus
Electrophoresis Device, and requires the user to set instrument parameters before use, and to access
cloud-based resources.
Set up the base module
1. Remove the protective film covering the amber filter.
2. Connect the power cable to the power adapter, then plug the adaptor plug to the E‑Gel™Power
Snap Plus Electrophoresis Device.
3. Plug the power cord into an electrical outlet.
The instrument operates at voltages of 100–240 VAC and the frequency range of 50/60 Hz. Ensure
that the local supply voltage in the laboratory conforms to that specified on the type label on the
back of the instrument
4. Turn on the master switch located at the back of the device.
Set up the camera module
1. Remove the protective film covering the touch screen.
2. Place the E‑Gel™Power Snap Plus Camera on top of the base module.
3. Set the date and time on the camera.
4. Set the cloud region on the camera.
5. (Optional) Connect the instrument to the Internet.
Chapter1Product information
Required materials not provided
1
12 E‑Gel™Power Snap Plus Electrophoresis System User Guide

Connect the instrument to the Internet
The instrument can connect to the Internet by either wired or wireless methods.
To connect by wired method through the instrument Ethernet port using a cable, see “Set up a wired
connection” on page14.
To connect by wireless method through the instrument USB wireless adapter port with a USB-enabled
Wi-Fi card, see “Set up a wireless connection” on page13.
Set up a wireless connection
Connect the High-Power USB Wi-Fi Module (Cat. No. A26774 to the USB wireless adapter port (see
“Rear view of the E‑Gel™Power Snap Plus camera module and base module” on page9 for port
location).
1. See “Set up a wired connection” on page14 Steps 1 through 3 to find the Network
configuration screen.
2. In the Network configuration screen, select a field in the Wireless panel.
12
1Wireless panel 2Wired panel
Note: During initial setup, if you selected the Wired option in the Network Connection screen,
you will be required to enter the IP address if you selected the Static IP wired option. If you
selected the Dynamic IP wired option, the IP address is automatically populated.
3. Once a wireless connection has been detected, a list of the available networks is displayed. Select
the network name of your choice or select Join others.
Note: If you choose Join others, the Configure and Join Network screen opens.
4. In the Configure and Join Network screen, select the Network Name field, then enter the name
and security type of the network.
Chapter1Product information
First time instrument setup 1
E‑Gel™Power Snap Plus Electrophoresis System User Guide 13

5. Select the security type from the Security type drop-down menu.
Note: Contact your IT Systems Administrator for information on security type.
Select from the following options:
•Open
•WEP
•WPA Personal
•WPA2 Personal
•WPA Enterprise
•WPA2 Enterprise
Note: The above options are available only if Join Other Network was selected in Step 3. You
cannot change the security type if you selected an existing network.
6. Select Join to continue or Cancel to exit from the Find and Join a Network screen.
7. Depending on the security type you have selected, enter the appropriate passwords and select
Join.
8. If all the entered information is correct, the Network Connection Complete screen will appear.
Select OK to continue.
Note: If incorrect information was entered the Network Connection Failed screen will open.
Select OK to continue to the Security type screen.
Set up a wired connection
Connect one end of a Ethernet cable to the instrument Ethernet port, and the other end to an Ethernet
port wall plug (see “Rear view of the E‑Gel™Power Snap Plus camera module and base module” on
page9 for port location).
1. On the Home screen, select (Settings).
Chapter1Product information
First time instrument setup
1
14 E‑Gel™Power Snap Plus Electrophoresis System User Guide

2. In the Settings screen, select Instrument Settings.
3. In the Instrument Settings screen, select Network configuration.
4. In the Network Connection screen, select a field in the Wired panel.
12
1Wireless panel 2Wired panel
Chapter1Product information
First time instrument setup 1
E‑Gel™Power Snap Plus Electrophoresis System User Guide 15

5. Select a method to enter an IP address.
a. Select DHCP to obtain an IP address automatically. A check mark appears when DHCP is
selected.
b. Select Static IP to enter an IP address manually, then enter the appropriate IP addresses
for the instrument, the Subnet Mask, and, optionally, the Default Gateway, the Primary DNS
Server, and the Secondary DNS Server using the numeric editor. Addresses are in the form of
X.X.X.X, where each X is a 3- digit number, from 001 to 255.
Note: If your instrument is not on a network, you do not need to set the IP address. Ask your
system administrator if the IP address is assigned statically or dynamically. For static addresses,
you need to know the IP address for the instrument, the subnet mask, and the default gateway.
6. Select Done to save the changes and go back to the Instrument Settings screen or select Cancel
to exit the screen without saving the changes.
Chapter1Product information
First time instrument setup
1
16 E‑Gel™Power Snap Plus Electrophoresis System User Guide

Create a user profile on the instrument
1. Select (Sign In) > Get started > Create profile.
2. Fill in the required text fields and enter a four digit PIN to create your user profile.
Note: The first profile created is automatically given an Administrator profile (indicated by an
asterisk after the Username).
3. Select Create.
Manage user profiles
All users can manage their profiles to edit personal folder names, change PINs, and link to the cloud by
selecting their (Profile) to enter their My Profile page.
Users with Administrator profiles (as indicated by an asterisk after their user name) also have the ability
to manage all user accounts by selecting All accounts after entering their My Profile page.
The following actions are available from the user profile screen:
•Change a password
•Create a new user profile
•Grant administrator rights to selected user profile (Administrator only)
•Delete a user profile (Administrator only)
•Delete a PIN (Administrator only)
Change a user password
1. Select Edit.
2. Enter the old password.
3. Enter a new four digit password.
4. Re-enter the new password, then select Done
Delete a user password
If a password is forgotten, an administrator can delete the existing password to allow a new one to be
created. This function resets a PIN, so the user with a deleted PIN is prompted to create a new PIN the
next time they log in)
1. Select All accounts.
2. Select the account with the forgotten password.
3. Select Delete PIN
Chapter1Product information
First time instrument setup 1
E‑Gel™Power Snap Plus Electrophoresis System User Guide 17

Delete a user profile
1. Select All accounts.
2. Select the account to be deleted.
3. Select Delete account
Assign or remove administrator privileges
1. Select All accounts.
2. Select the account to be modified.
3. Switch the toggle to Yes to grant privileges, or No to remove privileges
An asterisk appears next to user profiles with administrator privileges.
About the Thermo Fisher™Connect Platform
The Thermo Fisher™Connect Platform enables access to the E‑Gel™Power Snap Plus Electrophoresis
Device through InstrumentConnect by way of a web browser or mobile device. This cloud-based tool
allows the user to perform the following functions when the instrument has Internet connectivity.
•Upload captured images to your Connect account.
•Share captured images within a research team or with colleagues in another laboratory, location, or
country.
•Upgrade instrument software automatically, without hardware or manual updates (Administrator
profile only).
IMPORTANT! The date and time for the instrument must be properly configured for all features of
Thermo Fisher™Connect Platform to work properly. See “Instrument settings” on page46 for details
on setting the date and time.
Create a Connect account
1. Go to thermofisher.com/connect from your web browser.
2. Click Sign up now and follow the prompts to create an account.
Your e-mail address is used as your username.
3. When signed in, click Update PIN number.
4. Enter a PIN number in the new and confirm fields.
The PIN number is necessary to sign in to Connect from the instrument.
Chapter1Product information
First time instrument setup
1
18 E‑Gel™Power Snap Plus Electrophoresis System User Guide

Link the instrument to Connect (Administrator only)
1. Select (Sign In)4Link cloud, then select the cloud region of the instrument.
2. Select the method for linking the instrument to Connect .
Connect by mobile device
Select (Sign In)4Get started4Connect4Mobile device from the instrument to generate a QR
code.
1. Download the "Instrument Connect Mobile Application" on your mobile device.
a. For iPad™or iPhone™devices, download the application from the Apple™App Store by
searching for Instrument Connect by Thermo Fisher Scientific.
b. For Android devices, download the application from Google™Play by searching for Instrument
Connect by Thermo Fisher Scientific.
Chapter1Product information
First time instrument setup 1
E‑Gel™Power Snap Plus Electrophoresis System User Guide 19

2. Launch the Instrument Connect Mobile Application and log in using your Connect login and
password.
3. Capture the QR code on the instrument screen.
Connect by PC
Select (Sign In)4Get started4Connect4PC from the instrument to generate a linking code.
1. Log in to your Connect account using a web browser from a computer.
2. Select
(InstrumentConnect) from the left navigation strip.
3. Select (Add an Instrument) from the top navigation strip.
4. Select Power Snap Plus from the drop down menu, then click Next.
5. Enter the linking code generated by the instrument in the text box, then click Send.
Upon successful authentication, the instrument is linked to Connect.
Connect by instrument
1. Enter your Connect Username and Password from the instrument.
2. Click Link account.
Note: If you do not have a PIN, you will be prompted to create one.
Upon successful authentication, the instrument is linked to Connect.
Chapter1Product information
First time instrument setup
1
20 E‑Gel™Power Snap Plus Electrophoresis System User Guide
Table of contents
Other Invitrogen Laboratory Equipment manuals
Popular Laboratory Equipment manuals by other brands

Sigma
Sigma 4-5L operating manual

ThermoFisher Scientific
ThermoFisher Scientific Microliter 48 x 2 sealed instruction manual

Cypress Diagnostics
Cypress Diagnostics CYANSmart Service manual

Tuttnauer
Tuttnauer 2340EA-D Operation and maintenance manual

Buchi
Buchi HydrolEx H-506 Operation manual

Helmer Scientific
Helmer Scientific i.Series Pro Series Service manual

Abbott
Abbott VP 2000 Processor Operation manual

Dynamica
Dynamica VELOCITY15R Pro instruction manual

IKA
IKA Plate RCT digital manual

Molecular Devices
Molecular Devices SpectraMax M3 user guide

Labnet
Labnet BioPette A Series instruction manual

Endress+Hauser
Endress+Hauser analytikjena CyBio QuadPrint HQ-M operating manual