manuals.online logo
Brands
  1. Home
  2. •
  3. Brands
  4. •
  5. IPGARD
  6. •
  7. Switch
  8. •
  9. IPGARD SA-DVN-2S User manual

IPGARD SA-DVN-2S User manual

Other manuals for SA-DVN-2S

2

Other IPGARD Switch manuals

IPGARD SA-DPH-4Q-P User manual

IPGARD

IPGARD SA-DPH-4Q-P User manual

IPGARD SA-DVN-8D User manual

IPGARD

IPGARD SA-DVN-8D User manual

IPGARD SDVN-2S User manual

IPGARD

IPGARD SDVN-2S User manual

IPGARD SDVN-2D User manual

IPGARD

IPGARD SDVN-2D User manual

IPGARD SDHN-4D-P User manual

IPGARD

IPGARD SDHN-4D-P User manual

IPGARD SA-KMN-4S-P User manual

IPGARD

IPGARD SA-KMN-4S-P User manual

IPGARD SDPN-2S-P User manual

IPGARD

IPGARD SDPN-2S-P User manual

IPGARD SDVN-1S-P User manual

IPGARD

IPGARD SDVN-1S-P User manual

IPGARD SA-KMN-4S-P User manual

IPGARD

IPGARD SA-KMN-4S-P User manual

IPGARD SA-DVN-2S User manual

IPGARD

IPGARD SA-DVN-2S User manual

IPGARD SA-DVN-4D User manual

IPGARD

IPGARD SA-DVN-4D User manual

IPGARD SA-DPH-4Q-P User manual

IPGARD

IPGARD SA-DPH-4Q-P User manual

IPGARD USM-0S0-1M4 User manual

IPGARD

IPGARD USM-0S0-1M4 User manual

IPGARD SDVN-8S User manual

IPGARD

IPGARD SDVN-8S User manual

IPGARD SMART-AVI SM-MST-2S User manual

IPGARD

IPGARD SMART-AVI SM-MST-2S User manual

IPGARD SA-DVN-2S User manual

IPGARD

IPGARD SA-DVN-2S User manual

IPGARD SDPN-2S User manual

IPGARD

IPGARD SDPN-2S User manual

IPGARD SDMN-4S-P User manual

IPGARD

IPGARD SDMN-4S-P User manual

IPGARD SA-DMN-DP-P User manual

IPGARD

IPGARD SA-DMN-DP-P User manual

IPGARD SKMN-8S User manual

IPGARD

IPGARD SKMN-8S User manual

IPGARD SDVN-44-X User manual

IPGARD

IPGARD SDVN-44-X User manual

IPGARD SA-DVN-1S-P User manual

IPGARD

IPGARD SA-DVN-1S-P User manual

IPGARD SDPN-2D User manual

IPGARD

IPGARD SDPN-2D User manual

IPGARD DPMST-2S-P User manual

IPGARD

IPGARD DPMST-2S-P User manual

Popular Switch manuals by other brands

SMC Networks SMC6224M Technical specifications

SMC Networks

SMC Networks SMC6224M Technical specifications

Aeotec ZWA003-S operating manual

Aeotec

Aeotec ZWA003-S operating manual

TRENDnet TK-209i Quick installation guide

TRENDnet

TRENDnet TK-209i Quick installation guide

Planet FGSW-2022VHP user manual

Planet

Planet FGSW-2022VHP user manual

Avocent AutoView 2000  AV2000BC AV2000BC Installer/user guide

Avocent

Avocent AutoView 2000 AV2000BC AV2000BC Installer/user guide

Moxa Technologies PT-7728 Series user manual

Moxa Technologies

Moxa Technologies PT-7728 Series user manual

Intos Electronic inLine 35392I operating instructions

Intos Electronic

Intos Electronic inLine 35392I operating instructions

Cisco Catalyst 3560-X-24T Technical specifications

Cisco

Cisco Catalyst 3560-X-24T Technical specifications

Asante IntraCore IC3648 Specifications

Asante

Asante IntraCore IC3648 Specifications

Siemens SIRIUS 3SE7310-1AE Series Original operating instructions

Siemens

Siemens SIRIUS 3SE7310-1AE Series Original operating instructions

Edge-Core DCS520 quick start guide

Edge-Core

Edge-Core DCS520 quick start guide

RGBLE S00203 user manual

RGBLE

RGBLE S00203 user manual

Thrustmaster FLIGHT SIMULATOR X quick guide

Thrustmaster

Thrustmaster FLIGHT SIMULATOR X quick guide

Southwire SURGE GUARD 41390 RVC troubleshooting guide

Southwire

Southwire SURGE GUARD 41390 RVC troubleshooting guide

Buhler Nivotemp NT 61 Brief instructions

Buhler

Buhler Nivotemp NT 61 Brief instructions

Kramer VS-41HDCP user manual

Kramer

Kramer VS-41HDCP user manual

Techly IDATA AU-270 user manual

Techly

Techly IDATA AU-270 user manual

Belkin F1U109 user manual

Belkin

Belkin F1U109 user manual

manuals.online logo
manuals.online logoBrands
  • About & Mission
  • Contact us
  • Privacy Policy
  • Terms and Conditions

Copyright 2025 Manuals.Online. All Rights Reserved.

2 Port DVI-I secure KVM switch
CONSOLE
K/M
SA-DVN-2S
AUDIO
K/M
K/M
12VDC2.0A AUDIOAUDIO
IN-2 IN-1
1 2ST1 ST2
DVI OUT DVI IN2 DVI IN1
TECHNICAL SPECIFICATIONS
SA-DVN-2S
Advanced 2-Port Secure
Single-head DVI-I KVM Switch
with Audio
Quick Start Guide
VIDEO
Host Interface (2) DVI-I 29-pin F
User Console
Interface (1) DVI-I 29-pin F
Max Resolution 2560 x 1600 @ 60Hz;
3840 x 2160 @ 30Hz
DDC 5 volts p-p (TTL)
Input Equalization Automatic
Input Cable Length Up to 20 ft.
Output Cable Length Up to 20 ft.
USB
Signal Type USB 1.1 and 1.0 Keyboard and
Mouse only
USB Connectors (2) USB Type B
User Console Interface (2) USB Type A for keyboard/mouse
connections
AUDIO
Input (2) Connector stereo 3.5 mm
female
Output (1) Connector stereo 3.5 mm
female
POWER
Power Requirements 12V DC, 3A power adapter with
center-pin positive polarity
ENVIRONMENT
Operating Temp 32° to 104° F (0° to 40° C)
Storage Temp -4° to 140° F (-20° to 60° C)
Humidity 0-80% RH, non-condensing
CERTIFICATIONS
Security
Accreditation
Common Criteria Validated To
NIAP, Protection Prole PSS Ver.
4.0
OTHER
Emulation Keyboard, mouse, and video
User Controls Front-panel buttons
WHAT’S IN THE BOX
PART NO. QTY DESCRIPTION
SA-DVN-2S 12-Port SH Secure DVI-I KVM with
Audio
PS12VDC2A 112-VDC, 2-A power adapter with
center-pin positive polarity.
1Quick Start Guide
A full manual can be downloaded from
www.ipgard.com/documentation/
DESIGNED
AND MADE
IN THE USA
NOTICE
The information contained in this document
is subject to change without notice. iPGARD
makes no warranty of any kind with regard
to this material, including but not limited to,
implied warranties of merchantability and
tness for a particular purpose. iPGARD
will not be liable for errors contained
herein, or for incidental or consequential
damages in connection with the furnishing,
performance, or use of this material. No
part of this document may be photocopied,
reproduced, or translated into another
language without the prior written consent
from iPGARD, Inc.
20170518
Toll Free: (888)-994-7427
Phone: (702) 800-0005
Fax: (702)-441-5590
WWW.iPGARD.COM
EDID LEARN HARDWARE INSTALLATION
1. Ensure that power is turned off or disconnected from the unit and the computers.
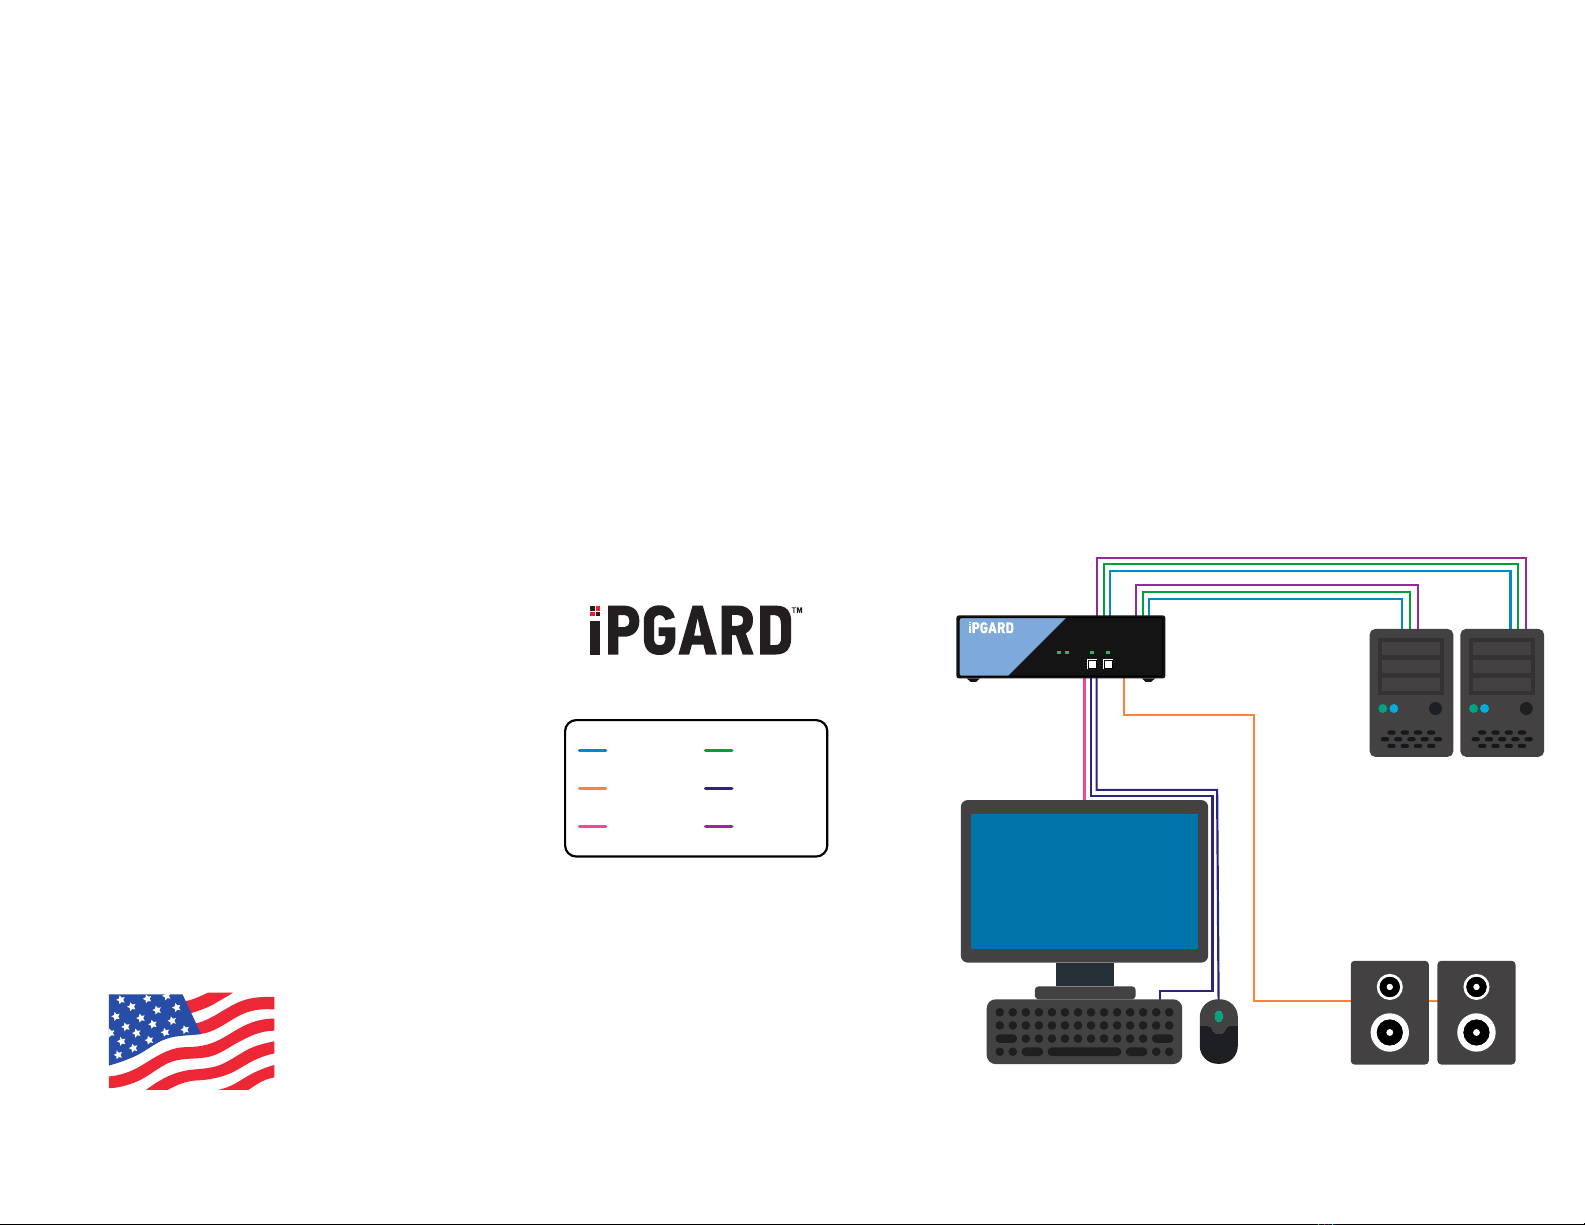
2. Use DVI-I cables to connect the DVI-I output ports from each computer to the corresponding
DVI-I in ports of the unit.
3. Use a USB cable (Type-A to Type-B) to connect a USB port on each computer to the
respective USB ports of the unit.
4. Optionally, connect a stereo audio cable (3.5 mm to 3.5 mm) to connect the audio output of
the computer(s) to the audio in ports of the unit.
5. Connect monitor(s) to the DVI-I out console port of the unit using DVI-I cable(s).
6. Connect a USB keyboard and mouse in the two USB console ports.
7. Optionally, connect stereo speakers to the audio out port of the unit.
8. Finally, power on the secure KVM switch by connecting a 12-VDC power supply to the power
connector, and then turn on all the computers.
Note: You can connect one monitor to the single-head KVM switch. The computer connected
to port 1 will always be selected by default after power up.
Note: You can connect up to 2 computer to the 2 port KVM.
DESIGNED
AND MADE
IN THE USA
The KVM switch is designed to learn a
connected monitor’s EDID upon power up. In
the event of connecting a new monitor to the
KVM a power recycle is required.
The KVM switch will indicate the unit’s
EDID learn process is active by ashing
the front panel’s LEDs in sequential order.
Starting with the LED above button “1” on
the front panel, each LED will ash green for
approximately 10 seconds upon beginning
the EDID learn. Once all the LEDs stop
ashing, the LEDs will cycle and the EDID
learn will be complete.
If the KVM switch has more than one video
board (such as dual-head and quad-head
models), then the unit will continue to learn
the EDIDs of the connected monitors and
indicate the progress of the process by
ashing the next port selection green and
blue push-button LEDs respectively.
A monitor must be connected to the video
output port located in the console space at
the back of the KVM switch during the EDID
learn process.
If the read EDID from the connected monitor
is identical to the current stored EDID in the
KVM switch, then the EDID learn function
will be skipped.
1. Ensure that power is turned off or disconnected from the unit and the computers.
2. Use DisplayPort cables to connect the DisplayPort output ports from each computer to the
corresponding DP IN ports of the unit.
3. Use a USB cable (Type-A to Type-B) to connect a USB port on each computer to the
respective USB ports of the unit.
4. Optionally, connect a stereo audio cable (3.5 mm to 3.5 mm) to connect the audio output of
the computer(s) to the audio in ports of the unit.
5. Connect monitor(s) to the DP OUT console port of the unit using DisplayPort cable(s).
6. Connect a USB keyboard and mouse in the two USB console ports.
7. Optionally, connect stereo speakers to the audio out port of the unit.
8. Finally, power on the secure KVM switch by connecting a 12-VDC power supply to the power
connector, and then turn on all the computers.
Note: You can connect four monitors to the quad-head KVM switch. The computer connected
to port 1 will always be selected by default after power up.
Note: You can connect up to 2 computer to the 2 port KVM.
SA-DVN-2S
DVI-I IN
AUDIO OUT
DVI-I OUT
USB IN
USB OUT
AUDIO IN
SA-DVN-2S
1 2ST1 ST2
A full Manual can be downloaded from
www.ipgard.com/documentation/