IRISTICK H1 User manual

Iristick.H1
User guide
for Android™

https://iristick.com/
1

2
Welcome to Iristick
Welcome to the beginning of your enterprise AR journey.
With the Iristick industrial smart safety glasses, you will
experience the endless possibilities of augmented reality.
Your new pair of Iristick smart glasses - Iristick.H1 - is the
result of more than five years of experience, research and
development and our constant pursuit of perfection. Our
goal is to make a wearable device that can truly support
various frontline workers in the field and connect them to
the correct information and support from remote experts in
real-time.
Iristick.H1 is manufactured by Iristick NV in Antwerp,
Belgium. Proud winner of a Red Dot Design Award (2018),
H2020 European Commission Innovation Grant (N°811820) in
2018 and holder of multiple patents.
Thank you for your support.
The Iristick Team

Table of contents
WELCOME TO IRISTICK
TABLE OF CONTENTS
IMPORTANT USER INFORMATION
PACKAGE CONTENTS
QUICK START
HEADSET
POCKET UNIT
SERIAL & MODEL NUMBER
PHONE
SOFTWARE
CHARGING & STATUS
ADJUSTMENTS
Safety guidelines & warnings
Temperature
Warranties & duties
SAR
Phone compatibility
Metal plate
Iristick Services app
Synchronizing
Setup
Status
Wizzeye app
Iristick Examples app
Iristick Camera app
Iristick Image Viewer app
Partners
Pocket unit status
Swappable plugs
Connecting the charger
Charging the phone & pocket unit together
Charging by USB
Battery & charger
Heads-up display
Zoom module
Connector piece
2
3
5
5
5
5
5
6
7
8
9
10
11
11
12
13
13
13
14
16
17
17
18
18
18
19
19
19
20
21
22
23
24
24
24
25
3

NAVIGATION
MAINTENANCE
SDK & DEVELOPMENT
TROUBLESHOOTING
CERTIFICATIONS
ENVIRONMENTAL INFORMATION
BARCODE EXAMPLES
Please download the latest version of this user
guide at https://support.iristick.com/ as Iristick may
update this user guide without giving notice.
Touchpad
Voice commands
NATO phonetic alphabet
Cleaning the glasses
Storing the glasses
Examples & source code
Web console
Partner program
CE
EN60950
EN55032-CISPR32 Class B ITE
(Information Technology Equipment)
IEC 60825-1:2014
FDA compliance
Manufacturing information
Waste electrical & electronic equipment
Disposal of batteries in the product
RoHs compliance
26
26
27
28
29
29
29
30
30
30
30
31
32
32
32
32
32
32
32
33
33
33
33
35
4

Important user information
Safety guidelines & warnings
Temperature
The Iristick. H1 smartglasses are designed to work in
environments with a temperature between -5° C and 55° C
(23° F and 131° F). Temperatures outside this range may
damage the smartglasses resulting in malfunctions.
Warranties & duties
The Iristick. H1 and its accessories come with a 1-year
worldwide limited warranty, which starts counting on the
date of purchase as stated on the invoice.
SAR
As the Iristick.H1 does not transmit any radio frequency
such as Bluetooth, Wi-Fi or cellular radiation, a meaningful
SAR-value cannot be measured. The amount of radiation
the other electronics transmit is negligible.
Of course, the phone used in combination with the
Iristick.H1 has its own measured SAR value.
- Use of controls or adjustments, or carrying out
procedures, other than those specified herein may
result in hazardous radiation exposure.
- Never aim any laser towards an aircraft or moving
vehicle.
- Do not use the Iristick.H1 while operating a vehicle.
- Always push the heads-up display up, out of the
line-of-sight when not in use.
- Never use a charger and/or adapter that looks
damaged and/or has been tampered with.
- Do not charge and/or use the Iristick.H1 in humid
environments.
- Do not submerge the Iristick.H1 and/or any of the
accessories in any kind of liquid, in order to avoid
electrocution.
- Do not use and/or charge the Iristick. H1 in ATEX
(explosive atmospheres).
- Do not open the Iristick. H1 and/or any of its
accessories, in order to avoid fire or electrocution.
- Always disconnect the headset from the pocket
unit by removing the coaxial cable in-between
before cleaning the Iristick.
- Always disconnect the pocket unit from its charger
and the phone before cleaning the pocket unit
and/or the charger.
- Stop using the Iristick.H1 and/or the mobile phone
if you experience nausea, dizziness and/or any other
complication that might be caused by wearing
and/or using the Iristick. H1 and/or the mobile
phone.
5

Package contents
1.
2.
3.
4.
5.
6.
7.
Optional accessories:
•
•
•
•
Carrying case to store and protect the Iristick.H1 and
its accessories.
Pouch to package and protect both the smartphone1
and pocket unit and clip to a belt.
Barrel jack charging adapter that charges the pocket
unit and the phone when connected. Comes with
swappable, regional plugs.
Metal plate for mounting a mobile phone
magnetically onto the pocket unit.
Headset: the actual smart glasses with attachment
accessories.
Pocket unit: a battery and the connection between the
headset and mobile phone with USB Type-CTM
connection.
A coaxial cable to connect the headset to the pocket
unit.
AndroidTM 2 device with or without pre-installed
applications and a charging adapter with USB-C cable.
Extra pocket unit(s) for more battery power.
In-ear headphones with microphone and 3.5mm plug.
Screw-on connector piece with hex key (size: 1.5mm)
for helmet or headband connections.
- One or more accessories might already be included in
your package.
- Please contact us at info@iristick. com for more
information about the available accessories.
See https: //support. iristick. com/phones for an up-to-
date list of supported and tested phones.
Android is a trademark of Google LLC.
1
2
6
2
1
4
5
3
7
6

Quick start
You can use this section to get started with your Iristick.H1
right away and refer to the sections in the manual if parts
are unclear. However, it is still advisable to read through the
complete manual in order to learn all the ins and outs of the
Iristick.H1.
Please follow the steps below to continue with the quick
start:
1.
2.
3.
4.
5.
6.
7.
8.
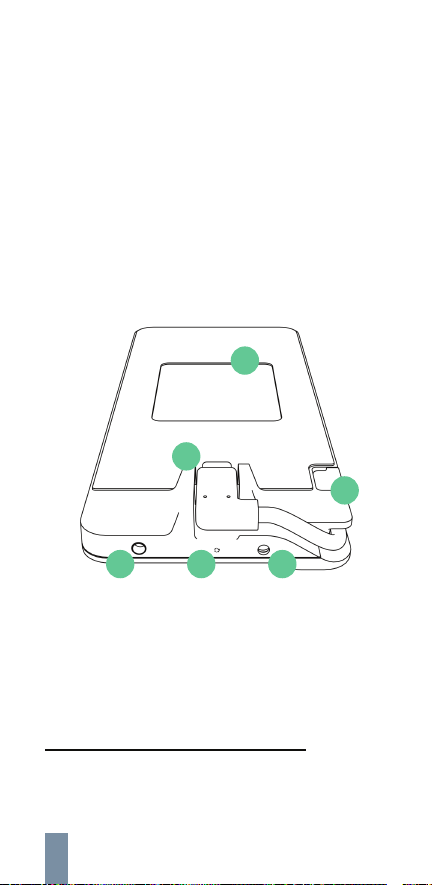
Position the Iristick.H1 flat on a surface with the display
positioned on the side of your dominant eye3 and the
cameras faced front.
Screw the connector piece onto the top of the Iristick.
H1 with the hex key.
Get an Android device with at least Android 7 installed
and a USB Type-C connector with host mode enabled.
Phone > Phone compatibility (p. 11).
Download and install the Iristick Services application
through Google Play4, F-Droid or via our developer
webpage.
Software > Setup > step 1 (p. 14).
Start the Iristick Services application and grant the
permissions.
Software > Setup > step 2 (p. 14).
Connect the phone to the pocket unit via USB and tap
‘OK’ in the dialog on the phone’s screen to open the
Iristick Services.
Software > Setup > step 3 (p. 14).
Connect the headset to the pocket unit with the
coaxial cable and tap ‘START NOW’ in the dialog on
the phone’s screen to activate the heads-up display.
Software > Setup > step 4 (p. 15).
Software > Setup > step 5 (p. 15).
Use the touchpad and/or voice commands to
navigate through the menus and lists of the phone and
launch for example our remote assistance demo
application Wizzeye, the Iristick Examples or the
Iristick Camera.
Software > Wizzeye (p. 17).
Software > Iristick Examples (p. 17).
Software > Iristick Camera (p. 18).
Navigating > Voice commands (p. 27).
Determine your dominant eye via the following link (video):
https:// support.iristick.com/dominant-eye
Google Play is a trademark of Google LLC.
3
4
7

Headset
1.
2.
3.
4.
5.
6.
7.
8.
9.
10.
Heads-up display which can be adjusted in several
directions and rotated to personal preference.
Screw-on connector piece to connect the Iristick.H1 to
a helmet or headband4. Can be screwed onto the
other side, which flips the Iristick. H1 180 degrees
supporting both left and right eye dominant wearers.
Zoom module with 6x optical zoom, laser and LED.
Dual 16MP center camera for a wide-angle view from
the user’s perspective.
Privacy LED to indicate when the cameras are active.
Flash LED to lighten the environment.
Capacitive touch pad which supports the gestures
swipe forward, backward and down and single tap,
double tap and long tap.
3.5mm audio jack for stereo audio with microphone.
Speaker which is aimed towards the ear.
Coaxial connection to connect the headset with the
pocket unit.
Quad microphone array with active noise-control
(ANC) and beamforming, optimized for video calls and
voice commands.
9-axis sensor: accelerometer, gyroscope, head motion
detector, magnetic field detector and measurement of
the absolute rotation of the headset.
8
6
2
1
4
4
5
3
7
8
9
10

Pocket unit
The pocket unit provides the headset with power and
allows communication between the headset and the phone
through the coaxial cable.
It has the following features:
1.
2.
3.
4.
5.
6.
Magnetic bed for mobile phone.
USB Type-C connection for mobile phone.
Detachable USB cable to charge the pocket unit by
USB-C5 in case the barrel jack charging adapter is not
available.
Coaxial connection to connect the headset.
LED indicator for battery status.
Charging port to charge the pocket unit with the 15V
barrel jack charging adapter6.
1
2
3
4
5
6
Please refer to Charging & status > Charging by USB (p. 22)
for more information on how to charge via USB-C.
Please refer to Charging & status > Connecting the
charger (p. 20) for more information about the barrel jack
charging adapter.
5
6
9

Serial & model number
The internal serial number of the headset and pocket unit
can be read-out by connecting the Iristick. H1 to a mobile
phone and launching the Iristick Services application. This
is the serial number of the internal hardware and looks like
123456789A12x7 (pocket unit) or 123456789H12x7 (headset).
The last part of the internal serial number shows the model
number. A pocket unit has A12x as its model number and a
headset has H12x.
- It is advised to take note of the serial numbers of both
the headset and pocket unit.
The serial number
shown on the
outside of both the
headset and
pocket unit, is the
serial number of
the casing and
looks like A00000
(pocket unit – in
the middle of the
top surface) and
H00000 (headset -
on top or bottom,
next to the
heads-up display).
The serial number may contain a trailing letter (e. g. 'A') to
indicate a hardware revision.
7
A00000
10
MODEL: Iristick.H1
COO: Belgium
S/N: H00000

Phone
Phone compatibility
In default mode, the Iristick. H1 mirrors (with screencast)
everything visible on the screen of your connected phone
onto its heads-up display. This allows you to display any8
app installed on your phone on the heads-up display on
the headset.
The Iristick.H1 product line is compatible with most Android
mobile phones9 with at least Android 7 and a USB-C
connector with host mode enabled.
Not all applications are optimized to work with either voice
commands or the accessibility layer that the Iristick’ s
touchpad relies on to detect, highlight and click on-screen
buttons.
Please refer to the list of supported phones at our support
page at https://support.iristick.com/phones or send us an
email at [email protected].
8
9
11

Metal plate
The phone will stick magnetically to the top surface of the
pocket unit when the metal plate is adhered to the back of
the phone.
The easiest way to do this, is as follows:
1.
2.
3.
4.
Remove the paper from the back of the metal plate to
expose the adhesive.
Place the metal plate onto the middle of the pocket
unit surface with the bottom aligned and the adhesive
side at the top.
Carefully connect the phone to the pocket unit by USB
while having the phone lifted from the surface and the
metal plate.
- Push down on the outside of the USB connector to lift
up the USB-C connector on the inside.
Align both the left and right side of the phone with
both sides of the pocket unit and gently push the
phone down towards the surface of the pocket unit.
3
4
12

Software
Iristick Services app
In order to use any of the applications installed on the
phone with the Iristick.H1, it is necessary to install one very
important application. This application is called Iristick
Services and is the bridge between the hardware of the
glasses and the software on the phone.
It is designed to work out-of-the-box as it scans the screen
for clickable items and guides with highlights while
navigating with the touchpad. In addition, it mirrors the
phone’s screen onto the heads-up display with screencast,
routes the audio and processes voice commands offline.
In the settings section of this application you can change
additional settings, for example the touchpad sensitivity,
the brightness of the heads-up display and enable a
remote screen share function called Web console10, which
is known to be useful for developers and demonstrating
purposes.
Synchronizing
Upon connection with the Android device, the Iristick
Services application checks for differences in the firmware
version of the Iristick Services itself, headset and pocket
unit. If necessary, the devices will be synchronized
automatically within a minute.
Synchronizing can be recognized by the following icon in
the notification bar:
- When the Iristick. H1 gets disconnected while
synchronizing, a fail-safe recovery mechanism will be
triggered and the old firmware will be reloaded.
Please read more about Web console in the section SDK &
Development > Web console (p. 30).
10
13

Setup
Please follow the steps below to set up the Iristick Services.
1.
2.
3.
Download and install the Iristick Services application
on the Android phone through Google Play, F-Droid
(add the repository https://apk.iristick.com/release)
or via our developer webpage at
https://developer.iristick.com/ > Getting Started
> Phone setup > Manually.
Start Iristick Services and grant the permissions. You
might need to tap the red banner at the top or open
the notification drawer of the phone and tap the
notification.
The 'Accessibility Service' permission allows the
usage of the touchpad to select items on the screen.
The ‘Display over other apps’ permission allows us to
highlight the selected buttons for easy navigation.
- Some permissions might need to be allowed again
after an update of the Iristick Services.
Connect the phone to the pocket unit via USB-C by
sliding it down on the soft surface. The phone will stick
magnetically to the surface of the pocket unit, thanks
to the metal plate12.
The Google Play logo is a trademark of Google LLC.
See Phone > Metal plate (p. 12) for more information on how to
attach the metal plate to the phone.
11
12
11
14

4.
5.
Tap ‘OK’ in the Iristick Services’ dialog box on the
phone which is asking to ‘Open Iristick Services to
handle Smartglass?’.
- You might find it useful to check the checkbox ‘Always
open Iristick Services when Smartglass is connected’
to have the Iristick Services to start automatically upon
connection (not available on all Android versions).
- This dialog box looks different on Android 11.
- The pocket unit’s firmware might be synchronized. This
will be shown in the notification bar.
Connect the headset to the pocket unit with the
coaxial cable.
- The headset’ s firmware might also be synchronized.
This will be shown in the notification bar.
15

6.
Status
The status of the Iristick Services is shown in two ways:
1.
2.
Tap ‘START NOW’ in the Iristick Services’ dialog box
on the phone to allow ‘Iristick Services will start
capturing everything that’ s displayed on your
screen.’ to activate the heads-up display. This mirrors
the phone’s screen onto the heads-up display.
- You might find it useful to check the checkbox ‘Don’t
show again’ to automatically mirror the screen upon
connection.
- This notification looks different on Android 10 and
higher. Also, the checkbox 'Don't show again' has been
removed.
By the LED on the pocket unit:
The LED on the pocket unit is dark blue if only the
pocket unit is connected to the phone and initialized
properly by the Iristick Services.
It will turn bright blue when the headset is also
connected.
By the Iristick logo in the notification bar:
Only the outer ring of the Iristick logo is shown when
only the pocket unit is connected to the phone and
initialized properly by the Iristick Services.
The full logo is shown when the headset is also
connected.
16

Wizzeye app
Wizzeye is our free and open-source remote assistance
demo application, created for our customers to quick start
with the Iristick.H1 and for demo purposes.
In order to start with Wizzeye, please follow the steps
below:
Iristick Examples app
The Iristick Examples app is a simple application that
serves as an example to showcase all the features the
Iristick.H1 series has to offer. Its main goal is to function as
an example to developers as the source code is available
for download on our developer page15.
- Please note that we do not give any kind of support on
Wizzeye. A full-fledged remote assistance application
by one of our partners is strongly recommended.
Contact us or refer to our webpage
https://iristick.com/partners/ to get to know our
partners.
Install the latest version of Wizzeye through Google
Play or via https://wizzeye.app/.
Launch Wizzeye.
Grant the permissions.
Tap 'More options' > 'Settings' at the top right and fill in
the STUN and TURN credentials.
- Contact us to get your temporarily credentials to pass
through firewalls13 by using a TURN server.
Enter or generate a (new) room name.
Tap ‘JOIN’ to join this room on the Wizzeye server.
Share this room within Wizzeye via the share button or
have the remote observer (who is viewing the stream
through a browser14) visit https://wizzeye.app/
and enter the same room name over there.
- Please note that only one glasses wearer (with the
Iristick. H1 and Wizzeye application) and one remote
observer (via a browser) can be connected together at
once.
- Voice commands are disabled in Wizzeye when in a
call to avoid interference while talking.
13
14
15
Please make sure to open TCP port 433 for Wizzeye.
Please use a Chromium-based browser for the best
performance.
Please visit https: //developer. iristick. com/latest and click
'Download SDK package' to get a copy of the source-code.
•
•
•
•
•
•
17

Iristick Camera app
When the Iristick Services have been installed, the Iristick
Camera app will be installed too as it is bundled with the
Iristick Services.
This application allows you to take pictures or record video
with either camera on the headset and supports voice
commands16.The recordings will be saved on the internal
storage of the mobile phone.
Iristick Image Viewer app
When opening a picture from a file manager or gallery
application while the Iristick. H1 is connected, the image
may be opened17 with the Iristick Image Viewer app.
This viewer makes it possible to zoom and scroll over an
image with the use of the touchpad, voice commands and
even head rotation.
Partners
Refer to our webpage https://iristick.com/partners/ to
get to know our partners and the software solutions they
have built for Iristick. You can contact them directly or send
us an email at either [email protected]om or
support@iristick.com if you would like us to bring you into
contact with the right software partner for the best-fitting
solution.
If you happen to be a developer and you would like to join
our partner program to get your software running on
Iristick, please visit https://iristick.com/developers/ or
send us an email at inf[email protected] in order to get in
touch with us. Our sales team is happy to help.
16
17
Please refer to Navigating > Voice commands (p. 27) for a list
of these and all other available voice commands.
Depending on the default settings on which app Android
should open to show images.
18

Charging & status
Pocket unit status
Check the battery status of your Iristick. H1 before use by
shaking the pocket unit gently back and forth. The LED
indicator at the front of the pocket unit will indicate the
level of charge and the connection status:
Swappable plugs
The AC/DC adapter comes with 3 interchangeable plugs
for the following regions:
To apply one of the plugs, push the plug onto the adapter
and twist a few degrees to the right, until you hear a “click”
sound.
To change the plug, twist the plug a few degrees to the left
while pushing the “push” button.
Green = charged.
Yellow = battery is running low.
Red = empty. Please charge the pocket unit.
Dark blue = connected to a mobile phone.
Bright blue = connected to both headset and
smartphone.
Blinking (any color above) = charging (with color
status).
EUR
Europe
GBR
Hong Kong,
Qatar, Republic
of Ireland,
Singapore and
the United
Kingdom
USA
Japan and
North
America
click!
19
Table of contents
Other IRISTICK Smart Glasses manuals