ista Breeze i200 User manual

i-200
ORIGINAL-
INSTRUCTIONS
- Keep handy at the place of use -
Wind turbine system

EarthSafe
I Contents
WHAT YOU HAVE RECEIVED ?........................................................................3
WHAT DO YOU NEED FOR ASSEMBLY ?................ .................................3
LOCATION OF THE WIND CHARGER ..........................................................4
General considerations
Construction on a boat
ASSEMBLY & INSTALLATION
Assembly of the rotors
ELECTRICAL CONNECTION
WIRING
13
...................................................4
.........................................................5
Construction on land ..…....................................... 6
.............................................................7
.................................................
BATTERY............................................................................................................................ 9
CABLE SPECIFICATION ................................................................. 10
.............................................................................10
..................................................................................11
12
GETTING STARTED ....................................................................................................
INSPECTION AND MAINTENANCE ............................................................
Page
PREFACE ..................................................................………….……. 2
7
Attaching the generator to the tower ............ 8
Final mechanical check ........................................................8
1of 13 Translation of the original instructions iSTA wind turbine system 24.07.2018I00

EarthSafe
PREFACE
This user guide contains important information regarding your istaBreeze
Wind turbine and its installation and operation. Please lift these Instructions for use as a reference book.
Please read these operating instructions thoroughly before installing and commissioning your
wind generator system.
The istaBreeze i200 Windcharger is designed to use a battery bank (battery) to generate a DC
power supply for devices of 12V, lighting, etc. It is also ideal for a professional or recreational
application requiring the ability to charge batteries in locations that are not connected to the
public grid. The assembly and operation of the wind generator takes place outdoors.
WARNING !
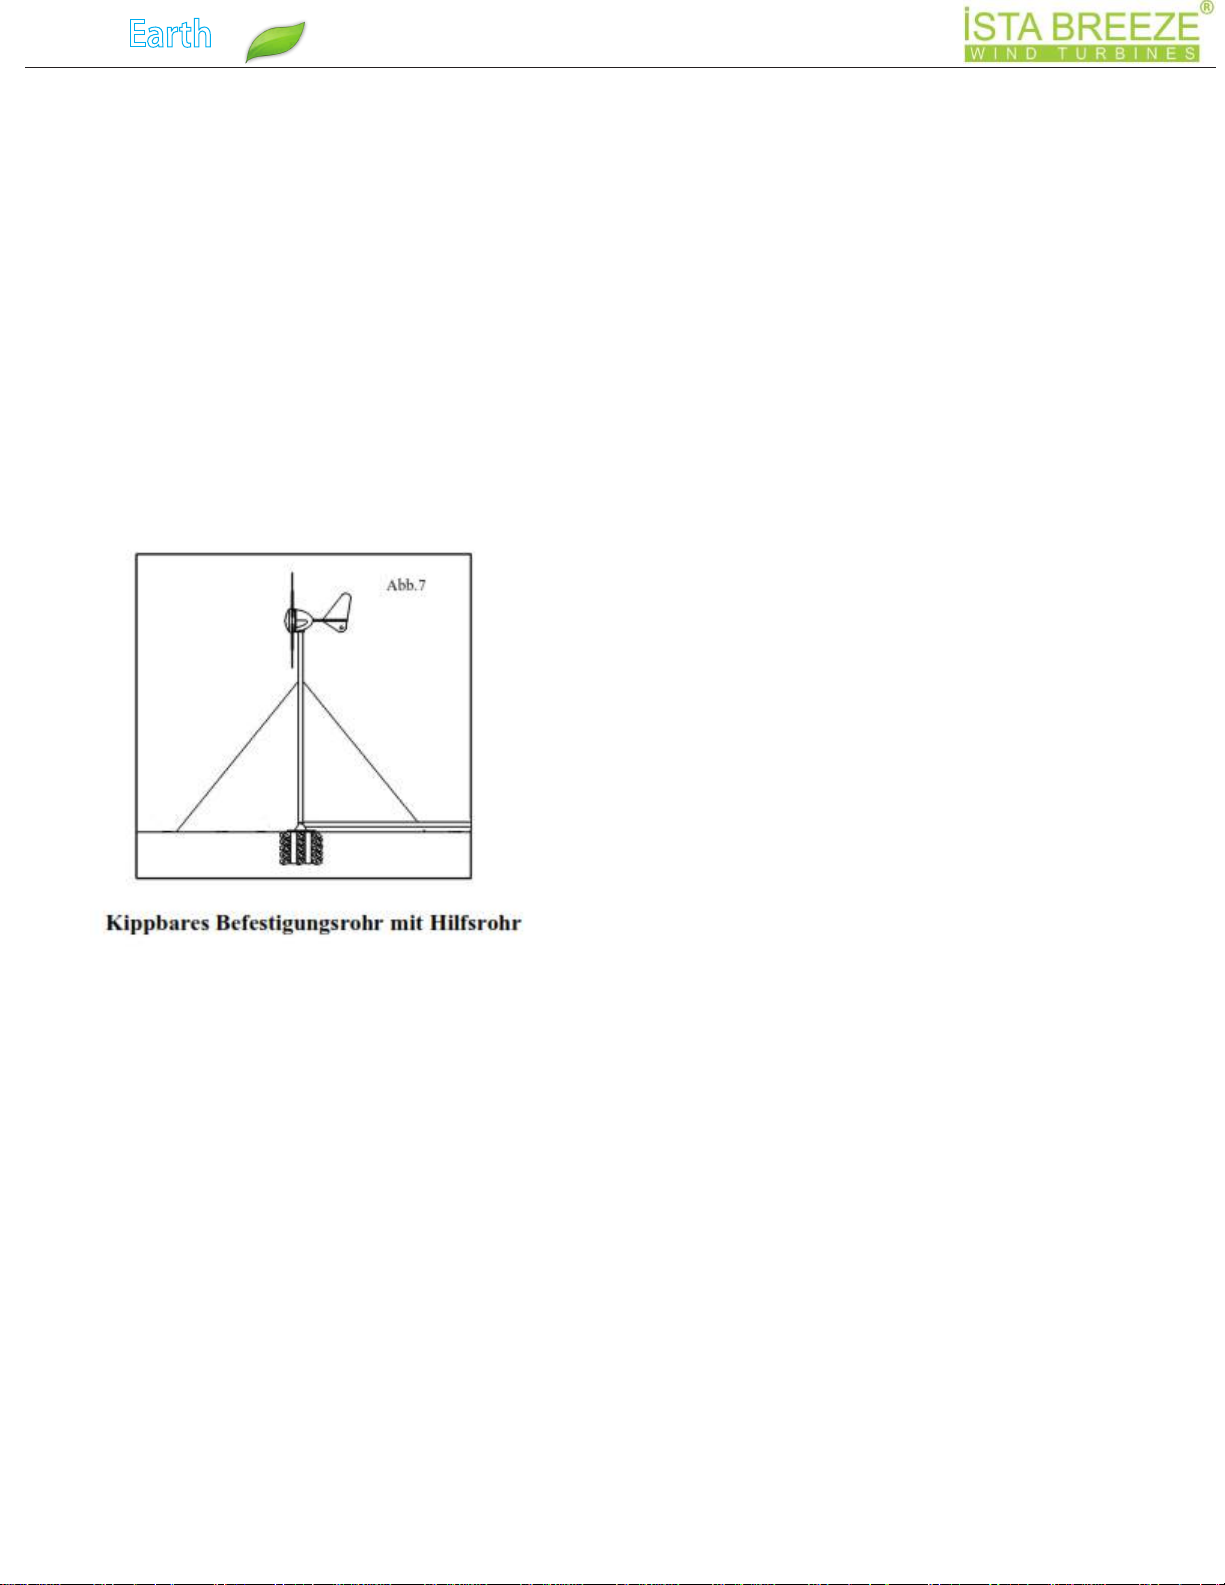
The outer diameter of the mounting tube must not be larger than 48, 5mm. A larger outer
diameter reduces the distance of the tube to the rotor blades and can cause damage to the
wind generator at high wind speeds when the rotor blades are rupturing the mounting tube.
During operation, the wind generator is able to generate voltages that exceed the
nominal voltage. Caution is always appropriate to avoid electric shock.
Before repair work, make sure that the wind generator can not turn.
The wind generator is equipped with ceramic magnets, which can be damaged by improper
handling. The main generator should be handled with utmost care during transportation and
assembly.
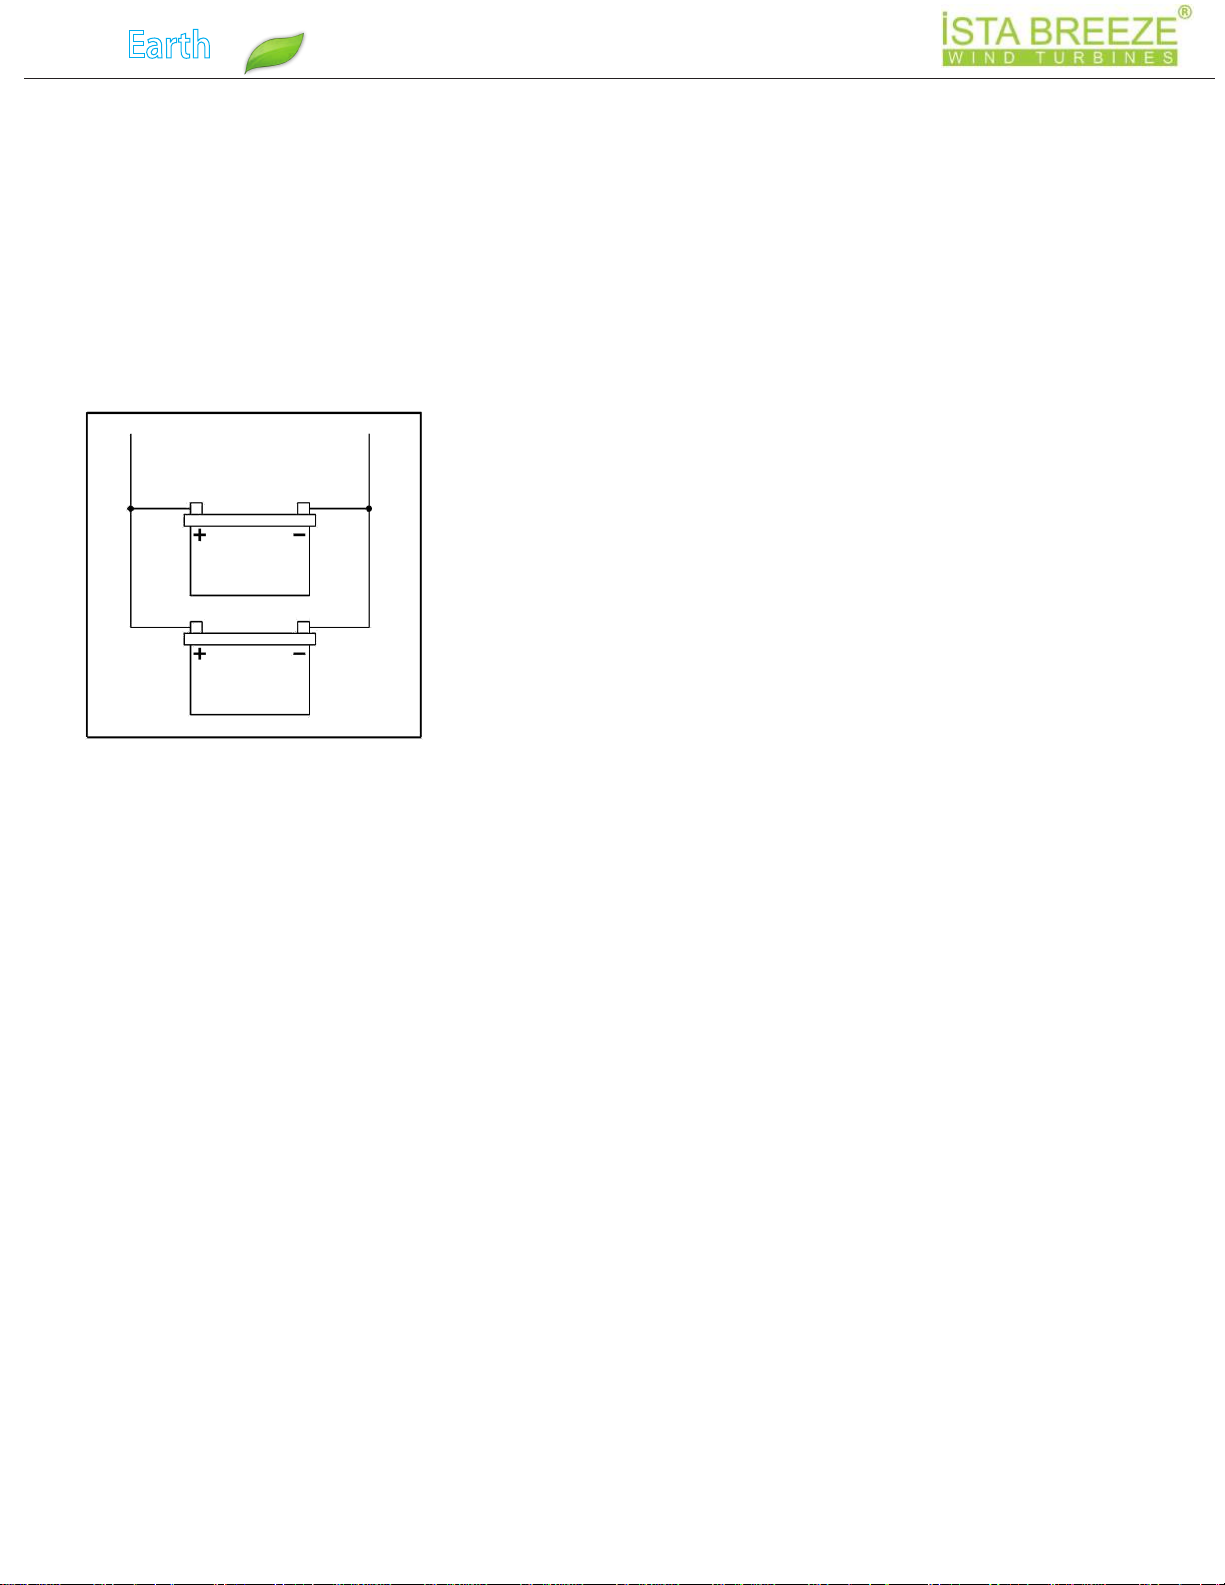
Make sure that all electrical connections (polarity of the cables) are carried out correctly.
An improperly made connection or loose contacts can considerably impair the function and a
wrong installation can damage the wind generator and the guarantee claims are automatically
extinguished.
The supplied fuse must be installed to protect the generator from overloading.
Maintenance or repair of the wind generator should only be carried out by a specialist who is familiar
with the associated hazards or the relevant VDE regulations.
If you have any further questions, please contact your dealer, a qualified electrician or the
manufacturer.
2of 13 Translation of the original instructions iSTA wind turbine system 24.07.2018I00

1 Generator
EarthSafe
WHAT HAVE YOU RECEIVED ?
6 Rotor blades
1 Cover for generator
In case of missing or damaged parts, please contact your dealer or the
manufacturer.
WHAT DO YOU NEED FOR ASSEMBLY ?
Tools
suitable wire stripper
small electric screwdriver
Other items you need
Tower / mounting tube
Electric Wire
Battery(Battery Pack)
Battery terminals
Terminal strips (depending on your chosen system)
3of 13 Translation of the original instructions iSTA wind turbine system 24.07.2018I00

2H
H
2H 20H
EarthSafe
LOCATION OF THE WIND CHARGER
General considerations
The location and height of the mounting tube or tower for your wind turbine is
the major factor in the overall performance of your system.
The unobstructed flow of wind over land and water is often disturbed by a
multitude of obstacles causing shear winds and turbulence.
air layer, which moves close to the land surface. Therefore, the closer you are to the surface, the average wind
speed decreases.
Windshear stands for the interference between the fast moving upper air layer and the slower moving lower
Turbulence caused by wind blowing over obstacles such as boats, trees and buildings. Both the shear wind
and the turbulence decrease with increasing altitude and can easily be reduced by installing the equipment
over them.
It is therefore important that the wind generator is installed at a location that is as
free as possible of disturbed airflow. But keep in mind that obstacles that are
downwind can be as detrimental to performance as obstacles that are against the
wind direction (Fig.1):
WIND DIRECTION
Range of Turbulence
4of 13 Translation of the original instructions iSTA wind turbine system 24.07.2018I00

3/4
7/8“ 10 SWG
Deck (Abb.3)
Mast (Abb.4)
EarthSafe
istaBreeze i200 is designed to fit an
aluminum or stainless steel tube with an
inside diameter of 41mm. The outer
diameter must not be greater than 485
mm.
Suitable pipes: stainless steel 1 “ 16 SWG
Aluminium 1
We suggest the following fixings,
which you can choose according to
preference or site conditions:
A suitable pipe attached to the deck with
appropriate attachment and guy ropes is
the most widely used method of
securing the wind charger to yachts,
mounting kits.
An attachment to the mast is suitable for
larger yachts, as the wind power, the
higher the wind generator is attached,
increases.
Construction on a boat
The wind generator must be placed in a
safe position, at least 2.3 meters above the
deck, so that the rotor blades are not
touched by obstacles that could interfere
with the rotor blades (Fig.2).
5of 13 Translation of the original instructions iSTA wind turbine system 24.07.2018I00

Kippbares Befestigungsrohr mit Hilfsrohr
EarthSafe
Construction on land
The istaBreeze i200 is designed to fit over
an aluminum, steel or stainless steel tube
with an inside diameter of 41mm. The
outer diameter must not be greater than
48.5 mm. The standpipe must be anchored
in a concrete foundation. And the depth of
the anchorage should be 1/3 of the total
pipe length.
A suitable mounting tube is a 6.5 meter
high, central, galvanized tube. The pipe
must be held in place by at least four
tethers.
The attachment points for the tethers on the
tower must be securely attached to the
tower and should be welded for safety.
The wire tension should be at least 4mm in
diameter.
The anchors in the ground should be at least
5mm in diameter.
The fixing screws should be at least 5mm in
diameter.
All items should be galvanized or stainless
steel to protect against possible corrosion.
When tensioning ropes are tied together, the
sling must include a rope thimble and must be
secured with a minimum of three slings.
All fortifications on the ground must be
adapted to the soil conditions.
We recommend that you use tilting towers
as these allow for easier installation and
easier lowering for access to the wind
generator. One type of tilting towers is
shown in Fig.
6of 13 Translation of the original instructions iSTA wind turbine system 24.07.2018I00

EarthSafe
ASSEMBLY AND INSTALLATION
2. Lay the rotor blades as shown in the figure (Fig.8).
The rotor blades can only be fixed in this position. Place
the rotor blades in the socket until they stop. The rotor
blade can then be easily inserted by means of a lever
movement. If need be, you can also help with a rubber
mallet.
blade.
3. You need three screws for each rotor
self-tapping
4. Attach the remaining rotor blade bolts from
the front of the rotor hub.
5. Check that all screws are tight (do not
overtighten the screws).
6. Attach the generator cover using the 3 screws.
be
perf
orm
ed
afte
r
the
gen
erat
or
has
bee
n
atta
che
d to
the
tow
er.
The attachment of the rotor blades and the cover can also
be performed after the generator has been attached
to the tower.
THE WIND CHARGER
Fixing the Rotor blades (Abb.8)
1. Place the generator with the hub side (hub) on a flat surface.
7of 13 Translation of the original instructions iSTA wind turbine system 24.07.2018I00

Abb.9
(Abb.9)
EarthSafe
Attaching the generator to the Tower
1. The tower adapter can be ordered and
fits into the istaBreeze tower with an
inside diameter of 47mm. Or note
(construction on land)
2. Drill four 10.5mm diameter holes into
the mounting tube (about 20mm from
the pipe end).
3. Attach the wind generator to the
mounting tube using the 2 Allen screws
and circlips.
Final mechanical
Check
1. Check that all screws are tight.
2. Check that the generator can rotate
freely.
Do not set up the wind generator in this development
phase yet. The turbine must be connected to the
battery before the rotors can turn in the wind.
8of 13 Translation of the original instructions iSTA wind turbine system 24.07.2018I00

Abb.10
Total = 12v
120Ah
1440Wh
12v
60Ah
12v
60Ah
EarthSafe
BATTERY
Leisure and professional batteries are
specially designed for good performance in
charge / discharge phases. Batteries are the
most important part of your battery
charging system and should be selected
according to your charging needs. They
should be provided with at least 3 days
power reserve. This will reduce the
workload, extend battery life and ensure
system reliability during low wind periods.
Ständige Anschlüsse sollten immer an den
Permanent connections should always be
made to the battery terminals. Never use
crocodile clips or similar. The battery
terminals should be greased with Vaseline
or similar.
The batteries can be connected as follows:
parallel to increase the ampere hours (Fig.10)
Red is + Positive
Black is - Negative
9of 13 Translation of the original instructions iSTA wind turbine system 24.07.2018I00

0-20
12 Volt
EarthSafe
2,5
21-30 4
31-45 6
46-80 10
Table 1
Cable Length Cable Size
(m)
(mm²)
Red is + Positive
Black is - Negative
CABLE SPECIFICATION
The cable used to connect the wind
generator to the batteries should be
selected according to Table 1. Using a
smaller cable than recommended in the
table will reduce the performance of the
charging system.
Cordsets are available from your dealer or
manufacturer.
10m x 2.5mm² including the battery
lugs (CA-10/11) 20m x 2.5mm²
including the battery lugs (CA-10/12)
ELECTRICAL CONNECTION
1. Feed the selected cable (see Table 1)
along the inside of the pipe.
2. Connect the bare wind generator cables
to the cable using the supplied terminal
block. Pay attention to the polarity.
Red is + positive
Black is - negative
Wrap electrical tape around this connector to
protect it from environmental impact.
3. Attach the wind generator to the tower
again using the screws provided.
4. Last electrical connection:
Connection with the battery.
10 of 13 Translation of the original instructions iSTA wind turbine system 24.07.2018I00

EarthSafe
I 200
11 of 13 Translation of the original instructions iSTA wind turbine system 24.07.2018I00

EarthSafe
Before you hoist and mount the wind generator, check that:
1. All final mechanical controls have been performed.
2. The cable is not pinched.
3. All electrical connections are properly secured and secure.
The wind generator can now be positioned.
Be sure to avoid any moving parts while setting up and setting down the wind generator.
After installation, anchor the system in a vertical position. The performance of your wind
generator may be affected if the pipe is not upright.
GETTING STARTED
12of 13 Translation of the original instructions iSTA wind turbine system 24.07.2018I00

EarthSafe
INSPECTION AND MAINTENANCE
The istaBreeze i200 does not require scheduled maintenance, but an annual inspection
should be performed to monitor the overall condition of the plant.
Before testing, the turbine should either be lowered to the ground or tied down to
prevent the generator from turning. To prevent the generator from turning, please
follow the procedure below:
1) Use the rudder to turn the wind generator out of the thread (180 °). An inlet at the
helm will help. The turbine will eventually come to a standstill.
2) Tie a rotor to the mounting tube to prevent it from rotating.
While the generator is shut down, the following routine checks should be
performed:
3) Check that the screws of the rotors are well tightened.
4) Check that all other moms, bolts and screws are well tightened.
5) Check whether the yaw axis can move freely.
6) Check the condition of the tower construction.
7) Check the tension of the wire ropes if they have been installed.
The tension of the wire ropes should be checked regularly during the first 12
months
8) The system can be cleaned with a mild detergent and washed with water to remove dirt.
13of 13 Translation of the original instructions iSTA wind turbine system 24.07.2018I00
Table of contents
Other ista Breeze Wind Turbine manuals