iSwag JOURNEY IS-Q3100 User manual

User Guide

1
WELCOME
Thank you for selecting the iSWAG IS-Q3100/Q3200
Journey model. By reading this manual you will fully
understand the operation of your mobile phone and will
appreciate its simple operation and functionality.
The phone Journey IS-Q3100/Q3200 is designed for use in
a GSM network environment. This model is Quadband
GSM quad band (850/900/1800/1900 MHz) and is
available in two versions:
IS-Q3100 Single SIM
IS-Q3200 Dual SIM
The Journey IS-Q3100/Q3200 provides many functions
practices such as sending messages, audio and video
player, camera and video recorder, E-book, games,
B-tooth, alarm clock, calculator, auto power on and off,
it which is very convenient for work and personal
activities.
For purposes of worldwide distribution, the default
language of this mobile phone GSM is Spanish.
You can set the language you need with the following
instructions:

2
1 Input the switching code of your target language under the STANDBY
status. The switching codes are listed as follows:
English
Spanish
Portuguese
*#0044#
*#0034#
*#0351#
2 Please press the DIAL KEY after inputting the switching code, then you
will get the language you need which is already loaded in the software.
For example: The default language is English, but you need Spanish.
Please input the relevant switching code “*#0034#”, then press the DIAL
KEY, now you have got Arabic!
*Specifications are subject to change without prior notice.

3
CONTENT
1 SAFTEY NOTICE................................................... 3
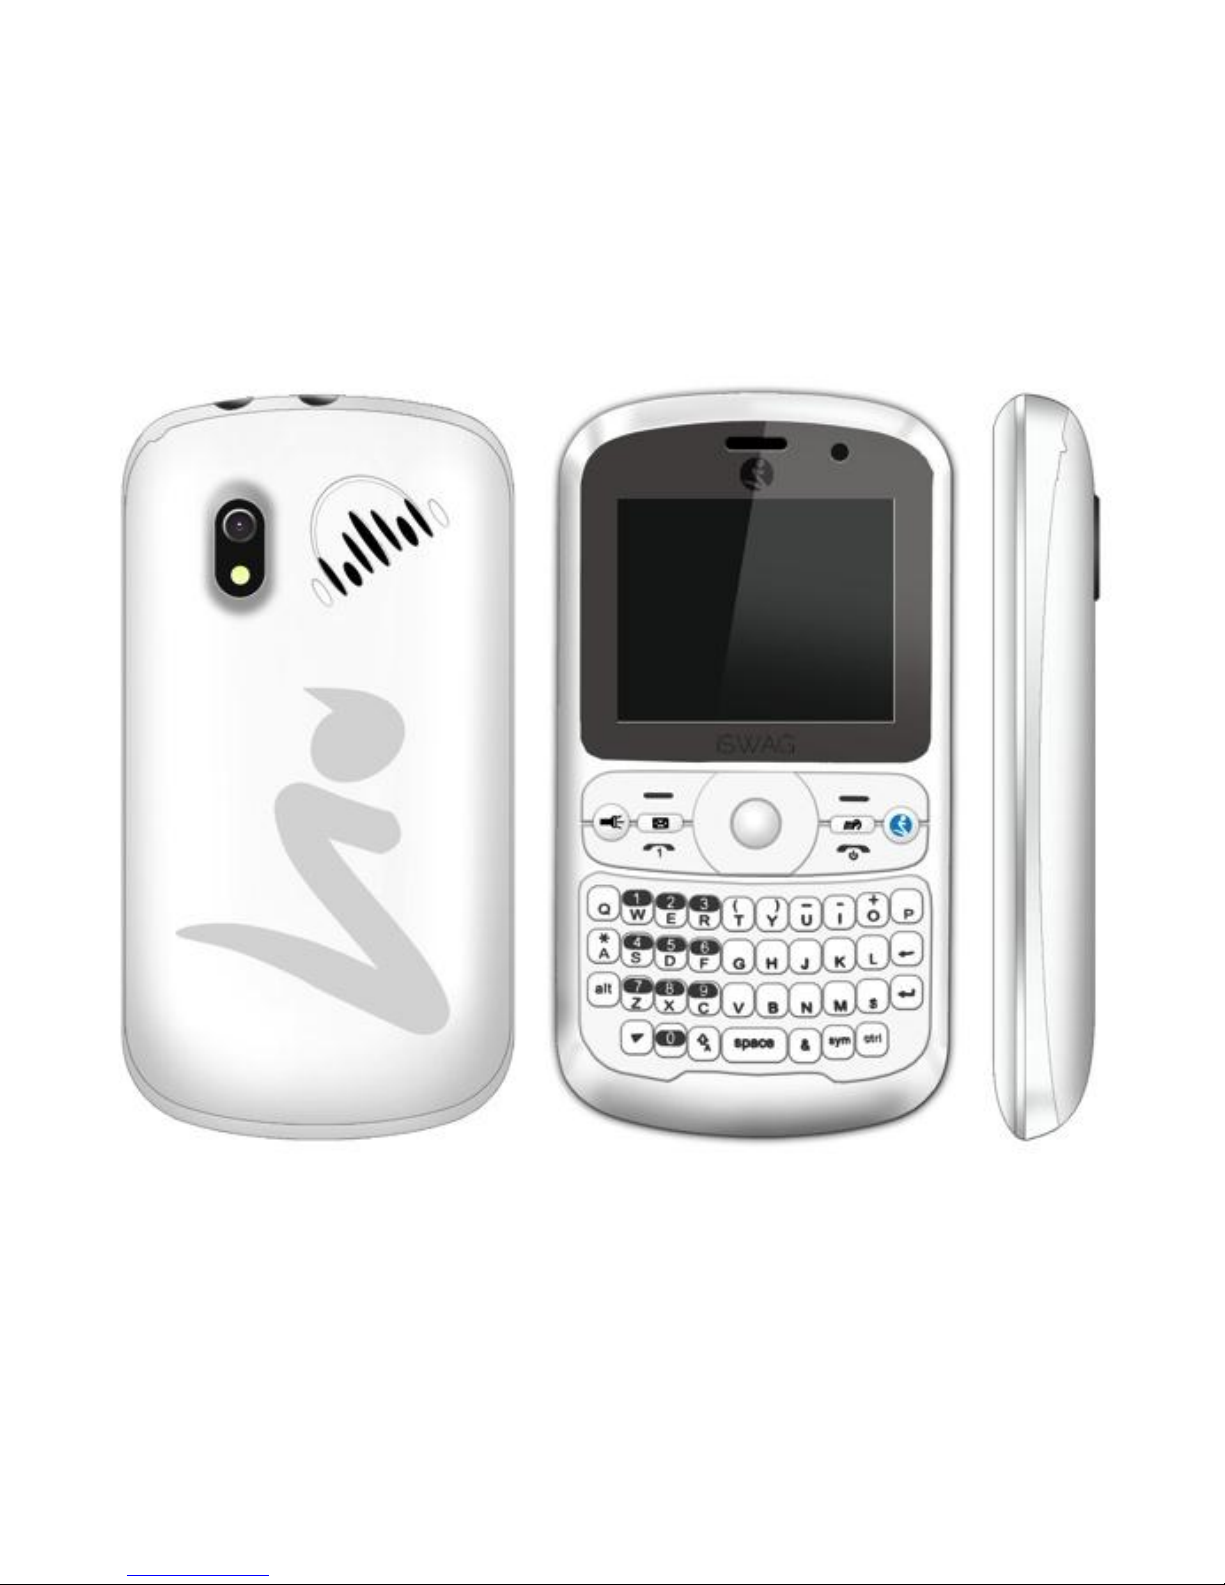
2 YOUR DEVICE .................................................... 5
3 KEY INSTRUCTIONS ............................................ 6
4 BEGIN TO USE .................................................... 8
4.1 INSTALL SIM CARD AND BATTERY .................. 8
4.2 CHARGE THE BATTERY ..................................... 8
4.3 SECURITY CODE ............................................... 9
5 BASIC FUNCTIONS ........................................... 10
5.1 POWERING ON/OFF THE MOBILE PHONE ... 10
5.2 LINKING TO THE NETWORK ........................... 10
5.3 DIAL ................................................................. 10
5.4 TORCH ............................................................. 13
6 MENU LIST ......................................................... 13
6.1 PHONEBOOK .................................................. 13
6.2 CALL CENTER ................................................. 14
6.3 MESSAGING ................................................... 18
6.4 MULTIMEDIA ................................................... 21
6.5 FILE MANAGER ............................................... 26
6.6 FUN AND GAMES ........................................... 26
6.7 ORGANAIZER ................................................. 27
6.8 SETTINGS ......................................................... 29
6.9 USER PROFILES ................................................ 31
7 EXTRA ................................................................ 31
8 SERVICES .......................................................... 32
9 SHORTCUTS
……………………….………………33
10 FAQ AND SOLUTIONS …………………..………33
11 IMPORTANT SECURITY INFORMATION….…….35

4

5
1 SAFETY NOTICE
You should read the following information carefully before using the
phone in order for you to use it safely and effectively.
Traffic safety is first
If you dial or answer a call while driving, please use the
hands-free device or use your phone after parking the vehicle.
Power the phone off at gas station
To avoid the risk of any explosion, please switch off the phone
at gas stations and places near fuel, chemicals or other dangerous
substances.
Power the phone off on flight
Please make sure your phone is switched off or in flight mode
during the whole flight, for mobile phone will interfere with the
communication network for the airplane.
Power the phone off at hospitals
Please switch off your phone near medical devices or places
which phone using is forbidden.
Disturbance
All phones may be susceptible to interference, which could
affect performance.
Use sensibly
Use only in a normal and proper manner. Do not put your
hand on the part of internal antenna since it is battery-costly and will

6
affect the conversation quality.
Qualified Service
Only qualified personnel may install or repair phone equipment.
Installing or repairing the mobile phone on your own may bring great
danger and violates the warranty rules.
Connectivity
If you need to connect your phone to other devices, please
read the user guide of that device carefully for safety.
Accessories
Use only approved accessories and batteries.
Children safety
Keep your phone and accessories out of the reach of
children.

7
2 YOUR DEVICE
ISWAG JOURNEY IS-Q3100/Q3200

8
3 KEY INSTRUCTIONS
Keys
Description
Left/Right key
In editing, press the left/right key to move
the cursor left and right; in some sub-menus,
press the right key to open the selected
menu, press the left key to back to the
previous menu.
SIM1/2
dial key
Dial or receive a call. In standby mode,
view the dialed numbers. or press it in
standby state to show the latest call
records.
End key
Press it to end a call being dialed or end an
ongoing call; or press it to exit the menu
and return to the standby state; or hold it for
two or three seconds to power on or off the
mobile phone.

9
Navigation
key
Press them to scroll the options when
browsing a function list. In edit state, press
direction keys to navigate. In standby state,
press a direction key to enter the specified
function page. You can also customize
direction keys to match the desired
functions. In conversation status, press up or
down direction key to tune the sound
volume.
Central key
Press it to confirm your selection. In standby
mode, press the central key to enter the
main menu.
* key
Different functions are shown in different
states or different function menus.
Press * key to input "+" for dialing an
international call, or press and hold * key to
input P or W to call an extension number.
Press * key in edit status to select a symbol.
# key
Long press the # key: to exchange
silence/general mode.
Press the # key in edit state to switch
between input methods, or press it after
pressing left soft key to lock/unlock the
keyboard when the keypad.
Number keys
0-9
Press number keys 0 through 9 in input or
edit state to input numbers and make a
call; press and hold 1 for voice command
or setting.
Shortcut key
In standby state, press this key to enter the
Message and MP3 interface.
Symbol&Letter
Kepad Area
Press these keys to input Letter and Symbol.

10
4 BEGIN TO USE
4.1 Install SIM Card and Battery
Please be sure to disconnect the phone with the adapter before
disassembling the battery.
This version is a dual-card dual-standby phone which can be inserted
with 2 SIM cards. Both SIM cards can register onto an identical network.
Each SIM card is included in the socket generally. The SIM card 1 is
inserted in the Socket 1 and SIM card 2 in Socket 2. You should be
careful to use, insert and disassemble the SIM card because the
contact of the SIM card is easy to be scraped or bent to damage.
1. Disassemble the battery cover.
2. Disassemble the battery.
3. Slide the SIM card into the socket.
4. Insert the battery.
5. Cover the battery.
4.2 Charge the Battery
The phone will release the warning tone displaying the insufficient
battery capacity with the indication of the empty battery icon when
the battery capacity is low. Under this case, the phone may not be
used in partial functions. The phone will power off automatically when
the battery capacity is too lower. Please charge the battery.
The battery icon on the screen will flash when the phone is being
charged. After completion of charging, the full battery icon will display
on the screen. The charging animation will be displayed on the screen
when the phone is being charged under the power-off state. After
completion of charging, the screen will display the prompt system of
finishing charging. Under the standby mode, it takes 2-3 hours to
charge the battery.

11
1. Insert the adapter in AC electric outlet.
2. Connect the adapter to the phone.
3.The symbol indication of charging the battery appears on the
screen. (The symbol indication of charging the battery can
appear after waiting for a few minutes if the battery capacity is
exhausted).
4.Pull the adapter apart from the power supply socket and then
pull the adapter out of the phone after completion of the
charge.
4.3 Security code
PIN: The PIN (Personal identification number, 4 to 8 digits) code
prevents your SIM card from being used by unauthorized people. In
general, the PIN is supplied with SIM card by the network operator. If
PIN check is enabled, you need to input the PIN each time when you
power on your mobile phone. The SIM card will be locked if you input
wrong PIN code for three times. To unlock the PIN, please contact
your local service provider.
PIN2: The PIN2 comprises four to eight digits. Provided along with an SIM
card, it sets functions such as call billing and fixed dialing. Please
contact the network operator to verify whether your SIM card supports
these functions. If the PIN2 you input at three consecutive times is
wrong, the PIN2 will be locked. To unlock the PIN2, please contact your
local service provider.
PUK: The PUK code (Personal Unlocking Key, 8 digits) is required to
change a blocked PIN. It is supplied with SIM card. If not, contact your
network operator. If you input wrong PUK code for 10 times, SIM card
will be invalid. Please contact the network operator to replace the SIM
card.

12
Phone lock code
The phone lock code may be set to prevent your mobile phone from
being misused. In general, this code is provided along with the mobile
phone by the manufacturer. The initial phone lock code is set to 1234
by the manufacturer. If the phone lock code is set, you need to input
the phone lock code when powering on the mobile phone.
5 BASIC FUNCTION
5.1 Powering On/Off the Mobile Phone
Hold the End key for a while to power on the mobile phone.
A power-on animation appears on the display screen.
Input the phone lock code and press the OK key if the mobile phone
prompts you to input the phone lock code. The default phone lock
code is 1234.
Enter the standby interface.
To power off the mobile phone, hold the End key for a while.
5.2 Linking to the Network
After the SIM card and the mobile phone are successfully unlocked,
the mobile phone automatically searches for an available network.
After finding a network, the mobile phone enters the standby state.
When the mobile phone is registered in the network, the name of the
network operator is displayed on the screen. Then you can dial or
receive a call.
5.3 Dial
You can dial with several ways as follows:
Input the phone number (should affix the international/national/
regional code or district code if necessary) and then press
[Send1/Send2] under the standby mode.

13
Press [Send1/Send2] to dial a phone number listed in the recent call log
under the standby mode.
Press and hold numeric keys [2]-[9] to dial the shortcut phone number
set on the numeric keys under the standby mode.
Dial with the contact name or phone number in the phone book.
The phone supports dialing the international emergency phone
number, such as 112 and 911 etc. With the phone, you can dial an
emergency call at any country or region under the normal situation
regardless of SIM card inserted when the phone is located within the
coverage of the GSM network. Input the emergency phone number
and press [Send1/Send2] to dial out.
Answer Incoming Call
You can perform as follows when there is an incoming call:
Press [Send1/Send2] to receive the incoming call. You can use the
earphone to answer the call when the generic earphone or B-tooth
earphone is inserted in the phone.
Press [End] to decline an incoming call.
Reject a call
When there is an incoming call, you can press 【End Key】to reject it.
Directly call on Home Screen
On the Home Screen, input the area code and phone number.
Briefly press 【Call Key 1/2】to call from SIM 1/2.
Make an international call
Enter the country code (To enter “+”, just press【* Key】twice).
Enter the area code (Usually exclude the first “0”) and the
phone number.
Briefly press 【Call Key 1/2】to call from SIM 1/2.

14
Call from Phonebook
Enter the phonebook to select the desired information.
Briefly press 【Call Key 1/2】to call from SIM 1/2.
Redial from call history
Enter the main menu and select [Call center], then select your
desired number.
On the Home Screen, press【Call Key 1/2】to check the call history, and
selected the desired dialed number.
Briefly press 【Call Key 1/2】to call from SIM 1/2.
Dial an extension number
Enter the switchboard number.
Press * quickly when P appears, then enter the extension number.
Briefly press 【Call Key 1/2】to call from SIM 1/2. The extension number
will be transmitted in few seconds after getting through the
switchboard.
Make an emergency call
Enter the emergency phone number.
(1) Press briefly 【Call Key 1/2】to call from SIM 1/2.
Function During Call
You can use many functions during the call process.
Option During call
Press <Option> to use the following options:
Hold single call: temporarily hold the current call.
End single call: end the current call.
New Call: call the opposite party to build a Call to Many.
Phonebook: enter in the phonebook menu.
Messages: enter in the SMS menu.
Mute: open or close the mute mode.

15
5.4 Torch
On the Home Screen, Long press [OK] keys can be used to open or
close the torch feature
6 MENU LIST
6.1 Phonebook
You can save the phone number in SIM cards or phone. The mobile
phone can store up to 300 telephone numbers. The number of
telephone numbers that an SIM card can store depends on the storage
capacity of the SIM card. Press RSK under the standby mode or press
shortcut to enter Phonebook function.
Quick search
Select to enter the telephone directory browser interface, according to
the soft keyboard in the English alphabetical list of names to find points
of the first letter of the alphabet can be quickly identified.(Note: SIM1/2
phone messages were used next to the user name to distinguish
between small numbers 1/2) Press Dial key can directly call this searched
contact, and press End key can terminate the call. Press LSK to Options:
edit, send text message, send multimedia message, call, etc.
Phonebook list
Select a contact in the contact list window and press<Option> to
perform:
View: view the detailed information of a selected contact.
Send text message: send a SMS to the current contact.
Send multimedia message: send a multimedia to the current contact.
Call: Call SIM1/2 selected contact.
Edit: edit the current contact.
Delete: delete the current contact.
Copy: You can copy the contact information to SIM 1/2 and phone.
Move: You can copy contract from SIM Card A to SIM Card B, or from
SIM Card A to handset, or the opposite direction

16
Send contact: send SMS, MMS, B-tooth to the current contact.
Add to Blacklist: Add to blacklist the contact.
Phonebook Settings :You can manage the phonebook with this function.
Preferred storage: choose the priority for the storage location- the
mobile phone or SIM1 / SIM 2 or All.
Speed dial: set quick dial. Up to 8 numbers can be set. In standby
interface, press and hold corresponding number key“2~9” and you
can call the specified number. Speed dial list will be displayed in speed
dial menu. Corresponding number key “(2 ~9) =contacts” will be
displayed if set. If not, corresponding number key “(2~9)=invalid”.
Press LSK to Options:
Human voice prompt::activate/Deactivate this function.
6.1.1 Add new contact
Press navigation key to select “Add new contact” in phonebook list,
then press OK add name, number, etc. to destination.
Phonebook copy
6.1.2 Phonebook backup
Backup contacts the phonebook deposit T card by default phonebook
folder, numbers in phone and SIM card backups to the appropriate
folders respectively. Each of contact with a VCF file storage , will cover
before each backup namesake backup corresponding.
6.1.3 Phonebook Restore
When restore please select Default path : the file Phonebook folder of
T card.
First restore the phone numbers in the phone, add then the SIM card.
Recovery the numbers can only be stored within phone.
6.2 Call Center
Call history
With this function, you can view the information of the missed, dialed,
received or all calls in SIM card 1 or 2。

17
6.2.1 SIM1 call history
Call List
All calls: view all call records.
Dialed calls: Display the recently dialed calls in SIM cards upon entering
in this function.
Received calls: Display the recently received calls in SIM cards upon
entering in this function.
Missed calls: Display the recently missed calls in SIM cards upon
entering in this function.
Select a call in the call list window and press<Option> to perform:
Call: Call use SIM1 selected log.
Send Text message: send a SMS to the current contact.
Send Multimedia message: send an MMS to the current contact.
Add to Blacklist: add to blacklist the contact.
Edit before call: edit before call number and make a call.
Delete: delete this call log.
Delete all: delete all call logs in SIM cards.
6.2.2 Advanced: Call timers: You can view the time record of the last
calls, dialed calls or received calls in SIM cards or zero the call timer in
SIM cards upon entering the function.
SIM1/2 last call: view the time length of last call in SIM cards.
SIM1/2 dialed calls: view the total time length of dialed call in
SIM cards.
SIM1/2 received calls: view the total time length of answered call in
SIM cards.
SIM1/2 reset all: zero the call timer in SIM cards.
SIM1 text msg. counter: Upon entering the function, you can view the
entries of sent and received SMS or zero the SMS counter.
SIM1/2 sent: view the entries of SMS sent.

18
SIM1/2 received: view the entries of SMS received.
Press <Reset > to zero the SMS counter in SIM1.
SIM1/2 GPRS counter: Upon entering the function, you can view the last
sent, last received, totally sent and totally received GPRS flow
capacities or zero the GPRS counter in SIM1.
SIM1/2 last sent: view the last sent GPRS flow capacity in SIM1.
SIM1/2 last received: view the last received GPRS flow capacity
in SIM1.
SIM1/2 all sent: view the totally sent GPRS flow capacity in SIM1.
SIM1/2 all received: view the totally received GPRS flow capacity
in SIM1.
SIM1/2 reset counter: clear all records the GPRS in SIM1.
6.2.3 Call settings
SIM1/2 call settings
Call waiting: New incoming call will be informed during calling. Please
contact your network operator for details. Perform as follows:
Activate: launch the Call Waiting function.
Deactivate: Disable Call waiting function.
Query status: view the present state of this function.
Call divert: This feature enables you to forward incoming calls to
another number or voice mail box.
Following options for call divert can be activated or deactivated. Input
the phone number when activated per your phone’s instruction.
Divert all voice calls: Divert all incoming calls to the preset number.
Divert if unreachable: Divert an incoming call to the preset number only
when the called party is unreachable.
Divert if no answer: Divert an incoming call to the preset number only
when the called party does not answer the call within the specified time.
Divert if busy: Divert an incoming call to the preset number only when
the called party is busy. Press right soft key to divert.
Divert all data calls: Divert an incoming call to the preset number only
when the called party is out of service of your service provider.

19
Cancel all divert:Cancel all call diverting.
6.2.4 Call barring: you can set up as follows:
Outgoing calls
All calls: Restricted all outgoing calls except emergency calls.
International calls: Restricted all international calls.
International calls except home: Only local network call can be made
when roaming. Please contact with the network operator for details.
Incoming calls
All calls: Restricted all incoming calls.
When roaming: Restricted all incoming calls when roaming.
Cancel all: cancel all call restrictions.
Change barring password: modify the password of barring
outgoing/incoming calls.
Line switch: switch between Line 1 & Line 2.
6.2.5 Advance settings
Blacklist
Open or close the blacklist for incoming calls. Input the phone number
to the blacklist or press OK button to select the phone number to be
added to the blacklist.
Auto redial
Set up whether the phone is redialed when the call is not connected.
Press the on/off button to launch or shut down the function.
IP dial
Add or edit IP call number.
Call time reminder
Select to release prompt tone during the call in each integral minute
time.
Auto quick end
Set a time limit. The call will automatically interrupt if there is a time
This manual suits for next models
1
Table of contents
Other iSwag Cell Phone manuals

iSwag
iSwag Eternity II User manual

iSwag
iSwag ICON User manual

iSwag
iSwag Infinity II User manual

iSwag
iSwag ICON User manual

iSwag
iSwag Fire User manual

iSwag
iSwag Mantra User manual

iSwag
iSwag Orbit User manual

iSwag
iSwag Profile IS-T4105 User manual

iSwag
iSwag ICON User manual

iSwag
iSwag Legend User manual