ITV DHD 200-30 User manual

USER MANUAL
MANUAL DEL UTILIZADOR
MODELS / MODELOS
DHD 200-30
DHD 200-30 W
ENGLISH

USER MANUAL
MANUAL DEL UTILIZADOR

ENGLISH
333
INTRODUCTION
Thank you for purchasing a ‘DHD’ ICE DISPENSER by ITV ICE MAKERS. You have purchased one of the
most reliable machines on the market today.
Carefully read the instructions contained in this manual since they provide important information relative to
safety during installation, use, and maintenance.
WARNING
The installation of this equipment should be performed by a qualied technician.
The electrical socket should always be placed in an accessible location.
Always disconnect the power supply from the machine before any cleaning or maintenance service.
Any change required on the electrical installation for the appropriate connection of the machine, should be
exclusively performed by qualied and certied professional personnel only.
This machine does not produce ice by itself; it must be used in combination with an ice maker.
Any use of the machine not intended to dispense ice, is considered inappropriate.
It is extremely dangerous to modify or intend to modify this machine, and will void the warranty.
This machine should not be used by children or handicapped without proper supervision and monitoring.
This machine is not intended to be used outdoors nor exposed to the rain, or similar elements.
The machine should be connected using the power cord supplied with the equipment.
It is mandatory to ground the equipment to avoid possible electric shock to individuals
or damages to the equipment. The machine should be grounded pursuant to local and/
or national regulations as the case may be.
The manufacturer shall be held harmless in case of damages arising due to the lack of
the ground installation.
In order to assure the proper operation and efciency of this equipment, it is of paramount importance
to follow the recommendations of the manufacturer, especially those related to cleaning and maintenance
operations, which should be performed by qualied personnel only.
CAUTION: The intervention of non-qualied personnel, apart from being dangerous, could result in
serious malfunctioning. In case of damages, contact your distributor. We recommend always using original
spare parts.
ITV Ice Makers reserves the right to make changes in specications and design without prior notice.

ENGLISH
44
UPON RECEIPT OF THE MACHINE
Inspect the outside packing. In case of damages, make the corresponding claim to the carrier. To conrm
the existence of damages, unpack the machine in the presence of the carrier and state any damage on the
equipment on the reception document or freight document.
Always state the machine serial number and model number. This number is printed in three locations:
(1) Packing: On the outside, it contains a label with the manufacturing number.
(2) Exterior of the equipment: On the back of the equipment, there appears a label with the same
characteristics as the previous one.
(3) Nameplate: On the back of the machine.
Check that located in the interior of the machine that the installation kit is complete and comprises:
• Drain hose
• Four legs
• User manual.
• Warranty and serial number
CAUTION: All packing elements (plastic bags, carton boxes and wood pallets) should be kept outside the
reach of children, as they are a source of potential hazard.

5
ENGLISH
5
INSTALLATION
I. LOCATION OF THE MACHINE
This ice dispenser is not designed for outdoor operation. The icemaker should not be located next to ovens,
grills or other high heat producing equipment.
2. LEVELING THE MACHINE
Screw the leveling legs onto the bottom of the ice dispenser and tighten as far as possible. Use a level on top
of the machine. Turn each foot as necessary to level the ice dispenser.

ENGLISH
6
4. WATER SUPPLY (ONLY DHD 200-30 W MODELS)
The quality of the water supplied to the machine will have an impact on the time between cleanings and
ultimately on the life of the product. It also will have a remarkable inuence on the appearance, hardness
and avor of the ice and the water.
Local water conditions may require treatment of the water to inhibit scale formation, improve taste and
clarity. If you are installing a water lter system, refer to the installation instructions supplied with the lter
system.
Connect the machine only to potable water supply.
Use a exible food grade hose.
Pressure should be between 10 and 85 psi (0.7 and 6 bar). If pressure overpasses such values, install a
pressure regulator.
ATTENTION: The machine shall be plumbed with adequate backow protection, according to applicable
federal, state and local regulations.
Please note that a water ltration system is highly recommended for use with the ice maker atop the
dispenser and if the ice maker is an ITV brand, it is mandatory under provisions of the in ice maker warranty.
3. MINIMUM DISTANCE TO OBSTACLES
The ice dispenser may be installed against a wall or recessed. Refer to the minimum clearances recommended
in the manual of the ice machine, for efcient operation and servicing.
Note that, the location must allow enough clearance for electrical, drain and (in DHD 200-30 W models)
water connections in the rear of the ice dispenser.
20
6” (15cm)

7
ENGLISH
5. DRAINAGE
Drainage should be located lower than the output of the machine, at 5.9” (150mm) minimum.
It is convenient that the drain hose is 1.18” (30mm) inside diameter and with a minimum gradient of 0.36”/
ft (3cm/m), see gure.
6. ELECTRICAL CONNECTION
It is mandatory to ground the equipment. To avoid possible electric shock to individuals or damages to the
equipment, the machine should be grounded pursuant to local and/or national regulations as the case may
be.
The manufacturer shall be held harmless in case of damages arising due to the lack of the ground installation.
In case the supply cable is damaged, it should be replaced by a cable or special assembly to be furnished
by the manufacturer or after-sales service. Such replacement should be performed by qualied technical
service only.
The machine should be placed in such a way as to allow a minimum space between the back and the wall to
allow an easy access and without risks to the cable plug.
Regarding the electrical socket, Please allow ample room to install adequate switches and fuses.
Voltage is indicated in the nameplate and on the technical specications of this manual. Variation in voltage
above the 10% stated on the nameplate could result in damages or prevent the machine start-up.
CORRECT INCORRECT
INCORRECT
DRAIN LINE
DRAIN
DISPENSER DISPENSER
DISPENSER
DRAIN
DRAIN

ENGLISH
8
7. INSTALLATION OF ICE MAKERS ON THE DISPENSER
When installing a modular ice maker on the ice dispenser, follow the instructions provided in its manual.
TECHNICAL SPECIFICATIONS
Dimensions
MODELS
VOLTAGE
FREQUENCY
PHASE
TOTAL
AMPS
MAXIMUM FUSE
CIRCUIT BREAKER
POWER
CORD
NEMA
(A) (A)
DHD 200-30 115/60 115 / 60Hz / 1Ph 1.8 15 3AWG16 5-15P
DHD 200-30 W 115/60 115 / 60Hz / 1Ph 1.8 15 3AWG16 5-15P
DHD200-30 220/50 220V / 50Hz / 1Ph 0.9 10 - -
DHD200-30 W 220/50 220V / 50Hz / 1Ph 0.9 10 - -
MODELS
WEIGHT DIMENSIONS PACKAGING DIMENSIONS
lbs. / Kg. inch / mm. inch / mm.
WIDTH
X
DEPTH
Y
HEIGHT
Z
HEIGHT
Z (legged)
WIDTH
X
DEPTH
Y
HEIGHT
Z
DHD 200-30 115/60
192lbs./
87Kg.
30.3” /
769mm.
32.9” /
835mm.
54.5” /
1383mm.
60.5” /
1537mm.
32.3” /
820mm.
35” /
890mm.
59.1” /
1500mm.
DHD 200-30 W 115/60
DHD200-30 220/50
DHD200-30 W 220/50
Y
Z
X

9
ENGLISH
START UP
1. VERIFY THE FOLLOWING
• Is the machine leveled?
• Voltage and frequency are the same as those on the nameplate?
• Are the drains connected and operating?
• Is water pressure appropriate?
NOTE: In case inlet water pressure is higher than 85 psi (6 bar), install a pressure regulator.
2. START-UP
Once the installation instructions have been followed, proceed as follows:
1) Open the water inlet (only DHD 200-30 W models). Verify the absence of leakages.
2) Connect the machine to the power supply.
3) Press the water dispenser button (only DHD 2000-30 W models), and verify it is dispensed properly.
4) Press the ice dispenser button, and on the inside of the bin, verify that the agitator and the paddle wheel
rotate smoothly and without friction.
5) Place the ice machine on the dispenser, following its instructions.
SEQUENCE OF OPERATION
1. DISPENSING ICE
The ice falls into the bin from the ice maker. Then it is stored until the user presses the ice dispensing button.
This opens the trapdoor that allows the ice cubes to drop; meanwhile the gear motor rotates the paddle
wheel which raises the ice cubes until they fall through the chute. The agitator rotates with the paddle
wheel, cutting up the ice blocks.
When the user releases the button, the trapdoor closes and the gear motor stops.
The bin is thermally insolated and keeps the ice in perfect condition for a long period of time. Despite this,
to prevent the ice from forming blocks if it is not dispensed during a determined interval, the gear motor
rotates the paddle wheel and the agitator during a short while automatically, without any user action. As
the trapdoor remains closed, no unintentional “ghost ice” is produced. The duration and interval of this
automatic rotation can be modied (see chapter 7.5).
MINIMUM 10 psi (0,7 Bar)
MAXIMUM 85 psi (6 Bar)

ENGLISH
10
2. WATER DISPENSING (ONLY DHD 200-30 W MODELS)
When the user presses the water dispensing button, an electro valve allows it to ow, at the correct supply
pressure and temperature.
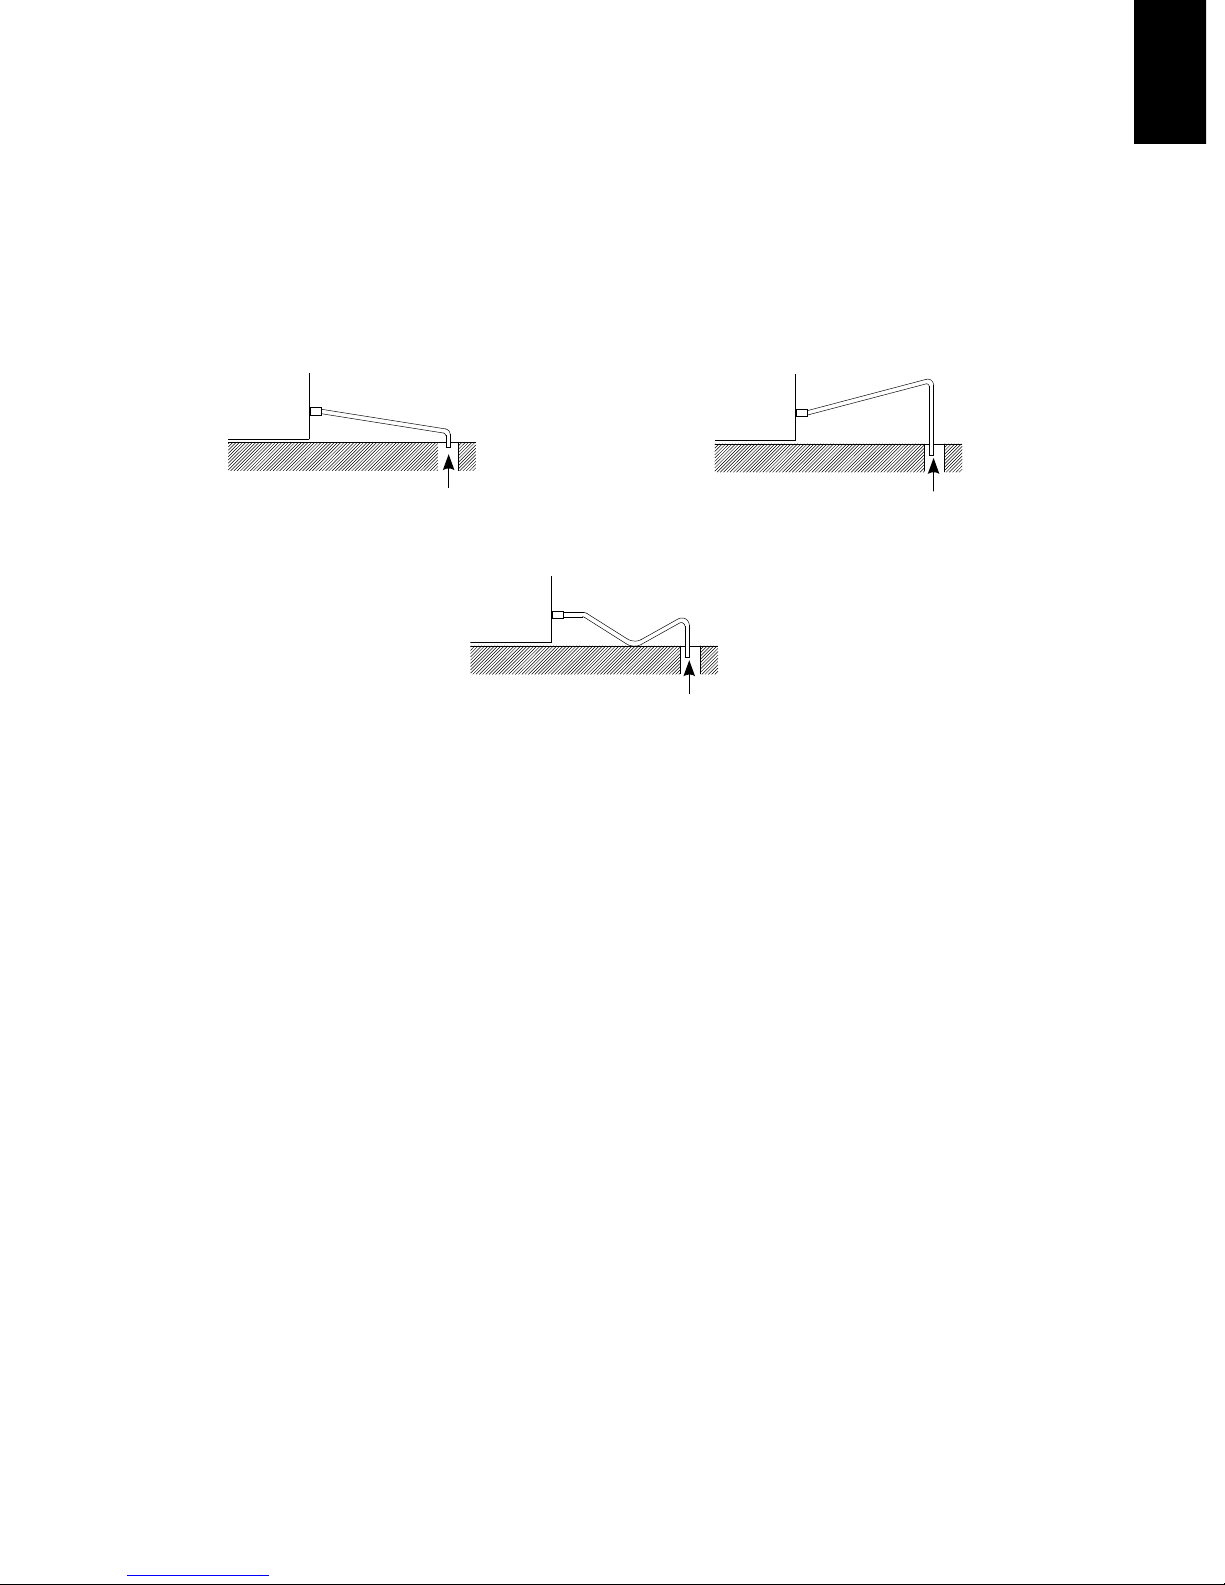
The water or ice lost during dispensing operations through the front grid, as well as the melt water from the
ice bin, are collected by the drain bin, where they are conducted out of the machine through the drain pipe.
CAUTION: Never try to reuse the ice or water contained in the drain bin. To access it for cleaning or
maintenance purposes, see chapter 7.
MAINTENANCE AND CLEANING PROCEDURES
1. CLEANING
It is the user’s responsibility to keep the ice machine and ice storage bin in a sanitary condition.
For the disassembly and cleaning of the ice maker, refer to its specic manual.
Sanitize the ice dispenser as frequently as local health codes require, and every time the ice machine is
cleaned and sanitized
To empty the ice that may remain in the bin, you can either do it manually or by pressing the ice dispensing
button and waiting until all the ice falls through the ice chute. If you choose the second option, note that the
gear motor has been designed for intermittent use, so a long, continuous use may provoke its overheating,
resulting in work stoppage. Should this happen, please let it cool for some time, after which it will work
again normally.
For the cleaning of the lime, prepare a solution of an appropriate product for the cleaning of ice machines.
Do not use hydrochloric acid. We recommend the use of any NSF approved scale removal product prepared
according to the manufacturer’s instructions
For sanitization, mix a solution of sanitizer using sodium hypochlorite food equipment sanitizer to form a
solution with 100 - 200 ppm free chlorine yield. Below is an example to calculate the proper quantity of
sanitizer to add to the water, for household bleach 12.5%.
Rinse thoroughly with water after each operation.
CAUTION: Do not mix ice machine cleaner and sanitizer solutions together.
WARNING: Wear rubber gloves and safety goggles when handling ice machine cleaner or sanitizer.
WARNING: Unit must always be disconnected during maintenance/cleaning procedures. The machine
may start rotating at any moment without user’s action, creating a risk.
Bleach to add = = 1.2 gr/L *0.133 = 0.16 oz/gal
15 15
% dis 12.5

11
ENGLISH
Clean the outside of the machine as often as necessary to maintain cleanliness, with mild soap and water.
Wipe dry with a clean soft cloth. Stainless steel parts can be cleaned with specic products, take care
especially to not touch the plastic parts.
2. AGITATOR AND PADDLE WHEEL DISASSEMBLY
Keeping the wheel still, rotate the agitator CW, and then push it opposite to the wheel until the end
becomes free. Afterwards pull the agitator to release the opposite side. Once the agitator is disassembled,
the wheel can be easily extracted from its location.
Proceed in reverse to mount it again.
CAUTION: Do not force or lever up the agitator or the wheel during these operations.
3. FRONT PANELS DISASSEMBLY
To access the dispensing mechanisms, the automatic agitation timer or the drain bin, it is necessary to
disassemble the front panels.
Start by disassembling the upper front panel, by unscrewing the 2 Phillips screws located in the inside of the
plastic front panel (see gure). Once removed, slide the panel upwards to remove it completely.

ENGLISH
12
The rest of the panels form a unique block. First unplug all the connections of the electrical parts that are
mounted on it (LED light, water button, etc…), then unscrew the 2 screws (see gure). The block can be
removed by tipping it slightly and extracting it upwards, to release it from the 2 bottom tabs.
4. DRAIN BIN DISASSEMBLY
First, disassemble the front panels as shown in chapter 7.3. Following this, remove the plastic ange of the
drain pipe. Then the drain bin can be extracted by pulling it.
2º
3º
1º
4º
2º
1º

13
ENGLISH
5. ADJUSTING THE AUTOMATIC AGITATION TIMER
Disassemble the front panels as shown in chapter 7.3. Then you can access the electronic timer that regulates
this function. The adjusting of this device must be performed only by qualied personal. The factory setting
is 6 seconds agitation each 6 hours.
The big OFF wheel regulates the interval between automatic agitations. The small OFF wheel sets the pitch
for the big wheel adjust.
The big ON wheel regulates the duration of the agitation. The small ON wheel sets the pitch for the big
wheel adjust.
USER TROUBLESHOOTING GUIDE
PROBLEM PROBABLE CAUSE SOLUTION
The ice dispenser does not work. Electrical power failure. Verify that the machines is plugged.
Check that the power cord is not broken.
Check the socket and the fuse.
After a continuous use the gear
motor has overheated.
Wait until it cools and try again.
The ice dispenser seems to work
but no ice is dispensed.
There is not enough ice in the bin. Check the ice maker.
Agitator or paddle wheel are
not properly mounted.
See chapter 7 for a proper assembly
of these components.
The ice dispenser works irregularly
or a tapping is heard.
The ice in the bin has formed blocks. Remove blocks of ice. If necessary, lower the
automatic agitation interval (see chapter 7).
Check the ice-maker to reduce
the thickness of the ice.
The shape or size of the ice in
the bin is not appropriate.
Remove improper ice.
No water is dispensed (only for
DHD 200-30 W models).
Water supply failure. Verify the water faucet is open.
Check the water supply connection.
Water leaks. The drain bin is stuck and has overfilled. Disassemble the drain bin as described
in chapter 7, empty and clean it.
Check the drain bin hose.
Main drain hose is stuck. Check the drain hose.
Verify that it is installed
according to chapter 3.
Water hose is broken (only
DHD 200-30 W).
Disassemble the front panels as indicated
in chapter 7 and check the water hose.
For further problems call warranty service

ENGLISH
14
WIRING DIAGRAM
15
18
T
Wv
N
Ws
1
2
Is
4
L
12VDC
Led light
45-40
A2
A1
M
COMPONENTS:
M Gear motor wheel and agitator
T Timer
Is Ice dispensing switch
Ws Water dispensing switch (only DHD 200-30 W models)
Wv Water electro valve (only DHD 200-30 W models)

135

136

C/6872 - 25/C/13
This manual suits for next models
1
Table of contents
Other ITV Ice Maker manuals
Popular Ice Maker manuals by other brands

Manitowoc
Manitowoc Indigo Series Technician's handbook

Manitowoc
Manitowoc WELTBILT NEO 310 Installation, operation and maintenance manual

Inbeca
Inbeca MF 30 WS Operation and maintenance manual

Jenn-Air
Jenn-Air Ice Maker Use & care guide

Hoshizaki
Hoshizaki DCM-500BAH Specifications

Viali
Viali V12IMS15 instruction manual

Cornelius
Cornelius Quantum 1000 Service manual

AGA marvel
AGA marvel ML15CRS1XS Installation, operation and maintenance instructions

Ice-O-Matic
Ice-O-Matic EFD270 Service parts

Polar Electro
Polar Electro GK031-A instruction manual

U-Line
U-Line UONP115SS01B User guide & service manual

Hoshizaki
Hoshizaki KML-200MAE parts list