Jack-Post H-37 User manual

Questions, problems, missing parts?
Please call Customer Service:1-800-800-4950
USE AND CARE GUIDE
Model H-37/800032
© 2020 Jack-Post Corporation 6A-=I-15 08/20
warranty
Traditional Swing

H-/800032
02
Contents
Do Not Return ......................................................................................03
Use & Care / Wood Care Guide..........................................................04
Instructions ...........................................................................................05
Customer Service Contact Info..........................................................
11
© 2020 Jack-Post Corporation 08/20

H-/800032
DO NOT RETURN THIS ITEM TO THE STORE
If you experience any difficulty with assembly, missing parts or use,
please DO NOT return this item to the store.
Retail stores are unable to properly assist you.
Contact our Customer Service Department directly for assistance.
Call toll-free 1-800-800-4950, Monday-Friday, between
the hours of 8 a.m. and 8 p.m. (EST).
Our friendly Customer Service Agents will be happy to assist you.
03
© 2020 Jack-Post Corporation 08/20

APPLYING THE OIL FINISH
PLEASE READ THIS INFORMATION CAREFULLY - IT WILL HELP YOU TO MAINTAIN YOUR FURNITURE
This furniture has been made from seasoned wood. Wood is a natural material and it’s appearance
will change when exposed to the elements; cracks and splits will appear, particularly on the end grain
and to a lesser extent on the surface within a few weeks if left exposed to the elements. This is
normal and more common in log furniture which adds to the rustic look of it. The furniture is designed
with this in mind to remain strong and durable. If left exposed to the weather your furniture will turn a
silver grayish color, the exact color will depend on the environment; for example, dark spots may
occur if the furniture is placed in a shady location under a tree. To help preserve the color cover the
furniture with a garden furniture cover when not in use. Wood expands and contracts with changes in
relative humidity, to prevent over drying and excessive cracking do not store in a heated place.
To maintain the original timber color and to keep your surface in pristine condition we recommend
applying an oil base penetrating finish such as deck stain which is available at most wood product
retailers. If the original color is desired a clear or natural stain will be similar in color. We DO NOT
recommend surface coatings such as sealers, varnishes or water base products. If your furniture is in
a fully exposed environment we recommend re-coating two times per year. In a semi-covered
environment (e.g. shade, covered patio or similar) we recommend coating once per year. Also by
applying the oil/stain before the wood begins to turn the characteristic silver/gray color following these
simple instructions may lengthen the interval between recoating.
CARE AND MAINTENANCE
H-/800032
04
© 2020 Jack-Post Corporation 08/20
THIS PRODUCT DESIGNED FOR A MAXIMUM CAPACITY OF 400 POUNDS.
NOTE: Save assembly instruction sheet for future reference.
WARNINGS:
USE & CARE
1. Cover the floor area with a suitable liquid resistant ground sheet to contain dust, dirt or spills.
2. Use suitable protective clothing, ie. Rubber gloves , apron etc.
3. Check and retighten all furniture hardware
4. Inspect the condition of all wood surfaces. The silver/gray color indicated the natural
oxidation of the wood and may be accompanied by fine surface splits or checking. This is
evidence of the wood’s natural protection acting like our outer skin. Consequently, the
natural weathered surface is only skin deep and the original color reappears when new wood
is exposed.
5. To return the wood to it’s original color we recommend cleaning the surface of dirt, bird
droppings, tree sap, grease etc. Scrub or brush with a mild detergent and rinse thoroughly.
Ensure the wood surface is completely dry before finishing.
6. DO NOT USE STEEL WOOL as the fine particles may result in dark rusty blotching.
1. After opening can of oil/stain, stir thoroughly to produce an even consistency. We
recommend the use of a lint free cloth or small brush suitable for oil base finishes.
2. Apply oil/stain evenly to all wood surfaces avoiding the oil/stain to pool. When finished, wipe
off any runs or excess oil/stain. (Avoid applying too much oil/stain as a thin coat will give
ample protection.) Any excess oil/stain may be cleaned with Mineral Spirits or Turpentine.
3. Allow approximately 48 hours for oil/stain to dry completely.
4. Before use, wipe away any residue using a lint free cloth and a furniture polish such as
Pledge. A buffing action may produce a slightly polished surface.
Customer Service: Monday-Friday 8:00 am to 8:00 pm Eastern Time
Phone: 1-800-800-4950
E-mail:[email protected]

H-/800032
05
© 2020 Jack-Post Corporation 08/20
Assembly Instructions – Model H-/800032
Instrucciones de armado – Modelo H-/800032
Instructions d'assemblage – Modèle H-/800032
Traditional Swing
Banco de oscilación tradicional
Balancelle traditionnelle
FINISHING INSTRUCTIONS
To preserve and beautify the wooden parts, they should be painted or varnished on all sides before assembly
with good quality exterior finish.
WARNING:
If left unfinished and exposed to weather, the wooden parts can weaken.
The swing can fail causing someone to fall and suffer serious injury.
INSTRUCCIÓN DE ACABO
Para preservar y embellecer las piezas de madera, antes del montaje, es aconsejable de pintar o poner barniz
a cada lado de las piezas de madera. Mejor de usar una pintura o barniz de exterior de buena calidad.
ADVERTENCIA:
Si no quieres pintar o barnizar la madera y si dejas el banco afuera, la madera se puede debilitarse.
Por lo tanto, el banco de oscilación podría caer y herir a alguien.
INSTRUCTIONS DE FINITION
Afin de préserver et d’embellir les pièces en bois, il est conseillé avant l’assemblage,
de peindre ces pièces ou de les vernir de chaque coté avec un vernis où peinture extérieur de bonne qualité.
ATTENTION:
Si vous décidez de ne pas peindre ou vernir le bois, et de le laisser a l’extérieur, le bois risque de s’affaiblir.
Par conséquent, la balancelle risque de tomber et blesser quelqu’un.

*Los artículos estándar de ferretería se pueden reemplazar en forma local.
LISTE DE PIÈCES DE QUINCAILLERIE
(À L'ÉCHELLE)
*Les articles de quincaillerie standard peuvent être remplacés localement.
H-/800032
06
HARDWARE PARTS LIST
(SHOWN TO SCALE)
*Standard hardware items may be replaced locally.
LISTA DE PIEZAS DE FERRETERÍA
(SE MUESTRAN A ESCALA)
TOOLS . HERRAMIENTAS . OUTIL
IMPORTANT
UNLESS NOTED, DO NOT TIGHTEN ANY BOLTS UNTIL LAST STEP.
IMPORTANTE
A MENOS QUE SE LE INDIQUE, NO APRIETE NINGúN PERNO HASTA EL úLTIMO PASO.
IMPORTANT
À
MOINS D
'
INDICATION CONTRAIRE, NE RESSERREZ PAS LES BOULONS AVANT LA DERNIÈRE
É
TAPE.
Hammer and 10 mm wrench, or adjustable wrench, pliers, and a standard screwdriver.
Martillo y llave inglesa de 10mm, o llave ajustable, alicates, y destornillador estándar
.
Marteau et clé anglaise de 10mm, ou clé ajustable, pince, et un tournevis standard.
© 2020 Jack-Post Corporation 08/20
ARM SUPPORT (2)
BRAS (2)
BRAS DE SUPPORT (2)
ARM (2)
BRAZO (2)
BRAZO DE SOPORTE (2)
EYE BOLT (2) PERNO DE OJO (2) PITON A OEIL (2)
CHAIN (2)
CADENA (2)
CHAÎNE(2)
EYE BOLT (2)
TORNILLO DE OJO (2)
ECROU A OEIL (2)
QUICK LINKS (2)
GANCHO (2)
MOUSQUETON (2)
FLAT WASHERS (10)
LOCK NUT (6)
ARANDELA PLANA (10)
TUERCA (6)
M6x mm SCREWS (2)
Tornillo de 6 mm x mm (2)
Vis de 6 x mm SCREWS (2)
M6 x 0 mm SCREWS (2)
Tornillo de 6 mm x 0 mm (2)
Vis de 6 x 0 mm SCREWS (2)
RONDELLE PLATE (10)
ECROU (6)
LARGE PARTS
(NOT TO SCALE)
PIEZAS GRANDES
(NO A ESCALA)
PIÈCES GRANDES
(PAS À L'ÉCHELLE)
SEAT (1) ASIENTO (1) SIEGE (1)
BACK (1) RESPALDO (1) DOSSIER (1)

H-/800032
07
© 2020 Jack-Post Corporation 08/20
STEP 1
Position and insert mm screws in 2 holes in back.
Place screws through 2 holes in seat using washer and lock nut.
NOTE: Do not mount back assembly incorrectly.
PASO 1
Posicionar y insertar los pernos de mm a través los agujeros del respaldo y del
asiento. Inserte las arandelas y tuercas en cada lado.
NOTA: No ensambla el respaldo incorrectamente.
ETAPE 1
Positionner et insérer les boulons de mm dans les trous du dossier et du siège. Insérer
les rondelles et les écrous de chaque coté.
NOTE : Ne pas monter le dossier incorrectement.
mm SCREW
PERNO DE mm
BOULON DE mm
mm SCREW
PERNO DE mm
BOULON DE mm
mm SCREW
PERNO DE mm
BOULON DE mm
CORRECT
CORECTO
CORRECT
INCORRECT
INCORECTO
INCORRECT
WASHER & NUT
ARANDELA &TUERCA
RONDELLE & ECROU
WASHER & NUT
ARANDELA &TUERCA
RONDELLE & ECROU
WASHER & NUT
ARANDELA &TUERCA
RONDELLE & ECROU
WASHER & NUT
ARANDELA &TUERCA
RONDELLE & ECROU

H-/800032
08
© 2020 Jack-Post Corporation 08/20
WASHER & NUT
ARANDELA &TUERCA
RONDELLE & ECROU
STEP 2
Attach each arm to back by placing0 mm screws through chain, thenthrough the hole in tapered
end of the arm (straight edge of the arm facing in), then attach to back with a washer and a nut.
PASO 2
Conectar cada brazo con el respaldo, colocando primero los Tornillo de 0mm a través de la cadena,
después a través de los agujeros del brazo lateral cónica (lado derecho hacia el interior).
Además, conectar el respaldo con una arandela y tuerca.
ETAPE 2
Attacher chaque bras au dossier en plaçant d’abord les Vis de 0mm à travers la chaine,
ensuite à travers les trous du bras coté fuselé (le coté droit fait face à l’intérieur).
Ensuite attacher au dossier en ajoutant une rondelle et un écrou.
0 mm SCREW
TORNILLO DE
0MMVis de 0MM
WASHER
ARANDELA
RONDELLE
WARNING:
Before using the chain, inspect each link in the chain to make sure all are welded closed and secure.
Failure of the chain could cause serious injury.
Should any defect be found, contact Customer Service for a free replacement.
ADVERTENCIA:
Antes de utilizar la cadena, inspeccionar cada enlace para asegurar que son cerrado y seguro.
Asegúrese de verificar si no, se puede ser peligroso. Si usted encuentra un defecto en la cadena,
gracias de llamar el Servicio al Cliente para obtener un reemplazo gratis.
ATTENTION:
Avant d’utiliser la chaine, inspecter chaque maillon afin de vérifier qu’ils soient bien fermés et sécurisés.
Soyez sur de vérifier sinon cela peut être dangereux.
Si vous trouvez un défaut sur la chaine, merci de contacter le Service Client pour un remplacement gratuit.

H-/800032
09
© 2020 Jack-Post Corporation 08/20
Washer & Nut
Arandela & Tuerca
Rondelle & Ecrou
Washer
Arandela
Rondelle
STEP 3
Place arm supports between each arm and seat at the front of the swing. Hook link of chain on each
side on 12" eye bolts and slide eye bolts through arms, supports, and seat as shown. Using nuts and
washers, tighten eye bolts until they indent the surface.This will prevent the chain from coming loose
from the eye.
PASO 3
Colocar los brazos de soporte entre el asiento y cada brazo en la parte delantera del banco de
oscilación. Unir la cadena y los pernos de ojo de 12 pulgadas en cada lado y deslice los pernos de
ojo a través de los brazos y de los soportes como se indica. Adjuntar tuercas y arandelas y apriete
cada perno de ojo hasta que toquen la superficie del brazo. Esto permitirá a la cadena de no escapar.
ETAPE 3
Placer les bras de support entre le siège et chaque bras à l’avant de la balancelle. Attacher au maillon
de la chaine les pitons à oeil de 12 pouces de chaque coté et glisser les pitons à œil à travers les bras,
les supports et le siège comme indiqué. Ajouter les écrous et rondelles et serrer chaque piton à œil
jusqu'à ce qu’ils touchent la surface du bras. Ceci permettra à la chaine de ne pas glisser et s’échapper.
Short lengths
Cadena pequeña
Chaine courte
Long length
Cadena larga
Longue chaine
Chain
Cadena
Chaine
12" Eye bolt
Perno de ojo de 12 pulgadas
Piton à œil de 12 pouces
NOTE: Make sure that the two short, equal lengths of chain
connect to the swing arm while the longer length of chain
attaches the swing to the ceiling or swing frame.
NOTA: Asegúrese de que las dos pequeñas partes de la
cadena se conecta a los brazos mientras que la larga cadena
unida el banco al techo o al soporte de banco (si tiene uno).
NOTE: Faites en sorte que les deux petites parties de la chaine
soit connectées aux bras alors que la longue chaine attache la
balancelle au plafond ou à la monture (si vous en avez une).
NOTE: To avoid a possible hazard, please cut off
eye bolts flush with the bottom of the nuts after
assembly is complete.
NOTA: Para evitar problemas, asegúrese de
cortar el extremo del perno de ojo una vez que
la instalación está bien hecho.
NOTE: Afin d’éviter tout incident, veiller à couper
le bout du boulon à oeil une fois que le montage
soit bien terminé.

H-/800032
10
© 2020 Jack-Post Corporation 08/20
STEP 4
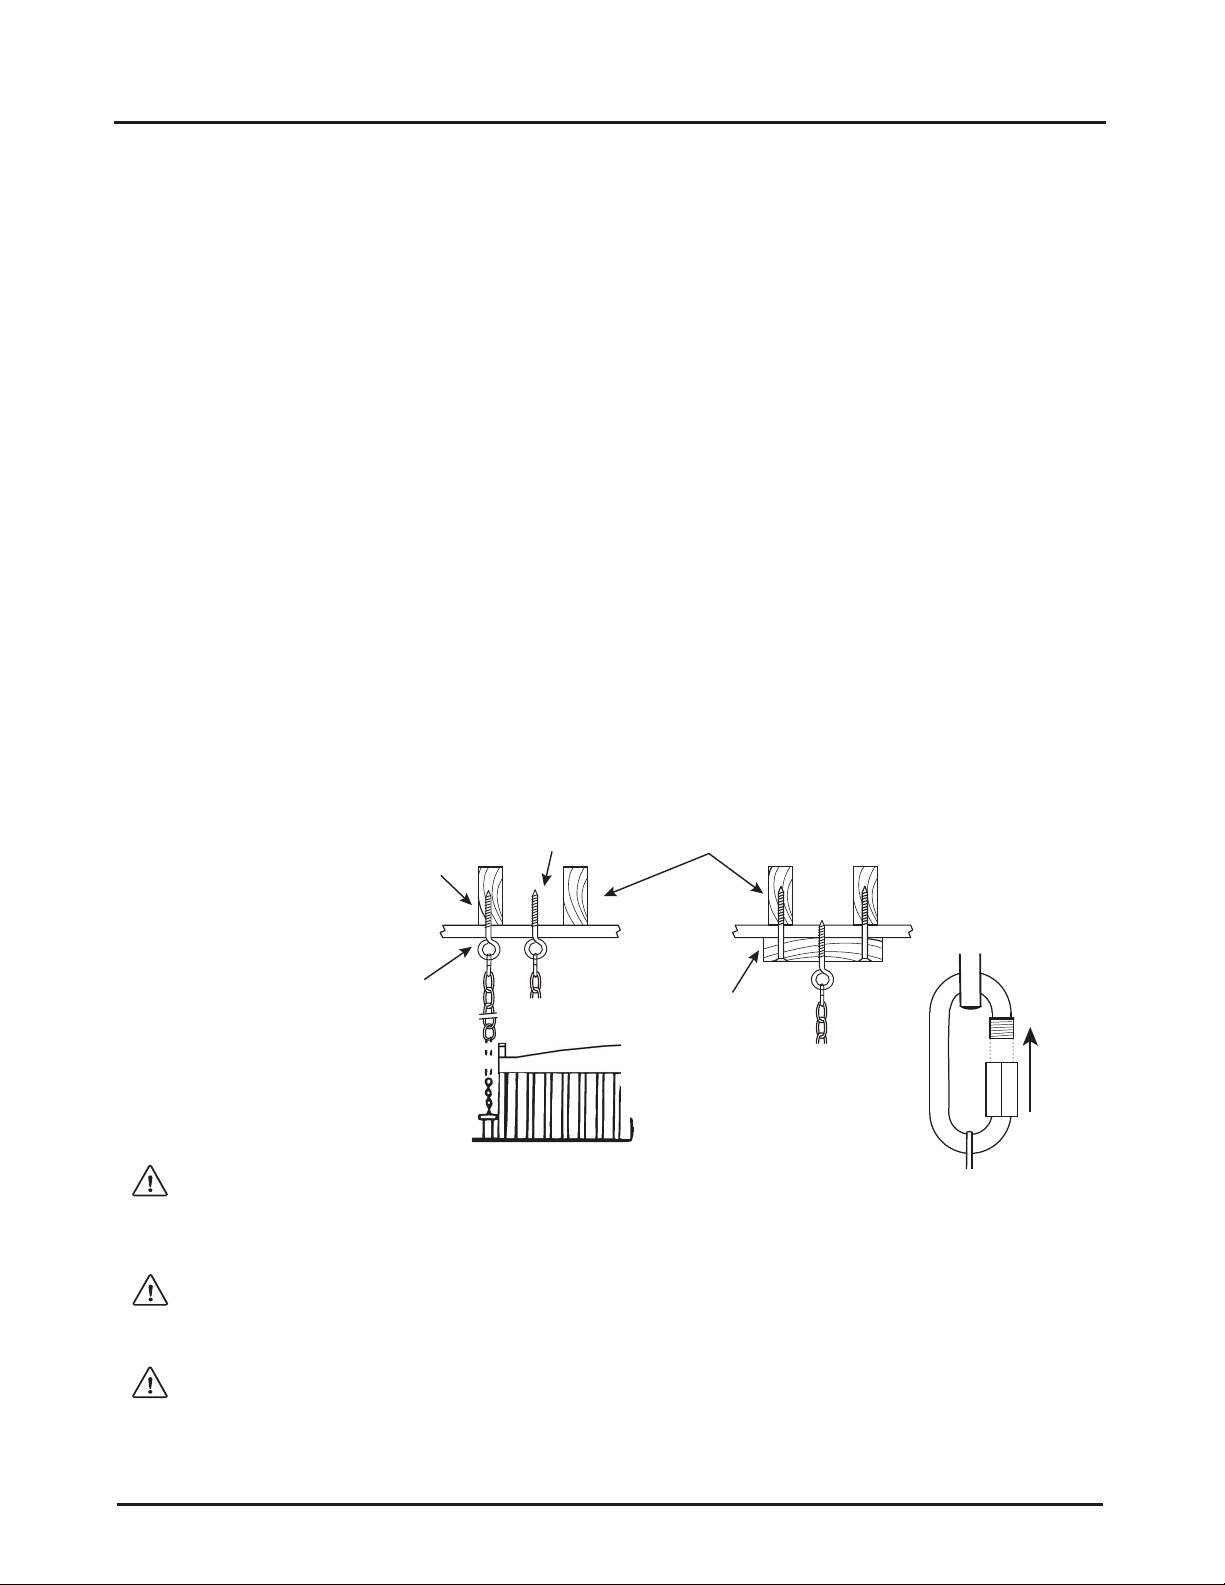
Your package contains two eyebolts. These should be screwed into a solid material (ceiling joists) as shown
in Figure A. The screws should be spaced 46 inches apart for the H-. Drill a 1/4 inch pilot hole for each
eyebolt and lubricate the threads with wax, oil, or soap for easiest installation. Be sure to screw the ceiling
hook completely into the ceiling joists so that no threads are visible.NOTE:
If the desired location of the swing does not match the overhead joist location, a suitable 2x4 header
should be attached to the joists. The hooks may then be screwed into the header as shown in Figure B.
PASO 4
Su paquete contiene dos tornillos de ojo. Estos deben estar unido a una superficie sólida del techo
(techo listón). Vea la Figura A. Estos tornillos se deben colocar a una distancia de 46 pulgadas para el H-.
Hacer un agujero de ¼ pulgadas para cada tornillo. Lubricar los tornillos con cera, aceite o jabón para
facilitar la instalación. Asegúrese de apretar las tuercas a los listones del techo.
NOTA:
Si quiere colocar su swing donde no hay listón de techo sólido, se puede atornillar a los listones del
techo una madera de 2x4. Puede fijar los tornillos a la madera como se muestra en la figura B.
ETAPE 4
Votre paquet contient deux écrous à œil. Ceux-là devraient être attachés à une surface solide au plafond
(latte du plafond). Voir Schéma A. Ces écrous doivent être placés à une distance de 46 pouces pour le H-.
Percer un trou de ¼ pouces pour chaque écrous et lubrifier ces écrous avec de la cire, de l’huile ou du savon
pour une installation plus facile. Faire en sorte de visser complètement les écrous aux lattes du plafond.
NOTE:
Si vous souhaitez positionner votre balancelle où il n’y a pas de latte solide au plafond, vous pouvez toujours
visser aux lattes du plafond une planche de 2x4. Vous pouvez ensuite attacher les écrous à œil à la planche
comme indiqué sur le schéma B.
FIGURE A FIGURA A SCHEMA A FIGURE B FIGURA B SCHEMA B
CORRECT
CORRECTO
CORRECT
INCORRECT
INCORRECTO
INCORRECT
JOISTS
LISTON DEL TECHO
LATTE EN BOIS DU PLAFOND
HEADER
MADERA 2X4
PLANCHE EN BOIS
NOTE POSITION NOTA
POSICIN NOTEZ LA POSITION
POSICION DEL TORNILLO DE OJO
POSITION DE L’ECROU A OEIL
NOTE:
The quick link is used to attach the chain to the eyebolt.
In its open position, it should be passed through the
chain and the eyebolt.
The nut portion should be turmed onto the threads
completely; then tightened with pliers or a wrench.
NOTA:
El gancho se usa para unir los tornillos de ojo y la
cadena. En su posición abierta, insertar la cadena
y el tornillo. Cerrar y apretar con una llave o unos
alicates.
NOTE:
Le mousqueton sert à attacher l’écrou a œil et la
chaine. Dans sa position ouverte, insérer la chaine
et l’écrou. Serrer fermement le mousqueton à l’aide
d’une clé ou d’une pince.
WARNING:
Periodically check the swing chain, ceiling hooks, and all hardware for signs of
wear and possible metal fatigue that could allow the swing to fall and cause
serious injury. Check all hardware to be sure bolts and nuts are tight.
Call our Customer Service Department for replacement parts.
ADVERTENCIA:
A veces,comprobar la cadena, los tornillos en el techo para asegurarse de que
nada está dañado para evitar un incidente. Comprobar que todas las tuercas y
tornillos estén bien apretados. Llamar al Servicio al cliente para el reemplazo.
ATTENTION:
Verifier de temps en temps la chaine, les écrous du plafond et tous les autres
boulons et écrous afin de s’assurer que rien ne soit usé ou endommagé afin
d’éviter tout incident. Verifier que tous les boulons et écrous soient bien serrés.
Contacter le Service à la clientèle pour tout remplacement.

H-/800032
© 2020 Jack-Post Corporation 08/20
CORPORATION
800 EastThird Street
Buchanan, Michigan 49107-1803
Customer Service 1-800-800-4950
Mon. thru Fri. 8:00am – 8:00pm EST
E-mail [email protected]
English, Español, François
11
For more information about warranty, please visit WWW.JACK-POST.COM / Warranty .
Questions, problems, missing parts?
Please call Customer Service: 1-800-800-4950
Customer Service
This manual suits for next models
1
Table of contents
Other Jack-Post Baby Swing manuals
Popular Baby Swing manuals by other brands

MaxiCosi
MaxiCosi Cassia instructions

Polywood
Polywood Vineyard ADSW600 Assembly instructions

AmazonBasics
AmazonBasics Outdoor 3-Seat Striped Patio Swing with... Assembly instructions

A&L Furniture
A&L Furniture Wingate Swingbed Assembly instructions

CANGAROO
CANGAROO ISWING instruction manual

Fisher-Price
Fisher-Price X4400 quick start