© 2005 Jack-Post Corporation ZI-2070-2 WL-70 8/05
CORPORATION
800 East Third Street
Buchanan, Michigan 49107-1803
Customer Service 1-800-800-4950
Mon. thru Fri. 8:00am – 4:30pm EST
Toda comunicación es solamente en inglés.
Toute communication sera seulement en anglais.
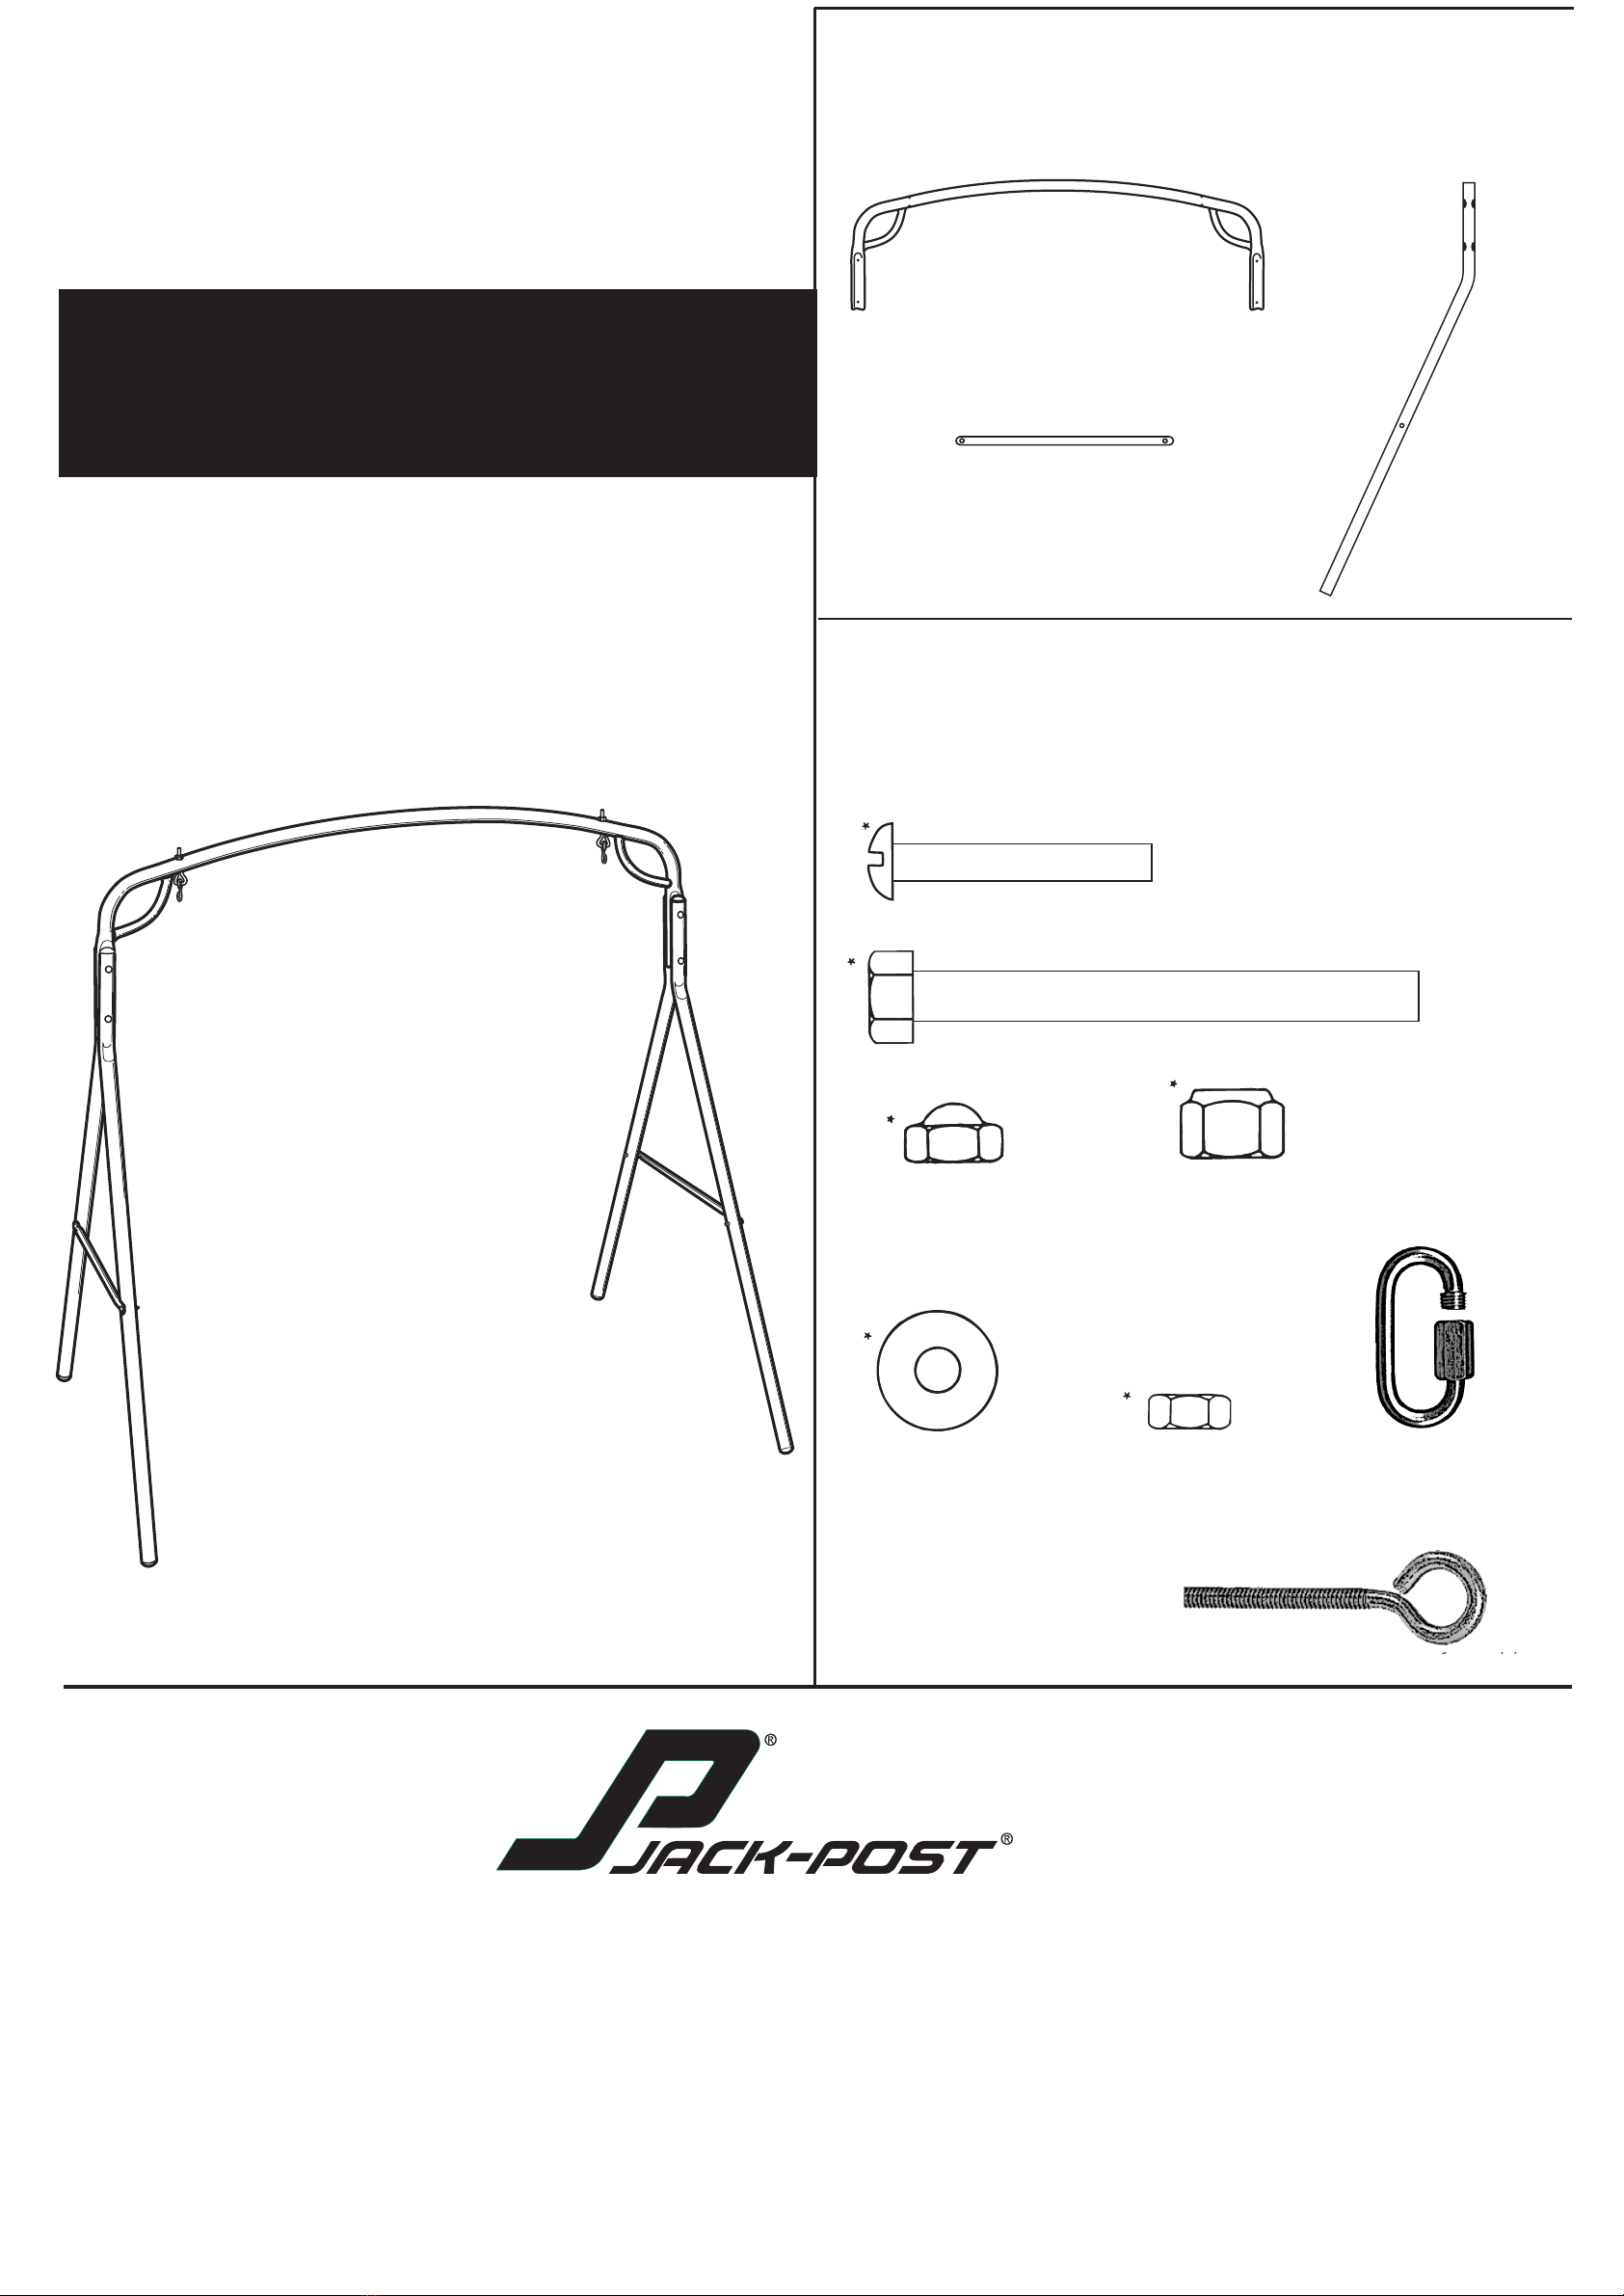
76mm
NUT
TUERCA
ÉCROU
42mm
FRONT LEG
PATA DELANTERA
PIED AVANT
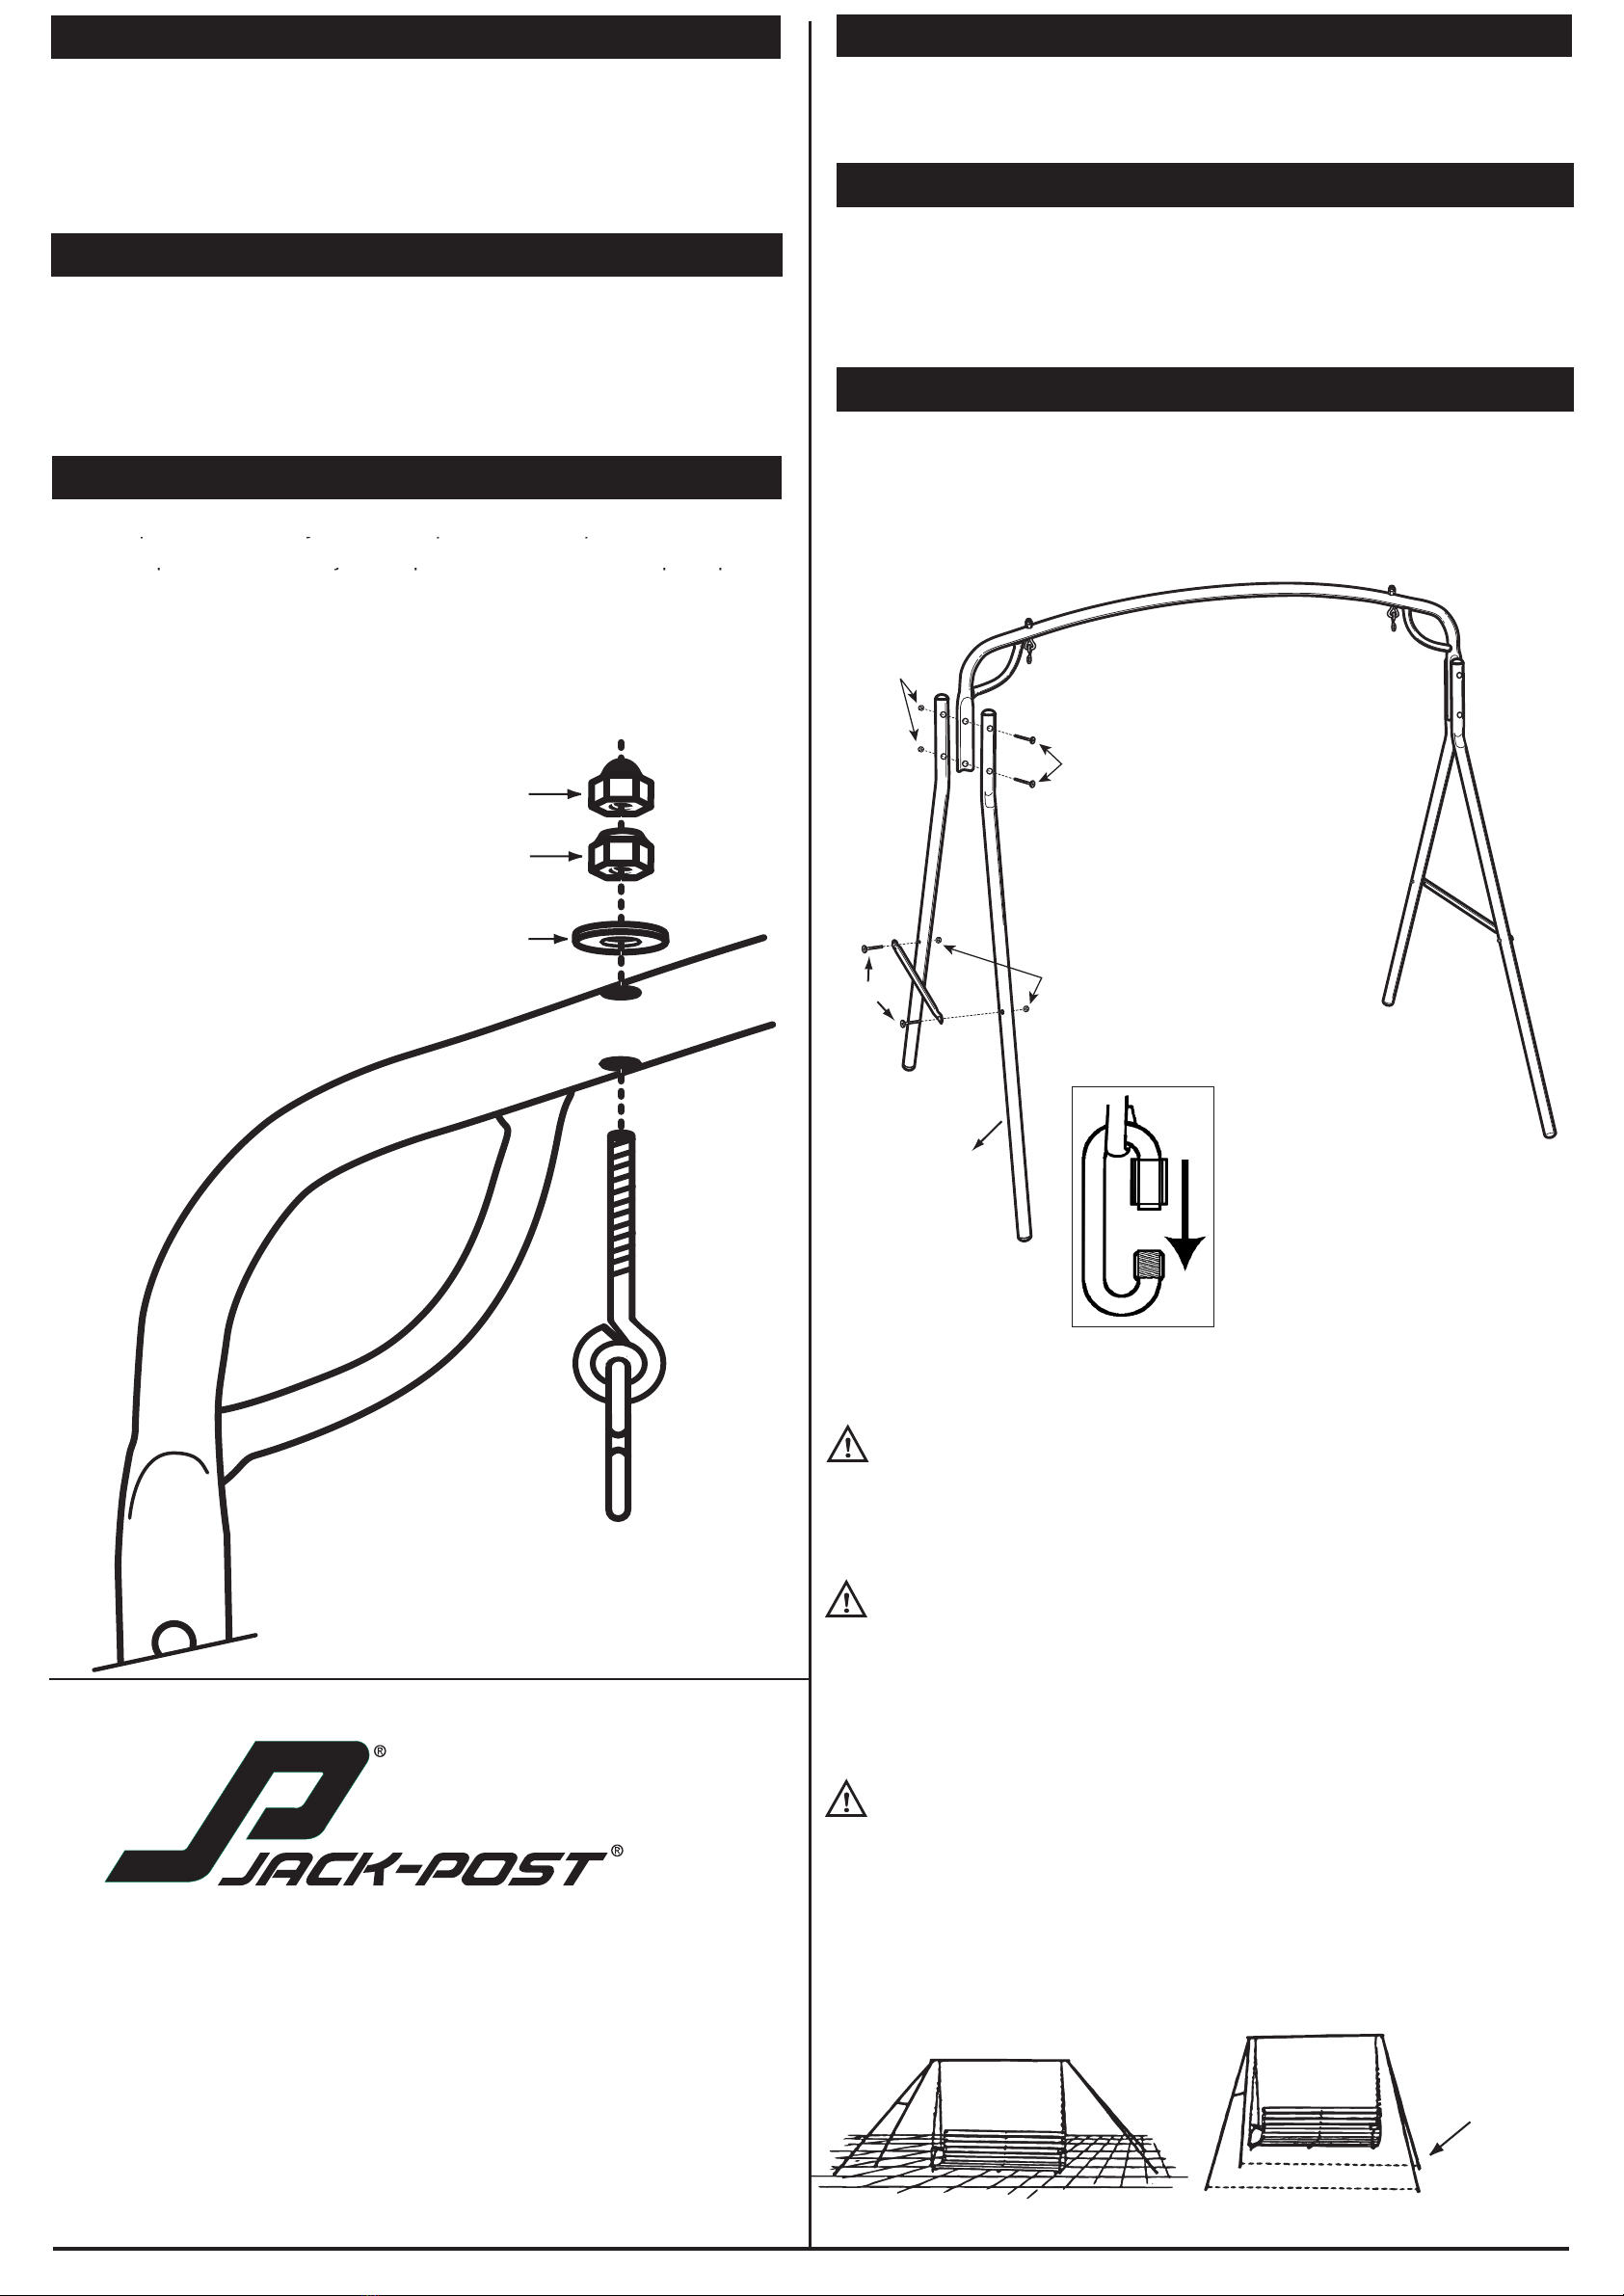
TILE OR SMOOTH SURFACE
SUPERFICIE DE TEJAS O LISA
CARREAUX OU SURFACE LISSE
WRONG / INCORRECTO / MAUVAIS RIGHT / CORRECTO / BON
SAFETY CHAIN OR
CABLE
CADENA O CABLE
DE SEGURIDAD
CHAÎNE OU CÂBLE
DE SÉCURITÉ
Figure 1 / Figura 1 / Figure 1 Figure 2 / Figura 2 / Figure 2
WASHER
ARANDELA
RONDELLE
ACORN NUT
TUERCA CIEGA
ÉCROU BORGNE
STEP 1 Open inner hardware bag IB-4313.
Attach the swing bearing with hardware as shown.
Hold the swing bearings in the position shown so the lower portion moves
freely with motion of the swing seat.
Gently tighten the locknut. Do not overtighten.
Add the acorn nut and tighten it.
ÉTAPE 1 Ouvrez le sac de quincaillerie intérieure IB-4313.
Fixez le palier de la balançoire avec la quincaillerie tel qu'illustré.
Tenez les paliers de la balançoire en position selon l'illustration pour que la
partie inférieure se déplace librement avec le déplacement du siège de la
balançoire.
Resserrez délicatement le contre-écrou. Ne resserrez pas trop.
Ajoutez l'écrou borgne et resserrez.
PASO 1 Abra la bolsa de ferretería interna IB-4313.
Adjunte el rodamiento del aramazon con la ferretería, como se indica.
Sostenga los tornillosrde ojo en la posodn que se muestra para
que la parte inferior se mueva libremente con el movimiento del asiento.
Apriete suavemente la contratuerca. No apriete en exceso.
Agregue la tuerca ciega y apriétela.
STEP 2 Open inner hardware bag IB-4020.
Attach leg and leg braces to the header bar with hardware shown.
TIGHTEN ALL HARDWARE.
Periodically check all hardware to be sure bolts and nuts are tight.
ÉTAPE 2 Ouvrez le sac de quincaillerie intérieure IB-4020.
Fixez le pied et les renforts de pieds à la barre du linteau avec la
quincaillerie indiquée.
RESSERREZ TOUTE LA QUINCAILLERIE.
Vérifiez régulièrement toute la quincaillerie pour vous assurer que les
boulons et les écrous sont serrés.
PASO 2 Abra la bolsa de ferretería interna IB-4020.
Adjunte la pata y los tirantes de la pata a la barra de la cabecera con la
ferretería que se muestra.
APRIETE TODA LA FERRETERÍA.
Controle toda la ferretería periódicamente para asegurarse de que todos los
pernos y tuercas estén ajustados.
NOTE: After hanging your swing,
it is recommended that the open
ends of the ceiling hooks be
closed using a pair of pliers.
NOTA: Después de colgar su
columpio, se recomienda cerrar
los extremos abiertos de los
ganchos superiores utilizando
una pinza.
REMARQUE : Après avoir
suspendu votre balançoire, il est
recommandé de fermer les
extrémités ouvertes des crochets
du plafond avec des pinces.
LARGE LOCKNUT
CONTRATUERCA GRANDE
LARGE CONTRE-ÉCROU
LARGE LOCKNUT
LARGE CONTRE-ÉCROU
CONTRATUERCA
GRANDE
DO NOT USE ON A SMOOTH SURFACE. THIS PRODUCT IS DESIGNED FOR
USE ON GROUND, LAWN OR CARPETED SURFACES. Under a heavy load
on smooth or slick surfaces, the legs may slip and cause a collapse of the
frame as shown in Figure 1 and cause serious injury.
On a smooth or slick surface, the legs should be hobbled by installing
a safety chain or cable (not provided) as shown in Figure 2.
NO UTILICE SOBRE UNA SUPERFICIE LISA. ESTE PRODUCTO FUE
DISEÑADO PARA USARSE SOBRE TIERRA, JARDÍN O SUPERFICIES
ALFOMBRADAS. Con una carga pesada sobre superficies lisas
o resbaladizas, las patas pueden resbalarse y provocar que el marco
se caiga, como se muestra en la Figura 1, causando así, lesiones graves.
En una superficie lisa o resbaladiza, las patas deberán sujetarse entre sí,
instalando una cadena o cable de seguridad (no se incluye), como se
muestra en la Figura 2.
N'UTILISEZ PAS SUR UNE SURFACE LISSE. CE PRODUIT EST CONÇU
POUR ÊTRE UTILISÉ SUR LA TERRE, LA PELOUSE OU LES SURFACES
À MOQUETTE. Sous une lourde charge sur les surfaces lisses ou
glissantes, les pieds pourraient glisser et provoquer l'affaissement de
l'armature tel qu'indiqué à la figure 1 et causer de graves blessures.
Sur une surface lisse ou glissante, les pieds devraient être fixés par une
chaîne ou un câble de sécurité (non fourni(e)) tel qu'illustré à la figure 2.
NOTE: The quick link is used to attach the
chain to the eyebolt. In its open position, it
should be passed through the chain and the
eyebolt. The nut portion should be turned onto
the threads completely; then tightened with
pliers or a wrench.
NOTA: El mosquetón sirve para unir la
cadena con el tornillo de ojo. Abierto, pasa el
mosquetón en el eslabón de la cadena y en el
ojo del tornillo. Después enrosca y apriete con
pinzas o llave mecánica.
REMARQUE: Le mousqueton sert à attacher l’écrou à la chaine.
Lorsqu’il est ouvert, accrocher le mousqueton à la chaine et l’écrou.
Visser le mousqueton et serrer à l’aide d’une pince ou clef universelle.
Attach the eyebolt and brace with hardware as shown.
Hold the eyebolt in the position shown so the lower portion moves freely
with motion of the swing seat.
Gently tighten the locknut. Do not overtighten.
Add the acorn nut and tighten it.
tornillos de ojo con la ferretería, como se indica.
tornillos de ojo en la posición que se muestra para
écrous à œil
avec la quincaillerie tel qu’illustr
é
.
écrous à œil
en position selon l’illustration pour que
© 2012 Jack-Post Corporation SB-ZI-2070-6 WL-70 09/12